![]()
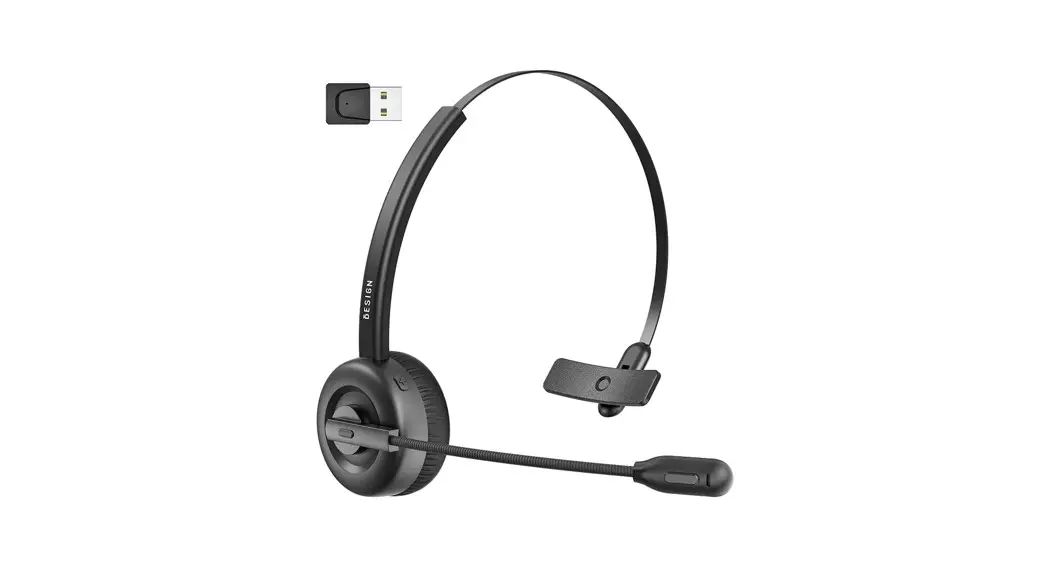
Wireless Headset BHF02
User Manual
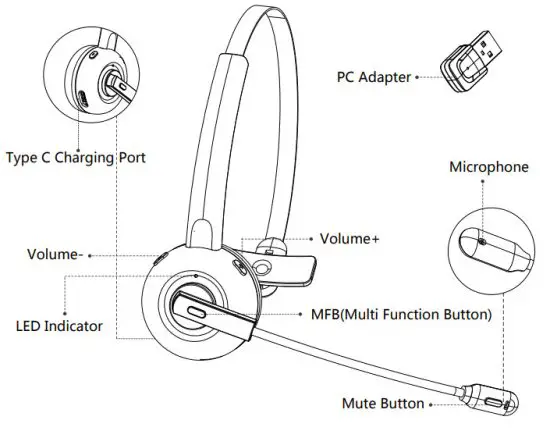
Product Overview:
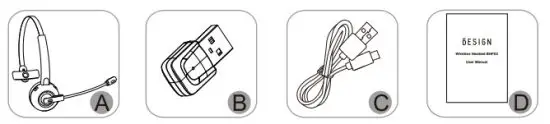
Product Contents:
A. Wireless Headset BHF02 x 1
B. PC Adapter X 1
C. Micro USB charging cable x 1
D. User manual x 1
Specification:
| BT standard: | Standby time: |
| V5.0 | Around 800H |
| BT protocl: | Charging input: |
| A2DP \ HFP \ HSP \ AVRCP | 5V DC ≤500mA |
| Operation Range: | Low battery indicator: |
| 10 meters | Red LED light flashes |
| Playing time for the headset | Charging time for the headset: |
| 30H (At 50% volume) | Around 2H |
BHF02 Headset & PC Adapter Pairing Instruction
1. Activate the USB Audio Adapter
(1) Plug the USB Audio Adapter into a USB port on your computer, it will be turned on automatically with blue led light flashing.
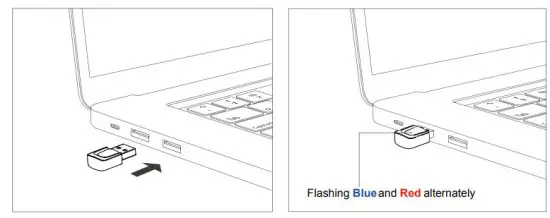
(2) Once turned on, the USB Adapter will search and re-connect the last paired BHF02. For the first time use, the USB adapter will enter into pairing mode with Blue and Red led lights flashing alternately around 20 seconds after it is turned on.
2. Pair BHF02 headset with the USB Audio Adapter
Before pairing, please disable the Bluetooth function on your phone/computer previously connected with this BHF02.
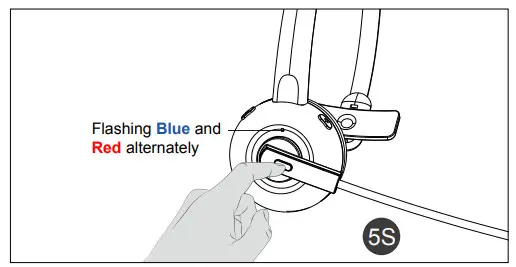
(1) When the BHF02 is powered off, press and hold the multifunction button for 5 seconds until you see the Blue and Red led light flashing alternately.
(1) When the BHF02 is powered off, press and hold the multifunction button for 5 seconds until you see the Blue and Red led light flashing alternately.
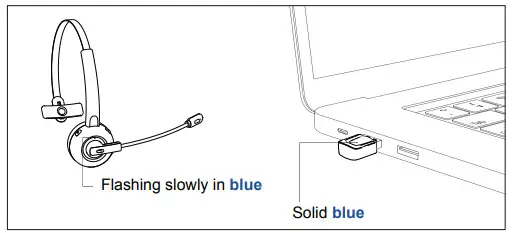
(2) Make these two devices close with each other and the USB audio Adapter will connect with the headset automatically in minutes.
Once connected, the indicator on the Adapter will stay solid blue. The indicator on the headset will flash blue.
3. Automatic Re-Pairing
BHF02 can remember the Adapter paired previously. After being paired successfully for the first time, make sure the USB Adapter is plugged in the computer first and then turn on the BHF02 headset, the auto-connection will be completed in minutes.
4. USB Adapter LED Indicator
| Mode | LED Indicator |
| Power on | LED Blue flashes |
| Pairing mode | LED Red & Blue flashes alternately |
| Connected | LED solid Blue |
Charging
- Connect the charging port with any USB charging adapter or active computer USB port.
- Charging will start automatically with LED indicator turning red.
- The Headset is fully charged when the red LED indicator turns off.
How to Pair BHF02 Headset with Smart Phone
1. Pairing and Connecting
Before pairing, please disable the Bluetooth function on your phone/computer previously connected with this BHF02. Please also ensure the included USB adapter is disconnected with this BHF02.
Step 1:
When the headset is off, press and hold the Multifunction Button for 5 seconds to bring the headset into pairing mode with the Led indicator flashing blue and red alternately.
Step 2:
Turn on bluetooth on your phone – search for new devices.
Step 3:
Find “BHF02” in the search results. Tap on the name to connect. Once connected, the LED indicator will flash blue once every 4 seconds
Note:
• This headset can connect to the last connected smartphone automatically without going into the pairing mode after it is switched on. If the automatic connection is failed with your smartphone, you could open your smartphone’s Bluetooth in the setting and click this BHF02 to connect it manually or repeat the above pairing process again.
2. Clear Pairing History
3. Button Control:
- Switch on this BHF02 headset, Long press the “Multifunction” button and the “Volume -” button at the same time for about 5 seconds.
- A beep is heard to indicate that the pairing has been cleared.
- After clearing the pairing information, the product will automatically enter the pairing mode with red and blue lights flashing alternately.
- Then re-pair your bluetooth device as instructed in “Pairing and Connecting”.
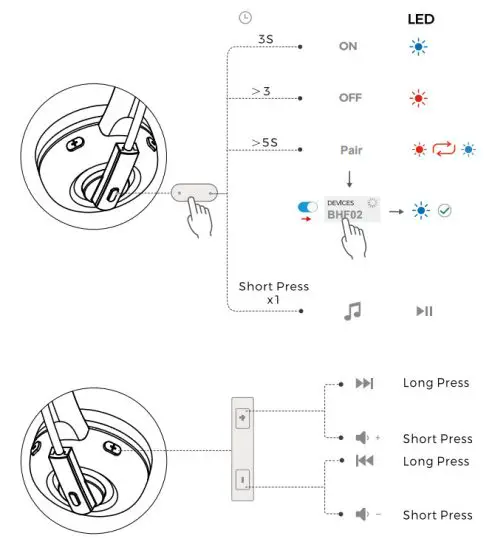
| Function | Operation |
| Power On | Press and hold the Multifunction Button for 3 seconds |
| Power Off | Press and hold the Multifunction Button for 3 seconds |
| Redial | Press the Multifunction Button twice |
| Voice Control | Press and hold the Multifunction Button for 1 5 seconds |
| Answer Calls | When there is an incoming call, press the Multifunction Button once |
| Reject Calls | When there is an incoming call, press and hold the Multifunction Button for 2 seconds |
| End Calls | During a call, press the Multifunction Button once |
| Transfer Calls | During the calling, press the + about 3s, and comes to a beep. then the voice will be transferred to the phone from the headset . The same operation will transfer the voice from the phone back to the headset with a beep. |
| Volume + / – | Press the Volume + / – Button |
| Previous / Next Track | Press and hold the Volume – I + Button for 2 seconds |
| Pause / Play | Press the Multifunction Button |
LED Indicator
4. BHF02 Headset LED Indicator
| Mode | LED Indicator |
| Power on | LED Blue flashes 5 times |
| Power off | LED Red flashes 5 times |
| Pairing mode | LED Red & Blue flashes alternately |
| Unconnected standby mode | LED Blue flashes once every 4 seconds |
| Connected standby mode | LED Blue flashes once every 4 seconds |
| Playing Music | LED Blue flashes once every 8 seconds. |
| Talking | LED Blue flashes once every 7 seconds |
| Charging | Solid LED Red |
| Full charged | Red LED turn off |
| Low battery | Red LED flashes |
5. Attentions and Q & A:
Q: How to Pair if Failed?
Switch on this BHF02 headset, At the same time, long-press the “multi-function” button and the “volume -” button for about 5 seconds, and a “beep” prompt sound is heard, indicating that the pairing information has been cleared. After the pairing information is cleared, the product will automatically enter the pairing mode with red and blue lights flashing alternately.
Q: Password for pairing:
A: You could try 0000 or 8888 or 1111 or 1234 if your Bluetooth device requires a password.
Q: How to Mute the Microphone?
During Calling, Long press Mute Button about 1s, the microphone is mute, long-press the same button about 1s again, the mute is canceled.
Q: How to Restart the Headset if Failed?
A: Try to charge it via USB cable and then restart it.. Suggested care & Maintenance
- Please power off when not in use or before storing.
- Please keep away from excessive heat and humidity.
- Do not use chemicals or detergents to clean this product.
- Extreme temperatures can shorten the lifespan of internal components.
 WEEE Compliance
Correct Disposal of This Product ( Waste Electrical& Electronic Equipment )(Applicable in countries with separate collection systems)
This Marking shown on the product or its literature indicates that it should not be disposed of with other household wastes at the end of its working life.
To prevent possible harm to the environment or human health from uncontrolled waste disposal, please separate this from other types of waste and recycle it responsibly to promote the sustainable reuse of material resources. Household user should contact either the retailer where they purchased this product, or their local government office, for details of where and how they can take this item for environmentally safe recycling. Business users should contact their suppliers and check the terms and conditions of the purchase contract. This product should not be mixed with other commercial wastes for disposal.
NOTE:
This equipment has been tested and found to comply with the limits for a Class B digital device, pursuant to part 15 of the FCC Rules. These limits are designed to provide reasonable protection against harmful interference in a residential installation. This equipment generates uses and can radiate radio frequency energy and, if not installed and used in accordance with the instructions, may cause harmful interference to radio communications. However, there is no guarantee that interference will not occur in a particular installation. If this equipment does cause harmful interference to radio or television reception, which can be determined by turning the equipment off and on, the user is
encouraged to try to correct the interference by one or more of the following measures:
- Reorient or relocate the receiving antenna.
- Increase the separation between the equipment and receiver.
- Connect the equipment into an outlet on a circuit different from that to which the receiver is connected.
- Consult the dealer or an experienced radio/TV technician for help
Changes or modifications not expressly approved by the party responsible for compliance could void the user’s authority to operate the equipment. This device complies with Part 15 of the FCC Rules. Operation is subject to the following two conditions:
(1) this device may not cause harmful interference, and
(2) this device must accept any interference received, including interference that may cause undesired operation.
Product Support:
[email protected]
Know more about us, you could visit our website:
www.besign-tech.com
MANUFACTURER
Manufacturer: Shenzhen Jianyi Technology Co., Ltd
Address: 401, B#1, 28 Jinhu Road,
Luohu District, Shenzhen, China
Product Support:
[email protected]
Know more about us, you could visit our website:
www.besign-tech.com![]()


