

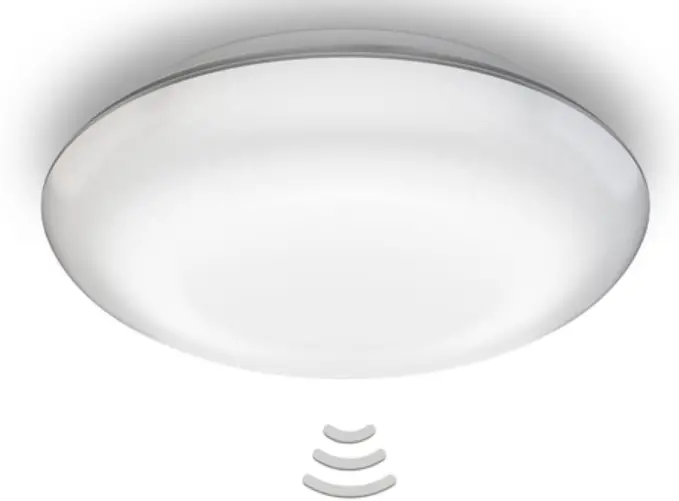
steinel 4007841035433 DL Vario Quattro PRO S LED Outdoor Luminaire
About this document
Please read carefully and keep in a safe place.
- Under copyright. Reproduction either in whole or in part only with our consent.
- Subject to change in the interest of technical progress.
Symbols
Hazard warning!
Reference to other information in the document.
General safety precautions
Disconnect the power supply before attempting any work on the unit.
• During installation, the electric power cable being connected must not be live. Therefore, switch off the power first and use a voltage tester to make sure the wiring is off-circuit.
• Installing the sensor-switched light involves work on the mains supply voltage. This work must therefore be carried out professionally in accord-ance with national wiring regulations and electrical operating conditions. (e.g.: DE: VDE 0100,
AT: ÖVE / ÖNORM E8001-1, CH: SEV 1000)
• Only use genuine replacement parts.
• Repairs may only be made by specialist workshops.
DL Vario Quattro PRO S
Proper use
- The Vario Quattro is a sensor-switched light for indoor and outdoor ceiling mounting.
The sensor-switched light is equipped with four pyro sensors that detect the invisible heat emitted by moving objects (people, animals, etc.). The heat detected in this way is converted electronically into a signal that switches the light ON. Heat is not detected through obstacles, such as walls or panes of glass, and will therefore not activate the light.
Note:
The light’s shade is susceptible to scratching. The light must not be installed near radiant heaters.
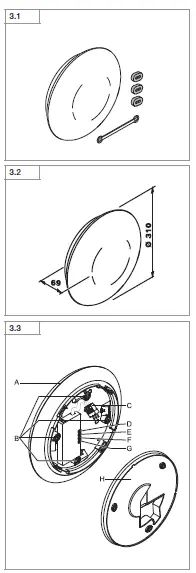
Package contents (Fig. 3.1)
- Sensor-switched light
- Spacer
- Retaining strap
- Product dimensions (Fig. 3.2)
- Product components (Fig. 3.3)
- Light
- Reach adjustment
- Connecting terminal
- Twilight setting
- Time setting
- Basic light level
- Relay ON/OFF
- Ceiling mount
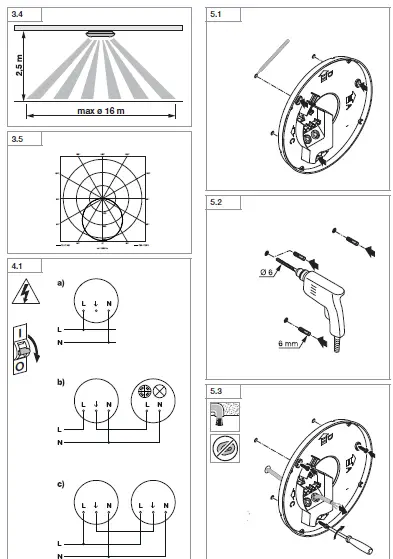
- Detection zone (Fig. 3.4)
- Luminous intensity distribution (Fig. 3.5)
Electrical connection
Wiring diagram (Fig. 4.1)
- Single light
- Connection with other loads
- Second light interconnected
The mains supply lead is a 3-core cable (max. lead diameter 19 mm):
L = phase conductor (usually black, brown or grey) N = neutral conductor (usually blue)
PE = protective-earth conductor (green/yellow)
If you are in any doubt, identify the conductors using a voltage tester; then disconnect from the power supply again. Connect the phase conductor (L) and neutral conductor (N) to the terminal block. Insulate protective-earth conductor (PE) and place it next to terminal block.
Important:
Mixing up the connections will produce a short circuit in the product or your fuse box. In this case, you must identify the individual conductors once again and reconnect them. A mains power switch for turning the unit ON and OFF may of course be installed in the mains supply lead.
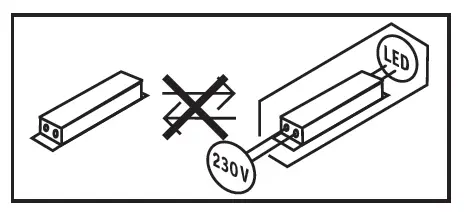
The light source of this luminaire cannot be replaced. If the light source needs to be replaced (e.g. at the end of its service life), the complete luminaire must be replaced.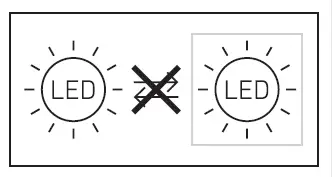
Mounting
- Check all components for damage.
- Do not use the product if it is damaged.
Select an appropriate mounting location, taking the reach and motion detection into consideration. When installing the sensor-switched light on the ceiling, make sure the installation site is not exposed to vibration.
Mounting procedure
- Switch OFF power supply (Fig. 4.1)
- Mark drill holes (Fig. 5.1)
- Drill holes and insert wall plugs (Fig. 5.2)
- Installation with concealed power supply lead (Fig. 5.3)
- Installation with surface-mounted power supply lead (Fig. 5.4)
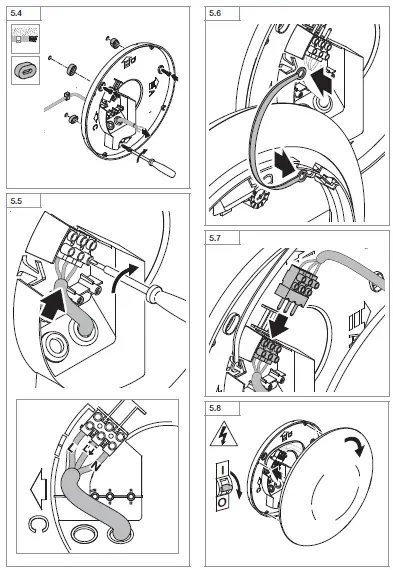
- Connect conductors (Fig. 5.5)
- Make settings ➔ “6. Function”
- Attach retaining strap (Fig. 5.6)
- Make plug connection (Fig. 5.7)
- Fit light shade (Fig. 5.8)
- Switch ON power supply (Fig. 5.8)
Function
Factory settings:
Twilight level: 1000 lux
Time setting: 5 seconds
Basic light level: OFF
Relay: OFF
The sensor-switched light can be put into service after mounting the enclosure and connecting to the mains power supply. When putting into operation manually at the mains switch, the light will switch OFF after approx. 30 seconds for the calibration phase and is then activated for sensor mode. It is not necessary to operate the mains switch a second time.
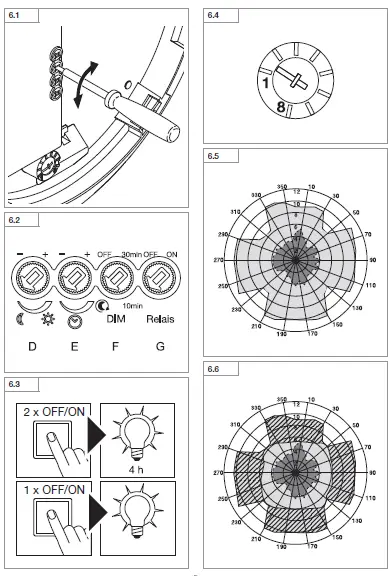
Functions – control dials (Fig. 6.1)
Twilight setting (response threshold) (Fig. 6.2/D) The chosen response threshold can be infinitely varied from approx. 2 to 1000 lux.
– Control dial set to
= daylight mode
(depending on ambient brightness)
Control dial set to = twilight mode
(approx. 2 lux)
The control dial must be turned to when adjusting the detection zone and performing the functional test in daylight.
Time setting (stay-ON time) (Fig. 6.2/E)
The light’s ON time can be set to any period from approx. 5 seconds to a maximum of 30 minutes. Any movement detected before this time elapses restarts the stay-ON time (for switch-off delay).
Note: After the light switches OFF, it takes approx. 1 second before it is able to start detecting movement again. The light will only switch ON in response to movement once this period has elapsed. The shortest time setting is recommended when adjusting the detection zone and performing the functional test.
Basic light level (Fig. 6.2/F)
The basic light level function provides illumination at approx. 10% light output when the brightness setting is reached.
Any one of four settings can be selected for the basic light level required:
- OFF
- 10 minutes after selected time elapses
- 30 minutes after selected time elapses
- all night
Basic light switches OFF every hour to measure ambient brightness. Basic light switches back ON again after a short period.
Relay (Fig. 6.2/G)
The relay switches external loads, such as other lights or fans, ON and OFF via L’:
- Relay ON: external loads in operation
- Relay OFF: external loads not in operation
Manual override function
If an optional mains switch is installed in the mains supply lead, the following functions are available in addition to simply switching light ON and OFF:
Manual override (Fig. 6.3)
- Activate manual override:
Switch OFF and ON twice. The light is set to manual override for 4 hours. Then it returns automatically to sensor mode. - Deactivate manual override:
Switch OFF and ON once. Light switches OFF or switches to sensor operation.
Important:
Switching must take place within 0.2 to 1 second.
Reach adjustment
Reach can be infinitely adjusted in four directions via four control dials from 2 m to 8 m independently of each other. The detection reach is selected via the control dials (Fig. 6.4).
Detection diagram (Fig. 6.5)
The shaded zones show the areas that can be masked out by customizing the reach setting. (Fig. 6.6)
Detection reach table
| Adjustment | Mounting height 2.5 m | |
| radial | tangential | |
| 1 | 2.4 m x 2.4 m | 4 m x 4 m |
| 2 | 3.2 m x 3.2 m | 6 m x 6 m |
| 3 | 3.6 m x 3.6 m | 7.3 m x 7.3 m |
| 4 | 4 m x 4 m | 8.6 m x 8.6 m |
| 5 | 4.4 m x 4.4 m | 10.2 m x 10.2 m |
| 6 | 5 m x 5 m | 12.6 m x 12.6 m |
| 7 | 6 m x 6 m | 15.7 m x 15.7 m |
| 8 | 6 m x 6 m | 16 m x 16 m |
| Adjustment | Mounting height 2.8 m | |
| radial | tangential | |
| 1 | 3 m x 3 m | 5.4 m x 5.4 m |
| 2 | 3.4 m x 3.4 m | 6.4 m x 6.4 m |
| 3 | 3.8 m x 3.8 m | 7.5 m x 7.5 m |
| 4 | 4.4 m x 4.4 m | 8.8 m x 8.8 m |
| 5 | 5.4 m x 5.4 m | 10.4 m x 10.4 m |
| 6 | 5.6 m x 5.6 m | 13.1 m x 13.1 m |
| 7 | 6 m x 6 m | 17 m x 17 m |
| 8 | 6 m x 6 m | 17.3 m x 17.3 m |
| Adjustment | Mounting height 3.0 m | |
| radial | tangential | |
| 1 | 3.4 m x 3.4 m | 6.2 m x 6.2 m |
| 2 | 3.6 m x 3.6 m | 6.6 m x 6.6 m |
| 3 | 4 m x 4 m | 7.7 m x 7.7 m |
| 4 | 4.8 m x 4.8 m | 9 m x 9 m |
| 5 | 6 m x 6 m | 10.6 m x 10.6 m |
| 6 | 6 m x 6 m | 13.4 m x 13.4 m |
| 7 | 6 m x 6 m | 17.9 m x 17.9 m |
| 8 | 6 m x 6 m | 18.1 m x 18.1 m |
| Adjustment | Mounting height 6.0 m | |
| radial | tangential | |
| 1 | 5.7 m x 5.7 m | 11 m x 11 m |
| 2 | 6 m x 6 m | 11.7 m x 11.7 m |
| 3 | 6.7 m x 6.7 m | 13.6 m x 13.6 m |
| 4 | 8 m x 8 m | 16 m x 16 m |
| 5 | 10 m x 10 m | 18.7 m x 18.7 m |
| 6 | 10 m x 10 m | 23.8 m x 23.8 m |
| 7 | 10 m x 10 m | 31.7 m x 31.7 m |
| 8 | 10 m x 10 m | 32 m x 32 m |
Maintenance
The light can be cleaned with a damp cloth (without detergents) if dirty.
Important note: the control gear cannot be replaced.
Disposal
Electrical and electronic equipment, accessories and packaging must be recycled in an environmentally compatible manner.
Do not dispose of electrical and electronic equipment as domestic waste.
EU countries only:
Under the current European Directive on Waste Electrical and Electronic Equipment and its implementation in national law, electrical and electronic equipment no longer suitable for use must be collected separately and recycled in an environ-mentally compatible manner.
Manufacturer’s warranty
As purchaser, you are entitled to your statutory rights against the vendor. If these rights exist in your country, they are neither curtailed nor restricted by our Warranty Declaration. We guarantee that your STEINEL Professional sensor product will remain in perfect condition and proper working order for a period of 5 years. We guarantee that this product is free from material-, manufacturing- and design flaws. In addition, we guarantee that all electronic components and cables function in the proper manner and that all materials used and their surfaces are without defects.
Making Claims
If you wish to make a claim, please send your product complete and carriage paid with the original receipt of purchase, which must show the date of purchase and product designation, either to your retailer or contact us at STEINEL (UK) Limited, 25 Manasty Road, Axis Park, Orton Southgate, Peterborough, PE2 6UP, for a returns number. For this reason, we recommend that you keep your receipt of purchase in a safe place until the warranty period expires. STEINEL shall assume no liability for the costs or risks involved in returning a product.
For information on making claims under
the terms of the warranty, please go to
www.steinel-professional.de/garantie
If you have a warranty claim or would like to ask any question regarding your product, you are welcome to call us a on our Serve
Technical specifications
| Dimensions (Ø × T) Ø 310 × 69 mm | |
| Supply voltage 220-240 V 50/60 Hz | |
| Power consumption (Pon) 14.00 W | |
| Luminous flux (360°) 1,430 lm | |
| Efficiency 102 Im/W | |
| Sensor on standby (Psb) 0.42 W | |
| Switching capacity Incandescent / halogen lamp load Fluorescent-lamp electronic ballasts Fluorescent lamps, uncorrected Fluorescent lamps, series-corrected Fluorescent lamps, parallel-corrected Low-voltage halogen lamps LED < 2 W 2 W < LED < 8 W LED > 8 W Capacitive load | 500 W 500 VA 500 VA 500 VA 500 VA 500 VA 16 W 64 W 64 W 88 µF |
| Power factor 0.87 | |
| Color temperature DL Vireo Quattro PRO S WW: 3,000 K (warm white) DL Vario Quattro PRO S NW: 4,000 K (cool white) | |
| Color rendering index Ra = 82 | |
| Average rated life expectancy L70B50 at 25°C: > 60,000 hours | |
| Color consistency SDCM Starting value: 3 | |
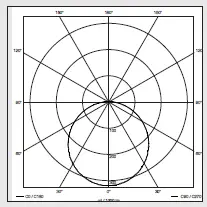
| Luminous intensity distribution 150° 180° 150° | |
 | |
| Sensor technology PIR, 4 pyros | |
| Angle of coverage 360° | |
| Detection reach 16 x 16 m detection areas for a mounting height of 2.50 m, can be reduced to an area of 4 × 4 m | |
| Time setting 5 s – 30 min | |
| Twilight setting 2 – 1,000 lux | |
| Basic light level OFF, 10 min, 30 min, all night | |
| IP rating IP54 | |
| Protection class II | |
| Impact resistance IK07 | |
| Ambient temperature -20 to +35°C | |
 Technical documentation at www.steinel.de | |
| Energy efficiency class This product contains an energy efficiency class “D” light source. | |
Troubleshooting | ||
| Malfunction | Cause | Remedy |
Sensor-switched light without
|
| |
| Sensor-switched light will not switch ON |
|
|
| Sensor-switched light will not switch OFF |
|
|
| Sensor-switched light switches ON without any identifiable movement |
|
|
| Sensor-switched light |
|
|
| does not switch ON despite | to minimize malfunctioning or | |
| movement | detection zone set too small | |
|
| |
| External loads not switching ON |
|
|
References
 Daljinsko Upravljanje d.o.o.
 F.Fonseca - High-tech Solutions since 1978
-
Avalehele
-
Hem - En ljusare framtid med ansvarsfull belysning - KHS
-
Steinel Group | STEINEL
 Priporočam.si - spletna trgovina za izključno najboljše stvari
-
Roliba - En moderne B2B Handelsvirksomhed med stort udvalg
-
SAOS Teknoloji STEINEL Türkiye Distribütörü | SAOS Teknoloji
-
Steinel Group | STEINEL
-
Herstellergarantie für Unternehmer | STEINEL
-
Steinel купить на steinel-russland.ru
-
【steinel 】施特朗中国官方网站
-
Steinel Group | STEINEL
-
International | STEINEL
-
STEINEL | Steinel Group
-
Luminaires & Détecteurs | STEINEL
-
Steinel Lietuva
 Ташев-Галвинг ООД: магазин за машини, инструменти, строителни материали, крепежи и градинска техника
-
Van Spijk | Online B2B inkoopplatform - VanSpijk.nl
-
Energieffektive løsninger - Vilan.no


