![]() Nano Box 110v AC RTS Shade
Nano Box 110v AC RTS Shade
Instruction Manual
 INSTALLERS: Please leave this manual with the owner.
PARTS LIST – NANO BOX – 110v AC – RTS
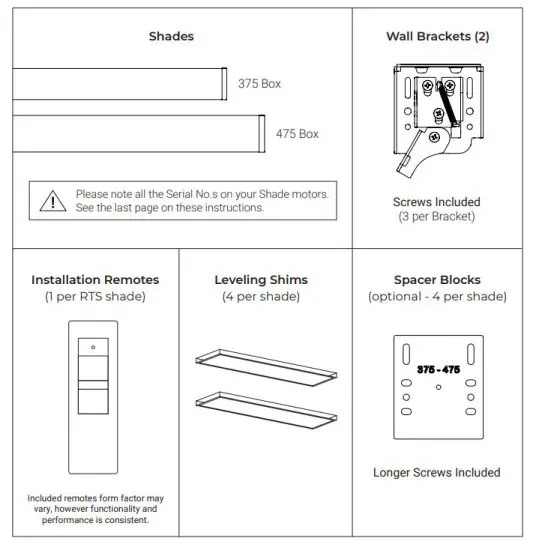
SPACER BLOCKS AND LEVELING SHIMS (OPTIONAL)
Spacer Blocks – used to clear an obstruction in the fabric path.
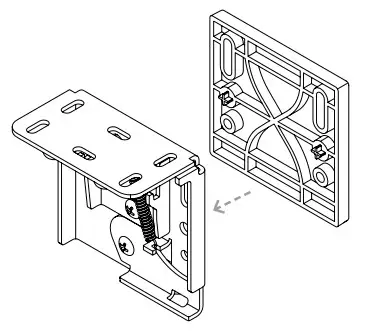
Connect spacer blocks to shade brackets before installation.
Note: Do not use more than 4 spacer blocks per bracket.
Leveling Shims – used if the window frame is out of level.
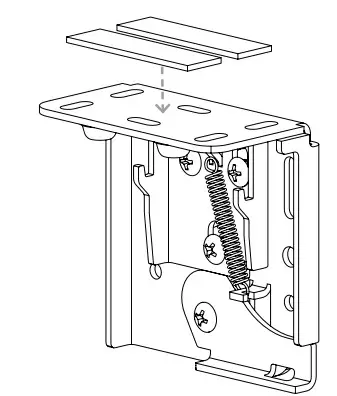
Connect to shade brackets before installation
Note: do not use more than 2 leveling shims per bracket.
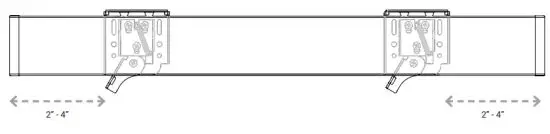
- Box bracket position is recommended 2”-4” from end caps.
 Make sure the wall bracket lever is down (may already be down).
- Push power cable into the pre-wire hole
 Note: Motor cable is not plenum rated. Terminate accordingly.
 - Hang shade onto wall brackets and center in the opening

- Use thumb to lock the shade in place

 Make sure the wall bracket lever is down (may already be down).
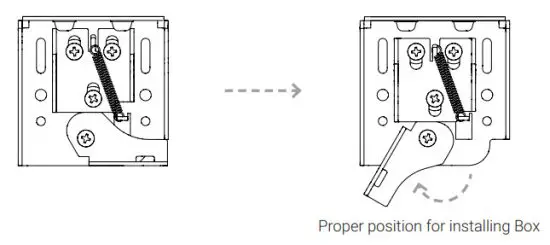
 Note: Motor cable is not plenum rated. Terminate accordingly.
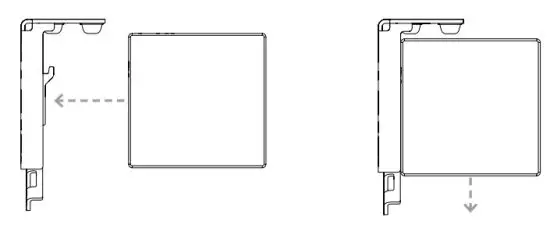

PROGRAMMING – RTS
PROGRAMMING STEPS (must follow in order)
Step 1: Fine-tune lower limit
Step 2: Assign shades to groups
Step 3: Pair groups to control system (Mylink, LinkPro)
Warning: Do not attempt to use any installation remote until all the shades are installed.
Each RTS Nano shade includes an installation remote that is used to adjust limits and program group controls. These installation remotes are uniquely numbered to the shade they are paired with. The lower limit of every shade is preprogrammed to ½” from the bottom of the window. After installing each shade, follow these steps to adjust the lower limit:
STEP 1 – Fine-tuning lower limit :
- Beginning with the first shade, pull the plastic tab from the remote and press
 allowing the shade to run to the lower limit set at the factory.
 - When shade has stopped, adjust the lower limit by holding
 and simultaneously until the shade jogs.
 - Use or move the shade to the desired lower limit.
- Hold the “My” button until the shade jogs again.
- Repeat this procedure at each window until all shades have lower limits set to desired positions.
STEP 2 – Assign shades to groups :
Next, program group controls. To pair with a permanent transmitter such as a multichannel Telis or DecoFlex, follow these steps.

- Press and hold the program button on the back of the installation remote until the shade jogs.
- Select the channel where you want to create a group, then bump (do not hold down) the program button on the back of the remote – the shade will jog.
- Both remotes now control the shade.
- Continue doing this with each shade until all shades are programmed in the desired groups.
NOTE: Each RTS motor can be paired with 12 unique transmitters.
STEP 3 – Pair Groups to control system (LinkPro, myLink) :
- Download the myLink app.
- Pair the grouped shades with LinkPro or MyLink according to the instructions in the myLink app.
TROUBLESHOOTING – RTS
| Problem | Possible Cause | Action to Take | |||
| For RTS | |||||
| The shade won’t operate. | The motor is not powered. | Have an electrician or approved personnel verify 110v AC to the shade. | |||
| Remote button presses are too short. | When operating an RTS remote hold the buttons down for at least 2 seconds. | ||||
| The remote is being used out of range. | Move within 30ft. of the shade. If the issue persists, adjust the antenna to a new position, and make sure the antenna does not touch metal. | ||||
| The remote battery is out of place or drained. | Check that the red LED on the remote flashes when buttons are pressed. On the installation remote, pry off the back by hand and ensure the battery is fully seated in the battery tray. If the remote remains unresponsive, replace the battery with a CR2430 3V lithium cell. | ||||
 Please use this QR Code to access the updated installation instructions and related documents. Please use this QR Code to access the updated installation instructions and related documents.https://support.screeninnovations.com/shade/nano-box/ | Technical Support: 512.832.6939 Hours of Support: 7:30am – 5pm CST screeninnovations.com [email protected] | ||||
NOTES
1______________________________________________________
2______________________________________________________
3______________________________________________________
4______________________________________________________
5______________________________________________________
6______________________________________________________
7______________________________________________________
8______________________________________________________
9______________________________________________________
10_____________________________________________________
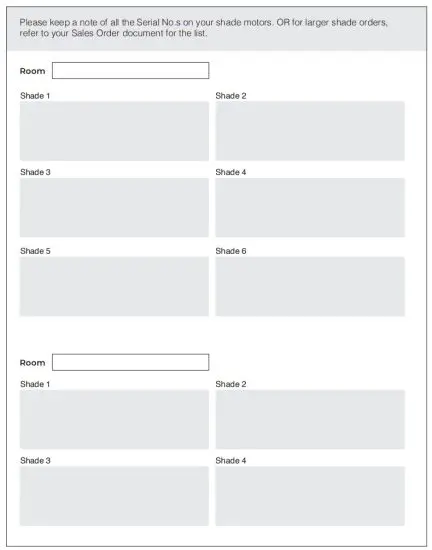
MOTOR SERIAL NO.S
![]()
Screen Innovations
9715-B Burnet Rd, Suite 400 Austin, TX 78758
512.832.6939
www.screeninnovations.com


