

PRODEMAND 65 12 072 Radio Head Unit

Instructions
RADIO, AUDIO AMPLIFIER, HEAD UNIT > 65 12 072 REMOVING AND INSTALLING (REPLACING) AMPLIFIER (TOP HIFI SYSTEM)
IMPORTANT: Read and comply with notes on PROTECTION AGAINST ELECTROSTATIC DAMAGE (ESD PROTECTION) .
NOTE: Comply with notes and instructions on HANDLING OPTICAL FIBRES .
Necessary preliminary work:
- Disconnect BATTERY EARTH LEAD
- Remove FLAP IN LUGGAGE COMPARTMENT TRIM PANEL ON LEFT
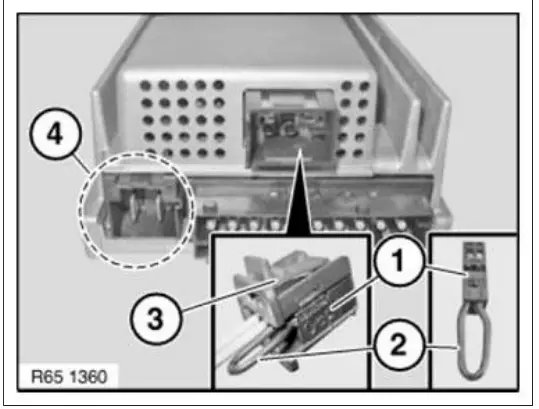
Disconnect plug connection (1).
Release screw (2) and slide amplifier (3) in direction of arrow out of mounting.
Fig 1: Removing Amplifier

Courtesy of BMW OF NORTH AMERICA, INC.
NOTE: Until 09/2009 a Top HiFi amplifier with a different pin assignment is installed!
Install cable jumper consisting of socket (1) (BMW Parts Service 6901844) and wire jumper (2) in connector (3).
Create wire jumper (2) from wire (cross-section 0.75 mm2 ) and two stops (BMW Parts Department 1393724). Then connect pins 1 and 2 in the socket (1) with wire jumper (2).
NOTE: Connector chamber (4) is not included in current version and remains unused in new replacement Top HiFi amplifier!
Fig 2: Identifying Socket, Wire Jumper, Connector And Connector Chamber
Courtesy of BMW OF NORTH AMERICA, INC.
Installation note:
Tabs (1) must be correctly slid into guide (2). Check that amplifier (3) is securely seated.
Fig 3: Identifying Amplifier, Tabs And Guide
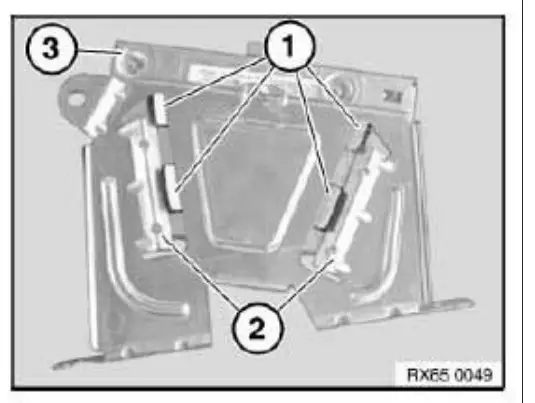
Courtesy of BMW OF NORTH AMERICA, INC.
Replacement:
Carry out PROGRAMMING/ENCODING .
RADIO, AUDIO AMPLIFIER, HEAD UNIT > 65 12 071 REMOVING AND INSTALLING/REPLACING AMPLIFIER (HIFI SYSTEM)
IMPORTANT: Read and comply with notes on PROTECTION AGAINST ELECTROSTATIC DAMAGE (ESD PROTECTION) .
NOTE: Comply with notes and instructions on HANDLING OPTICAL FIBRES .
Necessary preliminary work:
- Disconnect BATTERY EARTH LEAD
- Remove FLAP IN LUGGAGE COMPARTMENT TRIM PANEL ON LEFT
Release screw (1).
Disconnect plug connection (2) and slide amplifier (3) in direction of arrow out of bracket.
Fig 1: Removing Amplifier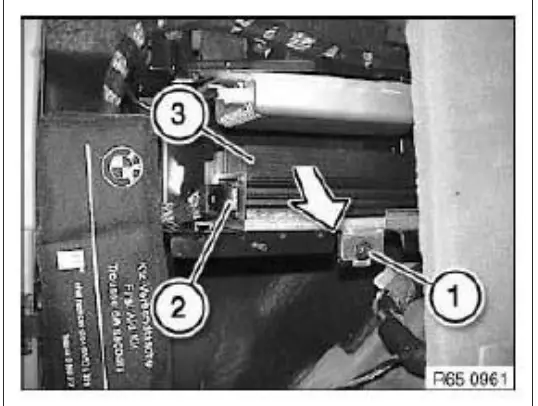
Courtesy of BMW OF NORTH AMERICA, INC.
Installation note:
Tabs (1) must be correctly slid into guide (2). Check that amplifier (3) is securely seated.
Fig 2: Identifying Amplifier, Tabs And Guide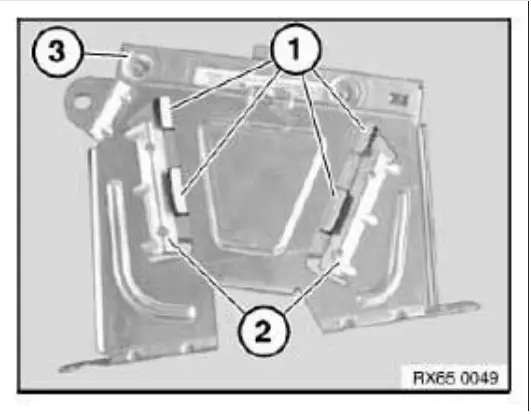 Courtesy of BMW OF NORTH AMERICA, INC.
Replacement:
For vehicle with production date up to 09/2010 , carry out conversion in the diagnosis system via path:
- Vehicle
- Conversions
- Conversion Hi-Fi system
NOTE: On vehicle with production date after 09/2010 , no vehicle programming/encoding needs to be carried out!


