Rienok GB5200-M Baby Monitor
WARNINGS
Incorrect use of this product may Lead to safety risks. Therefore, we strongly recommend that you read the following instructions before using this product.
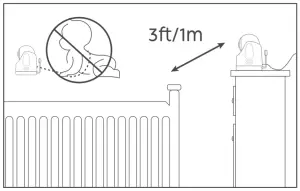
- Keep cord out of the reach of children (more than 3ft/1m away) in case of strangulation.

- The adapter can only be used indoors, please put the product in a dry place to prevent short circuit
- Please only use the power adapter provided by RIENOK. Using unauthorized charging cables and power adapters may cause overheating or even explosion
- Please turn off the power when not using this produc
- This baby monitor is not and shall not be deemed to be a substitute for responsible adult supervision, please check your baby’s activities regularly.
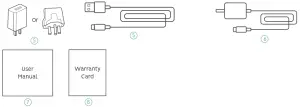
What’s in the Box

- 5 Inches HD Monitor 1PC
- 2.4 GHz camera 1PCS
- Camera Mounting Bracket 1PCS
- Charging Base 1PCS
- Power Adapter for Monitor x 1
- Power Adapter for camera x 1
- User Manual 1PC
- Warranty card 1PCS
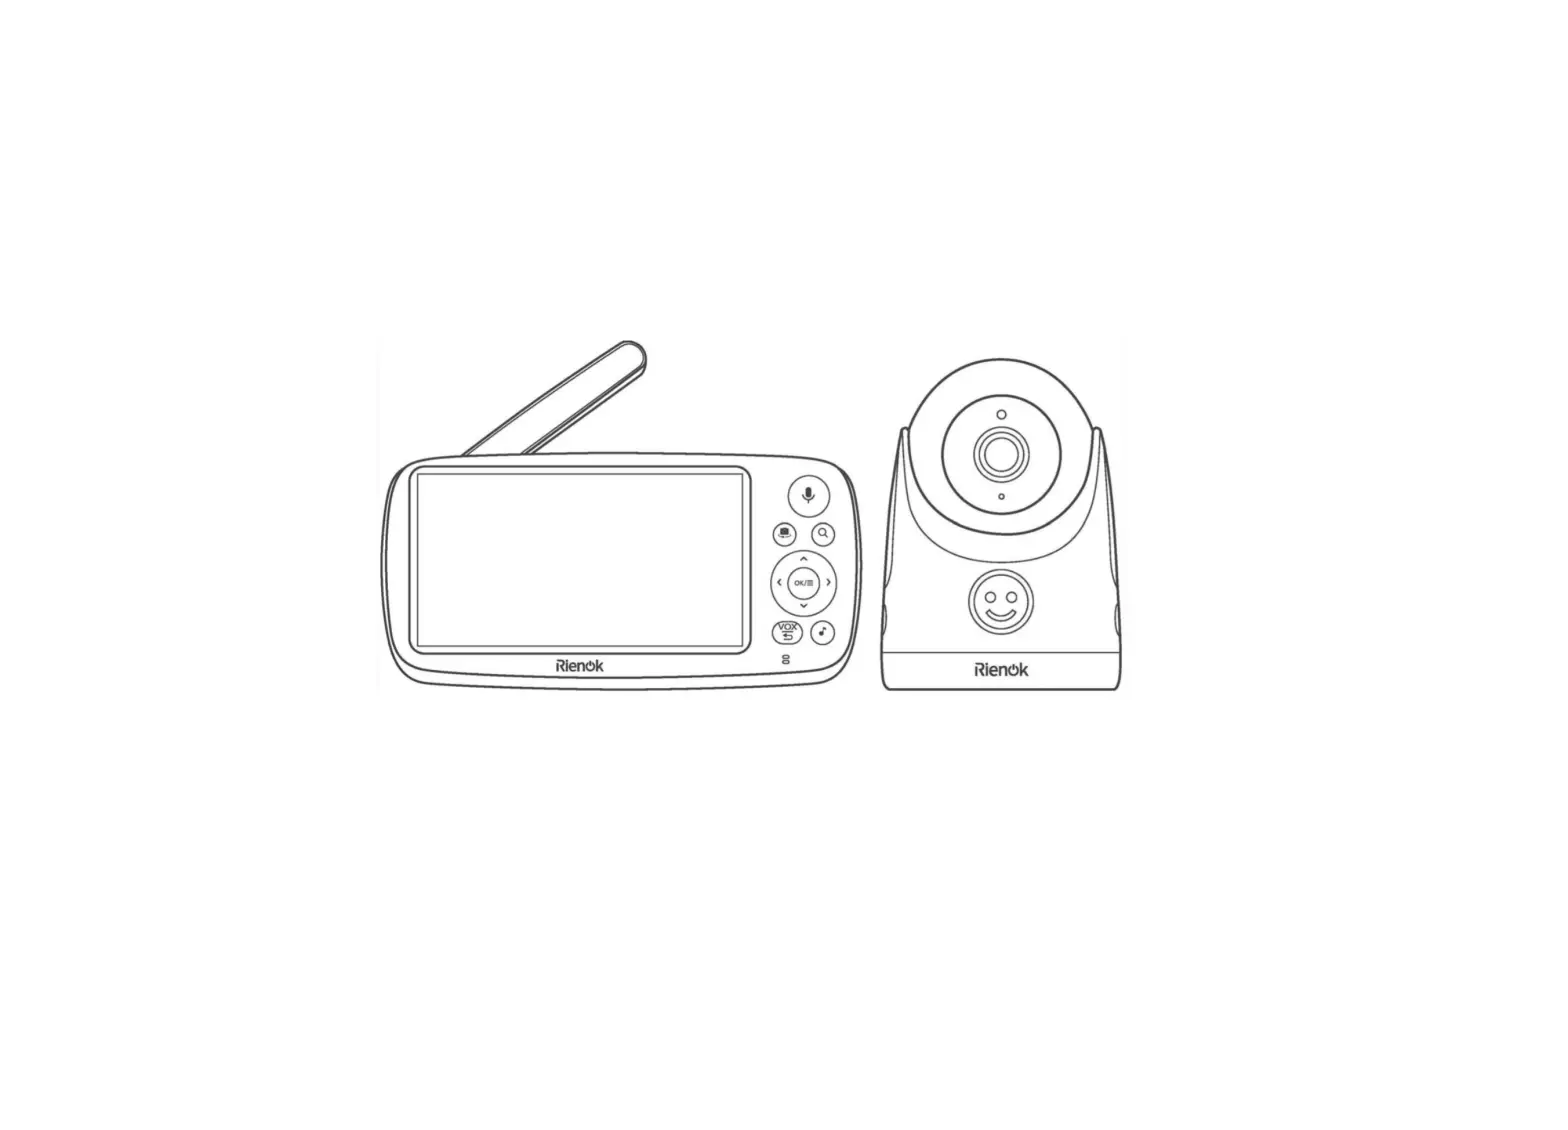
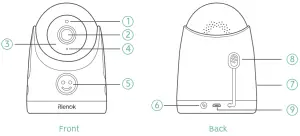
Camera
- Light Sensor
- FHD Camera
- Infrared Night Vision Light
- Microphone
- Emoji Indicator
- Pairing Button
- Speaker
- Temperature sensor
- Micro USB Port
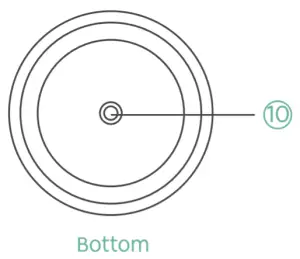
- Bracket screw Hole
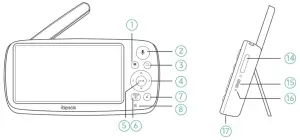
Monitor
- Camera switching
- Two-way Talk
- Zoom
- Direction Button (Left/Right/Up/Down)
- Menu/OK
- VOX/Return
- Lullaby
- Microphone
- Power/Sleep Button
- volume+/-
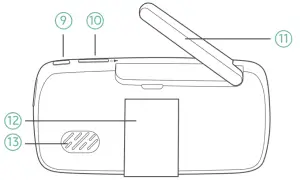
- Monitor Antenna
- Stand
- Speaker
- Brightness+/-
- Type-c charging Port
- Charging Indicator
- Reset Hole


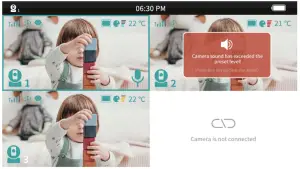
Interpretation of the main interface icons
Quick use Guide
Step 1: connect camera Power
- Connect the Camera to the matching power adapter.
- Plug the power adapter into the socket.
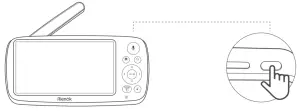
Step 2: Turn on Monitor
- Long press the monitor’s power button to turn on.
- Then you can see the monitoring interface.
Note:
|
Step 3: Place the camera on the desktop
Place the camera 1.s-2 meters/4.9-6.6 feet away from your baby for safety reasons and a better view.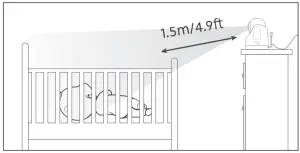
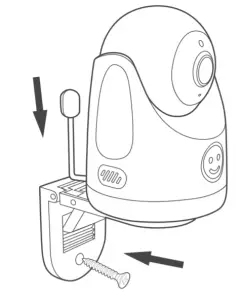
Step 4: Install camera on the wall
- Choose the location where the camera is installed, ensure it is beyond the reach of your child.
- Install the bracket to the wall.
- Install the camera on the bracket, and adjust the appropriate bracket angle.

Note: Before installing, ensure the distance between the camera and the power supply is enough.
Detailed Instruction
Power on
- Connect the camera to the power source via the Micro-USB cable and the camera power adapter. If the emoji indicator lights up, it means the device is powered on. The light will be off after about 1 minute.
- Long press the Power button
 on the monitor for about 3 seconds to turn on it, you will see the preview image.
- Only use the power adapters included in the package.
- Do not place the camera and power cord within the reach of your baby.
Press the Menu button OK/![]() . press
. press ![]() to shift, press OK/
to shift, press OK/![]() . to confirm. Press Return button
. to confirm. Press Return button![]() to exit.
to exit.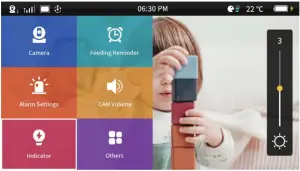
Camera setting
By default, the camera and monitor were paired when manufactured, so when you power on the monitor and camera, they two will automatically pair.
When you want to add more cameras or reset a baby camera, please refer to the following steps.
 | Note: You can add up to 4 cameras to the same monitor. |
- Add More cameras to the Monitor
Step 1: Press the Menu Button OK/ , go to Camera
  , press OK/.
Step 2: Press the Direction button , select the camera (1/2/3/4), press OK/ to pair.
Step 3: Long press the Pair button on the camera (next to the power port) for 3-4 seconds until the connection is successful.- Once they’re paired successfully, the camera number with icon will be shown at the top Left of the screen.
- Microphone feedback might occur when the monitor is too close to the camera. Please keep them at Least 1.sm / 4.9ft apart.
- It is recommended to pair in the baby’s room, or wherever you intend to place the camera.
- Delete cameras
Choose the camera you want to delete, press OK/and select delete. - Camera Display Mode
• When more than 2 cameras are connected, the camera display mode defaults to “Split display mode”.
• Select the cycle display interval time, then it starts cycle display of different cameras automatically. On the top of the screen, the current camera number will be shown with the camera icon.
Feed Reminder
- Press the Menu OK/, go to Feed Reminder
 , press OK OK/ .
 - Press to select:
• Turn off
• Time - Set the Mode: One Time or Repeat.
Note: once the feed reminder function starts, there is an icon on the top of the screen. When it comes to the pre-set time, the alarm is on and the icon flashes. Press any key to cancel the alarm, or the alarm will stop after 30 seconds if you do not press any key.
Alarm setting
- Press the Menu OK/ , go to Alarm setting –
 , press OK/ .
 - Sound Alarm
You can set: Alarm switch, Volume Detection, Alarm Interval, Alarm Volume, Alarm Mode. - Vox Mode
You can set: Alarm switch, volume Detection. - Temperature Alarm
You can set: Temperature Unit, Temperature setting, on Off, Alarm Interval, Alarm Volume, Alarm Mode.
Camera volume setting
Press the Menu OK/![]() , go to Camera Volume :V Press the A v to adjust the volume of the connected camera.
, go to Camera Volume :V Press the A v to adjust the volume of the connected camera.
Indicator setting
- Press the Menu OK/ , go to Indicator
 , press OK/ .
 - Status Indicator: select ON or OFF.
- Emoji Indicator: You can set ON/OFF, Adjust brightness Level, Select mode.
Lullaby
- Press the Menu OK/, go to Other
 -Find the Lullaby
  . choose a song, press OK/ to play.
 - Select Play Mode: Single Play, Single Cycle, List Cycle, Smart Mode.
Night vision Mode
- Press the Menu OK/= , go to other , select the Night vision Mode
 , press OK.
 - Three Options for selecting: Auto (Default), Manually On , Manually OFF
Time setting
Press the Menu OK/= , go to Other ![]() , find the Time set
, find the Time set ![]() . Press A v < > to select, OK to confirm, Return Key vox to exit.
. Press A v < > to select, OK to confirm, Return Key vox to exit.
Auto screen Off
Press the Menu OK/= , go to Other ![]() . find the Auto screen off
. find the Auto screen off ![]() . Select:
. Select:
- Turn off
- Auto screen off time.
Language setting
Press the Menu OK/![]() = , go to Other
= , go to Other ![]() . select the Language
. select the Language ![]() , choose one, press OK/= .
, choose one, press OK/= .
System settings
Press the Menu OK/![]() , go to Other
, go to Other ![]() , select the System
, select the System ![]() , press OK/
, press OK/![]() .
.
- Restore Factory settings : select confirm/ cancel
- System version
- After-sales service contact Information.
How to use the charging Base
connect the charging base to the power supply, open the Monitor bracket and put the monitor on the charging base to start charging.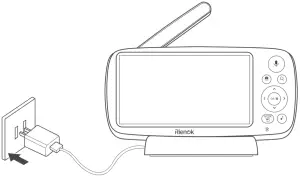
Troubleshooting
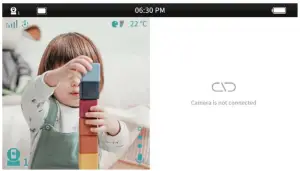
| why can’t I connect the camera to the monitor?Baby monitor can’t connect with the camera? |
| |
| why is the video so blurry? |
| |
| why does the monitor make a noise? |
| |
| can I hear my baby when I close the screen? | Yes. You should turn on the sound detection function and set a reasonable sound detection value, and then the device will automatically wake up and issue a sound alarm. | |
| why is the picture black and white? | When night comes and night vision mode starts, to ensure that the image is clear, the image is black and white. | |
| how long will the monitor be on standby? | Approximately 10 hours, the standby time depends on screen brightness, sound volume, frequency of intercom, etc. | |
| Why the monitor doesn’t respond? |
| |
| Why baby movement doesn’t activate vox? | The only activation is sound detection, not movement detection. | |
| Product not powering on? |
| |
After-sales service
| If you have any questions when using this product, please feel free to contact us. website: www.rienok.com Email: UK [email protected] US [email protected] CA [email protected] |
FCC STATEMENT
This device complies with Part 15 of the FCC Rules. Operation is subject to the following two conditions:
(1) This device may not cause harmful interference, and
(2) This device must accept any interference received, including Interference that may cause undesired operation.
Warning: Changes or modificat1ons not expressly approved by the party responsible for compliance could void the user’s authority to operate the equipment.
NOTE: This equipment has been tested and found to comply with the limits for a Class B digital device, pursuant to Part 15 of the FCC Rules. These limits are designed to provide reasonable protection against harmful interference in a residential Installation. This equipment generates uses and can radiate radio frequency energy and, if not installed and used in accordance with the instructions, may cause harmful interference to radio communications. However, there Is no guarantee that Interference will not occur In a particular installation.
If this equipment does cause harmful interference to radio or television reception, which can be determined by turning the equipment off and on, the user is encouraged to try to correct the Interference by one or more of the following measures:
- Reorient or relocate the receiving antenna.
Increase the separation between the equipment and receiver. connect the equipment Into an outlet on a circuit different from that to which the receiver is connected.
Consult the dealer or an experienced radio/TV technician for help.
FCC Radiation Exposure Statement: (for monitor)
This equipment complies with FCC radiation exposure limits set forth for an uncontrolled environment. This equipment should be Installed and operated with minimum distance 20cm between the radiator & your body.
RF warning statement: (for video)
The device has been evaluated to meet general RF exposure requirement. The device can be used in portable exposure condition without restriction.


