![]() FusionCharge AC
FusionCharge AC
User Manual AP07N-EU, AP22N-EU
About This Manual
Thank you for choosing Huawei FusionCharge AC.
This manual will guide you through the steps required to install, use, and maintain FusionCharge AC.
Exercise caution when performing operations with “Caution” marks to avoid injury or product damage. The symbol that may be found in this manual is defined as foltows.![]() Caution: supplements important information or indicates a potentially hazardous situation which, if not avoided, could result in device damage, data loss, performance deterioration, or unanticipated results.
Caution: supplements important information or indicates a potentially hazardous situation which, if not avoided, could result in device damage, data loss, performance deterioration, or unanticipated results.
The manuat is for reference onty and does not constitute a warranty of any kind. The actual product (including but not limited to color, size, and functions) may vary. if this manual Is inconsistent with the description on the official website, the latter prevails.

Scan the QR code to obtain the latest documents.![]() Some functions may be subject to change, according to the charger’s latest software and app updates.
Some functions may be subject to change, according to the charger’s latest software and app updates.
Safety Information
- Before using and operating this product, read this document thoroughly and observe all of the safety precautions, including the equipment safety markings.
- The statements made in this manual do not constitute the full safety instructions. These are only supplemental. The Company shall not be held liable for any consequences caused by the violation of these general safety requirements, design, production or safety standards.
- Ensure that the product is installed in environments as specified in this manual Incorrect installation could potentially damage the charger. Any resulting damage, personal injury or property damage is excluded from the warranty.
- In addition to the requirements specified in this manual, the usage and operation of the product should also comply with the local regulations.
- Radio waves generated by the product may affect normal operation of implanted medical appliances or personal medical appliances, such as the pacemakers, cochlear implants, and hearing aids. Consult the manufacturer of your medical equipment for more informadon.
- Before installing or cleaning the product, switch off the upstream residual current operated circuit-break-ers with integral overcurrent protection (RCBO) of it.
- Do not install or use the product in an environment with strong magnetic fields or near a wireless transmitter.
- Do not install or use the product in or near areas with flammable, explosive, chemical materials, or steam.
- Install and use this product in a place without direct sunlight.
- Do not use or replace the product in extreme weather conditions.
- Before charging an electric vehicle with the product, read the instructions of the vehicle carefully.
- Do not remove the safety marks, warning signs, nameplates, or cabling marks from the product
- Do not spray water or any liquids on the product Do not submerge the charging connector in water
- Before charging your electric or hybrid vehicle, turn off the car
- Keep children away from the product
- Do not disassemble, repair, or modify the product by yourself.
- Do not use third-party cables or adapters.
- Do not insert your fingers or sharp objects into any components of the product.
- Do not drop, squeeze, or pierce the product to avoid device faults.
- Do not fold or crush any component of the product, or damage it with sharp objects.
- Do not use the product if it is defective, cracked, damaged, or malfunctioned. A generator cannot serve as the power supply for the product. Do not connect the product to devices other than a vehicle.
Packing List

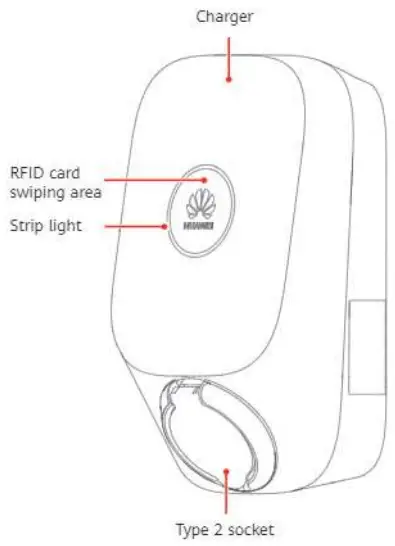
Product Overview
- PV power preferred*
PV power adaptive charging with a high PV self-consumption rate.
Automatic phase switchover to maximize PV power utilization (available on AP22N-EU). - Scheduled charging
Scheduled time-of-use charging allows you to set when fo start and stop a charging session on the app. - Normal charging
Charging power up to 7.4 kW (single-phase) or 22 kW (three-phase). - Smart authentication
Supports user authentication and denies access for unauthorized users. Plug-and-play charging is supported after authentication is disabled.
Supports RFID card management. - Dynamic charging power*
The charger power is dynamically controlled based on the total premise power to prevent the general circuit breaker from tripping.
* This function is available when an electricity meter and a Huawei PV inverter of specified models and versions are installed. Scan the QR code in “About This Manual” and see detailed information about the meter in “Meter Description.”![]() In PV power preferred mode, scheduled charging mode, or dynamic charging power mode, cars that do not support CP signal wake-up may fail to be started and the charging session may be interrupted.
In PV power preferred mode, scheduled charging mode, or dynamic charging power mode, cars that do not support CP signal wake-up may fail to be started and the charging session may be interrupted.
Technical Specifications
| AP22N-EU | APO7N-EU | |||
| Operating voltage range Frequency Supported earthing system Rated output power (current) Operating temperature* (without direct sunlight) | Mode A | Mode B | Mode C | |
| Three-phase 400/230 V AC (±20%) 50/60 Hz± Hz Tine-phase fin-wire, TN, TT Three-phase 22 kW (32 A), -35°C to +40°C | Three-phase 400/230 V AC (±20%) 50/60 Hz± Hz Thee-phase five-wire; TN, TT Three-phase 11 kW (16 A), -35°C to +50°C | Single-phase 230 V AC (±20%) 50/60 Hz± Hz Single-phase, three-wire; TN, TT, IT Single-phase: 7.4 kW (32 A) -35°C to +45°C | ||
| Weight | About 3.1 kg | About 3.0 kg | ||
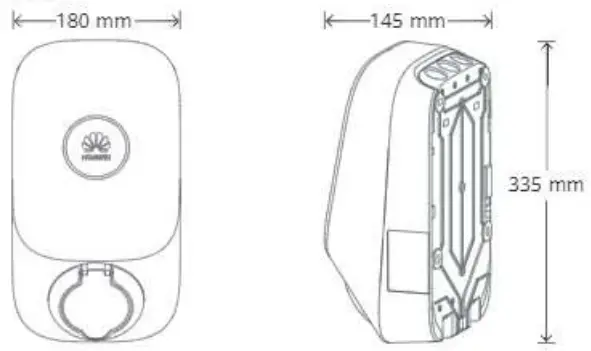
| Dimensions (H x W x D) | 335 mm x 180 mm x145 mm | |||
| Network type Bluetooth Ethernet port RFI D | WiFi 2.4 GHz BLE 5.0 FE 100 Mbit/s IEC 14443 Type A | |||
| Transportation and storage temperature Relative humidity Altitude* | -40°C to +70°C 5%-95% RH (non-condensing) 0-2000 m | |||
| IP rating Standard compliance | TP54 EN 61851-1 2019, IEC 62955 2018, IEC 61008-1 2010, IEC/EN 62196-1 | |||
*When the altitude ranges from 2000 m to 4000 m, the output power of the charger is derated.
*APO7N-EU: When the operating temperature ranges from 45°C to 55°C, the output power of the charger is derated.
*AP22N-EU (Mode A): When the operating temperature ranges from 40°C to 55°C, the output power of the charger is derated.
*AP22N-EU (Mode 8): When the operating temperature ranges from 50°C to 55°C, the output power of the charger is derated.
*AP22N-EU (Mode C): When the operating temperature ranges from 45°C to 55°C, the output power of the charger is derated.
Installation Precautions
Before installation, carefully read the precautions in this manual and prepare for the Installation.
- Only professionals with local qualifications are allowed to disassemble and install chargers.
- Ensure that all installation operations are performed correctly to avoid accidents such as fire and electric shock
- Ensure that the installation surface is solid enough to hold the charger. It is recommended that the wall have a bearing capacity of at Least 100 kg.
- Ensure that the wall is flat and reserve sufficient space around the installation position to ensure good ventilation.
- Ensure that the wall is larger than the rear cove: the charger.
- When installing the product, install the ground cable first. When uninstalling the product, remove the ground cable last_ Do not work on the product in the absence of a properly installed ground cable.
- Do not install or remove power cables with power on.
- Before switching on the upstream RCBO, ensure that cables are correctly connected to the charger
- After the upstream RCBO is switched on, do not touch the terminals on the rear cover directly or with conductors.
- Use cables that comply with local regulations and ensure that the insulation layer is intact
- When installing the product, use a screwdriver with a proper torque to tighten the screws. When using a screwdriver, ensure that the screwdriver does not tilt and the torque error does not exceed 10% of the specified value.
- When routing power cables, ensure that there is no coiling or twisting.
- Keep cables at least 30 mm away from heat-generating components or heat source areas.
- Do not join or weld power cables. If necessary, use a longer cable.
- Seal unused power cable holes with rubber plugs after the installation is complete.
- In case of short-circuit, the value of Pt at the EV socket-outlet of the charging station shall not exceed 75000 A²s.

Scan the QR code to get the installation video.
Installation Preparations
Before the installation, ensure that:
- The charger power is within the allowed toad range of the residence.
- Cables and RCBOs meet the installation and usage requirements.
- If the AC input power cable exposed to the outdoor environment is 3 m or longer, consult the local installer. You are advised to install a surge protective device (SPD) at the upstream of the charger’s RCBO. The SPD specifications should meet the following requirements: Uc = 385 V AC, In ≥ 10 kA, and Up ≤ 2 kV, The cable between the SPD and charger must be at least 3 m.
- A network cable that is long enough is prepared if the charger is connected to a wired network
- The installation area should be covered by a wireless network if the charger is connected to the network through WiFi.
- If the PV power preferred mode and dynamic charging power mode are used, you need to configure an electricity meter. Scan the QR code in “About This Manual” and see detailed information about the meter in “Meter Description.”
Preparing Tools
| Personal protective equipment | Safety helmet | Protective gloves | Insulated shoes |
| Hardware installation tools | Phillips insulated torque screwdriver (M4/MS/M6) | Insulated security tons torque screwdriver (TT20) | Hammer drill and drill bit (010) |
| Marker | Rubber mallet | ||
| Cable installation tools | Wire stripper | Crimping tool | Scissors |
| Measurement instruments | Clamp meter | Steel measuring tape | Level instrument |
| Auxiliary materials | Insulation tape | Heat-shrink tubing | Cord end terminal |
Preparing Cables
| Cable Type | Operating Current | Cross-sectional Area |
| AC input power cable (single-phase three-wire) | 32A | 6-10 mm² |
| AC input power cable (three-phase five-wire) | 6-10 mm² | |
| Note: To facilitate cabling, aluminum wires and solid copper wires are not recommended | ||
Preparing an RCBO
| Input | Specifications |
| Single-phase / Three-phase | 2P/4P RCBO, 40 A (50 A is recommended if the ambient temperature is higher than 45°C), Type A or B, in compliance with local regulations. |
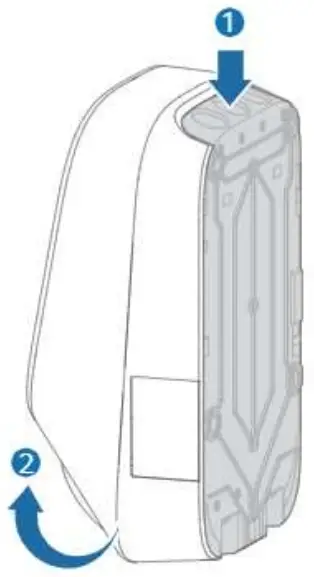
1. Opening the Charger![]() Read the installation precautions before the installation.
Read the installation precautions before the installation.
- Push the rear cover downwards.
- Separate the charger body from the rear cover.
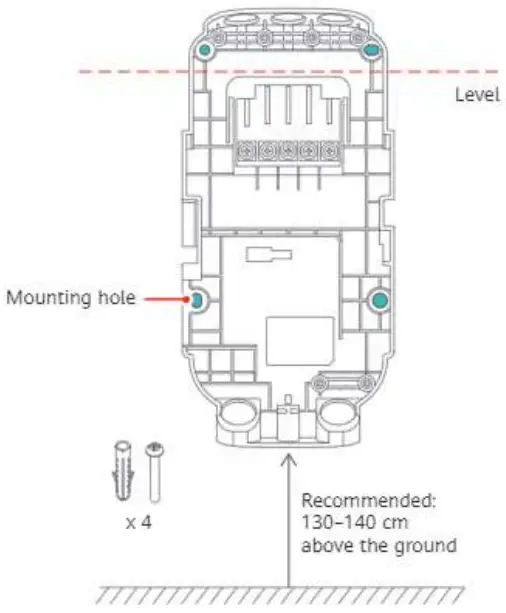
2. Securing the Rear Cover![]() Ensure that the installation surface is solid enough to hold the charger. It is recommended that the wall have a bearing capacity of at least 100 kg. Do not drill holes on the rear cover. Otherwise, the rear cover may be damaged.
Ensure that the installation surface is solid enough to hold the charger. It is recommended that the wall have a bearing capacity of at least 100 kg. Do not drill holes on the rear cover. Otherwise, the rear cover may be damaged.
- Place the rear cover on the wall, keep it horizontal, and use a marker to mark the hole drilling positions on the wall.
- Use a hammer drill to drill hotes on the wall at the marked positions, and place wall piugs into the holes. (insertion depth: 50 mm; 10)
- Use wall-mounting screws to secure the rear cover to the wail (Use an M6 Phillips screwdriver with a torque of 1.4-1.6 N-m.)
3. Cabling in the Rear Cover
- Switch off the upstream RCBO.
- Use scissors to cut the rubber covers to fit the cable size. Rubber covers should tightly hold cables to ensure sealing effect.
- The cable stripping template is printed inside the carton. Use a wire stripper to strip the power cable based on the template.
- Select an appropriate cord end terminal based on the cable diameter, and crimp the cord end terminal to the cable.
- Connect the power cable through the cable intet based on the actual cable route. Squeeze the cable rubber cover in the cable inlet. (If the cable diameter is 22+1 mm, you do not need to squeeze the cable rubber cover in the charger. Attach it to the charger enclosure.)

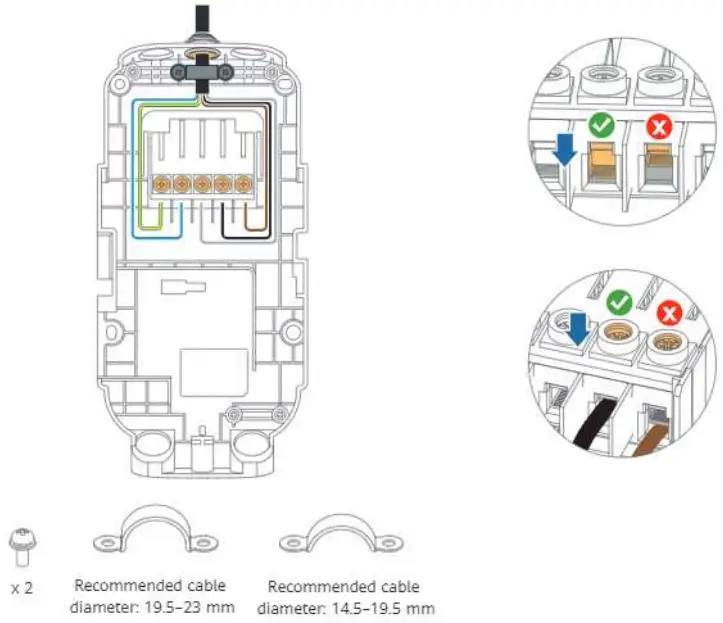
4. Connecting Power Cables
- Keep the screw terminals in the correct status, as shown in the rightmost figures. Connect cables to the correct terminals and tighten the screws clockwise. Pull the power cables to check that the cables are securely connected. Check that the screws are in the required status. (Use an MS torque screwdriver with a torque of 2.020.2 N-m.)
- Select a cable clip based on the cable size. Install the cable clip and use screws to secure the cables. (Use an M4 torque screwdriver with a torque of 1.2 N-m.)
- Pull the power cables to ensure that they are securely connected.
![]() In the following figure, the power cable is routed in from the middle.
In the following figure, the power cable is routed in from the middle.
![]() When five 10 mm² cables are routed in from the bottom, it is recommended that no more than two layers of cables be stacked.
When five 10 mm² cables are routed in from the bottom, it is recommended that no more than two layers of cables be stacked.
 The following cables comply with the IEC 60446 standard. Cable colours may vary according to different regions.
Connect power cables based on the actual phase condition.- TN and TT systems are configured with neutral conductors. IT systems do not have neutral conductors.
- The APO7N-EU supports TN&TT 1-phase and IT 1-phase.
- The AP22N-EU supports TN&TT 3-phase, TN&TT 1-phase, and IT 1-phase.
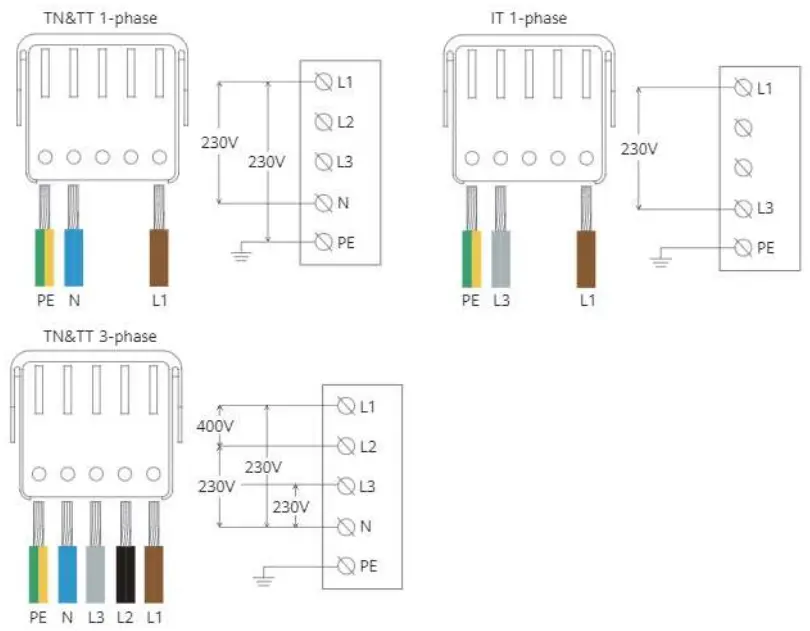
![]() For a TT system, connect cables by referring to the TN system cabling imprint on the rear cover.
For a TT system, connect cables by referring to the TN system cabling imprint on the rear cover.
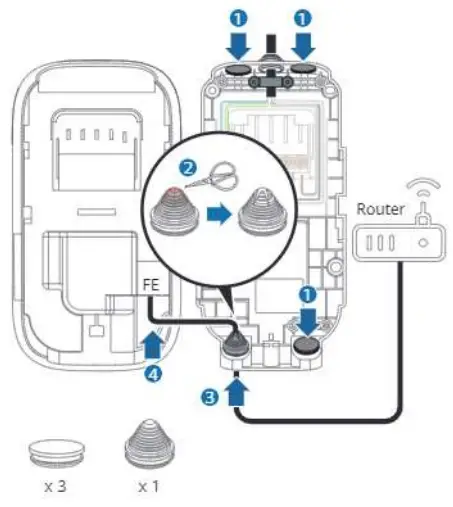
5. Connecting Communications Cables![]() If you use WiFi connection, ensure that the installation area is within the coverage.
If you use WiFi connection, ensure that the installation area is within the coverage.
- If you select wired connection, refer to the following to connect communications cables.
- In the following figure, the power cabie is routed in from the middle.
- Seal unused power cable holes with rubber plugs.
- Cut the cable rubber cover based on site requirements and secure it to the communications cable inlet.
- Route the network cable through the left cable hole at the lower part of the rear cover.
- Connect the network cable to the FE port on the rear side of the charger.
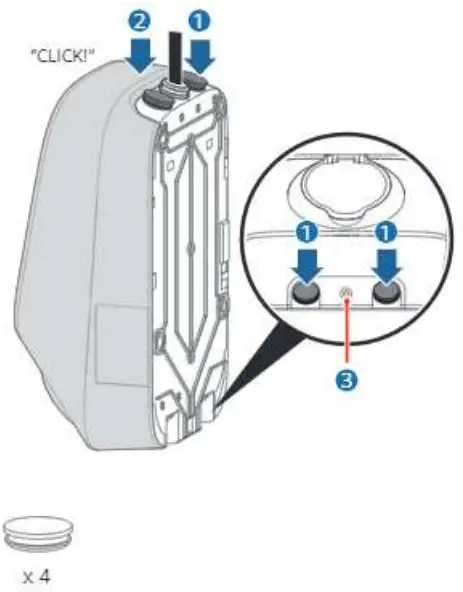
6. Completing the Installation![]() In the following figure, the power cable is routed in from the middle and WiFi networking is used.
In the following figure, the power cable is routed in from the middle and WiFi networking is used.
- Seal unused power cable holes with rubber plugs.
- Align the charger with its rear cover, and push the charger downwards.
- Tighten the screws at the bottom. (Use a TT20 insulated security torx torque screwdriver with a torque of 2.0 N-m.)
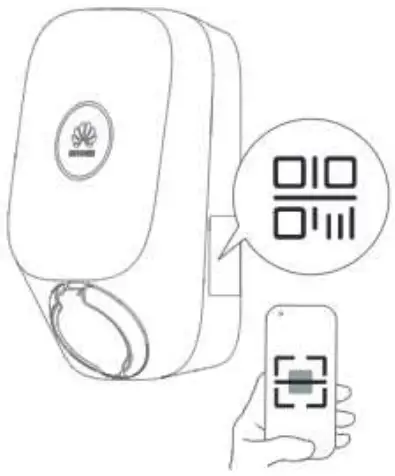
App Installation
Scan the device’s QR code before operating. Download and install the latest app on your smartphone
Follow the instructions on the app to complete wizard settings and parameter settings.
App Operation Guide
 https://support.huawei.com/enterprise/en/doc/EDOC1100261978
Scan the QR code to obtain the app operation guide.
Charger Usage
- Read the installation precautions before using the product.
- Ensure that the charger is not cracked or damaged.
- Ensure that there is no liquid or other foreign matter on the charging connector or inside the charging port of the vehicle.
- The following shows how to start a charging session by swiping the card. For details about other charging modes, see the charger app.
- If the plug-and-play charging mode is used, you can stop a charging session from the vehicle, by RFID card swiping, or on the charger app.
Charging by Card Swiping
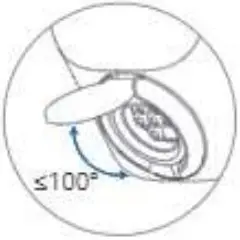
- Open the vehicle’s charging port.
- Take the charging connector; open the socket cover, and property insert the charging connector into the charger and vehicle.

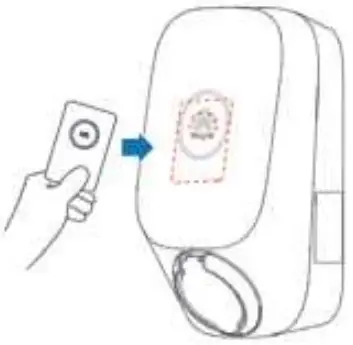
- Place the RFID card in the swiping area to start a charging session. Keep the ring pattern on the card in the swiping area. If the indicator fast flashes blue for three times, the card swiping is successful

Stopping Charging
Swipe the RFID card to stop a charging session.
- Charging will automatically stop when the battery is full.
- If the indicator fast flashes red for three times, scan the QR code in “About This Document” and refer to “Troubleshooting.”
Indicators
![]() Some functions may be subject to change according to the charger’s latest software and app updates.
Some functions may be subject to change according to the charger’s latest software and app updates.
| Indicator | Indicator Status | Charger Status |
| Cycle: steady blue for 4s and off for I s | Charging connector plugged (The authentication function is disabled.) | |
| Cycle: pulsating blue for is | Charging in progress | |
| Steady blue | Charging ended (The charging connector is not removed.) | |
| Cycle pulsating blue for 4s and off for is | Scheduled charging waiting | |
| Cycle: pulsating white for 4s and off for I s | Idle (default state or charging connector removes from the vehicle) | |
| Cycle flashing white for 0.5s | Software upgrading | |
| Cycle pulsating green for 1s | PV power charging waiting and PV power charging in progress | |
| Cycle flashing red for 0.5s | Alarming | |
| Steady red | Faulty |
“This function is available when an electricity meter and a Huawei PV inverter of specified models and versions are installed.
Routine Maintenance
- Chargers do not need special maintenance. You are advised to check and clean the enclosure of the charger and accessories such as the charging connector every six months.
- Check whether the charger and cables are damaged.
- Use a dry cloth to clean the surface of the charger. Do not spray water directly on the charger.
![]() Do not use corrosive cleaners, glass cleaners, or organic solvents.
Do not use corrosive cleaners, glass cleaners, or organic solvents.
Communication Specifications
| Operating Frequency Range Maximum Transmit Power | Antenna Gain | ||
| WIFI | 2400 MHZ – 2483.5 MHZ | 18.93 dBm | 2.85 dBi |
| Bluetooth | 2400 MHZ – 24835 MHZ | 9.23 dBm | 2.85 dBi |
| RFID | 13.56 MHZ | / | 0 dBi |
Miscellaneous
- Storage and Transportation
Chargers should be transported in the original packages. Do not place other objects on the top of the charger. Before transportation, store the product in a clean, dry, and well ventilated place with a relative humidity of not more than 80% and free from corrosive gases. The environmental specifications for storage and transportation shall not go beyond those specified in the Technical Specifications. - Disassembly
Only authorized and qualified electricians are allowed to disassemble the product Power off the charger before disassembling it Disassemble a charger in the reverse order of installation. - Disposal/Scrapping
The product should be disposed of at recycling points for electronic equipment Dispose of the product in a correct and environmental friendly manner in compliance with local laws and regulations. Electronic devices cannot be disposed of as household waste. - Privacy Protection
For more information about privacy protection, log in to the app. - Troubleshooting
For details about troubleshooting, scan the QR code in “About This Document” and refer to “Troubleshooting.”
Meter Description
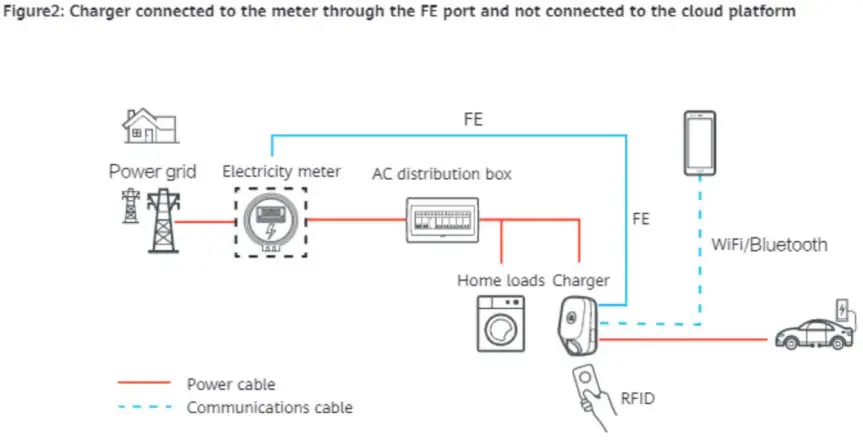
- If the PV power preferred mode and power equalization function are used, you need to configure an electricity meter, which is not detivered with this product. This document provides only recommended models and basic information. For details, see the meter manual
- When installing the meter, ensure that the current wansformer or voltage cable is correctly installed. Otherwise, the charger may charge at the maximum power, possibly causing the general circuit breaker to trip.
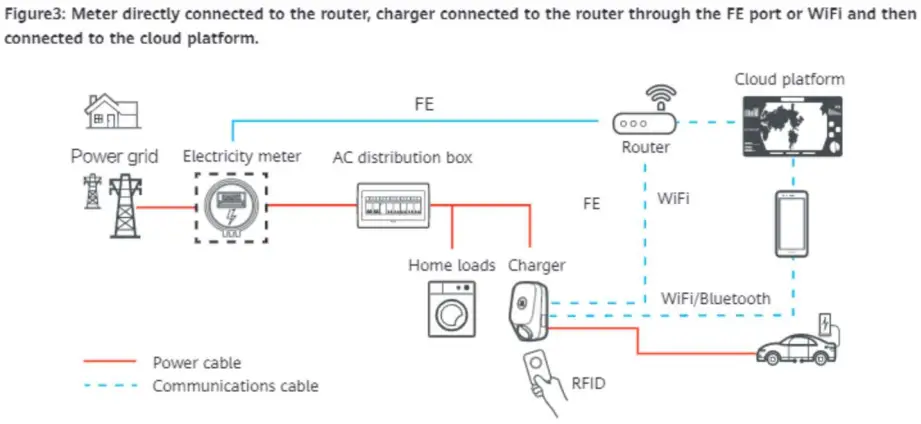
- Type C or type D circuit breakers are recommended for the general circuit breaker. Ensure that the rated current of the general circuit breaker is larger than the highest total current of all loads.
- Under the maximum home toad and maximum charger power, the current must be less than or equal to 150% of the rated current of the general circuit breaker.
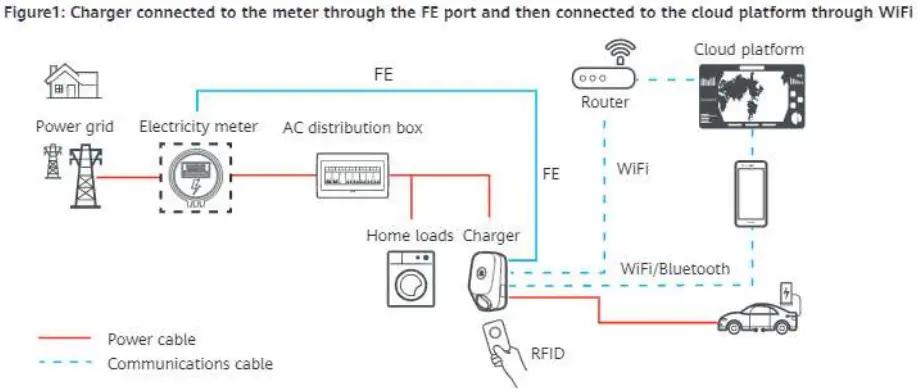
- If there is already an FE meter in the networking, you are advised to install the OTSU666-FE by referring to Figure 1. Otherwise, the power equalization function of the charger will be affected.
Recommended meter
| Component | Description | Prepared By |
| DTSU666-FE | The DTSU666-FE three-phase four-wire electricity meter has one Ethernet port. It supports the Modbus-TCP protocol It is recommended that the meter be installed at the utility entry of the home. Meter version: V322 or later | Customer |
Troubleshooting Common Faults
| Symptom | Possible Cause | Solution |
| The indicator is off. The indicator is steady red. | The upstream input power is abnormaL | Check the upstream input power cable. |
| The upstream RCBO is abnormal | Check the upstream RCBO. If the RCBO is faulty, replace it. | |
| The AC power cable is abnormal (damaged, loosely connected, or other connection faults). | Check the cable. | |
| The charger is faulty. | Contact the after-sates team. | |
| The AC input power cable of the charger is loose, damaged, or incorrectly connected to the power distribution box_ | Reconnect the cable as required. | |
| The earthing system is incorrectly set | Contact the installer to correct the earthing system. | |
| The charger socket is faulty. | Contact the after-sales team. | |
| The charging connector cable is damaged or abnormaL | Replace the charging connector. | |
| There is a risk of current Leakage_ | Switch off the upstream RCBO and power on the charger 5 seconds later. | |
| Other causes | If the fault persists after the restart, contact the after-sales service team. |
| Symptom | Possible Cause | Solution |
| The indicator is flashing red | Input overvoltage occurs. The AC voltage is greater than 276 V. | Check whether the input voltage is within the normal range. |
| Input undervoltage occurs. The AC voltage is less than 184 V. | Check whether the input voltage is within the normal range. | |
| A phase fails in the three-phase input if the voltage of a phase is smatter than 50 V (The input status is normal when the voltages of all the three phases are greater than 60 V after the system is powered on.) | Check whether the three-phase input voltage is within the normal range. | |
| Charger overheat protection is triggered. | Ensure that the charger is not covered. Check that there is no heat source around the charger and that the ambient temperature is in the allowed range. | |
| The charging connector is unplugged in an ..)correct way. | Remove and replug the charging connector. | |
| Overcurrent protection is triggered. | Reduce the charging current of the vehicle or consult the after-sates service of the vehicle. |
Troubleshooting Common Faults
| Symptom | Possible Cause | Solution |
| The indicator is . normal, but charging cannot be started. | The RFID card is faulty. | Check whether the correct RFID card is used. |
| The mobile app is not connected to the charger | Check whether the network of the mobile phone is enabled and whether the mobile phone is successfully connected to the charger | |
| The car is turned on. | Check whether the car is turned oft | |
| The charging connector is not properly connected to the car | Remove and replug the charging connector. | |
| There are foreign objects in the charging connector | Check the charging connector. If there are foreign objects, remove them. If the foreign objects cannot be removed, replace the charging connector. | |
| The charging connector is abnormal. | Replace the charging connector. | |
| The charger status is abnormal. | Switch off the upstream RCBO and power on the charger S seconds later | |
| The charger is faulty. | Replace the charger |
Customer Support
| Country | Service support email | Tel |
| Germany | [email protected] | 80033888888 |
| Spain | ||
| Italy | ||
| Netherlands | ||
| Tiirkiye | [email protected] | |
| Hungary | ||
| Other countries | Log in to solar.huawei.com and check for other countries. | |
![]() This product cannot be sold in the UK and France.
This product cannot be sold in the UK and France.
Copyright © Huawei Digital Power Technologies Co., Ltd. 2022. All rights reserved.
Huawei Digital Power Technologies Co., Ltd
Address: Huawei Digital Power Antuoshan Headquarters,
Futian, Shenzhen, People’s Republic of China
Postal code: 518043
Website: solar huawei.com
v.1.0


