KAHUDA8OBDA OBD-II Car Head Up Display
OBD-II CAR HEAD UP DISPLAY KAHUDA8OBDA
SAFETY & WARNINGS
Read all instructions in this guide before using this product. Retain this guide for future reference. Do not skip, substitute or modify any steps or procedures in this guide, as doing so could result in personal injury or product damage.
This product is NOT compatible with the following vehicles:
European cars | American cars | French cars |
Build date before 2004 | Dodge, Jeep, Ford, GM & Chrysler with build date before 2004 | Peugeot, Citreon & Renault not supported |
Japanese cars | Korean cars | Chinese cars |
Suzuki, Mazda, Toyota & Honda with build date before 2008 | Some Kia & Hyundai models built before 2007 | Build date before 2008 |
The following vehicles are also NOT compatible | ||
Nissan Rouge 2014 | Toyota Alitis 2016 | Pontiac Bonneville 2005 |
Nissan Frontier 2012 | Toyota Fortuner 2014 | Pontiac Grand Prix 2006 |
Nissan Altima 2005 | Chevrolet Silverado ‘04-05 | Ford Mustang 2004 |
Nissan Sunny N17 2012 | Chevrolet Trailblazer 2006 | Ford Galaxy 2005 |
Nissan Note 2006 | Chevrolet Vivant 2007 | Ford Taurus 2003 |
Nissan Murano 2007 | Perodua Alza | Nissan Altima 2005 |
Nissan Livine 2008 | Perodua Viva | Mitsubishi Outlander 2013 |
Nissan G11 2009 | Perodua Myvi Agibeast 2012 | Mitsubishi 2016 |
Honda HRV 2016 | BMW X5 Diesel 2013 | Rainier 2005 |
Honda CRV 2016 | Chrysler Town & Country ‘07 | Jaguar XF 2011 |
Honda CRV 2008 | Lincoln Towncar 2003 | Hyundai Sonata 2013 |
Honda Jazz 2010 | Renault Clio 2 Phase | Hyundai i20 2012 |
Honda Jazz 2014 | Volvo XC60 2005 | Hyundai Santa Fe 2013 |
Honda V6 2010 | Toyota Alitis 2016 | Skoda Fabia 2009 |
Honda Element 2010 | Toyota Fortuner 2014 | Grand Marquis 2004 |
Toyota Hilux Vigo 2015 | Kia Morning 2008 | Toyota Camry Hybrid ‘16 |
Toyota Porte 2009 | Dodge Neon SRT-4 2004 | Toyota Prius 2012 |
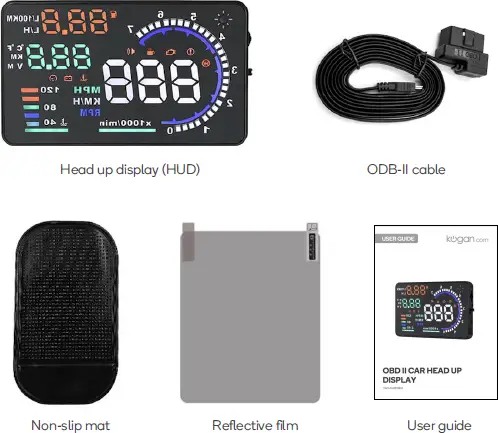
COMPONENTS
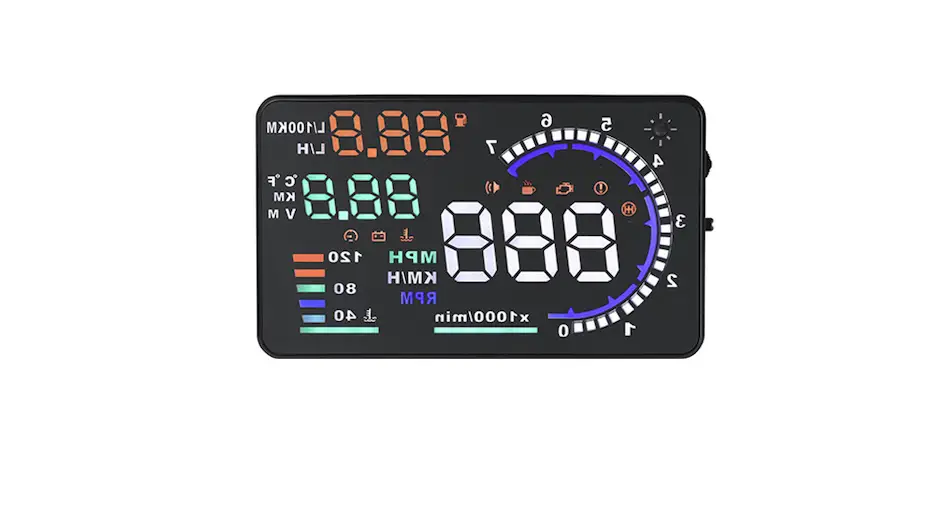
OVERVIEW
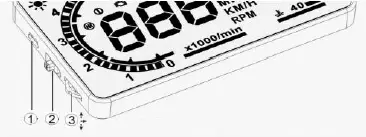
- OBD-II Input
- Power Switch
- Input button
Display (as viewed on windscreen)
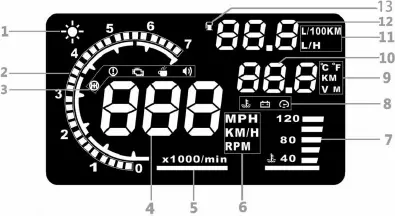
- Light sensor: Changes the unit’s display brightness to suit the constantly
changing environment whilst driving. - Tachometer: Indicates the speed of the engine.
- Alarm panel: From left to right- Shift reminder, over speed alarm, engine fault,
fatigued driver reminder, buzzer. - Speed: Vehicle speed.
- Revolution speed units: indicating the units of rotational speed
- Unit mark:
• KM/H = Kilometres/hour
• MPH = Miles/hour
• RPM = rotations per minute - Engine temperature: Current engine temperature
- Secondary Alarm icon panel: From left to right, Engine temperature alarm,
battery voltage alarm, over speed alarm - Unit mark: Left to right top to bottom Degrees (Celsius or Fahrenheit)
• KM = Kilometres
• V = Voltage
• M = Miles - Multifunction display window: Voltage, Mileage, Water temperature.
- Fuel consumption unit mark:
• L/100km = Litres/100 kilometres,
• L/H = Litre/hour - Fuel consumption display: Fuel consumption with adjustable units of
measurement as above. - Fuel consumption icon
INSTALLATION
Locating your vehicles ODB-II port
Use the guide below to locate your vehicle’s ODB-II port. Some vehicle’s port may be
located in other locations not listed below. Always refer to your vehicle’s owner’s manual to confirm where the ODB-II port is located.
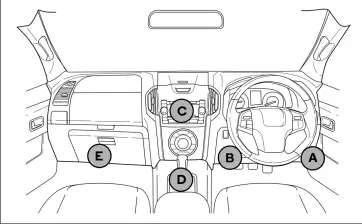
Location | Vehicle |
A | GM, Volkswagen, BMW, Ford, Toyota, Hyundai, Citreon and most vehicles. |
B | Volkswagen Touran, Lexus and other models |
C | Citreon and other rare models |
D | Citreon and other rare models |
E | Geely GX7, Geely Vision SUV and other rare models |
Before First Use
1. Place the non-slip mat on the driver’s side corner of the dashboard and then place the head up display (HUD) on it.
2. Ensure vehicle is ODB-II or EUOBD compatible and connect the supplied cable to the 16-pin connector (usually under the steering wheel, consult vehicle’s user manual if unsure).
3. Connect the cable to the ODB-II input on the unit.
4. Place the power switch in the on position.
Note: Once the HUD’s switch has placed in the on position, it is designed to automatically power on and off with the vehicle’s accessory power.
5. Start the engine and the HUD will power on.
6. Allow 1 minute for software to sync and display voltage, fuel consumption, RPM, etc.
Reflective Film
The HUD projects information up onto the windscreen. Due to the construction of your windscreen, the HUD may create a double reflection on the windscreen, which will make it difficult to read. If this occurs, install the reflective film.
1. Spray some water onto the inside of your windscreen above where the HUD is installed. Clean the area with a dry cloth.
2. Remove the backside (marked 1) of the film and apply to the windscreen. 3. Ensure the film is installed in the correct location and adjust if necessary.
4. Use a flat plastic object (credit card) to squeeze out any water or bubbles from behind the reflective film.
5. Remove the protective film (marked 2).
6. If the reflective film isn’t positioned to display all the vehicle information, adjust the position of the HUD and non-slip mat until it is correctly aligned.
OPERATION
HUD Buttons
Power switch:
Power ON and OFF. ON is towards the ODB-II input, OFF is towards the Input button.
Input button:
The Input button is a three-way button used to navigate the HUD’s menu and adjust the settings.
- Up: push the button towards the windscreen
- Ok: press the button inwards
- Down: pull the button towards the driver
Press and hold the input button for 5 seconds to enter the menu. When finished adjusting the settings, press and hold the input button for 5 seconds to save changes and exit.
- Up: increases setting value
- Down: decrease setting value
- Down and hold: turn alarm tone on or off
- OK: short press to change menu selection
Reset setting
Long pull up and hold. When all LEDs are illuminated, the HUD has restored factory settings.
A vehicle’s instrument cluster has an offset value meaning the value displayed on the factory instrument cluster Is slightly higher than that computed by the vehicle. This offset value Is different for different vehicle manufacturers. As a result, the following table is included from a large range of test data. If you find the value on your dashboard is different to the value displayed by the HUD, you can change it through the following procedure.
Menu | Parameter | Adjustment range | Explanation | Default |
0 | Speed | 50-150 | 50%-%150. | 102 |
1 | RPM | 50-150 | 50%-%150. | 117 |
2 | Fuel Consumption | 50-150 | 5096-96150. | 100 |
3 | RPM Alarm | 10-75 | 1000-7500 r. | 50 |
4 | Shift Reminder | 1-75 | 1000-7500 r. | 45 |
5 | Single/Four Stage Alarm | 0-1 | 0=manual mode 1=four-stage alarm value (60, 80,100, 120km/h). | 0 |
6 | Single Stage Alarm | 30-250 | Setting range is 30km/h 250km/h. | 112 |
7 | Display Mode | 0-4 | 0= automatic mode, all speed under 80km/h; high-speed mode above 80km/h. 1= all information 2= high-speed mode, only display speed and fuel consumption 3= use voltage to control power on/off HUD (only use for gas electric hybrid) 4=reserved options, don’t set to 4 | 1 |
8 | Brightness Adjustment | 0-2 | 0=automatic adjustment; 1=darkest; 2=brightest; | 0 |
9 | Fuel Consumption Unit | 0-2 | 0=no display; 1=L/H; 2=L/100km; | 2 |
10 | Speed Unit | 0-2 | 0=RPM; 1=KM; 2=MPH; | 1 |
11 | Water Temperature Unit | 0-2 | 0=display water temperature; 1=°C; 2=°F; | 1 |
12 | Distance Unit | 0-1 | 0=km/h; 1=MPH; | 0 |
13 | Reference Fuel Consumption | 10-500 | Vehicle fuel consumption | 80 |
14 | Air Displacement Setting | 0-100 | 0=vehicle has airflow meter; 1=the reference fuel consumption 2, 3… 100 = emission is 0.2L, 0.3L…..10L | 16 |
15 | Start Reference Voltage | 110-150 | This is the auto power on and off voltage for the HUD: no need to set | 132 |
16 | Restore to Factory Settings | 0-1 | Set to 1, vertically press the ‘OK’ button for 5 seconds, then return to display interface | 0 |
SPECIFICATIONS
Operating temperature -40 – 80°C
Working voltage 9V~16Vdc (12Vdc/400mA) Relative Humidity 10%-95%
Alarm sound level >=30dB(A)
Barometric pressure 86-106KPa
Environment sound <=60dB
HUD size 125x75x15mm HUD weight 110g
TROUBLESHOOTING
Issue | Possible cause | Steps to resolve |
No speed display | The setting value is too high or the function is disabled | Change alarm stages |
No RPM display | The setting value is too high or the function is closed | Reset the unit and open the switch of alarm |
No display after starting | Power supply issue Start reference voltage incorrect | Check power supply Adjust start reference voltage |
Fuel consumption inaccurate | No air flow sensor | Reset and recalibrate |
No speed/engine speed display | Not compatible with ODB-II or EU-OBD port | Contact your vehicle manufacturer |
No mileage display | No settings for fuel and fuel consumption calibration | Switch to manual to input fuel and adjust fuel consumption |
Speed inaccurate | Incorrect distance unit Speed incorrect | Switch km/h or MPH, adjust speed in Settings |
Only speed and fuel displayed | Speed exceeds 80KM/H | Enter settings and switch display mode to 1 |
HUD not visible in sunlight | Reflective film faulty Brightness incorrect | Inspect physical condition of reflective film Adjust brightness Change display mode to view on HUD |
NOTES
Need more information?
We hope that this user guide has given you the assistance needed for a simple set-up.
For the most up-to-date guide for your product, as well as any additional assistance you may require, head online to help.kogan.com
![]()


