![]() AirAssure™
AirAssure™
Indoor Air Quality
Monitor Model 8144
 Operation and Maintenance Manual
P/N 6015658, Revision H
March 2023
Start Seeing the Benefits of Registering Today!
Thank you for your TSI® instrument purchase. Occasionally, TSI® releases information on software updates, product enhancements and new products. By registering your instrument, TSI® will be able to send this important information to you.
http://register.tsi.com
As part of the registration process, you will be asked for your comments on TSI products and services. TSI’s customer feedback program gives customers like you a way to tell us how we are doing.
Copyright©
TSI Incorporated / 2021–2023 / All rights reserved.
Part Number
6015658 / Revision H / March 2023
Address
TSI Incorporated / 500 Cardigan Road / Shoreview, MN 55126 / USA
Fax No.
(651) 490-3824
LIMITATION OF WARRANTY AND LIABILITY (effective February 2020) (For country-specific terms and conditions outside of the USA, please visit www.tsi.com.)
Seller warrants the goods, excluding software, sold hereunder, under normal use and service as described in the operator’s manual, to be free from defects in workmanship and material for 12 months, or if less, the length of time specified in the operator’s manual, from the date of shipment to the customer. This warranty period is inclusive of any statutory warranty. This limited warranty is subject to the following exclusions and exceptions:
a. Parts repaired or replaced as a result of repair services are warranted to be free from defects in workmanship and material, under normal use, for 90 days from the date of shipment;
b. Seller does not provide any warranty on finished goods manufactured by others or on any fuses, batteries or other consumable materials. Only the original manufacturer’s warranty applies;
This warranty does not cover calibration requirements, and seller warrants only that the instrument or product is properly calibrated at the time of its manufacture.
Instruments returned for calibration are not covered by this warranty;
This warranty is VOID if the instrument is opened by anyone other than a factory authorized service center with the one exception where requirements set forth in the manual allow an operator to replace consumables or perform recommended cleaning;
This warranty is VOID if the product has been misused, neglected, subjected to accidental or intentional damage, or is not properly installed, maintained, or cleaned according to the requirements of the manual. Unless specifically authorized in a separate writing by Seller, Seller makes no warranty with respect to, and shall have no liability in connection with, goods which are incorporated into other products or equipment, or which are modified by any person other than Seller.
f. This warranty is VOID if the product is used in environments other than indoors.
The foregoing is IN LIEU OF all other warranties and is subject to the LIMITATIONS stated herein. NO OTHER EXPRESS OR IMPLIED WARRANTY OF FITNESS FOR PARTICULAR PURPOSE OR MERCHANTABILITY IS MADE. WITH RESPECT TO SELLER’S BREACH OF THE IMPLIED WARRANTY AGAINST INFRINGEMENT, SAID WARRANTY IS LIMITED TO CLAIMS OF DIRECT INFRINGEMENT AND EXCLUDES CLAIMS OF CONTRIBUTORY OR INDUCED INFRINGEMENTS. BUYER’S EXCLUSIVE REMEDY SHALL BE THE RETURN OF THE PURCHASE PRICE DISCOUNTED FOR REASONABLE WEAR AND TEAR OR AT SELLER’S OPTION REPLACEMENT OF THE GOODS WITH NON-INFRINGING GOODS.
TO THE EXTENT PERMITTED BY LAW, THE EXCLUSIVE REMEDY OF THE USER OR BUYER, AND THE LIMIT OF SELLER’S LIABILITY FOR ANY AND ALL LOSSES, INJURIES, OR DAMAGES CONCERNING THE GOODS (INCLUDING CLAIMS BASED ON CONTRACT, NEGLIGENCE, TORT, STRICT LIABILITY OR OTHERWISE) SHALL BE THE RETURN OF GOODS TO SELLER AND THE REFUND OF THE PURCHASE PRICE, OR, AT THE OPTION OF SELLER, THE REPAIR OR REPLACEMENT OF THE GOODS. IN THE CASE OF SOFTWARE, SELLER WILL REPAIR OR REPLACE DEFECTIVE SOFTWARE OR IF UNABLE TO DO SO, WILL REFUND THE PURCHASE PRICE OF THE SOFTWARE. IN NO EVENT SHALL SELLER BE LIABLE FOR LOST PROFITS, BUSINESS INTERRUPTION, OR ANY SPECIAL, INDIRECT, CONSEQUENTIAL OR INCIDENTAL DAMAGES. SELLER SHALL NOT BE RESPONSIBLE FOR INSTALLATION, DISMANTLING OR REINSTALLATION COSTS OR CHARGES. No Action, regardless of form, may be brought against Seller more than 12 months after a cause of action has accrued. The goods returned under warranty to Seller’s factory shall be at Buyer’s risk of loss, and will be returned, if at all, at Seller’s risk of loss.
Buyer and all users are deemed to have accepted this LIMITATION OF WARRANTY AND LIABILITY, which contains the complete and exclusive limited warranty of Seller. This LIMITATION OF WARRANTY AND LIABILITY may not be amended, modified or its terms waived, except by writing signed by an Officer of Seller. Buyer further agrees that purchase of TSI’s AirAssure™ IAQ Monitors Buyer agrees to the Terms and Conditions of Use and the Privacy Policy located at https://tsi.com/terms/.
Service Policy
Knowing that inoperative or defective instruments are as detrimental to TSI as they are to our customers, our service policy is designed to give prompt attention to any problems. If any malfunction is discovered, please contact your nearest sales office or representative, or call TSI’s Customer Service department at (800) 680-1220 (USA) or (001 651) 490-2860 (International) or visit www.tsi.com.
Trademarks
TSI and TSI logo are registered trademarks of TSI Incorporated in the United States and may be protected under other country’s trademark registrations. AirAssure and DustTrak are trademarks of TSI Incorporated. Wi-Fi is a registered trademark of the Wi-Fi Alliance. 3M and Command brand are registered trademarks of the 3M Company.
Cloud Software End User Licensing Agreement and Privacy Policy
Go to https://tsi.com/terms/ to view the TERMS OF USE & PRIVACY POLICY link.
Safety Information
Description of Caution/Warning Symbols
Appropriate caution/warning statements are used throughout the manual and on the instrument that require you to take cautionary measures when working with the instrument.
Description of Caution/Warning Symbols
Appropriate caution/warning statements are used throughout the manual and on the instrument that require you to take cautionary measures when working with the instrument.
![]() CAUTION
CAUTION
Failure to follow the procedures prescribed in this manual might result in irreparable equipment damage.
Important information about the operation and maintenance of this instrument is included in this manual.
Warning![]() WARNING
WARNING
Warning means that unsafe use of the instrument could result in serious injury to you or cause damage to the instrument. Follow the procedures prescribed.
Caution and Warning Symbols The following symbols may accompany cautions and warnings to indicate the nature and consequences of hazards:
| Warns that the instrument contains a laser and that important information about its safe operation and maintenance is included in the manual. | |
| Warns that the instrument is susceptible to electrostatic discharge (EDS) and EDS protection should be followed to avoid damage. | |
 | Indicates the connector is connected to earth ground and cabinet ground. |
![]() WARNING
WARNING
- Use of components other than those specified by TS® Incorporated (TS®) may impair the safety features provided by the equipment.
- When mains power adapters are used, the equipment should be positioned so the mains plug will remain accessible for emergency disconnect.
![]() CAUTION
CAUTION
- The Air Assure™ Indoor Air Quality monitor enclosure is designed for INDOOR USE ONLY.
The monitor is NOT water or spray resistant. - The power adapter provided with the Air Assure™ IA monitor is rated for indoor use only. DO NOT use any other power supply with the Air Assure™ IAQ monitor.
![]() CAUTION
CAUTION
NEVER open the monitor when it is powered on or connected to the power adapter!
The monitor contains very sensitive sensors that are susceptible to electrostatic discharge (EDS) and ES precautions should be followed to avoid damage.
NOTICE
Installation videos can be found on our website.
• 8144-2 https://tsi.com/products/indoor-air-quality-meters-instruments/continuous-iaq-monitoring-instruments/airassure-8144-2-indoor-air-quality-monitor/
• 8144-4 https://tsi.com/products/indoor-air-quality-meters-instruments/continuous-iaq-monitoring-instruments/airassure-8144-4-indoor-air-quality-monitor/
• 8144-6 https://tsi.com/products/indoor-air-quality-meters-instruments/continuous-iaq-monitoring-instruments/airassure-8144-6-indoor-air-quality-monitor/
NOTICE
The safety of any system incorporating the Air Assure™ IRAQ monitor is the responsibility of the installer of the system.
Laser Safety
- Air Assure™ Indoor Air Quality monitors are Class 1 laser-based instruments.
- During normal operation, you will not be exposed to laser radiation.
- You will not be exposed to the laser radiation when the Air Assure™ IAQ monitor is disassembled.
- The PM sensor has a laser inside it. DO NOT open the PM sensor inside Air Assure™ IAQ monitor when the AirAssure™ IAQ monitor is powered.
Take these precautions:
– DO NOT remove any parts from the AirAssure™ Indoor Air Quality monitor unless you are specifically told to do so in this manual.
![]() WARNING
WARNING
The use of controls, adjustments, or procedures other than those specified in this manual may result in exposure to hazardous optical radiation. WARNING
If the AirAssure™ IAQ monitor is used in a manner not specified by the manufacturer, the protection provided by the equipment may be impaired.
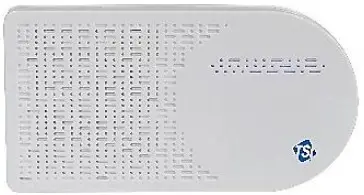
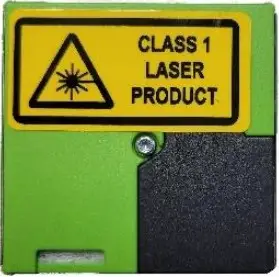
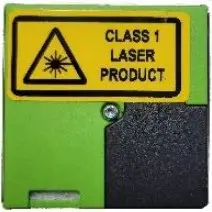
When operated according to the manufacturer’s instruction, this device is a Class 1 laser product as defined by U.S. Department of Health and Human Services standards under the Radiation Control for Health and Safety Act of 1968. A certification and identification label like the one shown below is affixed to each instrument.
Labels
Advisory labels and identification labels are attached to the instrument.
| 1.Serial Number Label (back) | 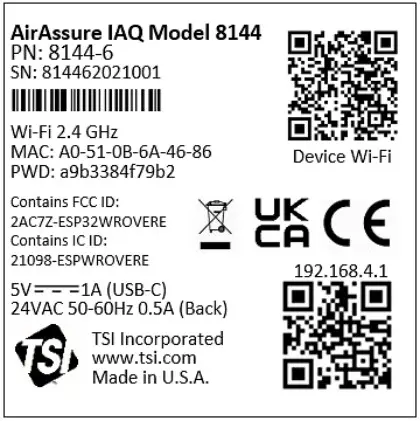 |
| 2.Laser Radiation Label (internal, on the PM sensor) |  |
| 3.C E Safety Details | FCC ID: 2AC7Z-ESPWROVERE Contains IC ID: 2AC7Z-ESPWROVERE |
| 4.European symbol for non-disposable item. Item must be recycled. |  |
Reusing and Recycling![]() As part of Incorporate effort to have a minimal negative impact on the communities in which its products are manufactured and used: If instrument becomes obsolete, return to SIT® Incorporated for disassembly and recycling.
As part of Incorporate effort to have a minimal negative impact on the communities in which its products are manufactured and used: If instrument becomes obsolete, return to SIT® Incorporated for disassembly and recycling.
Product Overview
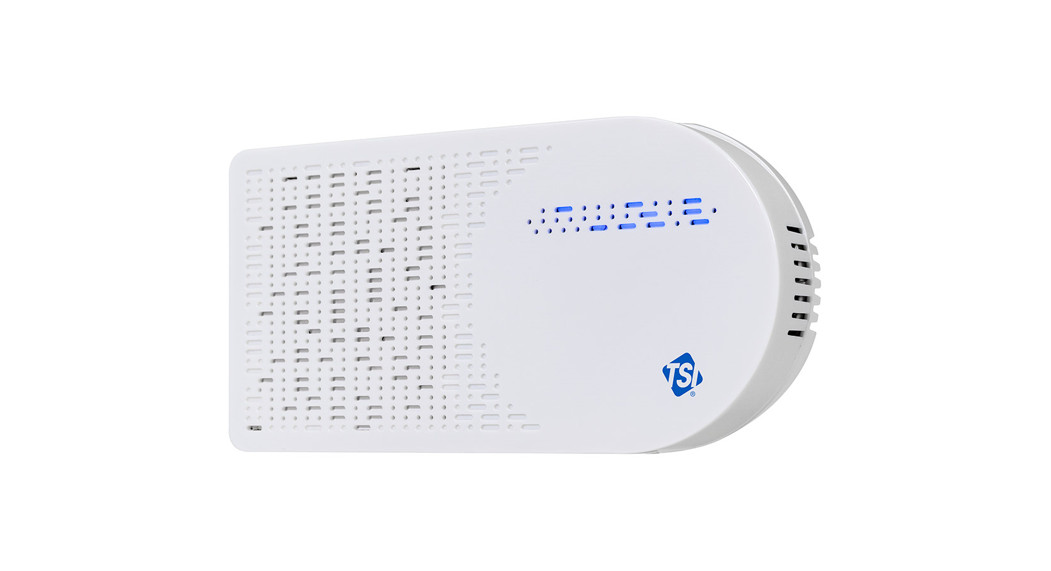
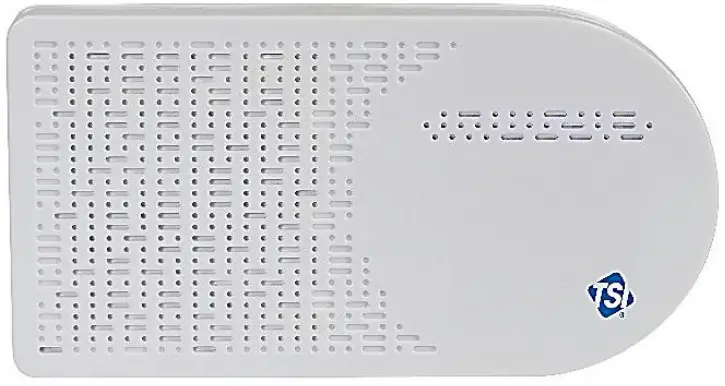
TS® Incorporated AirAssure™ Indoor Air Quality Monitor is a real-time Particulate Matter (PM) and Gas monitor designed to provide accurate gas and mass concentrations as well as temperature, humidity, and barometric pressure measurements. The monitor is designed to be deployed in less than ten minutes and is intended for indoor air quality monitoring only.
Data from the sensor is available at www.tsilink.com. All you need is an internet connection and web browser. The AirAssure™ IAQ monitor connects to the internet using 2.4 GHz Wi-Fi® to upload data.
Cloud data can be viewed in a web browser. There is no need to install an app on your smartphone. Logged data is also available on the internal microcosm card accessible from the bottom of the device.
The AirAssure™ IAQ monitor comes with a PM sensor factory calibration, whose standards adhere to the same standards that are applied to other high-quality TS® monitors like the Dust Trak™ and AM520 models. The AirAssure™ IAQ monitors also come with self-diagnostics to enable you to run the monitor with greater than 95% run-time.
Unpacking
Compare all the components you received with those listed in the table below.
| Item | Qty | Description |
 | 1 | AirAssure TM Indoor Air Quality Monitor |
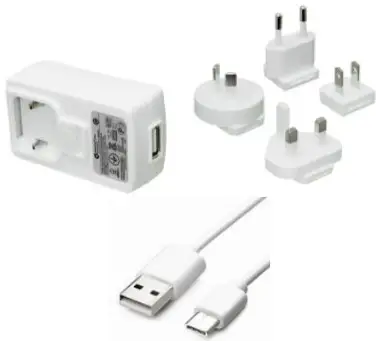
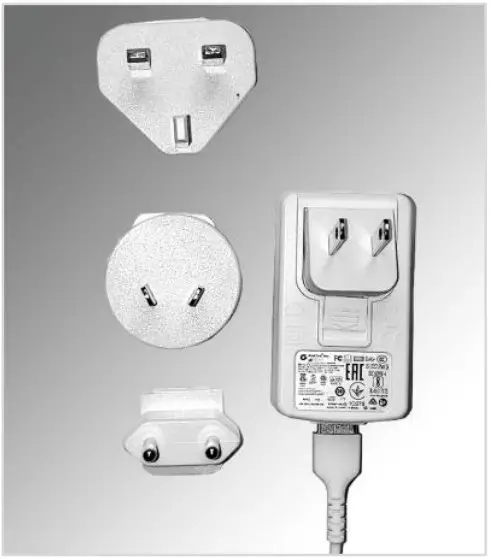
 | 1 | USB Power Supply |
 | 1 | Country Specific Plug Adapter Kit |
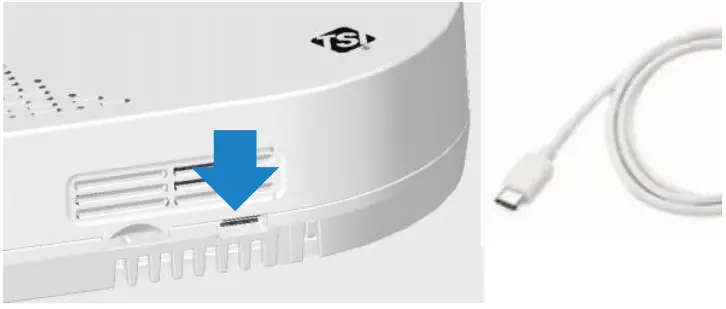
 | 1 | 2m USB-A to USB-C Cable |
 | 1 | 24 VAC Terminal Connector |
 | 1 | 32 GB micro SD card (installed) |
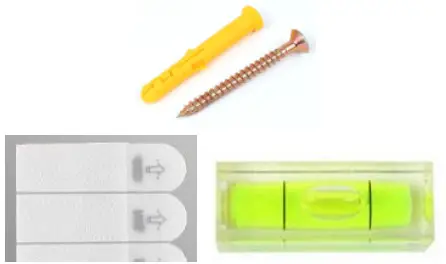 | 1 | Mounting Kit: (2 screw and plug sets, 8 tape strips, 1 level) |
AirAssure™ IAQ Monitor Replacement Parts
Listed below are replacement items for the AirAssure™ Indoor Air Quality Monitor. Contact TSI® for purchase information.
| Item | Part Number | Description |
 | 814408 | Replacement 2-Gas Variant Sensor Cartridge: octavo, Temperature, Relative Humidity, and Barometric Pressure |
 | 814401 | Replacement 4-Gas Variant Sensor Cartridge: CO, octavo, Temperature, Relative Humidity, and Barometric Pressure |
 | 814402 | Replacement 6-Gas Variant Sensor Cartridge: CO, 03, octavo, NO2, and 502, Temperature, Relative Humidity, and Barometric Pressure |
 | 814403 | Replacement TSI® Calibrated PM Sensor |
 | 814404 | Replacement CO2 Sensor |
 | 814405 | Replacement Formaldehyde Sensor |
 | 814406 | Replacement Power Supply Kit |
 | 814407 | Replacement Membrane Filters (pack of 3) |
Setting Up
The AirAssure™ Indoor Air Quality Monitor is delivered fully assembled and ready to be mounted on an interior wall. Start by unpacking the device and its contents from the shipping package.
The monitor is intended to be connected to local 2.4 GHz Wi-Fi® to access all cloud features, but it can be used without Wi-Fi® if needed as all data is recorded to a pre- installed micro SD memory card accessible from the bottom of the case next to the USB-C port.
A quick start guide is shipped with each instrument. It provides the necessary steps to configure the Wi-Fi® settings for connecting the device to a local Wi-Fi® network and will also guide you through installation.
NOTICE
As long as a suitable microSD card is installed, the AirAssure™ IAQ monitor will store data on the card whether or not the unit is connected to Wi-Fi®. SIT® is not liable for corrupt data on the memory card.
NOTICE
If connection to the internet is lost, the AirAssure™ device will buffer and store data onto its internal memory for approximately 14 days (logged at 15 min. intervals), which will then be uploaded to the cloud once internet connection has been restored. Data older than that will be available only on the microSD card. Currently, customers cannot manually upload microSD card data to the TSI® Cloud. You will be notified on the cloud data if the AirAssure™ IAQ monitor has trouble writing to the microSD card.
NOTICE
The monitor does not have the capability to connect to public Wi-Fi® networks that require a second step of browser authentication, such as a free public hotel or airport network.
A different network will need to be chosen.
NOTICE
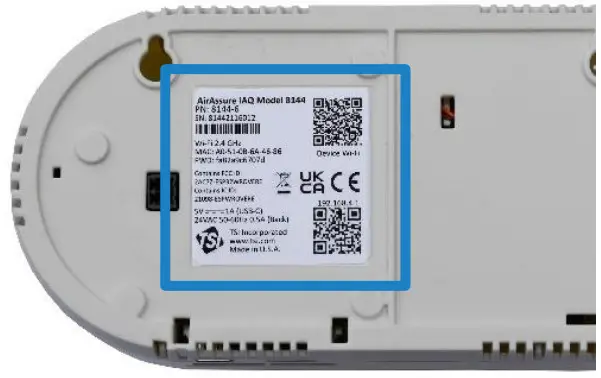
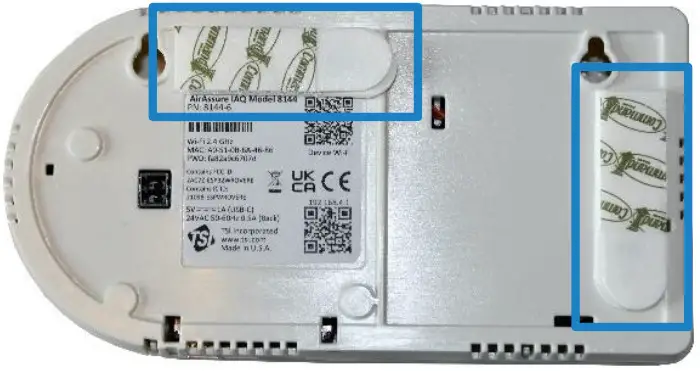
Some corporate networks require the device MAC address for security. This can be found on the serial number label of the monitor.
CAUTION
NEVER open the monitor when it is powered on or connected to the power adapter!
The monitor contains very sensitive sensors that are susceptible to electrostatic discharge (EDS) and EDS precautions should be followed to avoid damage.
If using the microSD card only, you can skip the steps below for connecting the device to a Wi-Fi® network.
Activating a New Device(s)
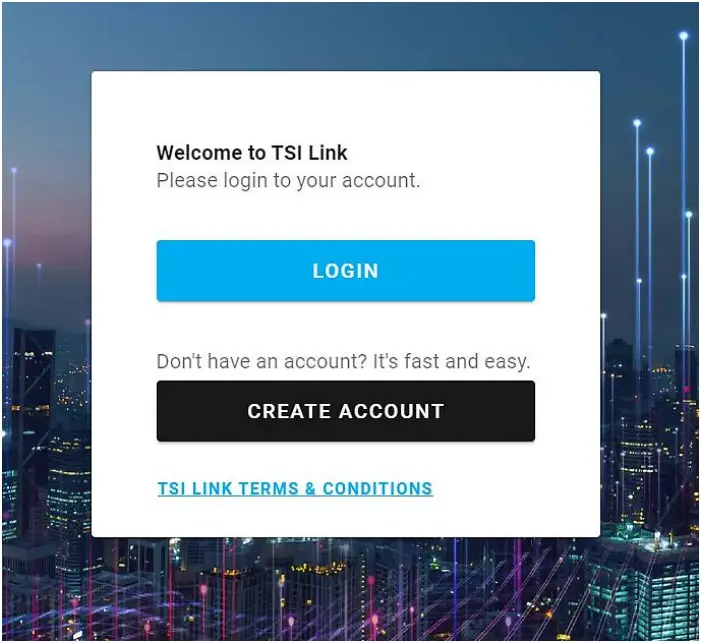
- Open the browser on your phone/computer and navigate to www.tsilink.com/.
- Login using your TS.com account credentials. If you do not have a TI.com account, click on the “Create Account” button and create a new account.

- Once you are logged in, click on the plus icon in the lower right.
Hovering over it will show “Activate New Device.”
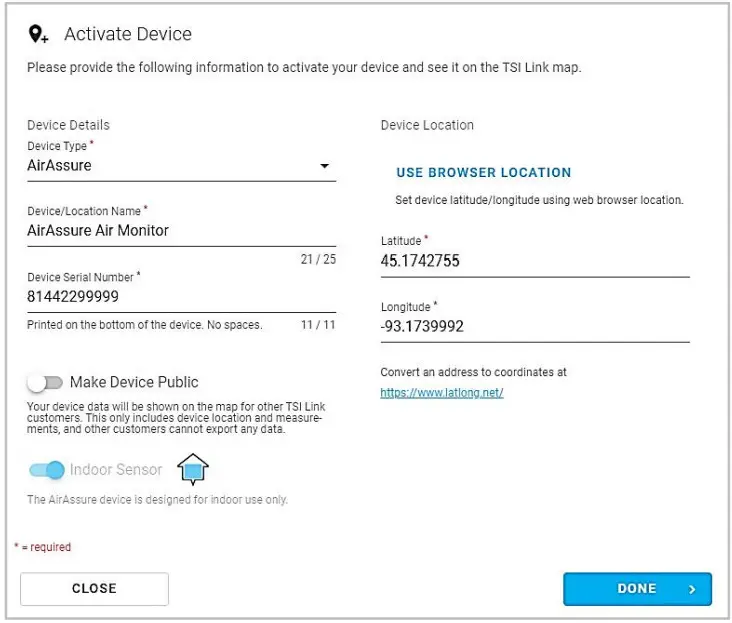
- Enter the required information into the fields. The serial number can be found on the back of the device. You can also name the-device, configure its location and whether or not you would like to make the data public.

- Click “Done” when finished.
- Repeat as necessary for remaining devices.

Connecting AirAssure™ Monitor to a Wi-Fi® Network
For best results, set up the device before mounting it in a permanent location. However, ensure you have good Wi-Fi® strength in the final location. If access to Wi-Fi® is not available, data will always be stored on the included microSD memory card.
The AirAssure™ Indoor Air Quality Monitor can be powered by the USB wall plug power supply and USB-C cable for this part of the process. It is recommended to complete these steps prior to wall mounting, as access to the back of the device is required.
- Remove the power supply, plug adapter kit, and USB-C cable from its packaging. Select your region’s plug connector and mate it to the power supply by “snapping” the plug connector into the adapter.

- Connect the other end of the USB cable to the USB-C port on thebottom of the monitor.

- Connect the USB-A cable end into the power supply and then plug-in the power adapter to a nearby power outlet

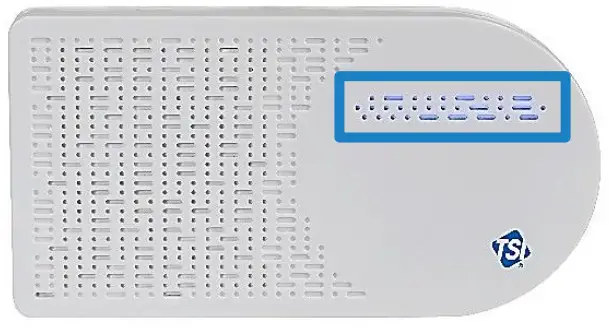
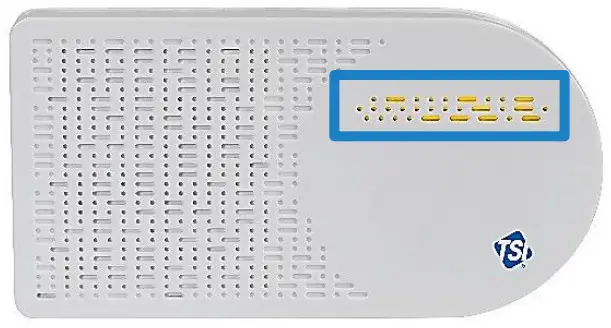
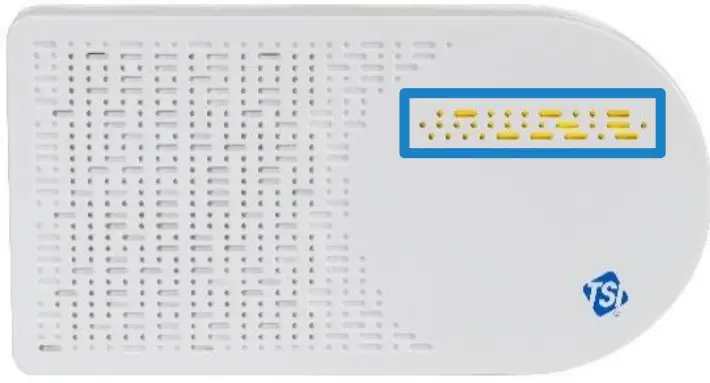
- The monitor should turn on as indicated by the light bar on thefront. To connect the monitor to the internet, you first have toconnect to the monitor’s hot spot.

- Pulse yellow indicates that the monitor is in set up mode as Wi-Fi® hotspot. It will remain in this mode for 60 seconds. If you need more time, simply unplug and plug the monitor backin again.


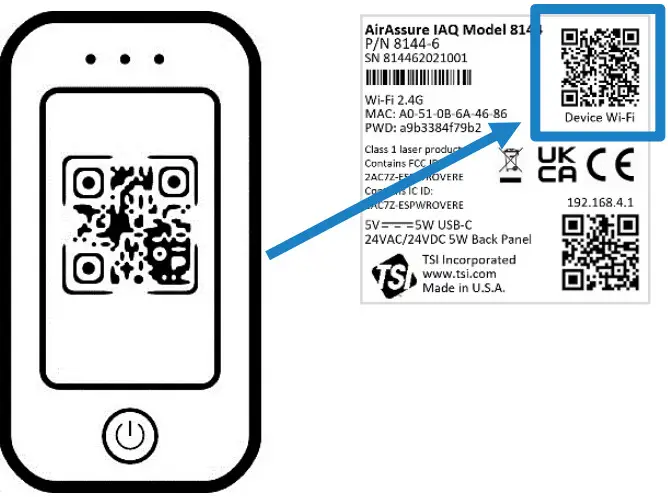
Pulse Yellow Set up Mode Pulse White Connecting Pulse Blue Connected Connecting Solid Blue Connected Connected Solid White No connection No connection - Locate the label on the back of the monitor.

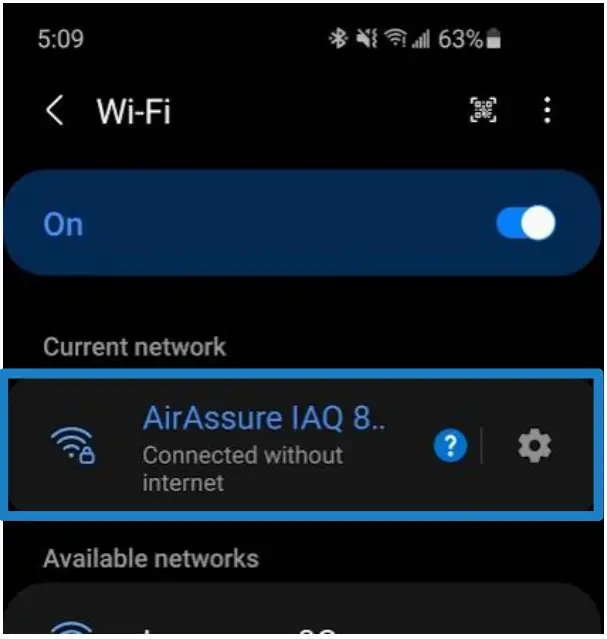
- With your phone camera, scan the QR code at the top of thelabel to connect to the monitor’s Wi-Fi® hotspot. You should beprompted to connect to a new Wi-Fi® network called“AirAssure IAQ 8144XXX…”

- If you are not connected automatically, you can still connectmanually by searching for Wi-Fi® networks and connecting to theone listed as “AirAssure IAQ 8144XXX…”

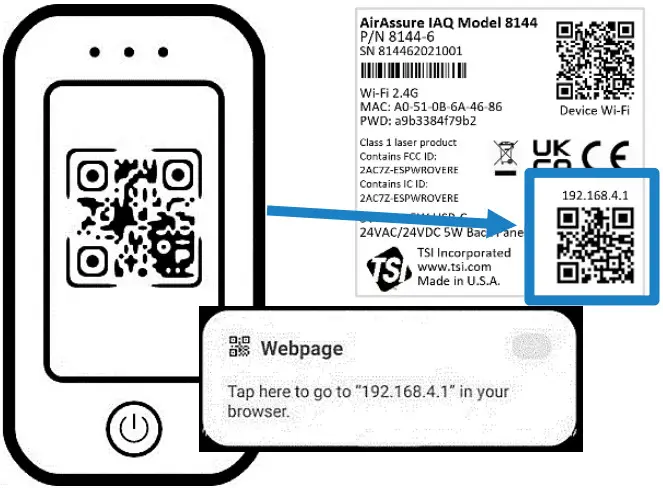
- Once connected to the AirAssure™ IAQ monitor Wi-Fi® network,use your phone camera again to connect to the setup web pageor open your phone browser and enter a URL of 192.168.4.1.

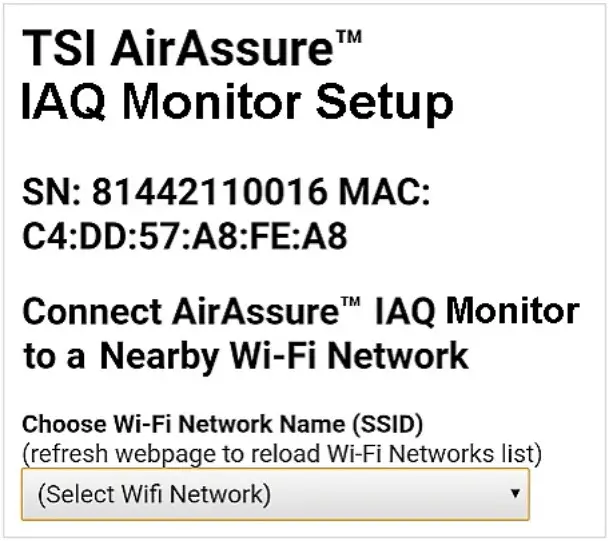
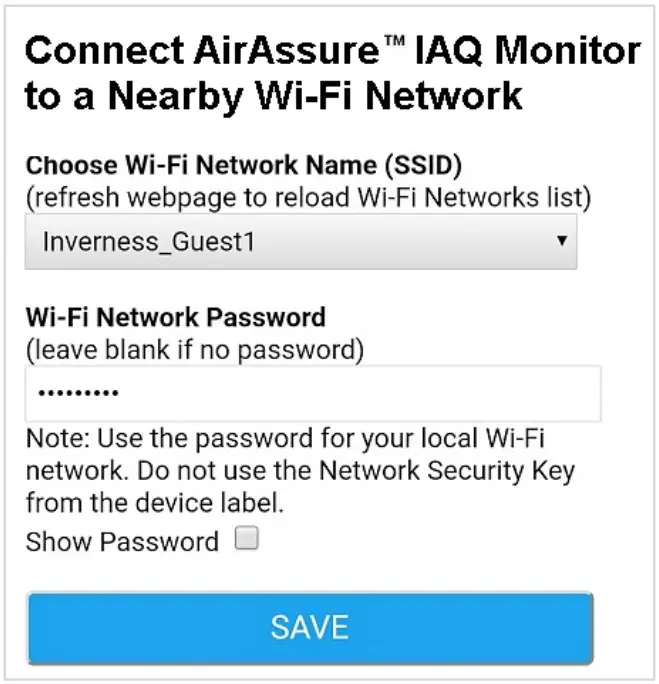
- You should see a web page like the one below. Select your homeor office Wi-Fi® network from the list.

- Enter the local Wi-Fi® password and click Save.

- The monitor should automatically power cycle and start again with a pulsing yellow LED light bar.

- The process of connecting to your local internet will be reflected in the color sequence shown below. This may take several minutes.
Pulse Yellow Set up Mode Pulse White Connecting Pulse Blue Connected Connecting Solid Blue Connected Connected Solid White No connection No connection - If all connections are made, the LED will be solid blue.
- You should now be able to see measurement data from the device. Be patient, as it may take a few minutes for the device to start reporting its data to the cloud.
- If the LED light bar stops at solid white, review the steps above and repeat as needed or see the “Getting Help” section below.

Installing the AirAssure™ Indoor Air Quality Monitor
The AirAssure™ IAQ monitor can be mounted using screws or using double-sided tape (such as 3M® Command® strips). Power can be supplied using either the wall plug or building-supplied 24 VAC from inside a wall. Instructions for both are below.
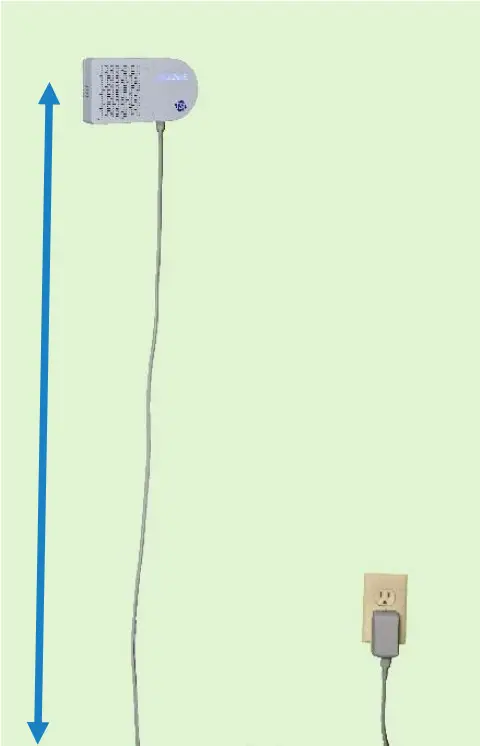
- Typically locate the monitor 1.2 to 1.5 m (4 to 6 ft) above the floor to monitor the “breathing zone.”

- Double-sided tape (such as 3M® Command® strips) works well and can be removed and repositioned.

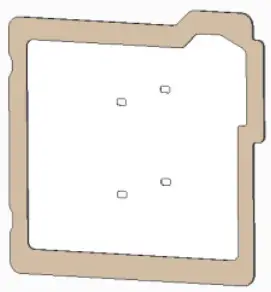
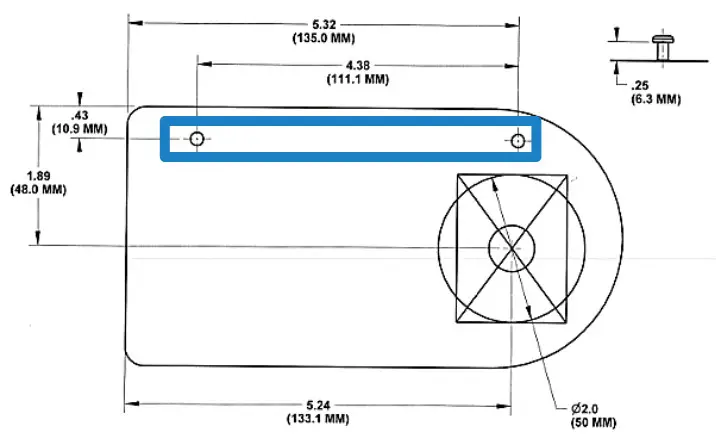
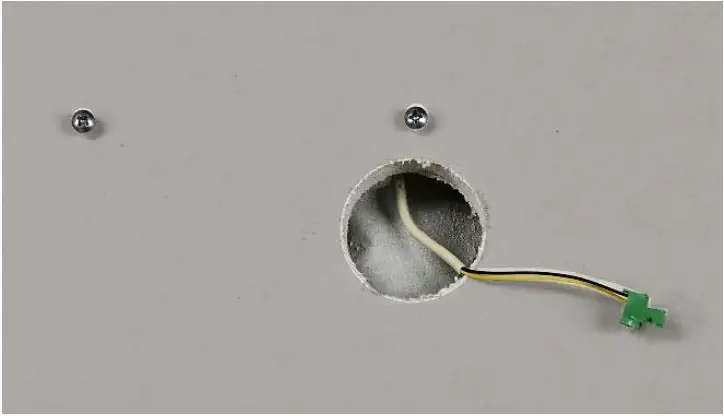
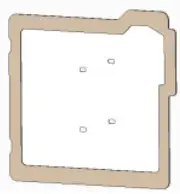
- If using screws, position the template from the quick start guideand use the included level to mark the screw locations on the wallfor mounting. If using a wall plug, install the screws and mountthe monitor

- If using 24 VAC power, mark the cut-out guide area for the wiring feed through (large circle or rectangle).

- Cut the hole and connect the wiring (22-16 AWG, 0.5-1.5 mm2) tothe 24 VAC plug.

- Before applying power to the connection, insert the 24 VAC plug into back of monitor and mount it on the wall.

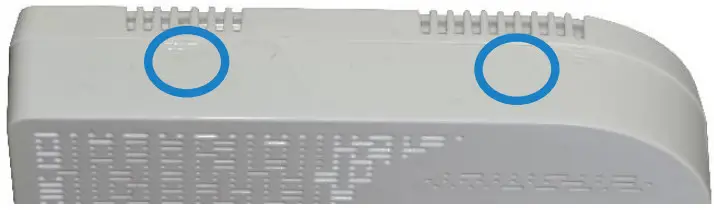
- If the screws need to be more secure, press gently on the two pads on top of the front cover and push down and away from the wall.
 NOTICE
NEVER open the monitor when it is powered on or connected to the power adapter!
The monitor contains very sensitive sensors that are susceptible to electro-static discharge (ESD) and ESD precautions should be followed to avoid damage. - Tighten the screws as needed and close the cover again.

- When power is now applied, the light bar on the monitor will illuminate and pulse yellow.

- The process of connecting to your local internet will be reflectedin the color sequence shown below. This may take several minutes. The LED light bar should be solid blue.
Pulse Yellow Set up Mode Pulse White Connecting Pulse Blue Connected Connecting Solid Blue Connected Connected Solid White No connection No connection - If the LED light bar stops at solid white, review the steps above and repeat as needed or see the troubleshooting section in Chapter 5 or the “Getting Help” section below.

 NOTICE
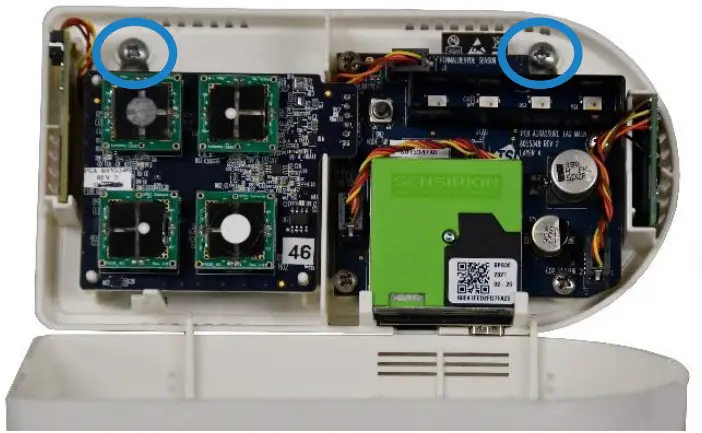
 |  |  |
| Pulse Yellow | Set up Mode | |
| Pulse White | Connecting | |
| Pulse Blue | Connected | Connecting |
| Solid Blue | Connected | Connected |
| Solid White | No connection | No connection |
Getting Help
Please check the Help Center at: www.tsilink.com
Click on “Help” and “Contact Support.” Send the support team a message by filling out the form and clicking “Send.”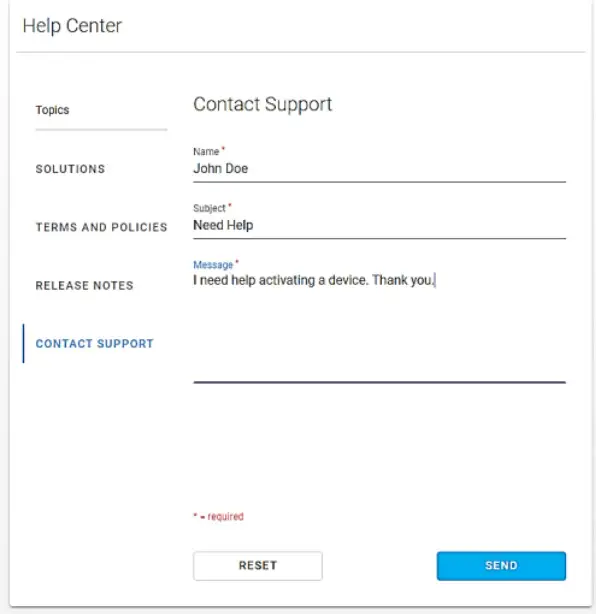
Technical Contacts
If you have any difficulty setting up or operating the AirAssure™ Indoor Air Quality monitor, or if you have technical or application questions about this system, contact Technical Support at TSI® Incorporated, 1-800-680-1220 (USA) or (651) 490-2860 or e-mail [email protected].
If the AirAssure™ monitor does not operate properly, or if you are returning the instrument for service, visit our website at tsi.com/service, or contact TSI® Customer Service at 1-800-680-1220 (USA) or (651) 490-2860.
International Contacts
Service
TSI Instruments Singapore Pte Ltd
150 Kampong Ampat
#05-05 KA Centre
Singapore 368324
Telephone: +65 6595-6388
Fax: +65 6595-6399
E-mail: [email protected]
TSI Instrument (Beijing) Co., Ltd.
Unit 1201, Pan-Pacific Plaza
No. 12 A, Zhongguancun South Avenue
Haidian District, Beijing, 100181
CHINA
Telephone: +86-10-8219 7688
Fax: +86-10-8219 7699
E-mail: [email protected]
TSI Instruments Ltd.
Stirling Road
Cressex Business Park
High Wycombe, Buckinghamshire
HP12 3ST
UNITED KINGDOM
Telephone: +44 (0) 149 4 459200
E-mail: [email protected]
Technical Support
TSI Instruments Singapore Pte Ltd
150 Kampong Ampat
#05-05 KA Centre
Singapore 368324
Telephone: +65 6595-6388
Fax: +65 6595-6399
E-mail: [email protected]
TSI Instrument (Beijing) Co., Ltd.
Unit 1201, Pan-Pacific Plaza
No. 12 A, Zhongguancun South Avenue
Haidian District, Beijing, 100181
CHINA
Telephone: +86-10-8219 7688
Fax: +86-10-8219 7699
E-mail: [email protected]
TSI GmbH
Neuköllner Strasse 4
52068 Aachen
GERMANY
Telephone: +49 241-52303-0
E-mail: [email protected]
TSI Instruments Ltd.
Stirling Road
Cressex Business Park
High Wycombe, Buckinghamshire
HP12 3ST
UNITED KINGDOMTelephone: +44 (0) 149 4 459200
E-mail: [email protected]
TSI France Inc.
Hotel technologique BP 100
Technopôle de Château-Gombert
13382 Marseille cedex 13
FRANCE
Telephone: +33 (0)1 41 19 21 99
E-mail: [email protected]
Operation
Overview
The AirAssure™ Indoor Air Quality (IAQ) Monitor’s primary use is for indoor applications. It is designed to operate 24/7 when powered by a power outlet or 24 Volts AC low-voltage building power. Once you have setup your monitor(s) and connected them to a local wireless (Wi-Fi®) network, you can log into the TSI® Cloud platform, www.tsilink.com, to view the air quality in real time. It will give you insights into how the air quality varies over time inside of your indoor space. Monitoring your indoor air allows you to start seeing trends, which can lead to making more informed decisions, benefiting you and potentially the entire building/community.
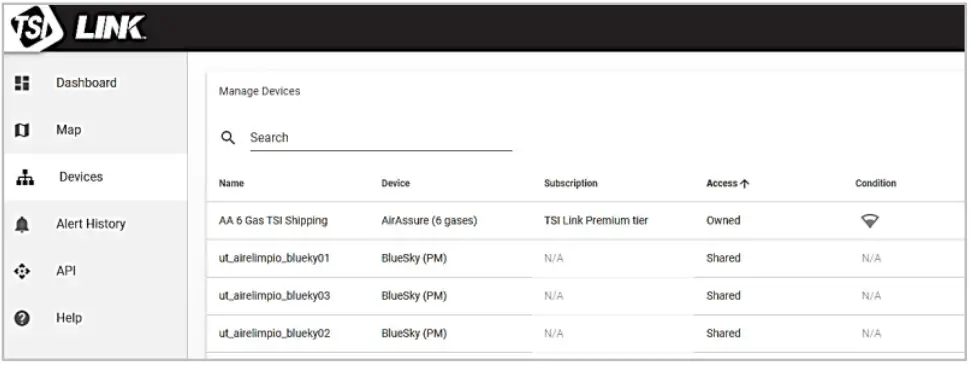
How to View Data from one or more AirAssure™ IAQ Monitors
- Go to www.tsilink.com and log in.
- Click on the map and zoom in to the area where your AirAssure™ IAQ device pin is located.
- Click on the device pin to view the current values.
- Or click on the devices tab to view high-level readings of multiple devices side-by-side.

- Please note to view data on the cloud right after you installed theAirAssure™ IAQ monitor, powered it ON and connected it to theTSI Link™ Solutions, please wait at least 15 minutes before yousee a data point in the cloud.
How to Download Data from one or more AirAssure™ IAQ Monitors
- Go to www.tsilink.com and log in.
- Click on the map and zoom in to the area where your AirAssure™ IAQ device pin is located.
- Click on the device pin.
- Click on the history button.
- Click on the three dots in the top left corner and select Export CSV.
How to Download Data from the microSD Card in the AirAssure™ IAQ Monitor
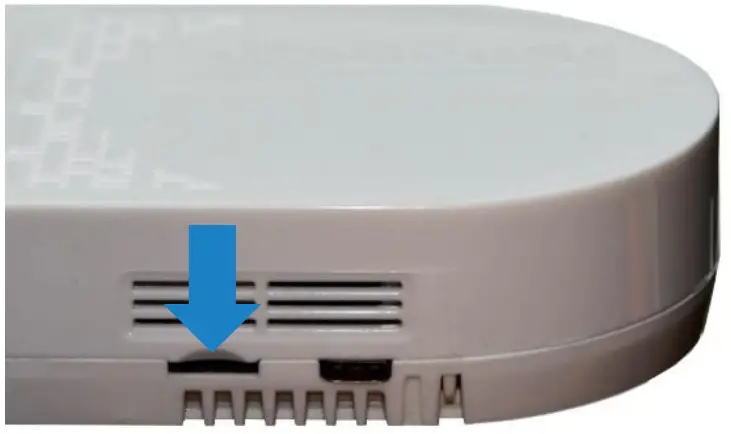
- To avoid the remote possibility of corrupting data on the card, disconnect the power to the unit by disconnecting the USB cable from the power adapter.
- The microSD card slot is located next to the USB connector.
Remove the card by pressing in with a fingernail or tool until the card is ejected.
- Insert the card into a computer (you may need a commonly-available adapter) and download the data. You have the optionsto erase and reinstall the card, insert a new card, or choose to notinstall a microSD card. If the AirAssure™ IAQ monitor has anyissues writing to the card, an error flag will be activated on thecloud that action needs to be taken.
- The 32 GB card provided will store approximately a maximum of300 million data entries or the equivalent of hundreds of years of data.
Interpreting the Data Downloaded from the microSD Card or from the Cloud
Data downloaded from the AirAssure™ Indoor Air Quality Monitor from the microSD card or cloud is stored as an ASCII format file with the serial number and date as the filename and .csv as the extension (e.g. 81442110016-2020111.csv). This format is easily imported into spreadsheet and database programs.
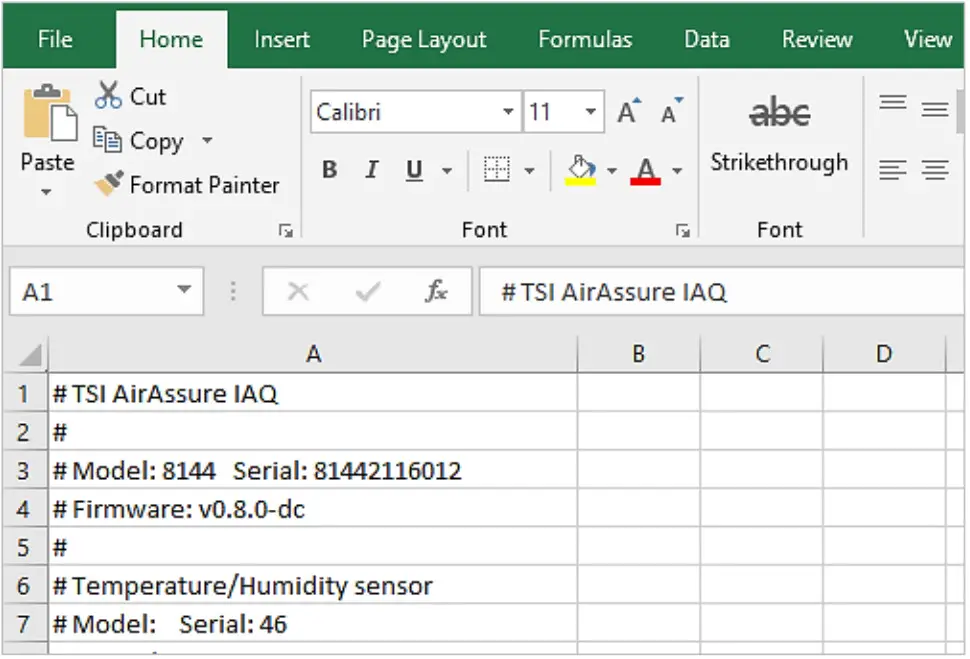
The top line of the output in the file has header information such as model, serial number, firmware version, etc. Farther down there are descriptions of the data in each column along with the data. The actual output of the file will depend on the number and configurations of sensors installed in your particular device.

Most of them are self-explanatory but a few such as sensor status require further explanation that can be found in the Frequently Asked Questions (FAQs) section on the website. https://tsi.com/resources/airassure-iaq-monitors-faqs/ See Appendix B: for Sensor and Device Status definitions.
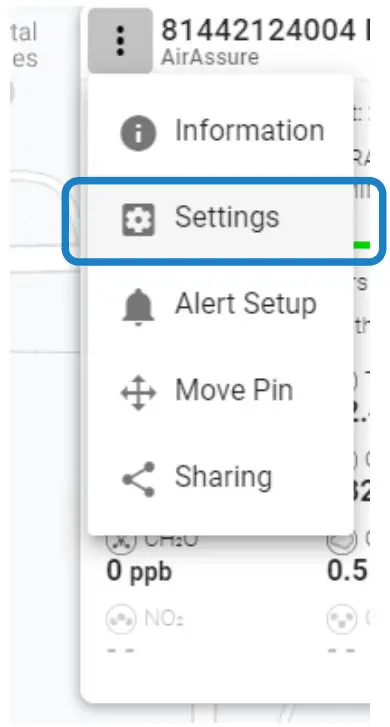
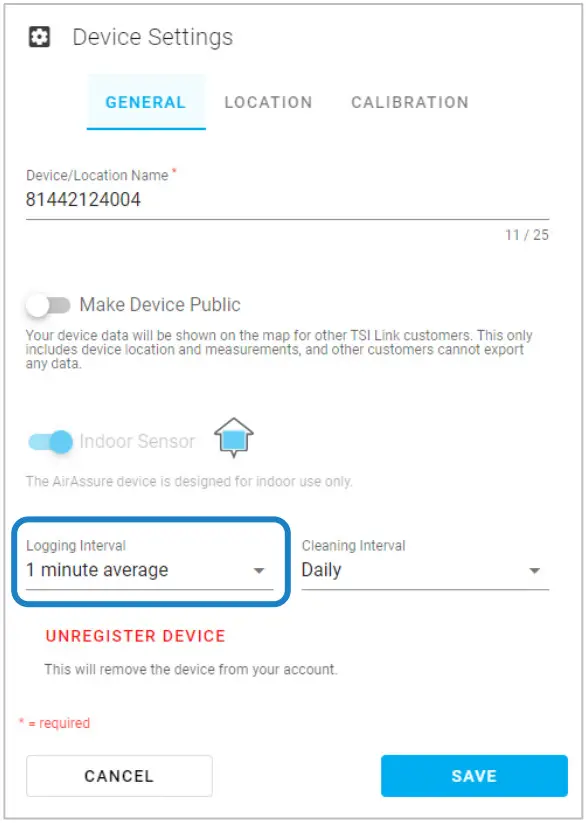
Logging Interval Options and How to Change the Settings
By default, the AirAssure™ Indoor Air Quality Monitor will log a sample (data point) every 15 minutes. Available logging intervals include 1, 5, 10, 15, 30 and 60 minutes. The logging interval can be changed by logging into TSILINK.com and accessing the device settings. Some logging interval options may not be accessible, depending on your TSILINK.com subscription level.
Sampling frequency varies from sensor to sensor for the AirAssure™ Indoor Air Quality Monitor. For example, the PM (particulate matter) sensor samples at a rate of 1 Hz. The logged data that is reported on TSILINK and microSD card, is an average of the 1 second data points. Therefore, if the logging interval is set to every 1 minute, then the logged data is an average of the last 60 data samples. Second by second data is not stored on the microSD card and cannot be obtained or downloaded from the device.
Maintenance
Replacement sensors can be ordered from TSI® Incorporated.
Although sensor life times vary depending on the conditions they are exposed to, conservative recommended replacement intervals are listed below for each sensor:
NOTICE
Recommend replacement intervals are derived from the expected indoor conditions: Temperature (65 to 75°F/18 to 24°C) and Relative Humidity (30 to 50%).
| Item | Part Number | Description | Replacement Interval |
 | 814408 | 2-Gas Variant Sensor Cartridge: tVOC, Temperature, Relative Humidity, and Barometric Pressure | 1 year |
 | 814401 | 4-Gas Variant Sensor Cartridge: CO, tVOC, Temperature, Relative Humidity, and Barometric Pressure | 1 year |
 | 814402 | 6-Gas Variant Sensor Cartridge: CO, 03, tVOC, NO2, and SO2 Temperature, Relative Humidity, and Barometric Pressure | 1 year |
 | 814407 | Membrane Filters (Pack of 3) | Replace when replacing the gas sensors above |
 | 814403 | TSI° Calibrated PM Replacement Sensor | 3 years |
 | 814404 | CO2 Replacement Sensor | 3 years |
 | 814405 | Formaldehyde Replacement Sensor | 1 year |
- Any maintenance should be performed only after powering the unit down by disconnecting the USB cable from the power adapter or removing the unit from the wall and disconnecting the 24 VAC power connector from the back panel.
CAUTION
NEVER open the monitor when it is powered on or connected to the power adapter!
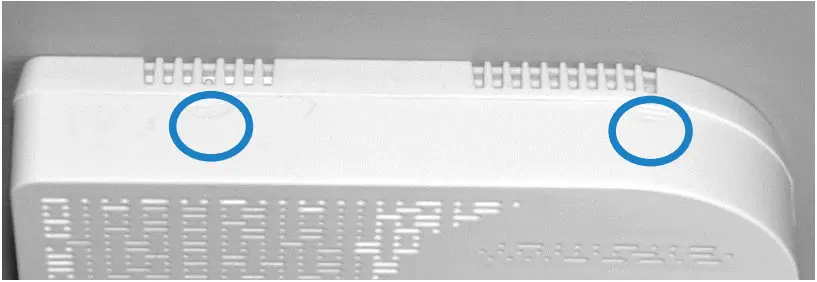
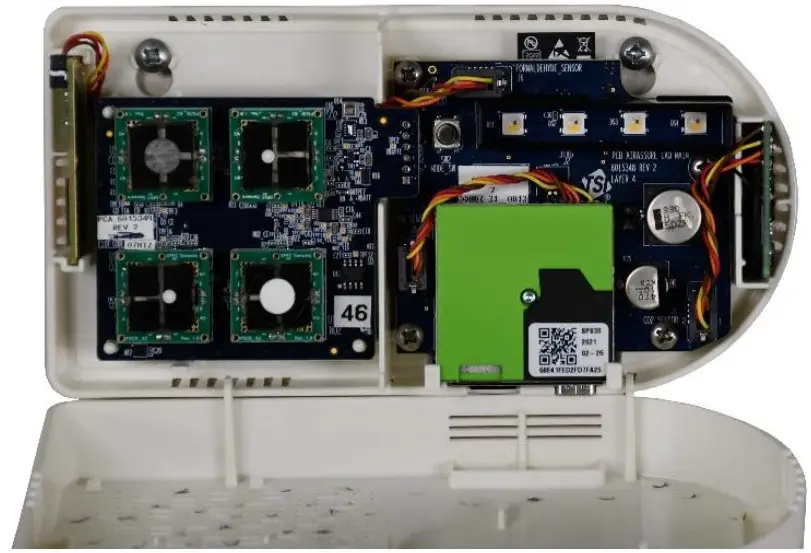
The monitor contains very sensitive sensors that are susceptible to electrostatic discharge (ESD) and ESD precautions should be followed to avoid damage. - There are two indents at the top of the unit indicating where to press down and out to separate the cover from the base. The cover will pivot from the bottom allowing the cover to be removed.

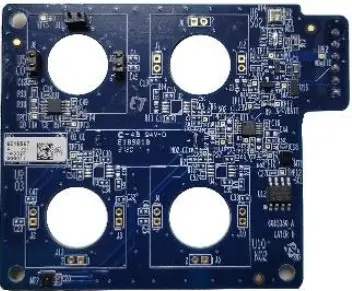
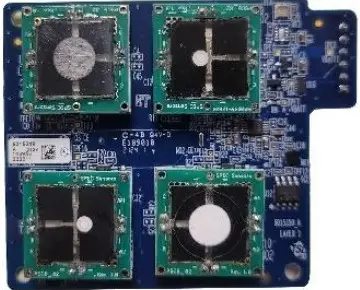
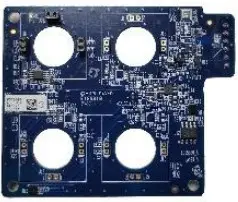
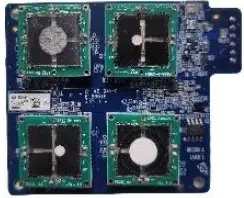
- You can identify the sensors based on the table above andpicture below. Detailed directions follow for each sensor.

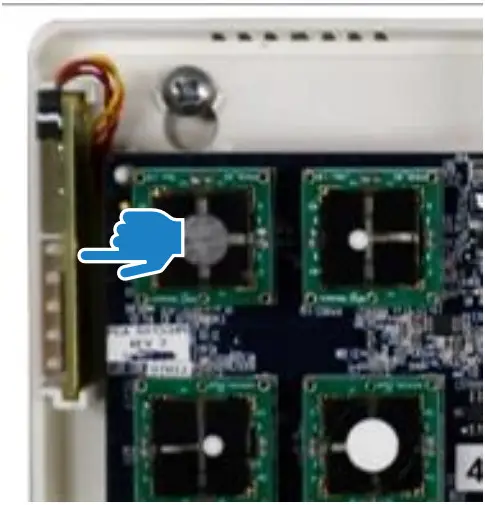
Replacing the Multi-Sensor Cartridge and Membrane
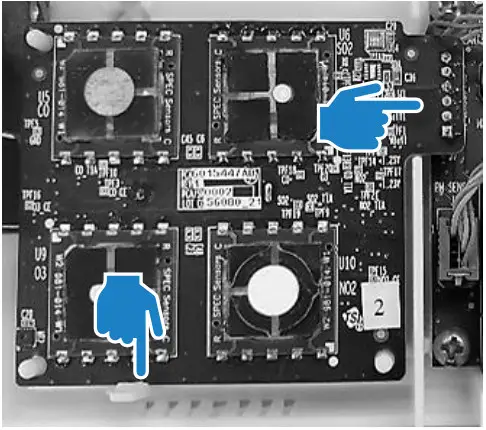
- Release the lever at the bottom-left of the board and lift the bottom of the PC board slightly away from the back panel.
- Pull straight out from the back panel at the top and bottom of the connector on the right until the board is free.
- Replace the old board with the new board.
- Remove the old membrane filter on the cover of the monitor and replace it with a new membrane. This will extend the life of the sensors by protecting them from dust and debris.
- Replace the cover, power up the monitor and connect it to the cloud to register the new sensors and their calibration values.
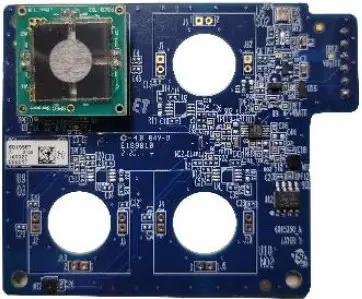
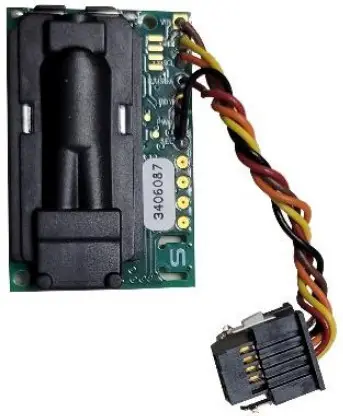
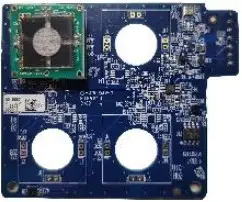
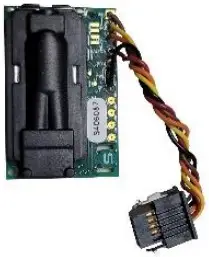
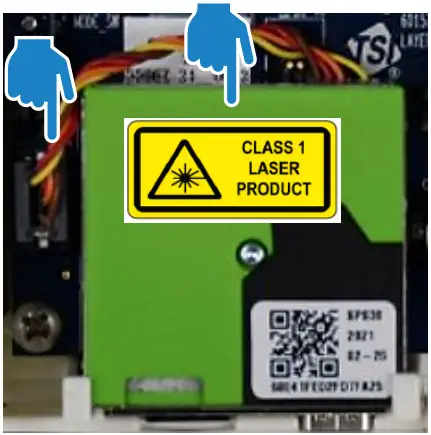
Replacing the PM Sensor
- Unplug the connector on the left by pressing the locking clips in from the top and bottom and pulling the connector straight out.
- Pull the sensor module from the top and pivot it away from the PC board.
- Lift the PM sensor module up and away from the case.
- Reverse the steps for the new sensor.
- Replace the cover, power up the monitor and connect it to the cloud to register the new sensor and its calibration values.

Replacing the CO2 Sensor
- Unplug the connector on the left by pressing the locking clips in from the top and bottom and pulling the connector straight out.
- Pull the sensor module from the top and straight away from the case.
- Reverse the steps for the new sensor.
- Replace the cover, power up the monitor and connect it to the cloud to register the new sensor and its calibration values.

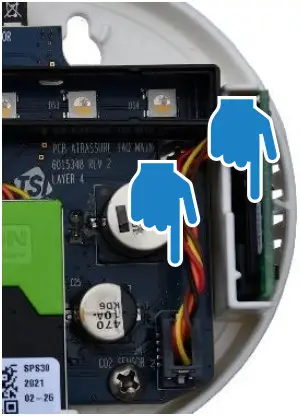
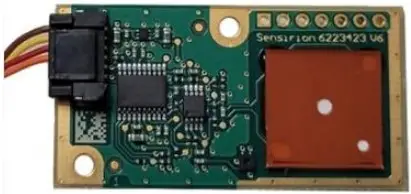
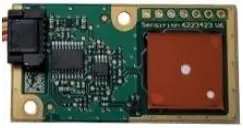
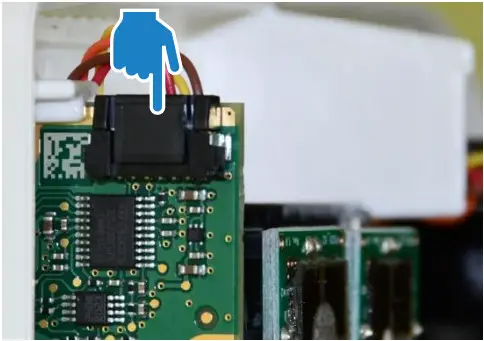
Replacing the Formaldehyde Sensor
- The formaldehyde sensor is located on the left side of the monitor on a separate PC-board.

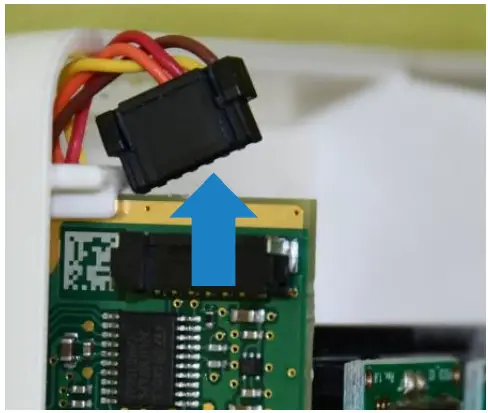
- Depress the back of the cable connector (pushing into the page inthe picture below).

- Pull the connector from the top and up.

- Pull the sensor module PC-board from the top and straight awayfrom the wall. You may have to wiggle it up and down to release.

- Reverse the steps for the new sensor.
- Replace the cover, power up the monitor and connect it to thecloud to register the new sensor and its calibration values.

Troubleshooting
Detailed troubleshooting and frequently asked questions can be found at https://tsi.com/resources/airassure-iaq-monitors-faqs/
The table below lists some symptoms, possible causes, and recommended solutions for common problems encountered with the AirAssure™ Indoor Air Quality Monitor.
| Possible Cause l Corrective Action | |||
| The AirAssure TM IAQ monitor does not turn on | |||
| Bad Power Connection | Check all power connections from the outside of the Enclosure to the Monitor. If you are powering with 24 VAC, confirm that the proper voltage is present or try powering with the USB power supply. If using the USB power supply, try a different power supply and/or cable. | ||
| The AirAssure TM IAQ monitor has no data on the TSI® Cloud | |||
| Check the LED status bar | If the device is not 2 minutes), check connection strength If there is a good Setting Up section | connecting (solid blue after your local 2.4 GHz Wi-Fi® with another device like a phone. signal, follow the directions in the to check the connection. | |
| | | |
| Pulse Yellow | Set up Mode | ||
| Pulse White | Connecting | ||
| Pulse Blue | Connected | Connecting | |
| Solid Blue | Connected | Connected | |
| Solid White | No connection | No connection | |
| Possible Cause | Corrective Action |
| Cannot connect to Wi-Fi® or the internet. | Note that AirAssure™ IAQ monitor can only connect to 2.4 GHz Wi-Fi® signals. Most Wi-Fi® routers provide several frequency channels. Please make sure you are connecting to the 2.4 GHz channel. The monitor does not have the capability to connect to public networks that require a second step of browser authentication, such as a free public hotel or airport network. A different network will need to be chosen. Some corporate networks require the device MAC address for security. This can be found on the serial number label of each monitor. The monitor does not support IEEE 802.1X connections. Additionally, the following firewall ports need to be available: • DNS: 53 (UDP) • SNTP: 123 (UDP) • HTTPS: 443 (TCP) • MQTT: 8883 (TCP) |
PM readings are unusually low
| Plugged with dust or debris | Check the inlet and outlet ports next to the USB connection. If they are plugged, gently blow out debris with clean compressed air. |
| Replace sensor | Sensor may be past its recommended replacement cycle. |
| Possible Cause | Corrective Action |
| PM or gas readings are not correct | |
| Custom calibration factor is incorrect | Check the custom calibration factor on TSI® Link. Is the value correct? Was it changed by mistake? |
| No custom calibration factor | Values can be corrected by using a custom calibration factor. The custom calibration factor can be changed in the cloud. |
| Replace sensor | Sensor may be past its recommended replacement cycle (see maintenance section for recommended |
| replacement cycle times). | |
Appendix A
Specifications*
| Overall | |
| Operating Temp Range | 0 to 40°C (32 to 104°F) |
| Operating Humidity Range | 15 to 95% non-condensing |
| Storage Temperature | 5 to 30°C (41 to 86°F) |
| Case Dimensions | 171 mm x 89 mm x 33 mm 6.75 in. x 3.5 in. x 1.3 in. |
| Weight | 0.23 kg (0.5 lbs.) |
| PM Sensor (PM 2.5) | ||
| Concentration Range | 0 to 1000 pg/m3 | |
| Measurement Resolution | 1 pg/m3 | |
| Counting Efficiency | 50% at 0.3 pm and 98% at 0.5 pm | |
| Accuracy | ±10 % @ 100 to 1000 pg/m3 when compared to a DustTrakTm DRX monitor | |
| Zero Stability | ±1 pg/m3 | |
| Gas Sensors (if installed) | |
| CO2 Range | 400 to 10,000 ppm |
| CO2 Resolution | 1 ppm |
| CO2 Accuracy* | ± 3% of reading + 30 ppm, typical |
| CO2 Sensor Technology | NDIR (Nondispersive infrared) |
| Formaldehyde Range | 0 to 1000 ppb |
| Formaldehyde Resolution | 1 ppb |
| Formaldehyde Accuracy* | ±20% of reading + 20 ppb, typical |
| Formaldehyde Sensor Technology | EC (electrochemical) |
| tVOC Range | 0 to 1885 mg/m3 |
| tVOC Resolution | 0.001 mg/m3 (tVOC) |
| tVOC Sensor Technology | Metal Oxide (i.e., solid state) |
| „Gas Sensors (if installed) | |
| CO Range | 0 to 1000 ppm |
| CO Resolution | 0.1 ppm |
| CO Accuracy* | ±15% of reading or ±15 ppb, whichever is greater |
| CO Sensor Technology | EC (electrochemical) |
| SO2 Range | 0 to 10,000 ppb |
| SO2 Resolution | 1 ppb |
| SO2 Sensor Technology | EC (electrochemical) |
| Ozone Range | 0 to 20,000 ppb |
| Ozone Resolution | 1 ppb |
| Ozone Sensor Technology | EC (electrochemical) |
| NO2 Range | 0 to 20,000 ppb |
| NO2 Resolution | 1 ppb |
| NO2 Accuracy* | ±15% of reading or ±15 ppb, whichever is greater, typical |
| NO2 Sensor Technology | EC (electrochemical) |
*Accuracy based on 40% relative humidity and 21°C temperature
| mperature Sensor | |
| Range | -40 to 125°C (-40 to 257°F) |
| Accuracy | ±0.5°C (±32.9°F) |
| umidity Sensori | |
| Range | 0 to 100% RH |
| Accuracy | ±3% RH |
| Barometric Pressure Sensor | |
| Range | 8 to 35 inHg (270 to 1185 hPa) |
| Accuracy | ± 0.12 inHg (± 4 hPa) |
| AC and DC Power Requirements | |
| 24 VAC Back Panel …………… | 24 VAC, 50/60 Hz |
| USB-C ……………………………… | AC/DC Adapter Input: 100 to 240 VAC, 50 to 60 Hz AC/DC Adapter Output: 5 VDC |
| Power Consumption …………… | < 5 W |
| Environmental/Installation Requirements | |
| Maximum Altitude | 2000 meters (6,560 feet) |
| Pollution Degree | 2 |
| Installation/Overvoltage Category | II |
*Specifications are subject to change without notice.
Status Flags and Error Codes
Below is a table of error codes that may be listed in the sensor status columns of the downloaded CSV file from the cloud and/or SD card.
Any error codes, other than zero, indicate one of the below errors occurred during that logging interval.
The AirAssure™ firmware is taking readings from the sensors usually at a frequency greater than one time per second. What that means is that if an error code is reported, it may have only occurred once during logging interval. For example, a PM sensor error of 16, during a 5 min logging interval, may have only occurred 1 time during the 300 times the firmware was attempting to take a reading from the sensor. Therefore, use best judgement to determine if there is an actual sensor failure. If the device seems to be reporting data accurately, when compared to other AirAssure™ devices and/or a reference device, you may not have to take any action. If needed call TSI® Technical Support and they can help provide direction.
| Type | Value | Definition | Actions/Resolutions |
| Device Status | 0 | No Errors | N/A |
| 1 | Device was rebooted | No action required | |
| 2 | Data was not written to the SD card (SD card not present or write failed) | Confirm SD present and installed properly | |
| 4 | Cloud communication error | No action required | |
| 8 | Sensor board battery is low | If error persists may have to replace entire sensor cartridge, it is not possible to replace the coin battery on the backside of the sensor board |
| Type | Value | Definition | Actions/Resolutions |
| Device Status (cont.) | 16 | Device internal time has not been synced to the cloud in the last 24 hours | If error persists may have to replace entire sensor cartridge, it is not possible to replace the coin battery on the backside of the sensor board |
| 32 | Device internal time value is invalid due to low battery, unpowered device and lack of cloud connection | If error persists may have to replace entire sensor cartridge, it is not possible to replace the coin battery on the backside of the sensor board | |
| 64 | Sensor board EEPROM failure. Some sensors may be disabled. | Replace sensor board | |
| Sensor Status Messages (for all sensor types, such as CO2, NO2, O3, CH2O, Temp/RH, PM, etc.) | 0 | No errors | N/A |
| 1 | Sensor is not factory calibrated | Replace sensor with factory calibrated sensor | |
| 2 | Sensor hardware fault | Power cycle device. Disconnect power and check sensor connections to ensure sensor cables are in good working condition and sensors are plugged in. If error persists, replace individual sensor or complete sensor cartridge | |
| 4 | Sensor communication error | Power cycle device. Disconnect power and check sensor connections to ensure sensor cables are in good working condition and sensors are plugged in. If error persists, replace individual sensor or complete sensor cartridge |
| Type | Value | Definition | Actions/Resolutions |
| Sensor Status Messages (cont.) | 8 | Sensor checksum (data corruption) error in data | Power cycle device. Disconnect power and check sensor connections to ensure sensor cables are in good working condition and sensors are plugged in. If error persists, replace individual sensor or complete sensor cartridge |
| 16 | Data not available | Power cycle device. Disconnect power and check sensor connections to ensure sensor cables are in good working condition and sensors are plugged in. If error persists, replace individual sensor or complete sensor cartridge | |
| PM Sensor Only (Additional Status Messages) | 128 | Skipped | N/A |
| 256 | Fan RPM error | If problem persists, replace PM sensor | |
| 512 | Laser error | If problem persists, replace PM sensor | |
| 1024 | Fan blocked | Check for blockage on PM sensor, remove blockage if possible, otherwise replace PM sensor. | |
| 2048 | Cleaning cycle completed | Not an error. Informational only. |
NOTICE
It is also possible that more than one error may occur during the logging interval. If this occurs, the codes are added together to produce the final code. Use math to determine what the individual codes are.
Examples:
Device status =
Reported Code = 3
3 = 1 + 2 = “Device was rebooted” + “Data not written to SD card”
Reported Code = 17
17 = 1 + 16 = “Device was rebooted” + “Device internal time has not been synced to the cloud in the last 24 hours”
TSI Incorporated – Visit our website www.tsi.com for more information.
USA Tel: +1 800 680 1220
UK France
Tel: +44 149 4 459200
Tel: +33 1 41 19 21 99
Germany Tel: +49 241 523030
India Tel: +91 80 67877200
China Tel: +86 10 8219 7688
Singapore Tel: +65 6595 6388
P/N 6015658 Rev. H (US)
©2023 TSI Incorporated
Printed in U.S.A.