![]() M505T 15.6-Inch 16:9 Portable Multi-Touch LCD Monitor
M505T 15.6-Inch 16:9 Portable Multi-Touch LCD Monitor
User Manual
 https://www.facebook.com/GeChicGlobalOfficial/
Notices, Cautions& Warranty Exclusions
Warning: The sign ![]() alerts you to potential hazards that can hurt you or damage the product.
alerts you to potential hazards that can hurt you or damage the product.
 When carrying On-Lap Monitor, please put it into the Folding Sleeve (Optional). Avoid hitting or press the monitor violently, these may cause the touch glass and panel cracked.
- When plugging in/out the cables, do make sure the force exerts in horizontal direction- do not shake the port or plug it in vertical direction. Any damage caused by wrong plugging is excluded from the warranty coverage .
- The power input specification for On-Lap monitor is 5V 2A DC current. If the input voltage is more than 5V, the monitor will become damaged seriously, and this will void GeChic manufacturer’s warranty. We suggest you to connect both connectors of the USB power cable to the USB ports on your PC or use GeChic 5V 2A adapter.
- It is recommended to use the monitor in a well-ventilated environment at room temperature around 5℃ to 35℃ and humidity around 45% to 85%. The monitor should display continuously changing images rather than displaying the same and a still image for a long time. If you need to use this monitor in an abnormal environment such as high temperature, high humidity, confined space, low atmospheric pressure, etc., please contact Gechic customer service center for further advice on usage environment.
- Cleaning On-Lap Monitor Unplug the power input before cleaning. Please use soft cloth to clean touch screen. For stubborn stains, please use lightly-dampened cloth to wipe again. Do not use benzene, alcohol, thinner, ammonia, abrasive cleaners, compressed air or other corrosive solvents. These solvents may cause permanent damage on the screen or leave non-removable stain.
- Do not expose the LCD panel to sunlight.
- Please do not use the monitor on a lasting shaky or unstable surface. Do not use the On-Lap Monitor on a moving vehicle.
- The product is not waterproof. Do not use this product in or near water.
- Do not insert any object into the slots or gaps on the product. Do not disassemble the monitor in any way.
- High Volume Warning: High volume can lead to lasting damage to your hearing. Please check the volume settings before reproducing any sound.
- Overuse of the monitor may result in vision damage. For every 30 minutes with the monitor, give your eyes 10 minutes break. Avoid children under age 2 to watch with the monitor; prevent children over age 2 from watching with the monitor over 1 hour per day.
- Exclusions from Warranty Service
Please read the warranty terms below carefully, and follow the usage guide and precautionary notes. Please keep this manual for future reference. GeChic does not warrant uninterrupted or error-free operation of this Product. The warranty only covers failure /malfunction under normal use conditions during warranty period. The warranty does not apply to the following conditions:
(1). The bar code has been removed or worn down, and cannot be identified.
(2). This product has been modified, disassembled, or refitted.
(3). Display and touch function working normally; only variation in appearance (i.e., ageing, attrition, scratch, color changing and etc.).
(4). Any breakdown caused by power supply. (i.e., inputting power over 5V or unsteady current)
(5). Any damage caused by disoperation or failure to follow this manual. (i.e., Plug or unplug the cable in wrong direction and causing damage on cable or monitor.)
(6). Any damage caused by hitting or cracking monitor accidentally or purposely, or collapsing or overturning monitor.
LCD Pixel Statement
There is slightly uneven brightness on the screen when displaying different screen pattern. The LCD screen has 99.99% or more effective pixels. 0.01% of pixels or less may not light or may light incorrectly. The On-Lap monitor uses a high quality LCD panel. Nevertheless, pixels on the LCD screen may not light or appear as red or black dots. All the above are normal with the LCD monitor and will not affect the normal usage of the product.
Avoid placing the monitor against sun-light, or it may damage the monitor. An afterimage of the previous screen may remain, when the same image is displayed for hours. In this case, the screen is recovered slowly by turning off the power for a few hours.
Federal Communications Commission (FCC) Class B Statement
Notice: This equipment has been tested and found to comply with the limits for a class B digital device, pursuant to part 15B of the FCC Rules. These limits are designed to provide reasonable protection against harmful interference in a residential installation.
If this equipment does cause harmful interference to radio or television re- ception, which can be determined by turning the equipment off and on, the user is encouraged to try to correct the interference by one or more of the following measures:
- Reorient or relocate the receiving antenna.
- Increase the separation between the equipment and receiver.
- Connect the equipment into an outlet on a circuit different from that to which the receiver is connected.
- Consult the dealer or an experienced radio/TV technician for help.
Caution:
- Changes or modifications not expressly approved by GeChic Corp. could void the user’s authority to operate the equipment.
- Shielded interface cables and AC power cord, if any, must be used in order to comply with the emission limits.
- The manufacturer is not responsible for any radio or TV interference caused by unauthorized modification to this equipment. It is the responsi- bilities of the user to correct such interference.
CE Declaration of Conformity
This product complies with the following standards:
- EN 55032:2015/AC:2016 Class B (Radio Disturbance requirement of Information Technology Equipment).
- EN55024:2010+A1:2015(Immunity requirement of Information Technology Equipment).
- EN 61000-3-2:2014 (Harmonic current emissions).
- EN 61000-3-3:2013 (Voltage fluctuations & flicker) following provisions of directives applicable.
- AS/NZS CISPR 32: 2015
- 2014/30/EU (EMC Directive).
WEEE Symbol Information This symbol on the product, accessories or literature indicates that this product and its electronic accessories (e.g., adapter, cables) must not be disposed of with your other household waste. Instead, it is your responsibility to dispose of these items by handing it over to a designated collection point for the recycling of waste electrical and electronic equipment.
For more information about where you can drop off your waste equipment for recycling, please contact your local city office, your household waste disposal service or the shop where you purchased the product.
For Disposal in Countries Outside of the European Union
If you wish to discard this product and its accessories in other area and countries, please contact your local government for applicable laws and regulations governing the disposal of this product.
Parts of On-Lap Product & Accessories
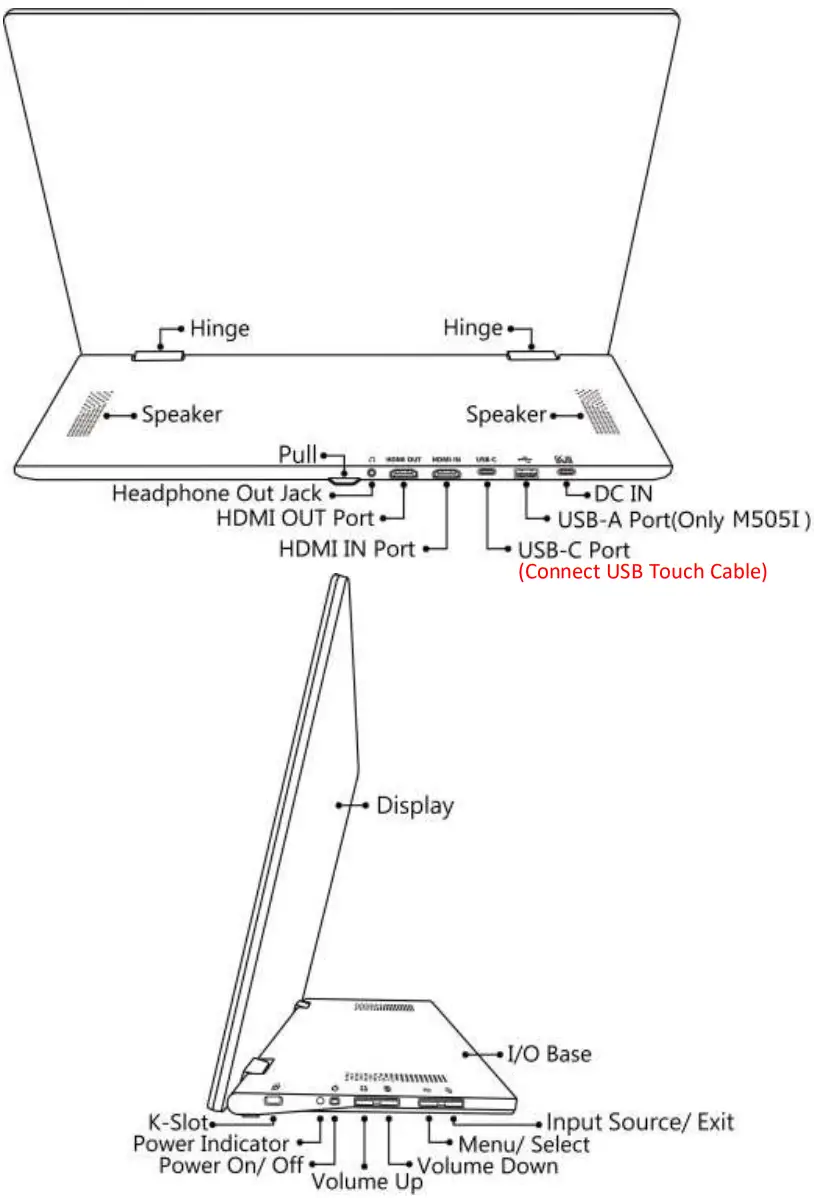
Section 1 Parts Description
Section 2 Accessories Description
| Standard Accessories | M505T | M505I |
| HDMI-A Video Cable(1.2m) | ||
| USB Type-C Video Cable(1m) | ||
USB-A to USB-C Power & Touch Signal Cable(1.2m) 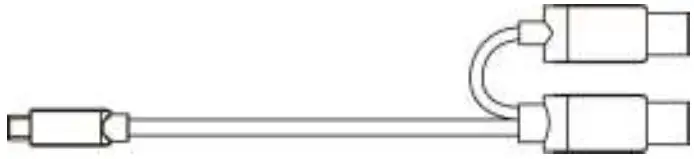 | ||
5V 2A Power Adapter 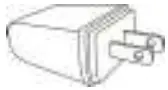 | − | |
65W PD Power Adapter & Power Cord 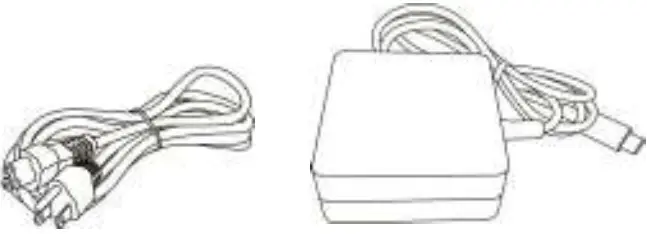 | − | |
M505T/I Folding Sleeve 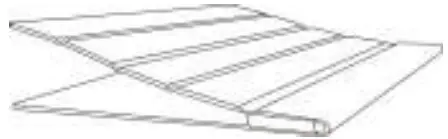 | − |
| Optional Accessories | Description |
| M505 VESA 100 Aluminum Alloy Bracket | Screw M505 monitor to VESA 100 arm or wall mount by the 4 VESA 100 screw holes on the bracket. Refer to Chapter 2> Section 7 |
| M505T/I Folding Sleeve | To store touch monitor and protect the screen while carrying the monitor. After folding the sleeve, it is able to be a stand to prop up the touch monitor or used as a laptop stand. |
| USB Type-C Video Cable(2m) | One plug is for USB-C(DP Alt) port of PC, the other plug is for On-Lap M505 to transmit video, power and touch signals. |
| USB-A to USB-C Power & Touch Signal Cable (2.1m) | One plug is USB-A (male) for USB port of PC, power adapter, or power bank; the other plug is USB-C (male) for connecting to On-Lap M505 monitor. |
| Micro-HDMI to HDMI-A Video Cable (2.1m) | One plug is micro HDMI (male) for connecting to cam- era/ PC; the other plug is HDMI-A (male) for connecting to On-Lap M505 monitor. |
| mini-HDMI to HDMI-A Video Cable (2.1m) | One plug is mini-HDMI (male) for connecting to camera; the other plug is HDMI-A (male) for connecting to On-Lap M505 monitor. |
Installation Instructions
Section 1 Setup of M505 Monitor & Use of M505T/I Folding Sleeve
- Set Up M505 Monitor and Adjust the Angle
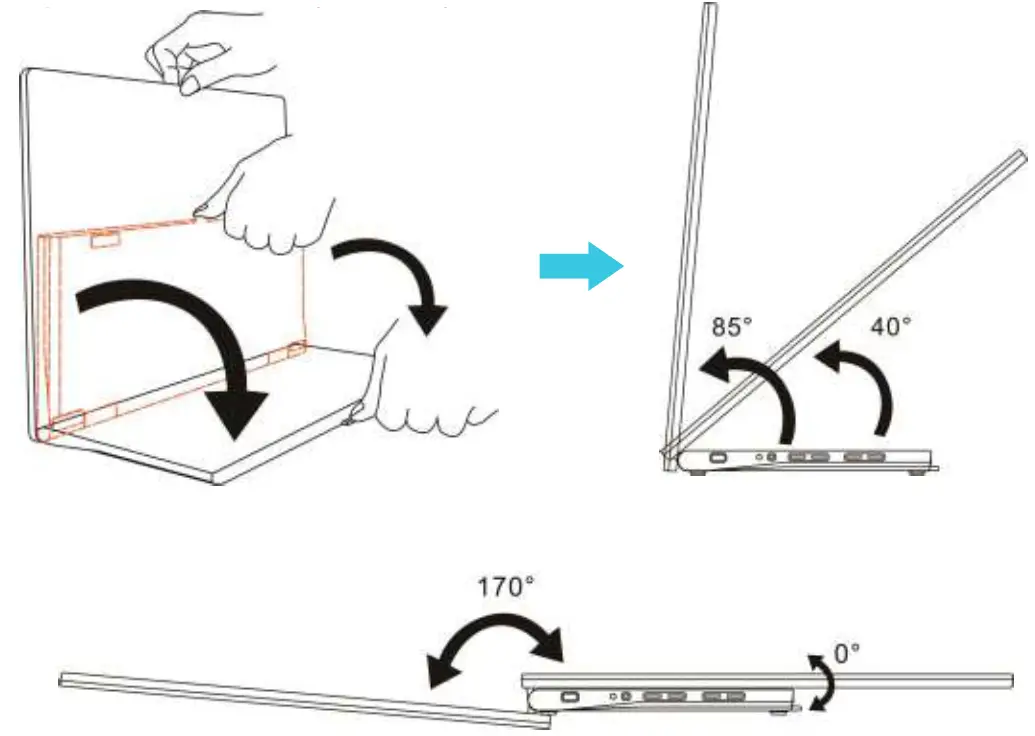
In the Fig. shown, erect the monitor on the desk. Hold the display by one hand and hold the pull of the I/O base to pull down the I/O base by the other hand. When the base is placed on the desk flat, adjust the screen angle between 40° and 85°.
Do not set up the monitor more than 90°. When angle is more than 90°, the monitor will overturn forward, causing the panel crack. When the display angle is less than 40°degrees, the monitor may fall slowly to 0°. Warning: The rotation range of the hinge is between 0° to 170°. Please do not rotate it more than 170°, otherwise the monitor may be damaged or cracked.
 - Instruction of M505T/I Folding Sleeve (Optional for M505T)
In the Fig. shown, use the sleeve in the following 3 ways:
A. Protective Sleeve: Put the monitor into the sleeve to store the monitor.
B. Monitor Stand: Fold the folding back cover to make a triangle, prop up the display stably while touching it.
C. Laptop Stand: Place the laptop on the sleeve to elevate the laptop.

Section 2 Connect to MacBook Pro/Air, Laptop or Smartphone by the USB Type-C Port
The computer, smartphone, etc. for USB Type-C connection must meet the following conditions:
- Supports DisplayPort Alternate Mode. (USB Type-C (DP Alt Mode))
- Supplies at least 5V 2A power current. If the smartphone or the devices can’t supply 5V 2A current to the monitor, please power the monitor by the adapter.
- Power the Monitor by a Computer
Inset USB Type-C Video Cable (1m) into the USB Type-C ports on the monitor and the computer. The computer outputs current, video signals and touch signals via its USB Type-C port, therefore, there is no more adapter or HDMI cable required. Caution: Only these computers/smartphones supporting external touch signal works touch function of M505T/I. Apple® computers (i.g., MacBook Pro/ Air and iPad Pro, etc.) all don’t support external touch signals so they can’t use M505T/I touch function.
 - Power M505T Monitor by the 5V 2A Adapter (Apply to Smartphone)
Please follow the steps below for connection.
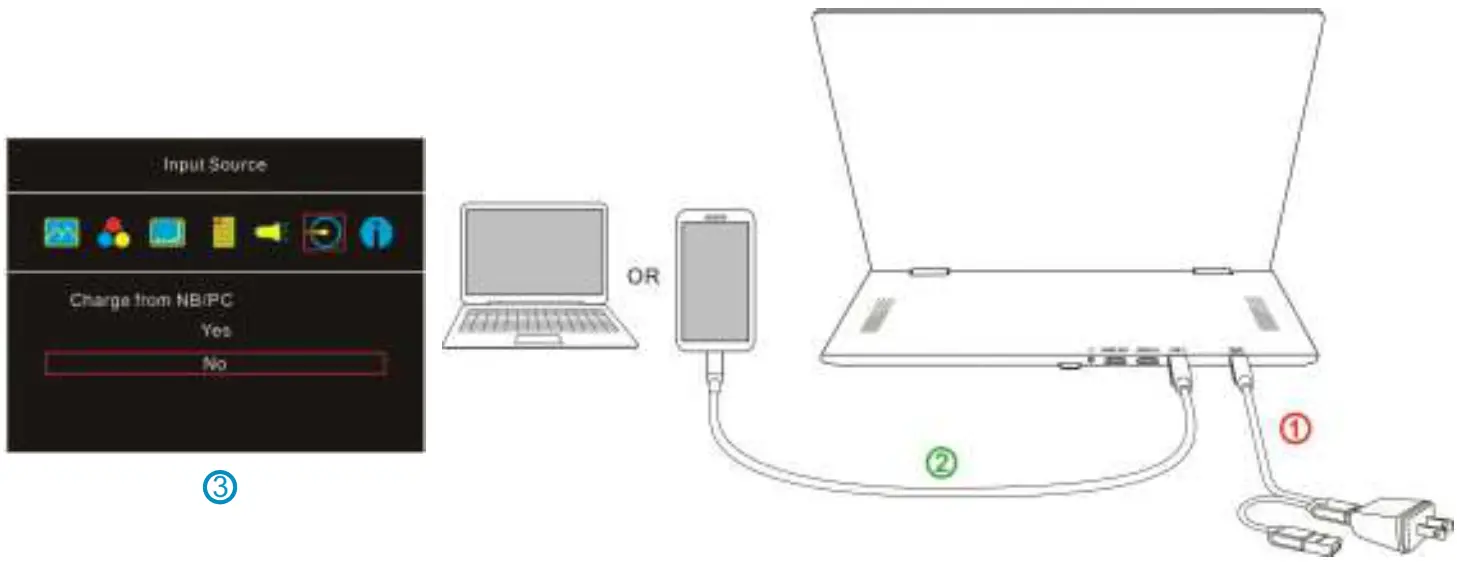
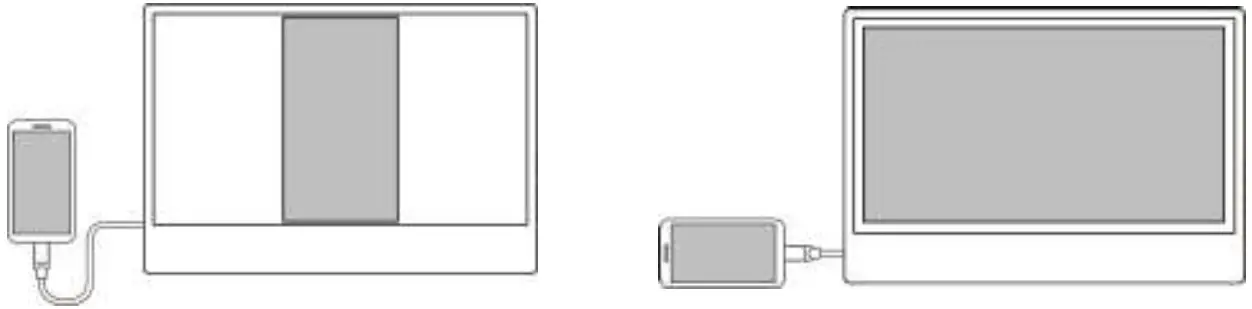
①. Use 5V 2A Power Adapter and USB-A to USB-C Power& Touch Signal Cable(1.2m) to connect to DC IN port on M505T monitor. (For M505I, please refer to Section 3 to connect the 65W PD power adapter.)
②. After turning on the smartphone or computer, connect M505 to computer/smartphone by USB Type-C Video Cable(1m).
③. To make smartphone not output current to the monitor, please enter the OSD menu> Input Source and select “No” for “Charge from NB/PC” so that M505 doesn’t receive current through USB-C port. Next, connect 5V adapter to the DCI IN port on the monitor and the monitor will turn on.

Notice
- In this case, the monitor can’t charge the smartphone.
- When the smartphone displays content in portrait, the mirrored image displays in the center part of the monitor. The full-screen display only shows when rotating the smartphone screen to landscape.
Section 3 Description of M505I Proprietary Functions Charge the Smartphone or Computer (Not Apply to M505T)
①. Connect the 65W PD Power Adapter to the DC IN port on M505I monitor.
②. After turning on the smartphone or computer, connect M505I to the smartphone/computer by USB Type-C Video Cable (1m). Upon a successful connection, the monitor displays the image from the smartphone/computer and charge the smartphone/computer simultaneously. 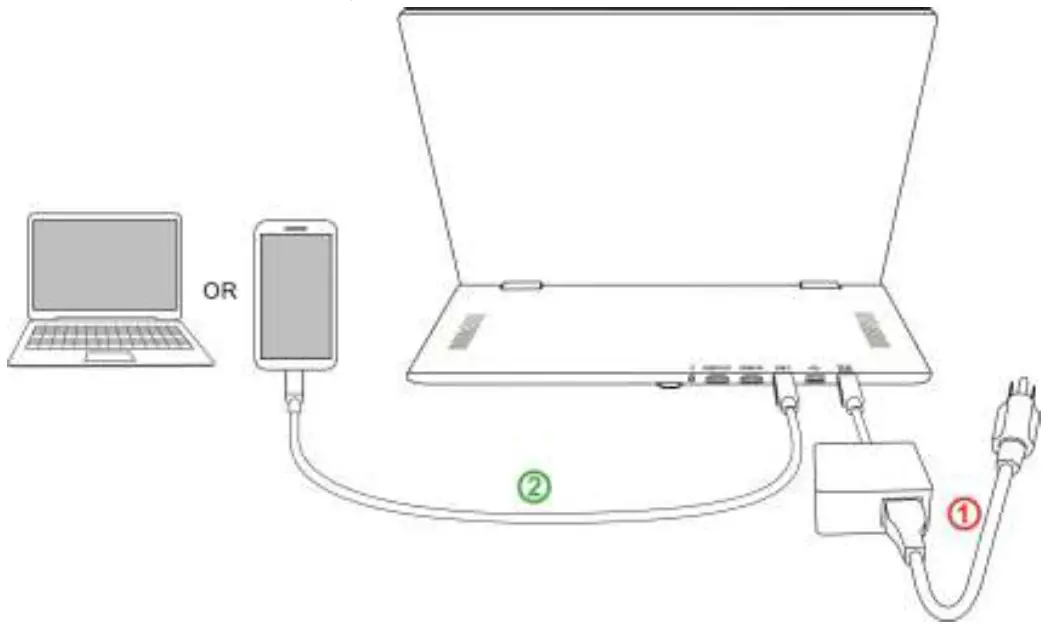
![]() Notice: The 65W PD power adapter shall be connected to M505I so that M505I can supply power to the laptop. If the monitor connects to a PD power adapter supporting less than 65W(e.g., The power adapter of MacBook Air® or Nintendo Switch®), M505I can’t power the laptop. The maximum power output of the monitor is 20V 2.25A. If the power requirement of the computer is more than 45W, a fail connection between the monitor and the computer may occur due to insufficient power . If so, please turn off the monitor, unplug the 65W PD power adapter and USB-C video cable. Refer to Chapter 2> Section 2> Point 1 to power the monitor by the computer.
Notice: The 65W PD power adapter shall be connected to M505I so that M505I can supply power to the laptop. If the monitor connects to a PD power adapter supporting less than 65W(e.g., The power adapter of MacBook Air® or Nintendo Switch®), M505I can’t power the laptop. The maximum power output of the monitor is 20V 2.25A. If the power requirement of the computer is more than 45W, a fail connection between the monitor and the computer may occur due to insufficient power . If so, please turn off the monitor, unplug the 65W PD power adapter and USB-C video cable. Refer to Chapter 2> Section 2> Point 1 to power the monitor by the computer.
2. USB-A Port Description (Not Apply to M505T)
Connect 65W PD Power Adapter to the DC IN port on the monitor. Insert USB Type-C Video Cable(1m) into the USB Type-C (DP Alt) ports on the monitor and computer. And then, connect a mouse or keyboard to the USB-A port on M505I monitor, the signal will be transmitted to the computer or smartphone through the monitor.![]() The maximum power output of the USB-A port on the monitor is 5V 500mA. Please do not charge the devices with power requirement more than 500mAh via the USB-A port.
The maximum power output of the USB-A port on the monitor is 5V 500mA. Please do not charge the devices with power requirement more than 500mAh via the USB-A port.
3. Connect to Nintendo Switch® by USB Type-C (No Touchscreen Function)
Nintendo Switch® doesn’t support external touch signals so it is unable to use the touch function of M505I monitor.
In the Fig. shown, ① insert the 65W PD Power Adapter into the DC IN port on M505I.
② Turn on the Switch® console first, and then use USB Type-C Video Cable(1m) to connect the monitor to Switch® console. Upon a successful connection, the monitor displays the image from Switch® and charge Switch® console simultaneously.
(Not Apply to M505T) 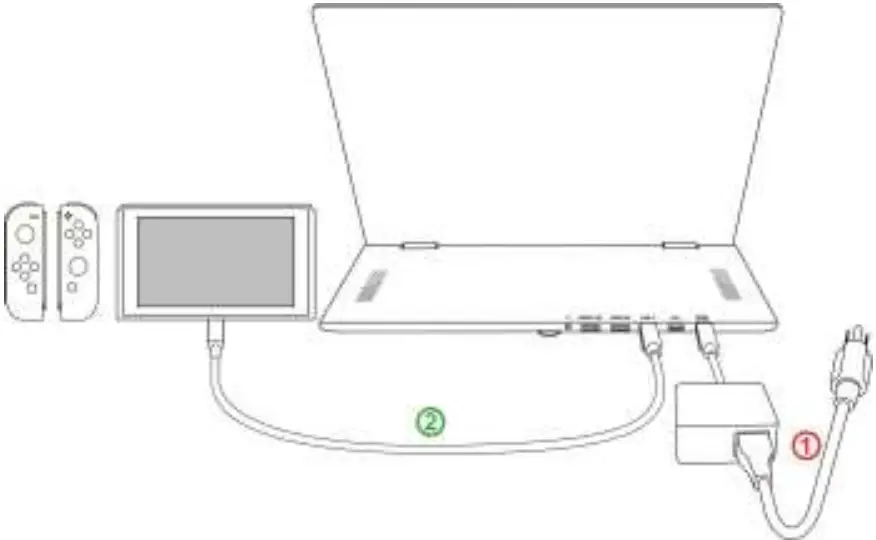
![]() Notice 1: To use Joy-Con while Switch® console outputs video signals to the monitor, please detach Joy-Con controllers from Nintendo Switch® console.
Notice 1: To use Joy-Con while Switch® console outputs video signals to the monitor, please detach Joy-Con controllers from Nintendo Switch® console.![]() Notice2: After finishing the games, please unplug the USB Type-C video cable and then turn off Switch® console. Otherwise, the battery power of Switch® will run out gradually. Since the power supply is interrupted, the Switch® console will boot automatically and run out all the battery power by time.
Notice2: After finishing the games, please unplug the USB Type-C video cable and then turn off Switch® console. Otherwise, the battery power of Switch® will run out gradually. Since the power supply is interrupted, the Switch® console will boot automatically and run out all the battery power by time.![]() Notice 3: When Switch runs out of power, it cannot be connected to the monitor. Please insert the 65W PD power adapter into Switch® console to charge it for 10 minutes and then connect to monitor by following the steps above.
Notice 3: When Switch runs out of power, it cannot be connected to the monitor. Please insert the 65W PD power adapter into Switch® console to charge it for 10 minutes and then connect to monitor by following the steps above.
Section 4 Connect to Computer by the HDMI IN Port![]() Notice: The USB-C Port (with
Notice: The USB-C Port (with ![]() symbol) on the PC doesn’t support PD power specification, which means the USB port cannot provide sufficient power to M505 monitor. The monitor may not be turned on.
symbol) on the PC doesn’t support PD power specification, which means the USB port cannot provide sufficient power to M505 monitor. The monitor may not be turned on.
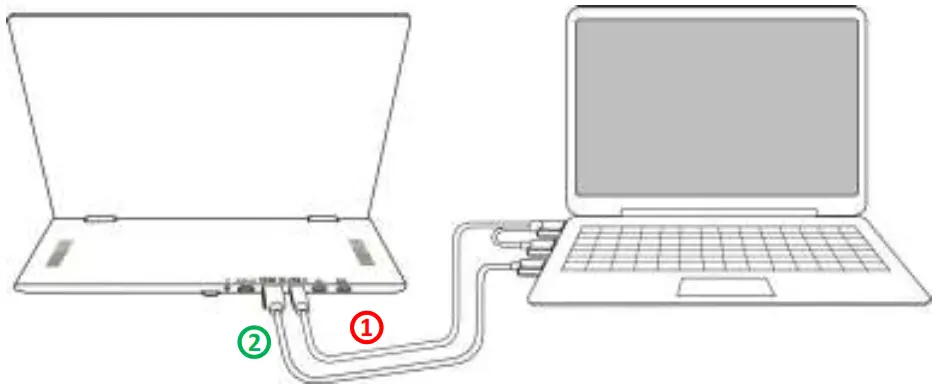
- Connect to USB-A Port on a PC to Transmit Power and Touch Signals
 ①. Insert both USB-A connectors of USB-A to USB-C Power& Touch Signal Cable(1.2m) into the USB-A ports on the PC and insert USB-C connector into the USC-C port on M505(Not DC IN port). (Caution: If only connecting to single USB-A port on the PC, M505 may not boot due to insufficient power.)
○2 Insert HDMI-A Video Cable(1.2m) to connect computer and the HDMI IN port on the monitor. - Use Power Adapter to Transmit Power
①. Use 5V 2A Power Adapter and USB-A to USB-C Power& Touch Signal Cable(1.2m) connect to the DC IN port on M505T.(For M505I, please refer to Section 3 for connecting the 65W PD power adapter.)
②. Insert HDMI-A Video Cable(1.2m) to connect computer and the HDMI IN port on M505 monitor.
③. Use USB Type-C Video Cable(1m) to connect to the USB-C ports on the PC and the monitor for transmitting touch signal. Caution: Please DO NOT connect to HDMI OUT port.
 ①. Insert both USB-A connectors of USB-A to USB-C Power& Touch Signal Cable(1.2m) into the USB-A ports on the PC and insert USB-C connector into the USC-C port on M505(Not DC IN port). (Caution: If only connecting to single USB-A port on the PC, M505 may not boot due to insufficient power.)
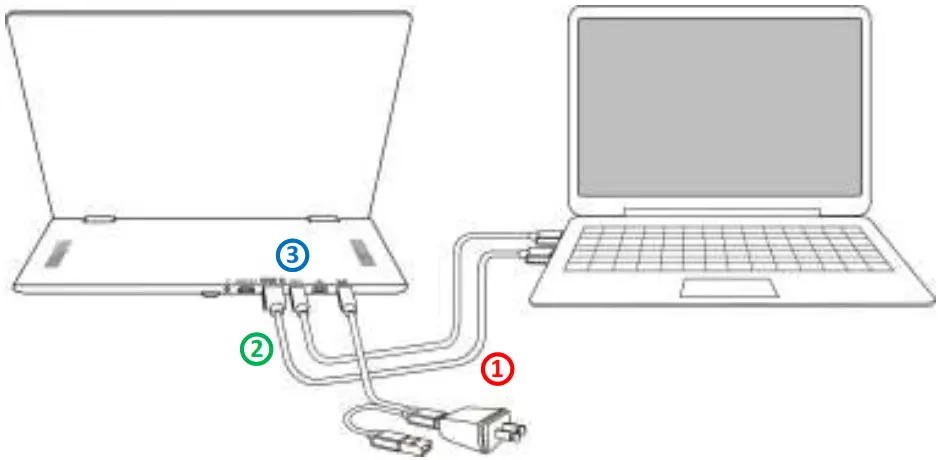
Section 5 Use the HDMI OUT Port![]() Notice 1: As the image is input by HDMI IN port, the HDMI OUT port can output the same image. The HDMI OUT port can’t output the image from USB Type-C port.
Notice 1: As the image is input by HDMI IN port, the HDMI OUT port can output the same image. The HDMI OUT port can’t output the image from USB Type-C port.![]() Notice 2: When using HDMI OUT ports to connect multiple monitors, all the monitors are able to display the same image only, not different images.
Notice 2: When using HDMI OUT ports to connect multiple monitors, all the monitors are able to display the same image only, not different images.
Connect to a Projector
It is able to synchronize the image of M505 with the projector by the HDMI OUT port on M505 monitor. The speaker watches M505 monitor and the audience watches the projector screen.
Please refer to the steps in Section 4 to connect the ① power adapter, ② HDMI-A video cable, ③ USB-C cable and then ④ use second HDMI-A Video Cable (Optional) to connect the HDMI OUT port on the monitor and HDMI IN port on the projector. 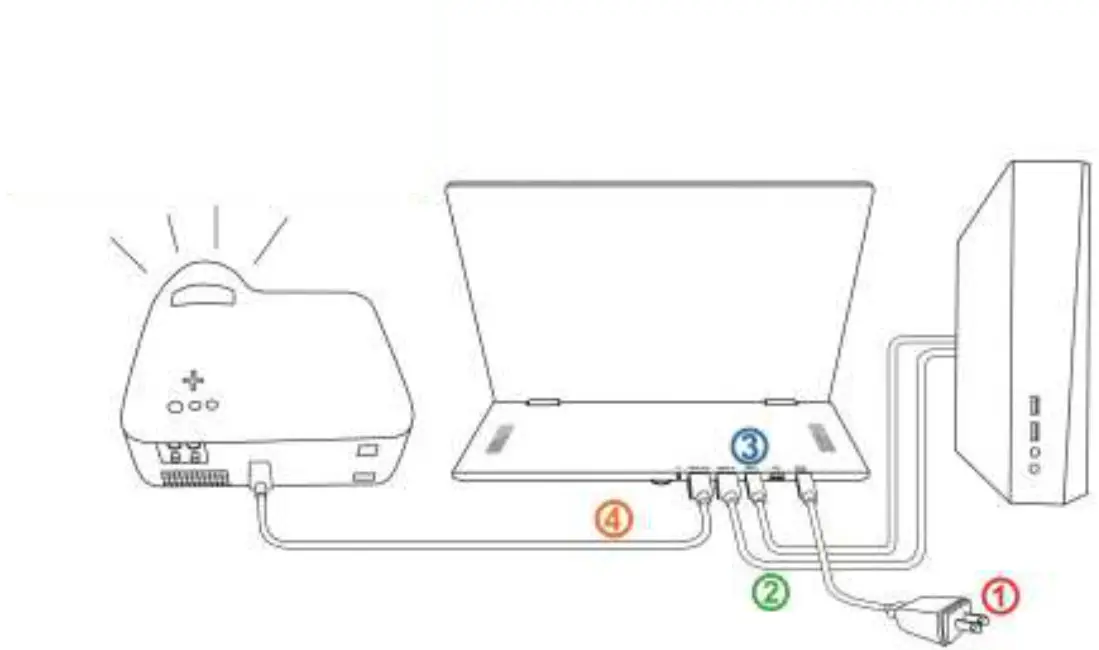 Section 6 Connect to Headphones or Speakers
In the Fig. shown below, connect the headphones or external speakers to the headphone jack on the monitor.![]() Notice: Headphone Out port supports 2-channel audio output. Please DO NOT plug in microphone audio input cable (Audio in). If the sound format of PC or game console is 5 or 7 channels, it may cause the headphones not be able to output all sounds (e.g., the vocals disappear in the game). Please select 2-channel audio output in the sound settings of PC or game console.
Notice: Headphone Out port supports 2-channel audio output. Please DO NOT plug in microphone audio input cable (Audio in). If the sound format of PC or game console is 5 or 7 channels, it may cause the headphones not be able to output all sounds (e.g., the vocals disappear in the game). Please select 2-channel audio output in the sound settings of PC or game console. 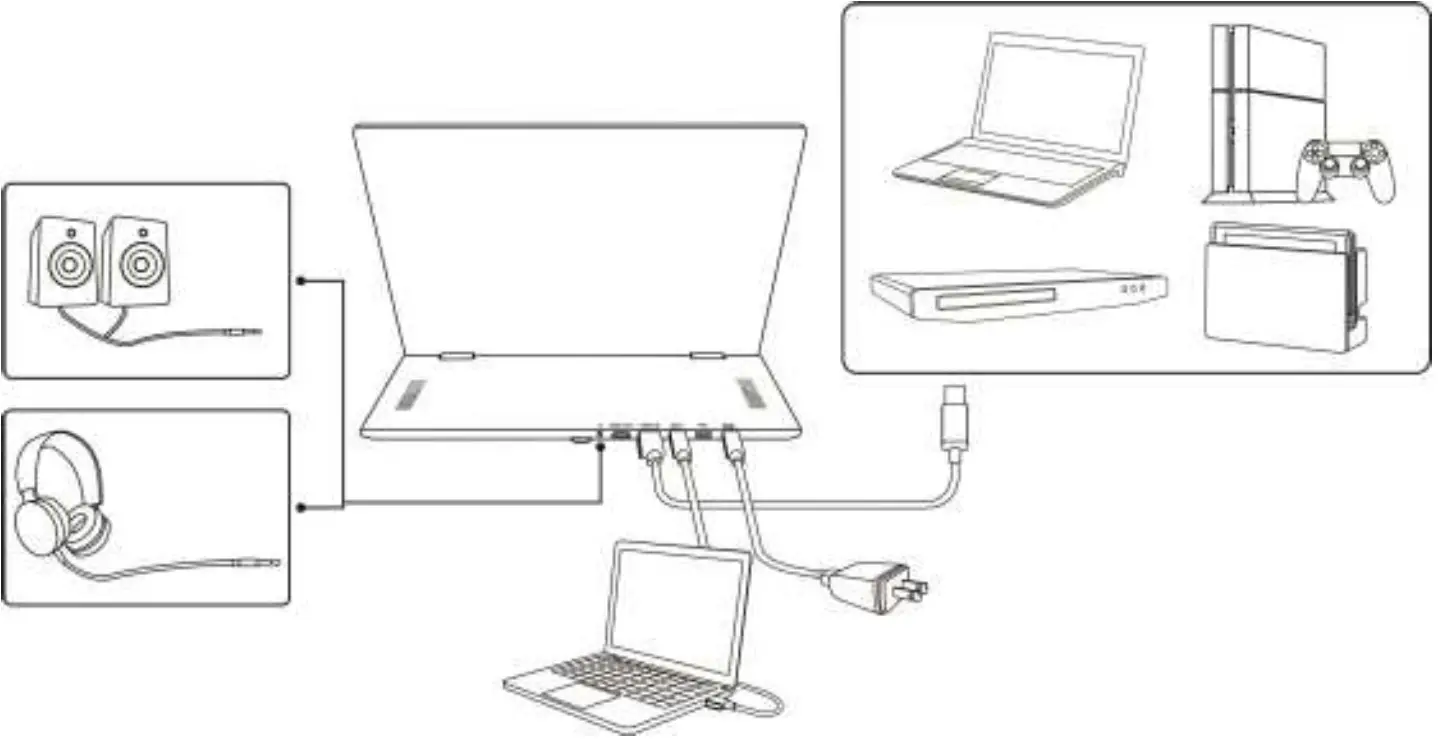
Section 7 Installation of VESA 100 Arm or Wall Mount
Please follow the steps below to assemble. 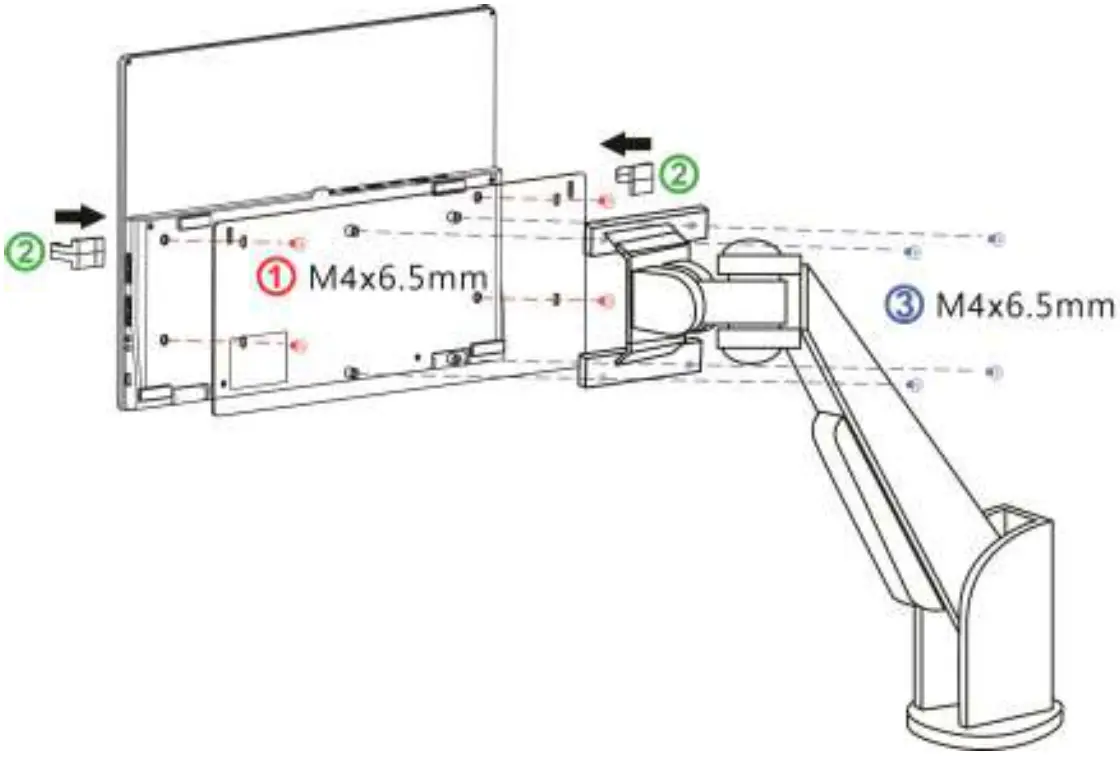
- Screw the M505 VESA 100 Bracket (Optional) to the I/O base of the monitor by 4 M4 screws.
- Clip the monitor screen and VESA 100 aluminum alloy brackettogether by two clips to prevent the screen from falling down.
- Screw M505 VESA 100 bracket onto a monitor arm or wall mount by 4 M4 screws.
Section 1 Hot Keys & LED Indications
Do not press any two shortcut keys at the same time, otherwise the buttons may not respond or react incorrectly.
- LED Light Description
It shows green light when On-Lap Monitor turns on and shows red light when it stands by. There is no light when the monitor is off. - Hot Keys Description

Power Press power button to turn on/off the monitor. 
Input Source/ Exit Press this button to show “Input Source” and then press  to switch the input sources. When using the OSD menu, press this button to return to previous page.
Menu/Select Press this button to launch OSD panel. When using OSD menu, press this button to select and enter the next page. Increase Volume/Next Press this button to show “Volume bar”. Press and hold this button to increase the volume continuously. In the OSD menu, press this button to move down or to the right. 
Decrease Volume/Previous Press this button to show “Volume bar”. Press and hold this button to decrease the volume continuously. In the OSD menu, press this button to move up or to the left. 
Reset Press both “Exit” and “Decrease Volume/Down” at the same time and OSD will be reset as the factory settings.
Section 2 OSD Menu Description
When turning on monitor at the first time, the “Language Select” menu appears on the right top. Please press ” Menu/Select ![]() ” button to choose a language, then the “Language Select” menu won’t appear next time.
” button to choose a language, then the “Language Select” menu won’t appear next time.
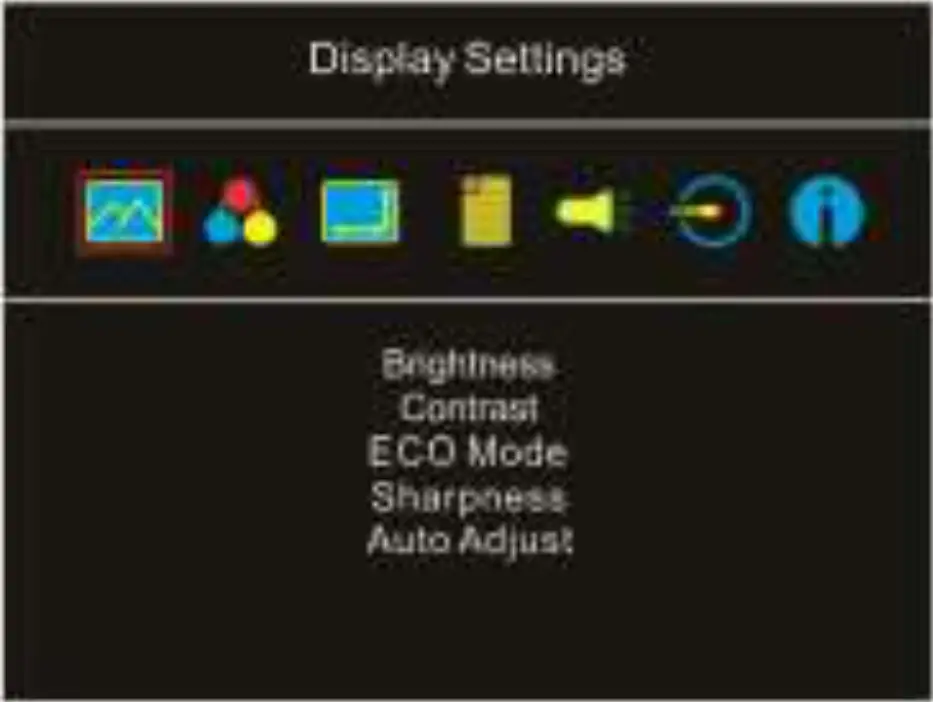
- Display Settings
In the Fig. shown right, enter “Display Settings” to adjust “Brightness”, “Contrast”, “Sharpness”, etc.
(1) ECO Mode: The maximum brightness is at 50 in ECO Mode.
(2) Auto Adjust: Launch “Auto Contrast Adjust” and “Auto Brightness Adjust” to adjust brightness and contrast automatically to ensure the highest quality when displaying moving images.
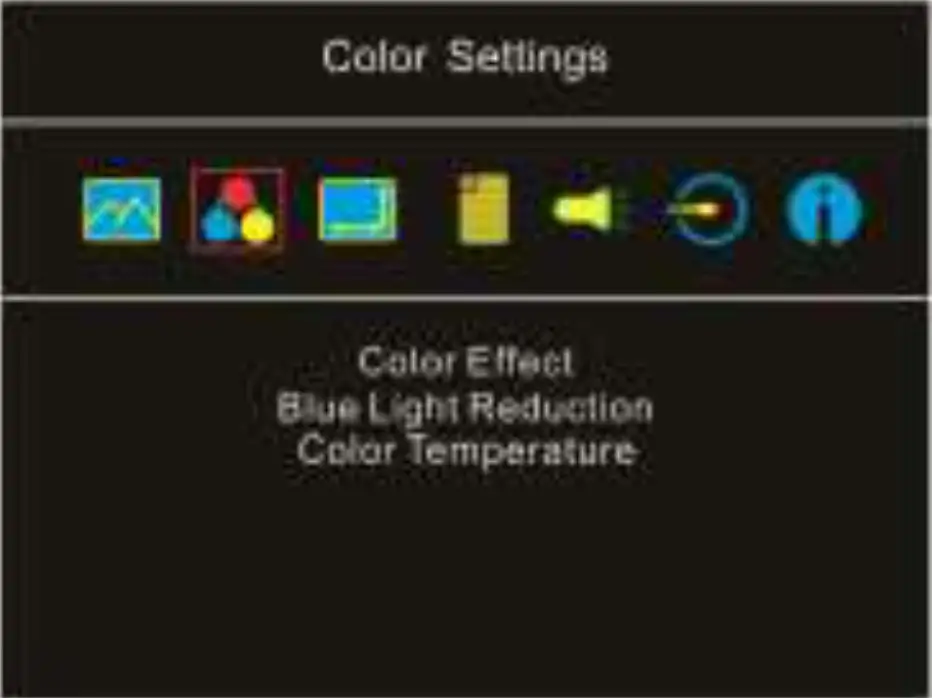
- Color Settings
(1) Color Effect: If the PC image output format is RGB Limited, it is recommended to select “Standard 1”; if it is RGB Full format, it is recommended to select “Standard 2”. Select “Phone” mode to make the colors more vivid; select “Movie” mode to display the dark scene more clearly.
(2) Blue Light Reduction: Select “On” to reduces the screen’s blue light automatically.
(3) Color Temperature: Select “Cool” to increase the blue color of the image; Select “Warm” to increase the red color of the image. Select “User” to adjust the RGB color settings manually.
- Aspect Ratio
(1) Aspect ratio: When select “16:9 Full Screen”, the monitor displays a 16:9 image in full screen. When select 4:3, the monitor displays a 4:3 image with leftright side black borders to fill the 16:9 screen. When select “Original”, the monitor displays the image in its original size.
(2) Overscan: Only available when HDMI video signal input (e.g., 1080P/720P). Enabling this function allows you to calibrate the display area.
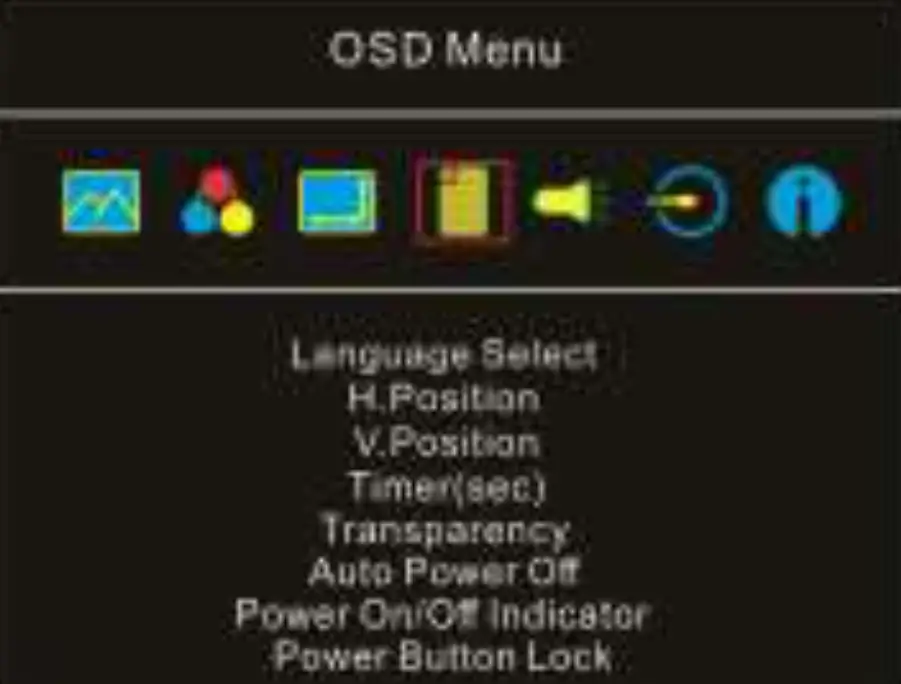
- OSD Menu
(1) Language Select: Change to the other language.
(2) H. Position: Move the OSD menu left/right.
(3) V. Position: Move the OSD menu up/down
(4) OSD Timer (sec): Adjust the idle time before OSD menu disappears.
(5) OSD Transparency: Make the OSD menu transparent to show the background.
(6) Auto Power Off: Select “On” to launch this function, when no image displayed on the screen, the monitor will enter Standby mode, and power off itself after 2 minutes. Select “Off” to disable this function. The monitor will stay in standby mode and will not power off.
(7) Power On/Off Indicator: Select “Off” to turn off the Power On/Off Indicator.
(8) Power Button Lock: Select “On” to lock the Power Button.
- Audio
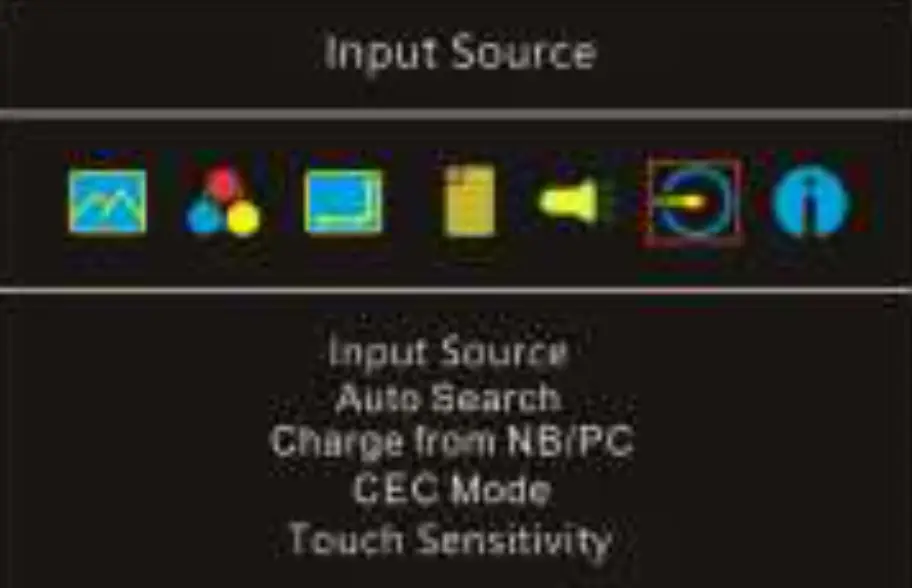
Adjust the audio volume or turn on the mute mode. When “On” is selected for “Mute”, the monitor stop playing audio and can’t release the mute mode by pressing volume buttons. After setting “ Mute” mode as “Off”, the audio can be played. - Input Source
 (1) Input Source: Select HDMI or USB type-C for the video signal input.
(2) Auto Search: When “On” is selected, the monitor will detect two video input sources in sequence, and the monitor will display the first one read. When “Off” is selected, only the video source selected in Input Source will be displayed. If no such selected video signal inputs, the monitor will show “No signal” warning message, and won’t detect other video sources.
(3) Charge from/ to PC: Select “Yes”, the computer/ smartphone will charge the monitor through the USB-C port. Select “No”, this power input will be closed. When the 65W power adapter is connected to M505I, M505I monitor can charge a computer; select “No”, this power output will be closed. Before selecting “No”, please connect the power adapter to the DC IN port on M505, or the monitor can’t work due to no power input. (4) CEC Mode: When “On” is selected, users can turn on/ turn off the monitor by connecting to a device with HDMI CEC function such as DVD player, camera, or PlayStation game console.
(5) Touch Sensitivity: 3 touch sensitivity values are available. Default value is “0”. The highest sensitivity is “100”.
Caution: The change of magnetic field in surroundings may cause a wrong recognition of touchscreen. If the cursor keeps moving on itself without touch, please reset “0” for touch sensitivity. - Information: Show frequency of the input image, On-Lap model name, firmware version, etc.
(1) Reset: Select “Yes” to reset to defaults.

 (1) Input Source: Select HDMI or USB type-C for the video signal input.
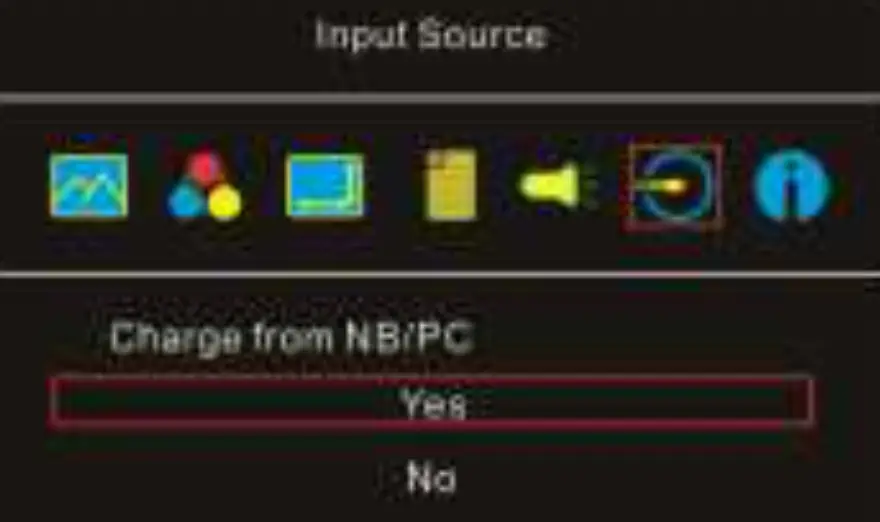 (4) CEC Mode: When “On” is selected, users can turn on/ turn off the monitor by connecting to a device with HDMI CEC function such as DVD player, camera, or PlayStation game console.
Settings of Extended Display
Section 1 Settings of Extended Display on Windows 10
Click ![]() , select [Settings]→ [System]→ [Display], and choose “Extend these displays” at “Multiple displays”; Select “1920×1080” at Resolution and select “Landscape” at Orientation for horizontal display.
, select [Settings]→ [System]→ [Display], and choose “Extend these displays” at “Multiple displays”; Select “1920×1080” at Resolution and select “Landscape” at Orientation for horizontal display.
Select “Portrait (Flipped)” for vertical display, and then click “Apply”. 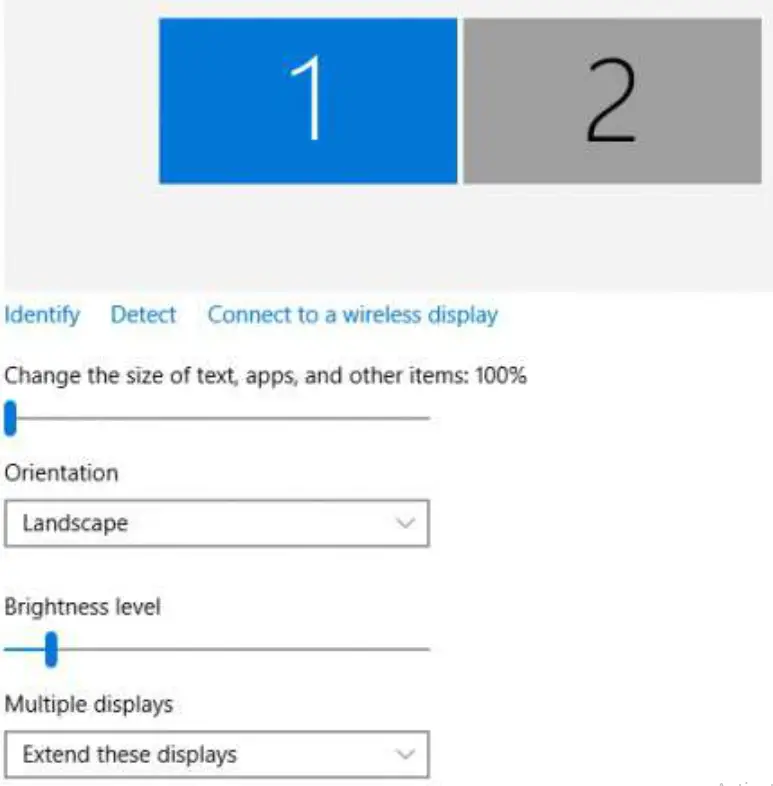
Section 2 Settings of Extended Display on Mac (OS X)
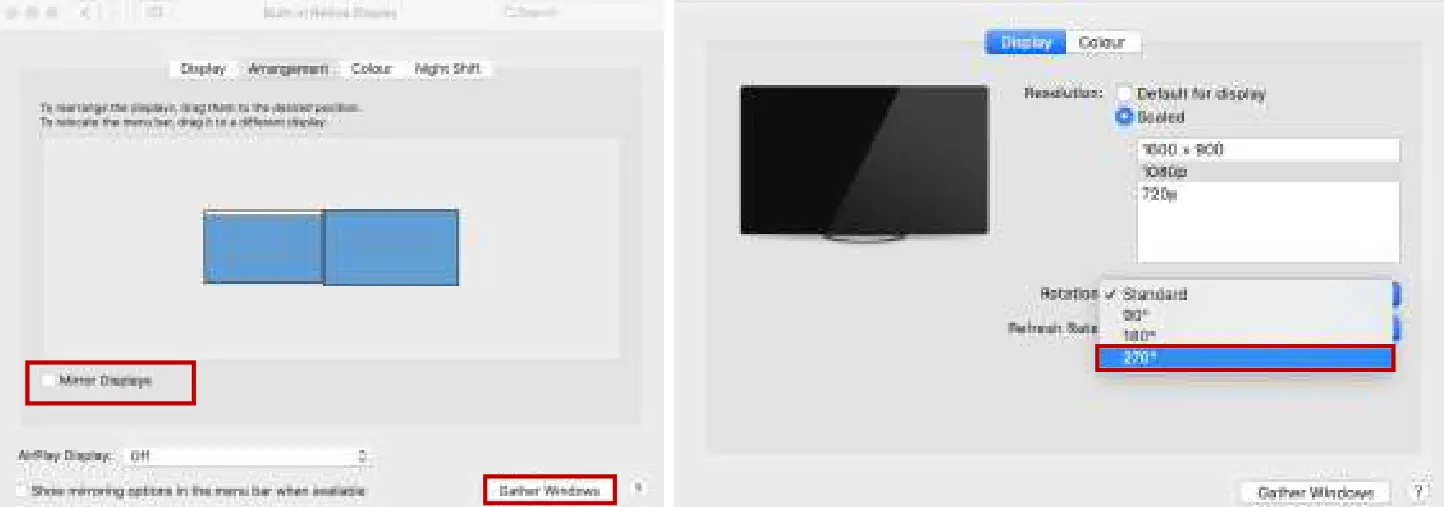
Click ![]() , select [System Preference] > [Displays], click [Arrangement] tab, and uncheck [Mirror Displays]. Select one of the blue rectangles, and drag to the desired position. Click [Display] tab and select resolu- tion of the laptop first, and then click “Gather Windows” to select resolution “1080p” for On-Lap M505. For vertical display, select 270゚at “Rotation”.
, select [System Preference] > [Displays], click [Arrangement] tab, and uncheck [Mirror Displays]. Select one of the blue rectangles, and drag to the desired position. Click [Display] tab and select resolu- tion of the laptop first, and then click “Gather Windows” to select resolution “1080p” for On-Lap M505. For vertical display, select 270゚at “Rotation”. 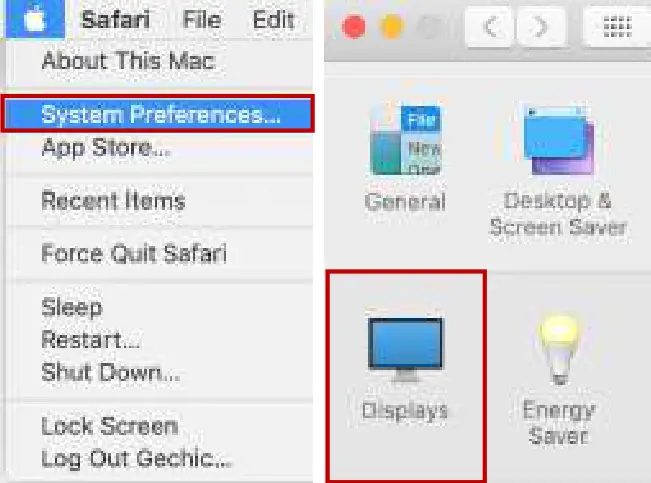
Settings of Touch Monitor and Input Methods (Touch Stylus and Gloves)
Please make sure if the computer OS supports external touch monitor. For example, computers with Windows 10/ 7 support external touch monitor. M505T/I touch function works well on them. Computers built with other operating systems may not support touch function. Apple computers (such as MacBook and iMac) do not support external touch signal. Therefore, M505 only displays video without touch function when connected to Mac computers.
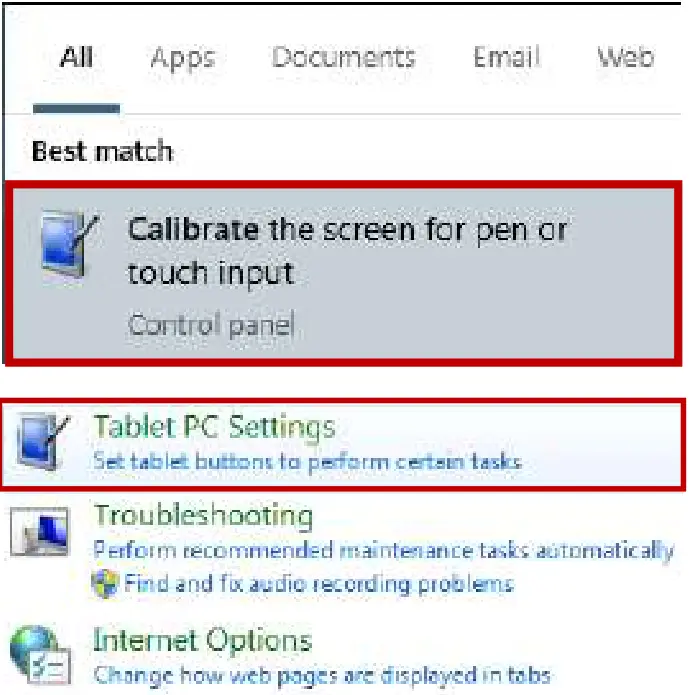
- Touch Screen Settings on Windows 10/ 7 If the computer does not enable touchscreen function automatically or the monitor doesn’t sense touch position accurately, please use Windows 10/7 “Tablet PC Settings” in “Control Panel” to start touch screen setting.
In Windows 10, search “Calibrate” and select “Calibrate the screen for pen or touch input”.
In Windows 7, click ”Tablet PC Settings” in “Control Panel” to start touch screen settings.
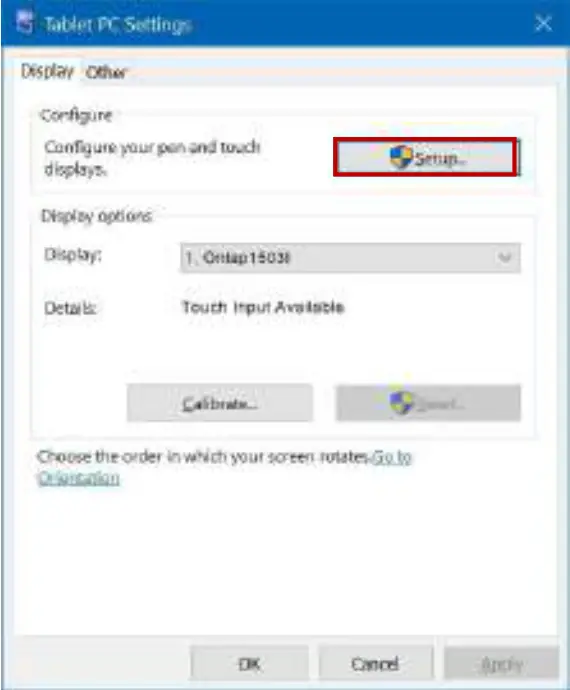
In the Fig. shown, please select “Setup”. When the display shows on-screen instructions on On-Lap M505T/I, touch On-Lap M505T/I to complete touch screen setting. 2. Use of Touch Stylus M505T/I doesn’t support the proprietary active styluses of other tablet PCs or smartphones. ● Passive Touch Stylus: M505T/I supports passive touch pens with conductive rubber tip or plastic disc whose diameter greater than 6mm. ● Active Touch Stylus: Stylus on the market are not identical in the magnetic flux. M505T/I monitor only supports some active touch styluses with sufficient electromagnetic induction.(e.g., Adonit® Dash 3). If you cannot draw lines or work smoothly with a touch stylus due to its insufficient induction, please refer to Chapter 3> Sections 2> Point 6 to select “50” for “Touch Sensitivity”. 3. Touch with Latex PVC Gloves and Wet Fingers M505T/I supports finger touch with PVC latex gloves. Gloves thickness ≤ 1mm is recommended. M505T/I monitor is touchable with wet fingers (without any water drop on the surface).
 Tap this screen with a single firger to identify itas the touchscreen
If this is not the tablet PC Screen press Enter to the next screen to chose the tool press Esc. - Use of Touch Stylus
M505T/I doesn’t support the proprietary active styluses of other tablet PCs or smartphones.
● Passive Touch Stylus: M505T/I supports passive touch pens with conductive rubber tip or plastic disc whose diameter greater than 6mm.
● Active Touch Stylus: Stylus on the market are not identical in the magnetic flux. M505T/I monitor only supports some active touch styluses with sufficient electromagnetic induction.(e.g., Adonit® Dash 3).
If you cannot draw lines or work smoothly with a touch stylus due to its insufficient induction, please refer to Chapter 3> Sections 2> Point 6 to select “50” for “Touch Sensitivity”. - Touch with Latex PVC Gloves and Wet Fingers
M505T/I supports finger touch with PVC latex gloves. Gloves thickness ≤ 1mm is recommended.
M505T/I monitor is touchable with wet fingers (without any water drop on the surface).
 Tap this screen with a single firger to identify itas the touchscreen
Product Specification
Section 1 General Specification
| Item | On-Lap M505T | On-Lap M505I |
| Panel | Wide screen 15.6-inch (16:9) | |
| True Resolution | 1920×1080 | 1920×1080 |
| Color Depth | 16.7M Colors | 16.7M Colors |
| Brightness | 250 (cd/m²) (Typ.) | 250 (cd/m²) (Typ.) |
| Contrast Ratio | 700:1(Typ.) | 700:1(Typ.) |
| Viewing Angle | 170°(H)/170°(V)(CR>10) | 170°(H)/170°(V)(CR>10) |
| Response Time | 15ms(Typ.) | 15ms(Typ.) |
| Touch Technology& | Projected Capacitive Touch Screen; Support 10-point touch nputs recognition; Support Windows 10/7 | |
| Video Input | HDMI-A*1, USB Type-C(DP 1.2)*1 | |
| Video Output | HDMI-A*1 (HDMI Loop: up to 14 monitors) The number of monitor loop depends on different HDMI cable, HDMI video signal and other variable factors. The actual units of the monitor loop may be more or less than 14 pcs. | |
| USB Output | No | USB-A*1 |
| Audio Output | Earphone Jack(3.5mm mini jack) (support analog 2.5mmAUX) | |
| Speakers | 1.5W(Max.)*2 | |
| USB-C Power Delivery Support | No | Yes |
| HDCP Support | Yes | |
| HDCP CEC Support | Yes | |
| Power Consumption | ≦ 10W | |
| Standby Mode | < 0.5W | |
| Off Mode | < 0.5W | |
| Rated Voltage | 5V | |
| Environment Conditions | Operation: 0~50℃; Storage :-20~60℃ | |
| Dimensions (W*H*D) | Display top cover: 364mm*250mm*7.2mm; I/O base: 364mm*135mm*10.7mm | |
| Weight (typical) | 1145g | 1181g |
| Certification | ||
Section 2 Supported Operating Modes
| Resolution | Refresh Rate | Horizontal Frequency (kHz) | Vertical Frequency (Hz) |
| 640×480 | 60Hz | 31.469 | 59.94 |
| 720×480 | 60Hz | 29.855 | 59.71 |
| 800×600 | 60Hz | 37.879 | 60.317 |
| 848×480 | 60Hz | 31.02 | 60 |
| 960×600 | 60Hz | 37.212 | 59.635 |
| 1024×768 | 60Hz | 48.363 | 60.004 |
| 1152×864 | 60Hz | 53.783 | 59.959 |
| 1280×600 | 60Hz | 37.377 | 59.9 |
| 1280×720 | 50Hz | 37.5 | 50 |
| 1280×720 | 60Hz | 45 | 60 |
| 60Hz | 44.772 | 59.855 | |
| 1280×768 | 60Hz | 47.776 | 59.87 |
| 1280×800 | 60Hz | 49.702 | 59.81 |
| 1280×960 | 60Hz | 60 | 60 |
| 1280×1024 | 60Hz | 63.981 | 60.02 |
| 1360×768 | 60Hz | 47.712 | 60.015 |
| 1366×768 | 60Hz | 47.712 | 59.79 |
| 1360×1024 | 60Hz | 63.606 | 59.836 |
| 1400×1050 | 60Hz | 65.317 | 59.978 |
| 1440×900 | 60Hz | 55.935 | 59.887 |
| 1600×900 | 60Hz | 55.99 | 59.946 |
| 1600×1024 | 60Hz | 63.675 | 59.901 |
| 1680×1050 | 60Hz | 65.29 | 59.954 |
| 1920×1080 | 50Hz | 56.25 | 50 |
| 1920×1080 | 60Hz | 67.5 | 60 |
| 60Hz | 66.587 | 59.934 |
Section 3 Supported Video Modes
| 1920x1080P 50Hz/59.94Hz/60Hz | 1280x720P 50Hz/59.94Hz/60Hz |
| 720x480P 59.94/60Hz | 640x480P 59.94/60Hz |
Troubleshooting
| Problem | Solutions |
| 1. When connecting the USB-C (DP Alt) port of the PC to M505 USB-C port, the power indica- for isn’t on and the monitor doesn’t turn on. | If the setting of “Charge from NB/PC” is “No”, power can’t be input to the monitor through the USB-C port. Please connect the adapter to the DC IN port on M505, enter OSD menu> Input Source, and select “YES” for “Charge from NB/PC”. Use the USB-C video cable to connect the USB-C(DP Alt) port of the PC and the USB-C port of the monitor again. |
| 2. There is no image while connecting to PC or smartphone by USB-C port. | 1. The PC or smartphone must support USB Type-C DisplayPort Alternate Mode (USB Type-C DP Alt Mode). Please contact the manufacturer of the PC/ smartphone to confirm whether USB-C DP alt mode is supported. 2. Many similar USB-C cables on the market don’t support video signal transmission. Please do use the USB Type-C Video Cable (1m) in this pack for connection. 3. Please connect USB Type-C cable to M505 USB-C port rather than the DC IN port. |
| 3. The monitor connected to my smartphone by USB Type-C port flickers or restarts some- times. | Smartphone may not be able to output stable 5V 2A current to monitor. If it causes the monitor to flicker or fail to be turned on due to the insufficient current, please refer to Chapter 2> Section 2> Point 2. |
| 4.When connecting smartphone to the monitor via its USB Type-C port, my mobile games or Apps run slow. | This condition may result from processor’s performance or insufficient RAM of the smartphone. Please contact the phone manufacturer for further assistance or answer. |
| 5.After ending the games, Switch® console automatically turns on, causing the battery to run out. | After finishing the games, the monitor is off or in sleep mode and it stops to power Switch®. Due to power inter-ruption, Switch® will be on automatically. Please change the setting in Switch®, enter System Settings> Sleep mode> and select “Disable” for “Wake When AC Adapter is Disconnected” so that Switch® won’t wake from sleep mode when AC adapter is disconnected. |
| 6.M505 touch monitor con- nected to MacBook or iPad Pro can’t operate touch function or the cursor always responds on wrong positions. | MacBook, iMac, iPad Pro and any product of Apple® do not support external touch monitor, therefore, it is unable to use touchscreen function on M505T/I monitor. |
 |  |  |
| https://www.gechic.com/ | https://www.facebook.com/GechicglobalOfficial/ | https://www.youtube.com/user/gechictw |
GeChic Corporation
11F.-3, No. 138, Zhongming S. Rd., West
Dist., Taichung, Taiwan
Customer Service: [email protected]
Rev. 2022/5/24


