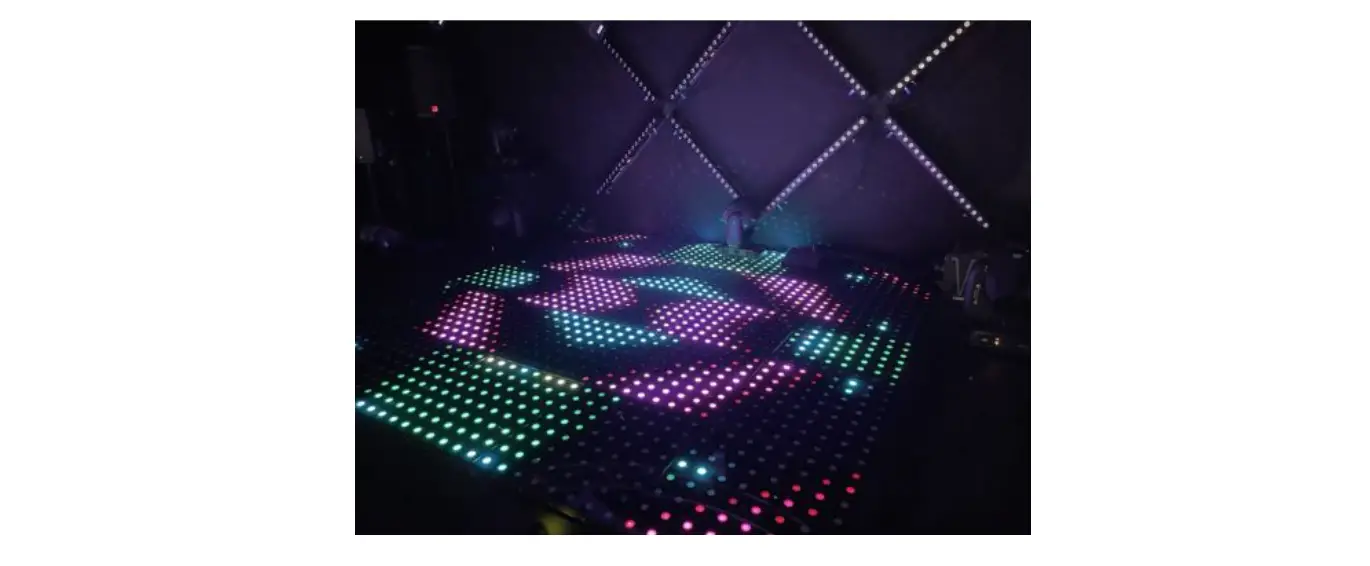
AFX LIGHT 16-2040 LED Crazy-Dance Floor

EXPLANATION OF SYMBOLS Please read this manual carefully before operating this product.
SAFETY RECOMMENDATIONS
- Please read these instructions carefully, they include important information about the installation, usage and maintenance of this product.
- Please keep this User Guide for future reference. If you sell the unit to another user, be sure that he also receives this instruction booklet.
- Always make sure that you are connecting to the proper voltage, and that the line voltage you are connecting to is not higher than that stated on the unit.
- This product is intended for indoor use only!
- To prevent risk of fire or shock, do not expose fixture to rain or moisture.
- The max. ambient temperature (Ta) is 40°C. Don’t operate the fixture at higher temperatures.
- In the event of a serious operating problem, stop using the unit immediately. Never try to repair the unit by yourself. Repairs carried out by unskilled people can lead to damage or malfunction. Please contact the nearest authorized technical assistance center. Always use the same type of spare parts.
- Never disassemble the parts while power is on.
- Put the product only on a flat, stable surface.
INSTALLATION
Be very careful during installation to avoid bumps and damages. First assemble all parts before connecting the dancefloor to the mains and signal. The slabs must be connected to each other according to the arrows on the bottom with the proper orientation. DO NOT rotate the slabs by 90° or 180°!  Place the slabs on the floor by following the direction of the arrows and align the magnets perfectly to the magnets of the previous slab otherwise the signal and power will not be transmitted properly. The 4 corners of every slab are empty to pass the signal and power lines. Once you have aligned all slabs, connect the controller and the power adapter to top edge of the dance floor. Now place the edges around the dance floor.
POWER SUPPLY
This product uses an external power adaptor as the lamps are powered by DC28V. The external power supply converts 100-250V~ voltage into 28V for use by the fixture.
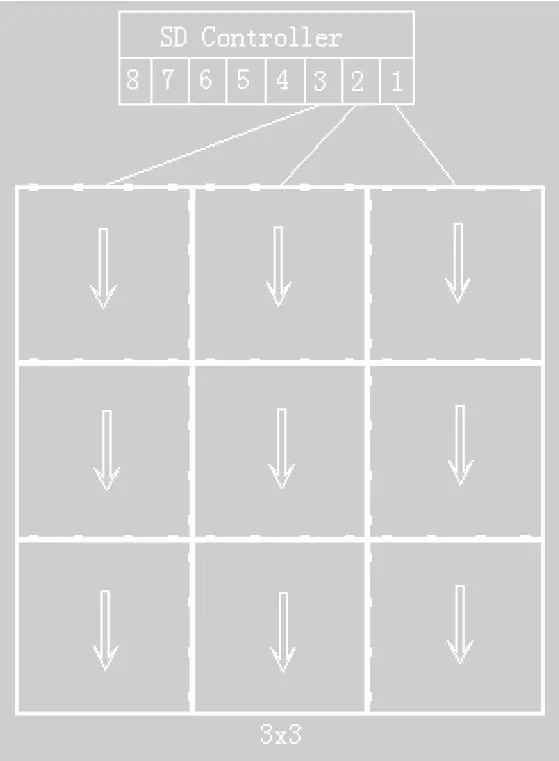 Connect the supplied SD controller to the slabs as shown on the illustration.
 Connect the SD controller to your PC
The SD controller has 8 outputs. Each output can drive to 16 columns. Each column can contain 28 slabs maximum. So one controller can connect: 8 * 16 = 128 slabs.
The following is the PC controller 3×3 signal line connection diagram:
OPERATION OF THE SD CONTROLLER

Input connectors
| Connector/ button | Function description |
| ON/OFF | Power switch |
| SD | SD card slot |
| AUDIO | Audio input, connect sound source device through the audio cable (CD/mi- crophone) |
| IN | Main control input, connect the last controller via net cable |
| OUT | Main control output, connect the next controller via net cable |
OUTPUT CONNECTORS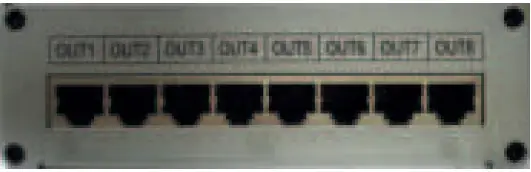
| LINE | 1 | 2 | 3 | 4 | 5 | 6 | 7 | 8 |
| COLOR | GREEN | BLUE | BLUE WHITE | ORANGE | ORANGE WHITE | BROWN | BROWN WHITE | GREEN WHITE |
| SIGNAL | DATE | GMD | GMD | GMD | GMD | GMD | GMD | GMD |
TOP VIEW
BASIC OPERATION
| Button | Button | Function description |
| MENU | Menu | Pattern/ sound/ audio mode selection: long press 2 seconds to enter menu setting mode |
| SPEED/ENTER | Speed | Normal mode: 1-18 class |
| Exchange mode: 1-9 class | ||
| Enter | On menu mode, press [enter] to save the current setting, lights will change the effect immediately. | |
| MODE | Mode- | Mode decrease exchange |
| MODE | Mode+ | Mode increase exchange |
| Menu Status | LED display | Operating Instruction | |
| Enter into menu setting | Long press [MENU] 2 seconds, into menu setting mode | ||
| Menu setting | Master-slave | Master Slave | 1) press [ u ] [ t ] select master-slave, press [ ENTER ] |
| 2) press [ u ] [ t ] to select | |||
| 3) press [ ENTER ] to save settings | |||
| 4) press [ MENU ] to quit | |||
| DMX address | DMX address** | 1) press [ u ] [ t ] to select DMX address, press [ ENTER ] | |
| 2) press [ u ] [ t ] to select | |||
| 3) press [ ENTER ] to save settings | |||
| 4) press [ MENU ] to quit | |||
| Time, date | week date time | 1) press [ u ] [ t ] select time and date, press [ ENTER ] | |
| 2) press [ u ] [ t] to select | |||
| 3) press [ ENTER ] to save setting | |||
| 4) press [ MENU ] out | |||
| Language | Chinese English | 1) press [ u ] [ t ] select language, press [ ENTER ] | |
| 2) press [ u ] [ t ] to select | |||
| 3) press [ ENTER ] to save setting | |||
| 4) press [ MENU ] to quit | |||
| Brightness setting | Brightness ** | 1) press [ u ] [ t ] to select brightness set- ting, press [ ENTER ] | |
| 2) press [ u ] [ t ] to select | |||
| 3) press [ ENTER ] to save setting | |||
| 4) press [ MENU ] to quit | |||
| Sensitivity setting | Sensitivity ** | 1) press [ u ] [ t ] select sensitivity, press [ ENTER ] in | |
| 2) press [ u ] [ t ] to select | |||
| 3) press [ ENTER ] save setting | |||
| 4) press [ MENU ] out | |||
| Exit menu setting | Long press [ MENU ] 2 second, exit menu set- ting mode and go back to control mode | ||

IMPORTANT NOTE: Electric products must not be put into household waste. Please bring them to a recycling centre. Ask your local authorities or your dealer about the way to proceed.
| CH | Function | DMX address | Description | |
| 1 | Sensitivity | 0-42 | MIN | |
| 43-85 | 2 | |||
| 86-128 | 3 | |||
| 129-171 | 4 | |||
| 172-214 | 5 | |||
| 215-255 | Sensitivity MAX | |||
| 2 | Brightness | 0-42 | 100% | |
| 43-85 | 50% | |||
| 86-128 | 25% | |||
| 129-171 | 12.5% | |||
| 172-214 | 6.25% | |||
| 215-255 | 3.125% | |||
| 3 | Pattern/ sound/audio | 0-85 | Pattern | |
| 86-170 | Sound | |||
| 171-255 | Audio | |||
| 4 | Speed | 0-13 | 1 | 1 AC |
| 14-27 | 2 | |||
| 28-41 | 3 | 2 AC | ||
| 42-55 | 4 | |||
| 56-69 | 5 | 3 AC | ||
| 70-83 | 6 | |||
| 84-97 | 7 | 4 AC | ||
| 98-111 | 8 | |||
| 112-125 | 9 | 5 AC | ||
| 126-139 | 10 | |||
| 140-153 | 11 | 6 AC | ||
| 154-167 | 12 | |||
| 168-181 | 13 | 7 AC | ||
| 182-195 | 14 | |||
| 196-209 | 15 | 8 AC | ||
| 210-223 | 16 | |||
| 224-237 | 17 | 9 AC | ||
| 238-255 | 18 | |||
| 5 | synch state | 0-127 | DC synch | |
| 129-255 | AC synch | |||
| 6 | Black screen | 0-128 | Black screen | |
| 129-255 | General (display effect) | |||
| 7 | Auto Mode | 0-126 | No | |
| 129-255 | Auto Mode | |||
| 8 | Mode 1-19 | 0-12 | No |
| 13-24 | Mode 1 | ||
| 25-36 | Mode 2 | ||
| 37-48 | Mode 3 | ||
| 49-60 | Mode 4 | ||
| 61-72 | Mode 5 | ||
| 73-84 | Mode 6 | ||
| 85-96 | Mode 7 | ||
| 97-108 | Mode 8 | ||
| 109-120 | Mode 9 | ||
| 121-132 | Mode 10 | ||
| 133-144 | Mode 11 | ||
| 145-156 | Mode 12 | ||
| 157-168 | Mode 13 | ||
| 169-180 | Mode 14 | ||
| 181-192 | Mode 15 | ||
| 193-204 | Mode 16 | ||
| 205-216 | Mode 17 | ||
| 217-228 | Mode 18 | ||
| 229-255 | Mode 19 | ||
| 9 | Mode 20-39 | 0-12 | No |
| 13-24 | Mode 20 | ||
| 25-36 | Mode 21 | ||
| 37-48 | Mode 22 | ||
| 49-60 | Mode 23 | ||
| 61-72 | Mode 24 | ||
| 73-84 | Mode 25 | ||
| 85-96 | Mode 26 | ||
| 97-108 | Mode 27 | ||
| 109-120 | Mode 28 | ||
| 121-132 | Mode 29 | ||
| 133-144 | Mode 30 | ||
| 145-156 | Mode 31 | ||
| 157-168 | Mode 32 | ||
| 169-180 | Mode 33 | ||
| 181-192 | Mode 34 | ||
| 193-204 | Mode 35 | ||
| 205-216 | Mode 36 | ||
| 217-228 | Mode 37 | ||
| 229-240 | Mode 38 | ||
| 241-255 | Mode 39 |
10 | Mode 40-59 | 0-12 | No |
| 13-24 | Mode 40 | ||
| 25-36 | Mode 41 | ||
| 37-48 | Mode 42 | ||
| 49-60 | Mode 43 | ||
| 61-72 | Mode 44 | ||
| 73-84 | Mode 45 | ||
| 85-96 | Mode 46 | ||
| 97-108 | Mode 47 | ||
| 109-120 | Mode 48 | ||
| 121-132 | Mode 49 | ||
| 133-144 | Mode 50 | ||
| 145-156 | Mode 51 | ||
| 157-168 | Mode 52 | ||
| 169-180 | Mode 53 | ||
| 181-192 | Mode 54 | ||
| 193-204 | Mode 55 | ||
| 205-216 | Mode 56 | ||
| 217-228 | Mode 57 | ||
| 229-240 | Mode 58 | ||
| 241-255 | Mode 59 | ||
| 11 | Mode 60-79 | 0-12 | No |
| 13-24 | Mode 60 | ||
| 25-36 | Mode 61 | ||
| 37-48 | Mode 62 | ||
| 49-60 | Mode 63 | ||
| 61-72 | Mode 64 | ||
| 73-84 | Mode 65 | ||
| 85-96 | Mode 66 | ||
| 97-108 | Mode 67 | ||
| 109-120 | Mode 68 | ||
| 121-132 | Mode 69 | ||
| 133-144 | Mode 70 | ||
| 145-156 | Mode 71 | ||
| 157-168 | Mode 72 | ||
| 169-180 | Mode 73 | ||
| 181-192 | Mode 74 | ||
| 193-204 | Mode 75 | ||
| 205-216 | Mode 76 | ||
| 217-228 | Mode 77 | ||
| 229-240 | Mode 78 | ||
| 241-255 | Mode 79 |
12 | Mode 80-96 | 0-14 | No |
| 15-28 | Mode 80 | ||
| 29-42 | Mode 81 | ||
| 43-56 | Mode 82 | ||
| 57-70 | Mode 83 | ||
| 71-84 | Mode 84 | ||
| 85-98 | Mode 85 | ||
| 99-112 | Mode 86 | ||
| 113-126 | Mode 87 | ||
| 127-140 | Mode 88 | ||
| 141-154 | Mode 89 | ||
| 155-168 | Mode 90 | ||
| 169-182 | Mode 91 | ||
| 183-196 | Mode 92 | ||
| 197-110 | Mode 93 | ||
| 111-124 | Mode 94 | ||
| 125-138 | Mode 95 | ||
| 139-255 | Mode 96 |


