![]()
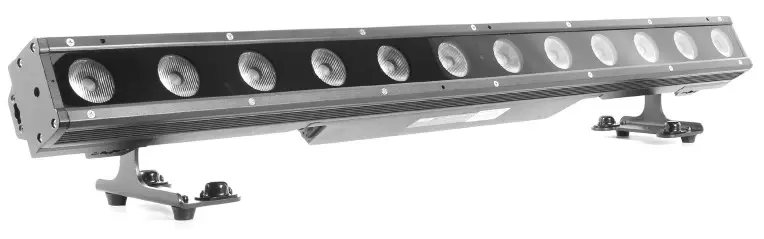
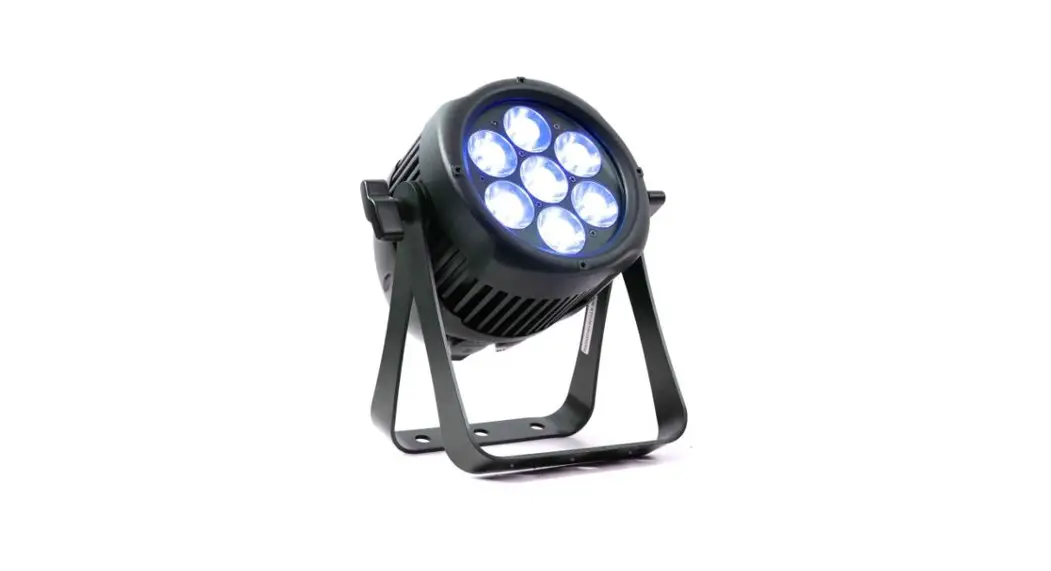
Arc Bar Pro 1215 IP65 12x15W RGBW LED
Product code: 113531
Product Overview
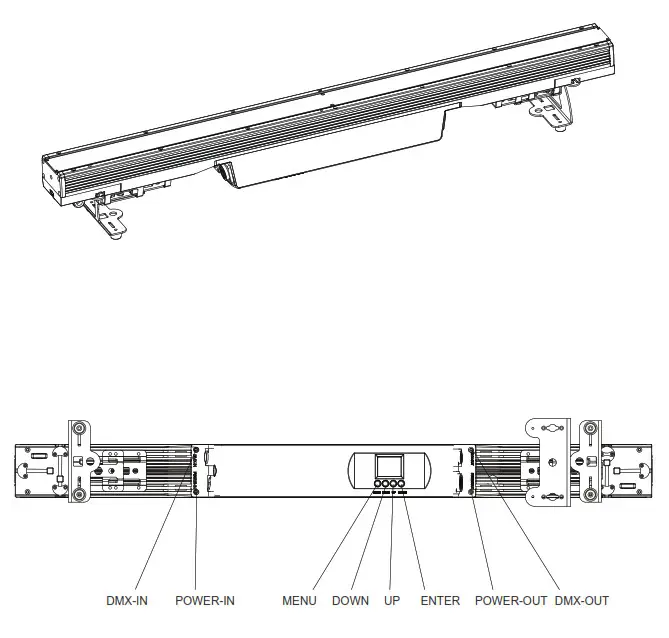
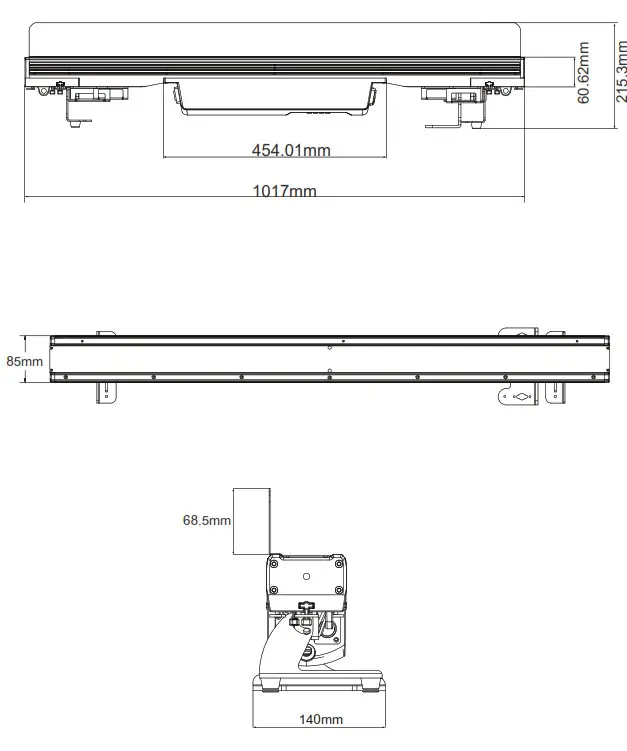
Mechanical Specification
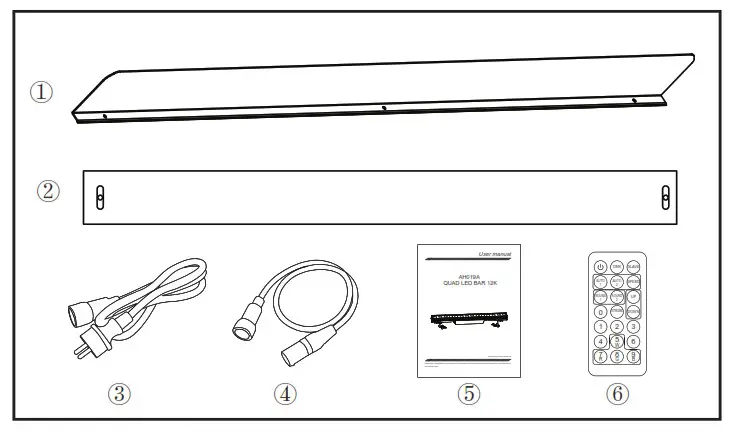
 Packaging: Thanks for your purchasing the AH019A. All the lights have been checked and are in excellent operating condition. Please check the shipping carton first. Because there maybe damage occurred during the shipment. Then check the lights carefully and be sure that the light is intact and works normally. In the event damage has been found, spare parts are missing or the lights works abnormally, please contact us for further instructions. And please don’t return the light to the dealer before contacting us. Introduction:The AH019A has four operating modes: DMX mode, Auto mode, Master/Slave mode. And the light has seven DMX channel. DMX channel is including 3
channel, 7 channel, 11 channel, 48 channel and 52 channel. You can see 13 kinds of shows when you open the Auto mode .All then all the lights in Master/Slave mode will run following the one in Auto mode. Using fog or special effect smoke, you can see better showing effect.
Warning!
- For the sake of preventing the risk of electrical shock or fire.
- Don’t look directly at the opening lights all the time, or it may damage your eyes.
Features
- Light Source: 12*15W, 4 in 1 RGBW LEDs
- Lens:10*45°/8°/25°/40°
- Power consumption: 160W
- Voltage: AC 110-230V 50/ 60Hz
- Run mode: DMX 512 /Master Slave /Auto Run
- DMX channels: 3, 7, 11, 48 & 52 CH
- Built-in Effect: color mixing, variable color chasing, strobing and fading
- Fan controlled by PWM waves
- 4 dimmer curves
- TFT displayer with four buttons
- Material: Aluminum body
- IP65
- Temperature: -20°C~40°C
- Dimension:1017×140×216mm
- N.W: 9.1 KG
- G.W: 10.4KG
Accessory
- Barndoor x 1 (purchase separate)
- Magnetic frost filter x 1 (purchase separate)
- Power cable x 1
- DMX cable x1
- User manual x 1
- IR Controller x 1
Displayer introduction
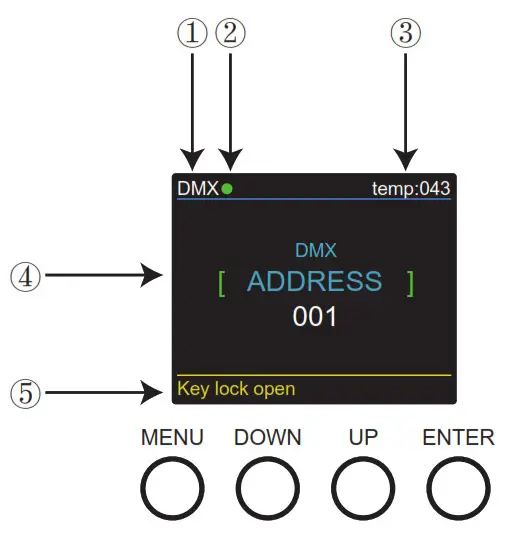
- DMX means the light is in the DMX mode.Similarly,SLAVE means the light is in the SLAVE mode.
- The color of the point shows the condition of signal transmission. Green represents the good condition, while red represents the signal is interrupted.
- The item shows the working temperature of the light.When the working temperature exceeds the max temperature,the color of the letters and number will change from white to yellow.
- This item shows the menu you selected.
- This item shows the condition of key lock. “Key lock open” means the key lock is open.And “Key lock off” means the key lock is close.
DMX control mode
| 3C1-1 | Channel | Value | Function |
| 1 | 0-255 | Hue | |
| 2 | 0-255 | Saturation | |
| 3 | 0-255 | Value (Brightness) | |
| 7CH | 1 | 0-255 | Master Dimming(0-100%) |
| 2 | 0-255 | Dimmer curve | |
| 3 | 0-255 | Red dimmer | |
| 4 | 0-255 | Green dimmer | |
| 5 | 0-255 | Blue dimmer | |
| 6 | 0-255 | White dimmer | |
| 7 | 0-255 | Strobe | |
| 11CH | 1 | 0-255 | Master Dimming(0-100%) |
| 2 | 0-255 | Dimmer curve | |
| 3 | 0-255 | Red dimmer | |
| 4 | 0-255 | Green dimmer | |
| 5 | 0-255 | Blue dimmer | |
| 6 | 0-255 | White dimmer | |
| 7 | 0-255 | Strobe | |
| 8 | 0-7 | none | |
| 8-255 | Marco Color | ||
| 9 | 0-255 | CCT | |
| 10 | 0 – 8 | none | |
| 9 – 27 | auto 1 | ||
| 28 – 47 | auto 2 | ||
| 48 – 67 | auto 3 | ||
| 68 – 87 | auto 4 | ||
| 88 – 107 | auto 5 | ||
| 108 -127 | auto 6 | ||
| 128 – 147 | auto 7 | ||
| 148 – 167 | auto 8 | ||
| 168 – 187 | auto 9 | ||
| 188 – 207 | auto 10 | ||
| 208 – 227 | auto 11 | ||
| 228 – 247 | auto 12 | ||
| 248 – 255 | auto 13 | ||
| 11 | 0 – 255 | Speed |
| 48CH | 1 | 0 – 255 | Red |
| 2 | 0 – 255 | Green | |
| 3 | 0 – 255 | Blue | |
| 4 | 0 – 255 | White | |
| 5 | 0 – 255 | Red | |
| 6 | 0 – 255 | Green | |
| 7 | 0 – 255 | Blue | |
| 8 | 0 – 255 | White | |
| 9 | 0 – 255 | Red | |
| 10 | 0 – 255 | Green | |
| 11 | 0 – 255 | Blue | |
| 12 | 0 – 255 | White | |
| 13 | 0 – 255 | Red | |
| 14 | 0 – 255 | Green | |
| 15 | 0 – 255 | Blue | |
| 16 | 0 – 255 | White | |
| 17 | 0 – 255 | Red | |
| 18 | 0 – 255 | Green | |
| 19 | 0 – 255 | Blue | |
| 20 | 0 – 255 | White | |
| 21 | 0 – 255 | Red | |
| 22 | 0 – 255 | Green | |
| 23 | 0 – 755 | Blue | |
| 24 | 0 – 255 | White | |
| 25 | 0 – 255 | Red | |
| 26 | 0 – 255 | Green | |
| 27 | 0 – 255 | Blue | |
| 28 | 0 – 255 | White | |
| 29 | 0 – 255 | Red | |
| 30 | 0 – 255 | Green | |
| 31 | 0 – 255 | Blue | |
| 32 | 0 – 255 | White | |
| 33 | 0 – 255 | Red | |
| 34 | 0 – 255 | Green | |
| 35 | 0 – 255 | Blue | |
| 36 | 0 – 255 | White | |
| 37 | 0 – 255 | Red | |
| 38 | 0 – 255 | Green | |
| 39 | 0 – 255 | Blue | |
| 40 | 0 – 255 | White | |
| 41 | 0 – 255 | Red | |
| 42 | 0 – 255 | Green | |
| 43 | 0 – 255 | Blue | |
| 44 | 0-255 | White |
| 48CH | 45 | 0 – 255 | Red |
| 46 | 0 – 255 | Green | |
| 47 | 0 – 255 | Blue | |
| 48 | 0 – 255 | White | |
| S2CH | 1 | 0 – 255 | Master Dimminq(0-100%) |
| 2 | 0 – 255 | 0immer rerun | |
| 3 | 0 – 255 | Auto | |
| 4 | 0 – 255 | Speed | |
| 5 | 0 – 255 | Red | |
| 6 | 0 – 255 | Green | |
| 7 | 0 – 255 | Blue | |
| 8 | 0 – 255 | White | |
| 9 | 0 – 255 | Red | |
| 10 | 0 – 255 | Green | |
| 11 | 0 – 255 | Blue | |
| 12 | 0 – 255 | White | |
| 13 | 0 – 255 | Red | |
| 14 | 0 – 255 | Green | |
| 15 | 0 – 255 | Blue | |
| 16 | 0 – 255 | White | |
| 17 | 0 – 255 | Red | |
| 18 | 0 – 255 | Green | |
| 19 | 0 – 295 | slue | |
| 20 | 0 – 255 | White | |
| 21 | 0 – 255 | Red | |
| 22 | 0 – 255 | Green | |
| 23 | 0 – 255 | Blue | |
| 24 | 0 – 255 | White | |
| 25 | 0 – 255 | Red | |
| 26 | 0 – 255 | Green | |
| 27 | 0 – 255 | Blue | |
| 28 | 0 – 255 | White | |
| 29 | 0 – 255 | Red | |
| 30 | 0 – 255 | Green | |
| 31 | 0 – 255 | Blue | |
| 32 | 0 – 255 | White | |
| 33 | 0 – 255 | Red | |
| 34 | 0 – 255 | Green | |
| 35 | 0 – 255 | Blue | |
| 36 | 0 – 255 | White | |
| 37 | 0 – 255 | Red | |
| 38 | 0 – 255 | Grepn | |
| 39 | 0 – 255 | Blue | |
| 40 | 0 – 255 | White |
| 32CH | 41 | 0 – 255 | Red |
| 42 | 0 – 255 | Green | |
| 43 | 0 – 255 | Blue | |
| 44 | 0 – 255 | White | |
| 45 | 0 – 255 | Red | |
| 46 | 0 – 255 | Green | |
| 47 | 0 – 255 | Blue | |
| 48 | 0 – 255 | White | |
| 49 | 0 – 255 | Red | |
| 50 | 0 – 255 | Green | |
| 51 | 0 – 255 | Blue | |
| 52 | 0 – 255 | White |
Channel 52 (Id address set)
| 0–9 | all Ids |
| 10–19 | Id1 |
| 20–29 | Id2 |
| 30–39 | Id3 |
| 40–49 | Id4 |
| 50–59 | Id5 |
| 60–69 | Id6 |
| 70–79 | Id7 |
| 80–89 | Id8 |
| 90–99 | Id9 |
| 100–109 | Id10 |
| 110–119 | Id11 |
| 120–129 | Id12 |
| 130–139 | Id13 |
| 140–149 | Id14 |
| 150–159 | Id15 |
| 160–169 | Id16 |
| 170–179 | Id17 |
| 180–189 | Id18 |
| 190–199 | Id19 |
| 200–209 | Id20 |
| 210 | Id21 |
| 211 | Id22 |
| 212 | Id23 |
| 213 | Id24 |
| 214 | Id25 |
| 215 | Id26 |
| 216 | Id27 |
| 217 | Id28 |
| 218 | Id29 |
| 219 | Id30 |
| 220 | Id31 |
| 221 | Id32 |
| 222 | Id33 |
| 223 | Id34 |
| 224 | Id35 |
| 225 | Id36 |
| 226 | Id37 |
| 227 | Id38 |
| 228 | Id39 |
| 229 | Id40 |
| 230 | Id41 |
| 231 | Id42 |
| 232 | Id43 |
| 233 | Id44 |
| 234 | Id45 |
| 235 | Id46 |
| 236 | Id47 |
| 237 | Id48 |
| 238 | Id49 |
| 239 | Id50 |
| 240 | Id51 |
| 241 | Id52 |
| 242 | Id53 |
| 243 | Id54 |
| 244 | Id55 |
| 245 | Id56 |
| 246 | Id57 |
| 247 | Id58 |
| 248 | Id59 |
| 249 | Id60 |
| 250 | Id61 |
| 251 | Id62 |
| 252 | Id63 |
| 253 | Id64 |
| 254 | Id65 |
| 255 | Id66 |
DMX-512 addressing with ID address
- Follow instructions 1 for DMX 512 addressing.
- Activate ID addressing in each fixture by setting panel function “ID ON/OFF” to ON.
“Settings” to “ID ON/OFF” to “ON” For every DMX 512 starting address the user can set 66 separate ID addresses. Set ID addresses in each fixture by setting panel function “ ID address” to incremental values.(l.e. 1, 12, 24, 36 etc…) “Settings” to “address” to “01~66”.

UPLOAD
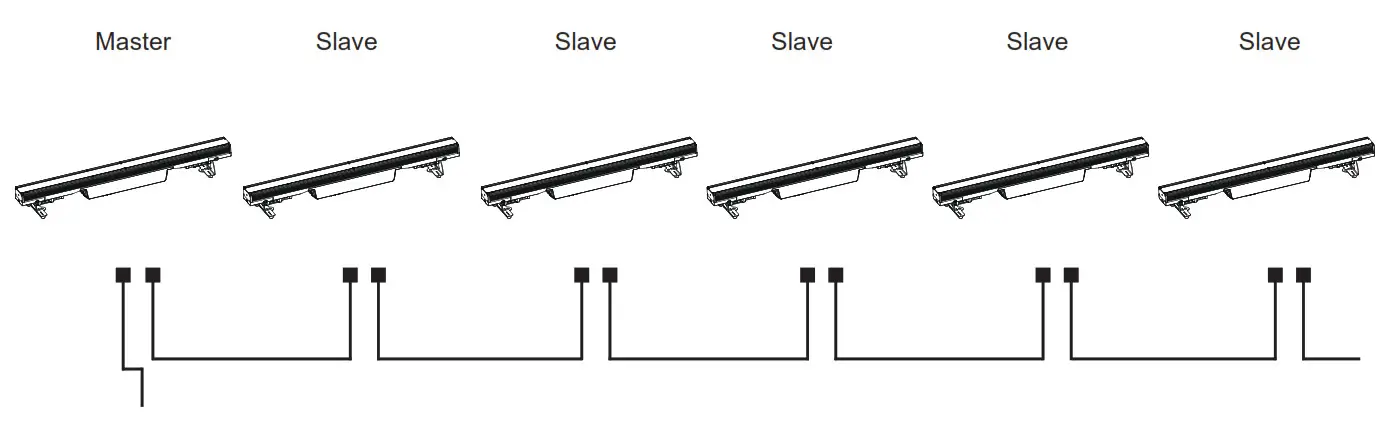
First,set one light, which involves the program you have edited in EDIT menu and want to upload, in Master mode,and others in Slave mode.
Then,connect all the lights with DMX cables.Finally,select the UPLOAD menu of the Master light and press ENTER.All the programs edited in the Master light will be uploaded to the Slave lights.
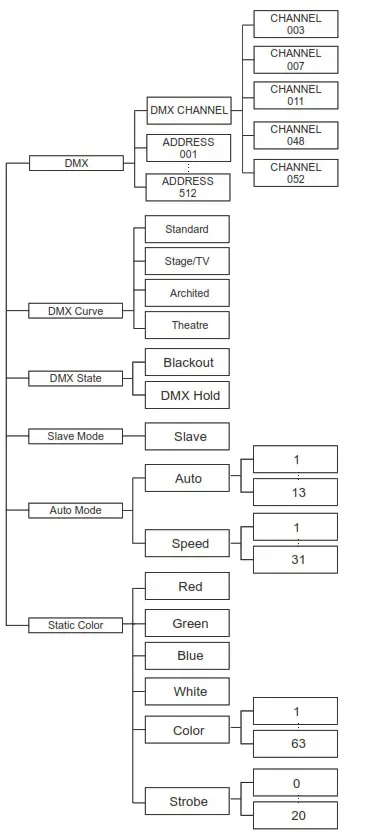
DMX MODE-In this menu,you can connect several pieces of lights with DMX cable and control them with the control console.
Press ”ENTER” and then press “UP” or “DOWN” to ”Address” or “DMX Channel” and press “ENTER”.
- “XXX” will be showed in “Address”, “XXX” means the Address 001-512. You can press “UP” or “DOWN”to select the address you desired.
- “Channel [xx]” will be showed in “DMX Channels”, “XX” means 5 kinds of DMX Channels Modes. You can press “UP” or “DOWN” to select the Channel Mode you desired.
DIMMER CURVE-In this menu,you can choose the mode you desired.
- Press ”ENTER” and then press “UP” or “DOWN” to “Dimmer Curve” to choose as below modes.
- Press “ENTER” you can see 4 items as below:
1) Standard
2) Stage/TV
3) Architec
4) Theatre
DMX STATE-In this menu,you can choose the DMX signal you desired.
- Press “ENTER” and then press “UP” or “DOWN” to “DMX STATE”.
- Press “ENTER” and you can choose “Blackout” or “DMX Hold” ;”Blackout” means cut off the DMX signal and “DMX Hold” means connect DMX signal.
SLAVE MODE-In this menu, you can choose one light as the MASTER light and other lights in SLAVE Mode will run follow the MASTER light.
- Press “ENTER” and then press “UP” or “DOWN” to “SLAVE Mode”.
- Press “ENTER” and “SLAVE” will be showed, then press “ENTER” to choose.
AUTO MODE-In this menu, you can choose your desired AUTO Mode and adjust the running speed.
- Press “ENTER” and then press “UP” or “DOWN” to “AUTO MODE”.
- Press “ENTER” you can see 2 items as below:
1.SPEED – It provides “01-31” for you choose.
2) AUTO MODE – It provides “AUTO 1- AUTO 13” for you choose.
STATIC COLOR-In this menu,you can choose the modes you need.
- Press “ENTER” and then press “UP” or “DOWN” to “AUTO MODE”.
- Press “ENTER” you can see 6 items as below:
1) RED
2) GREEN
3) BLUE
4) WHITE
5) COLOR – You can choose “1-63” in this menu.
6) STROBE – You can choose “0-20” in this menu.
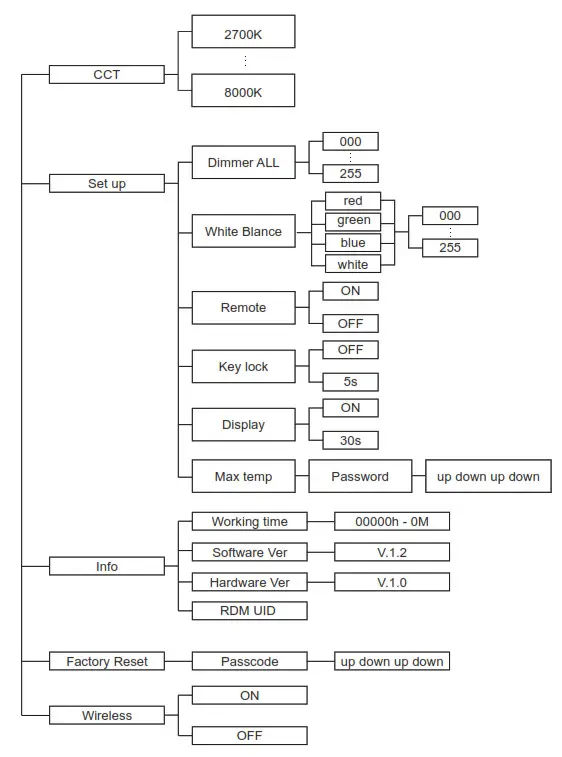
CCT-In this menu, you can choose the brightness you desired.
- Press “ENTER” and then press “UP” or “DOWN” to “CCT”.
- Press “ENTER” you can chooose from “2700K” to “8000K” as you need.
SET UP-In this menu, you can adjust the values of the function.
- Press “ENTER” and then press “UP” or “DOWN” to “SET UP”.
- Press “ENTER” and there has 6 options,then press “UP” or “DOWN” to choose the value you desired as below:
1) IR – You can press “ON” or “OFF” to choose whether you need to controll by this mode.
2) Dimmer All – You can adjust the brightness of colors.
3) Wihte Balace – You can select “RED” “GREEN” “BLUE” “WHITE” you need.
4) Key Lock – You can choose “5s” or “OFF” to make the Key Lock turn on or off.
5) Display – You can choose “ON” or “30s” to make the position of the light screen.
6) Max temp – You can set the your desired Max working temperature of the light with passcode in this menu.When the working temperature beyond max temperature of default settings, the color of letter “Temp XX” will show the color from white to yellow.Meanwhile, the light will adjust the working temperature automatically.
INFORMATION-In this menu, you can learn about the information of RDM,software,hardware and working time of the light.
- Press “ENTER” and then press “UP” or “DOWN” to “INFORMATION”.
- Press “ENTER” and you can see 3 items as below:
1) RDM – It shows RDM information.
2) Hardware – It shows the Hardware information.
3) Software – It shows the Software information.
4) Working time – It shows the working time information.
FACTORY RESET-In this menu, you can reset all the value of the system.
- Press “ENTER” and then press “UP” or “DOWN” to “FACTORY RESET”.
- Press “ENTER” and enter the passcode to reset all the values of the system.
WIRELESS-In this menu,you can set the Wireless signal.
- Press “ENTER” and then press “UP” or “DOWN” to “WIRELESS”.
- Press “ENTER” and then choose “ON” or “OFF” to set the Wireless signal.”ON” is turn on the signal and “OFF” is turn off the signal.
Mounting
When installing the unit, the trussing or area of installation must be able to hold 10 times the weight without any deformation. When installing the unit must be secured with a secondary safety attach-ment, e.g. and appropriate safety cable. Never stand directly below the unit when mounting, removing, or servicing the unit.
Overhead mounting requires extensive experience, including calculat-ing working load limits, installation material being used, and perodic safety inspection of all installation material and unit. If you lack these qualifcations, do not attempt the installation yourself. The installaiton should be checked by a skilled person once a year.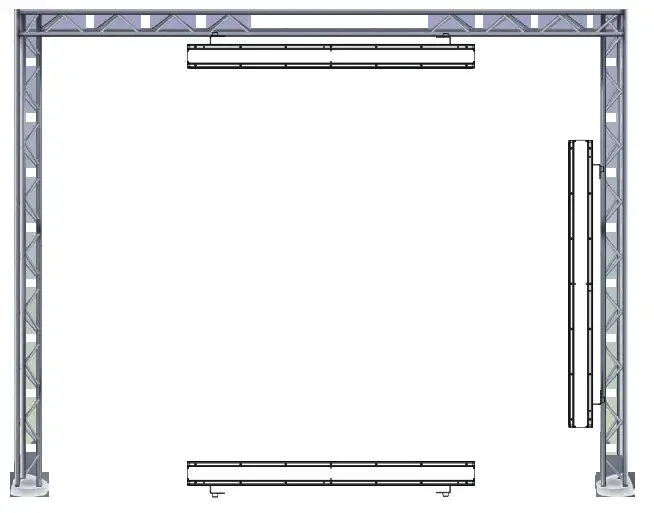
The AH019A is fully operational in three different mounting positions, hanging upside-down from a ceiling, set on a flat level surface or mount the unit on its side. Be sure this fxture is kept at least 0.5m away from any flammable materials (decoration etc.). And you’d better use and install the supplied safety cable as a safety measure to prevent accidental damage and/or injury in the event the clamp fails (see next page).
CABLE CONNECTORS
Cabling must have a male XLR connector on one end and a female XLR connector on the other end.
DMX connector configuration
OUTPUT
Termination reduces signal errors. To avoid signal transmission problems and interference, itis always advisable to connecta DMX signal terminator.
caution: Do not allow contact between the ground and the fixture’s chassis ground. Grounding the ground can cause a ground loop, and your fixture may perform erratically. Test cables with an ohm meter to verify positive pole and to make sure the pins are not grounded or shorted to the shield or each other.
3-PIN TO 5-PIN CONVERSION CHART
Note! If you use a controller with a 5 pin DMX output connector, you need to use a 5 pin to 3 pin adapter. The chart below details a proper cable conversion:
3-PIN TO 5-PIN CONVERSION CHART
| Conductor | 3 Pin Female (output) | 5 Pin Male (Input) |
| Ground/Shield | Pin 1 | Pin 1 |
| Data ( – ) signal | Pin 2 | Pin 2 |
| Data ( + ) signal | Pin 3 | Pin 3 |
| Do not use | Do not use | |
| Do not use | Do not use |
IR Controller
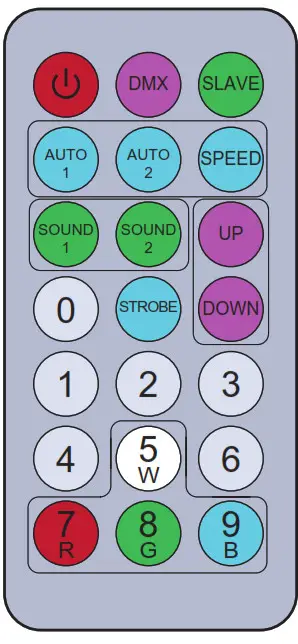
![]() Power on/off button
Power on/off button![]() DMX button,to control DMX address when press this button.It is channel mode when double click.
DMX button,to control DMX address when press this button.It is channel mode when double click.![]() Master-slave mode button.
Master-slave mode button.
![]() Automatic mode button
Automatic mode button
![]() Speed adjustive button
Speed adjustive button
![]() Sound mode button
Sound mode button
![]() Up and down button,you can choose the program that you need or numerical.
Up and down button,you can choose the program that you need or numerical.
![]() Strobe button
Strobe button![]() You can use these number button to adjust numerical in any program mode.
You can use these number button to adjust numerical in any program mode.
![]() Color choosing button.
Color choosing button.
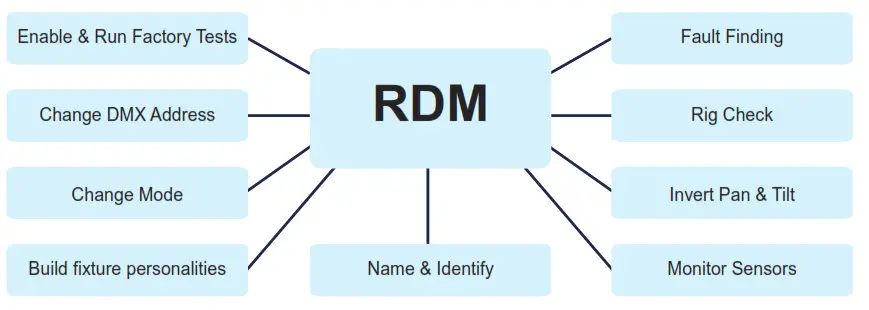
RDM—Remote Device Management
RDM is a wild version of the DMX512-A protocol, allowing dimming stations and other control devices to be discovered through a DMX512 network, and then configuring,
status monitoring, and managing intermediate and line end devices.
It allows two-way communication between the lighting device or system controller and the connected RDM compatible device through the standard DMX. This protocol will
allow these devices to be configured, monitored, and managed in a manner that does not interfere with the normal operation of standard DMX512 devices that do not
recognize the RDM protocol.
Allow a controller or test device to find other devices that can be RDM, such as computer lights or dimming cabinets, and remotely manage them through this connection intelligence. Including the ability to remotely set the initial address of the DMX512, query the device’s errors or statistics, and achieve most of the configuration settings that re usually done on the front panel of the device. RDM can run with the new RDM device or any original DMX512 product on the same data link without any performance mpact.Since RDM runs on the first team DMX512 link, the only infrastructure upgrade required by RDM is to upgrade the existing data distributor to implement a two-way mode to support RDM.
The RDM information is transmitted through the first pair of DMX512 data channels.RDM uses packets that include non-zero initial codes to start and control communications. This alternating(rotating) session and waiting for indicative responses is performed in a semi-duplex format. The second data pair is not used for any RDM function.
Two-way data transmission-each vendor’s equipment can exchange data, Art-net can only transmit data, can not exchange with each other.
Its functions are as followed:
 IMPORTER
B&K LUMITEC
ZI – 2 Rue Alfred Kastler – 67850 Herrlisheim – France
www.bklumitec.com


