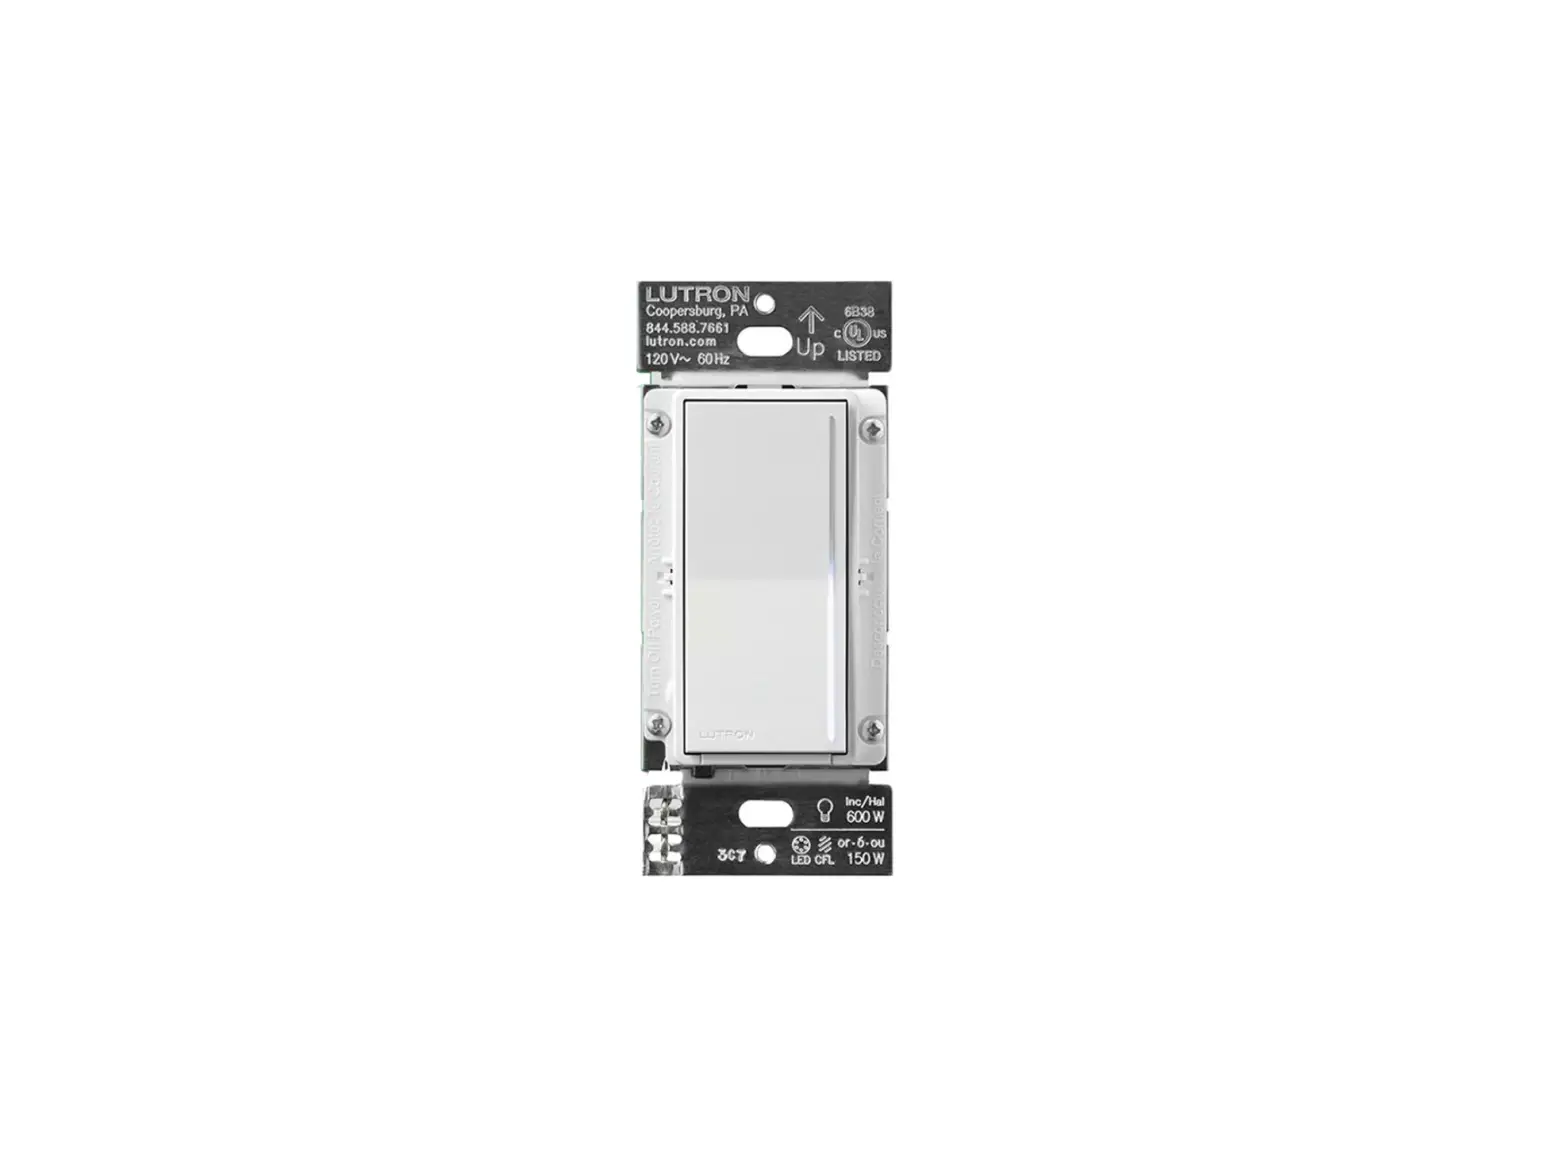
LUTRON ST-PRO-N Sunnata PRO LED Dimmer
Please read before installing
Sunnata PRO LED+ Dimmer
ST-PRO-N
120 V~ 50/60 Hz
 250 W
250 W
LED/CFL
 500 W
500 W
Inc./Hal./ELV
 400 VA
MLV
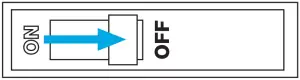
Turn power OFF at circuit breaker
 WARNING: ELECTRIC SHOCK HAZARD.
May result in Serious Injury or Death. Turn off power at circuit breaker orfuse before installing.
Load types and operation
Load Type | Minimum Load | Maximum Load | Neutral | Required Phase Mode | ||
Single Gang | End of Gang | Middle of Gang | ||||
| LED | 1 bulb | 250 W | 200 W | 150 W | Required | Either |
| MLV Transformer with LEDs | See Application Note #559 (P/N 048559) at www.lutron.com No Derating Required | Forward | ||||
| ELV Transformer with LEDs | Reverse | |||||
| MLV Transformer with Halogen | 10 W | 400 VA (300 W) | No Derating Required | Forward | ||
| ELV Transformer with Halogen | 10 W | 500 W | 400 W | 300 W | Reverse | |
| Incandescent / Halogen | 10 W | 500 W | 400 W | 300 W | Either | |
| Dimmable Fluorescent Ballast | 1 ballast | 3.3 A (400 VA) | No Derating Required | Forward | ||
| Hi-lume 1% 2-wire (LTE) LED Driver | 1 driver | 3.3 A (400 W) 20 drivers max. | No Derating Required | Forward | ||
| PHPM-PA / 3F and GRX-TVI | 1 interface | 3 Interfaces | No Derating Required | Forward | ||
* Neutral is required for all load types.
Note: For dimming MLV fixtures, the maximum lamp wattage is typically 70%-85% of the transformer’s VA rating. For actual transformer efficiency, contact the manufacturer. The total VA rating of the transformer(s) shall not exceed the VA rating of the dimmer.
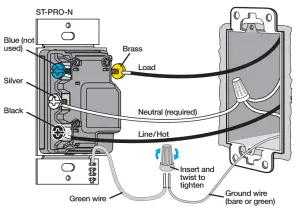
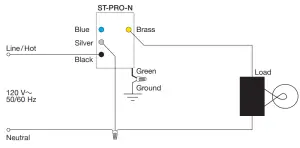
Remove existing device and connect the new dimmer (appropriately choose ONE of the diagrams below)
Single pole wiring
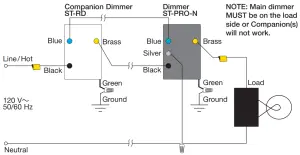
Multi-location wiring – Tag the wire connected to the different colored screw (Common screw) of the switch being removed.
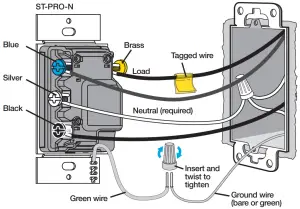
** To dim from 3 or more locations, visit lutron.com/Sunnata4Way
Note: Main dimmer MUST be wired on the load side.
Up to four companion dimmers may be used.
Mount the dimmer and attach faceplate
Setup Operation
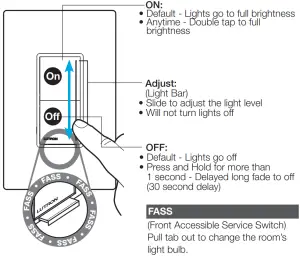
ST-PRO-N Only
Adjust Low-End Trim
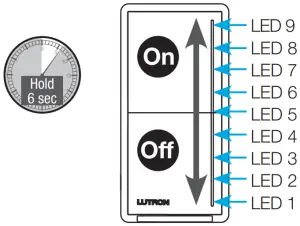
- Press and hold middle (LED 5) of light bar until dimmer goes to low-end and lowend setting starts to flash.
- Slide up or down on the light bar.
- Press and release Off to save and exit.
Phase-Select Mode
- Pull out the Front Accessible Service Switch (FASS).
- Press and hold On . Push in the Front Accessible Service Switch (FASS) and continue to hold On until LED 1 and LED 9 start flashing.
- Release the On . LED 1 or LED 9 will be flashing to indicate current phase mode.
LED 9 – Forward-Phase
LED 1 – Reverse-Phase (default) - Touch the light bar to select the desired phase.
- Press and hold On to save and exit.
See the Sunnata Dimmer MyLevel Personalization Application Note #734 (P/N 048734) at www.lutron.com/SunnataMyLevel for details on how to further adjust other settings.
Troubleshooting
Symptom | Cause | Action |
| Main Dimmer: LEDs 6, 8, and 9 are flashing slowly (once per second) Some Companions: LEDs 1, 2, and 4 are flashing quickly (three times per second) Some Companions: LEDs 7, 8, and 9 are flashing slowly (once per second) | One or more companion dimmer is on the load side of the main dimmer. All companions must be on the line side of the main dimmer. |
|
| Main Dimmer: LEDs 1,7,and 9 are flashing Companion: No LEDs illuminated | Wiring error |
|
| Main Dimmer: LEDs 7, 8,and 9 are flashing Companion: No LEDs illuminated | Wiring error |
|
| Main Dimmer: LEDs 1 and 7 are flashing Companion: No LEDs illuminated | The phase is not set to the correct setting for your load type | Change to forward-phase. Confirm load compatibility in Step 2 and use instructions in Phase-Select Mode above to change phase. |
| Incoming line voltage is too high | Ensure that the input voltage to the device is less than 130 V~. | |
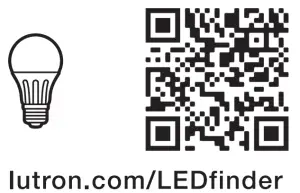
| Main Dimmer: LEDs 1, 2, and 3 are flashing Companion: No LEDs illuminated | Incompatible load | Check if lamp is compatible on www.lutron.com/ledfinder. Change to compatible lamp. |
| Hot and neutral connections are reversed | Swap wires on the black and silver terminals. | |
| Main Dimmer: LED 5 is flashing Companion: No LEDs illuminated | Load or ambient temperature exceed ratings |
|
| Main Dimmer: LEDs 1-9 are flashing Companion: No LEDs illuminated | A. Wiring issue at main dimmer B. Wiring issue at load or load failure C. Improper phase selection D. Incompatible load |
|
| LED lights do not operate well or they flicker/buzz | The phase is not set to the correct setting for your load type The low-end is not adjusted The lamp is not compatible with your Lutron dimmer |
|
For additional Troubleshooting, please visit www.lutron.com/support
IMPORTANT
- CAUTION: Use only with permanently installed fixtures with dimmable screw-in LED, dimmable self-ballasted compact fluorescent, halogen, or incandescent lamps. Use only to control the primary side of permanently installed transformer supplied low-voltage lighting, or in combination with incandescent lamps. To reduce the risk of overheating and possible damage to other equipment DO NOT use to control receptacles, fluorescent lighting fixtures, non-ballasted or externally ballasted compact fluorescent lamps, motor operated appliances or transformer supplied appliances.
- Neutral is required for all load types.
- Install in accordance with all national and local electrical codes.
- When no “grounding means” exist within the wallbox, the NEC® 2011, Article 404.9 allows a dimmer without a grounding connection to be installed as a replacement, as long as a plastic, noncombustible wallplate is used. For this type of installation, twist a wire connector onto the green ground wire or remove the green ground wire on the dimmer and use an appropriate wallplate such as Claro or Satin Colors series wallplates by Lutron.
- Protect the dimmer from dust and dirt when painting or spackling the wall.
- This dimmer is not compatible with standard 3-way or 4-way switches. Use only with Lutron companion dimmers listed above.
- In any 3-way/4-way circuit use only one dimmer with up to 4 companion dimmers.
- Maximum wire length between the dimmer and the farthest companion dimmer is 150 ft (45 m).
- Operate between 32 °F and 104 °F (0 °C and 40 °C).
- It is normal for the dimmers to feel warm to the touch during operation.
- Clean the dimmer with a soft damp cloth only. Do not use any chemical cleaners. For more information, please see
www.lutron.com/productcleaningrecommendations - For indoor use only.
- Tighten screw terminals securely to 5 in-lb (0.55 N•m).
- Fully wrap 14 AWG/12 AWG (1.5 mm2 /4.0 mm2)wires around the screw and tighten, or strip insulated 14 AWG (1.5 mm2) wires to 1/2 in (13 mm) and insert into the push-in terminals.
FCC/IC/IFT Information
This device complies with part 15 of the FCC Rules and Industry Canada license-exempt RSS standard(s). Operation is subject to the following two conditions: (1) This device may not cause interference, and (2) This device must accept any interference, including interference that may cause undesired operation. Modifications not expressly approved by Lutron Electronics Co., Inc. could void the user’s authority to operate this equipment.
NOTE: This equipment has been tested and found to comply with the limits for a Class B digital device, pursuant to part 15 of the FCC Rules. These limits are designed to provide reasonable protection against harmful interference in a residential installation.
This equipment generates, uses and can radiate radio frequency energy and, if not installed and used in accordance with the instructions, may cause harmful interference to radio communications.
However, there is no guarantee that interference will not occur in a particular installation. If this equipment does cause harmful interference to radio or television reception, which can be determined by turning the equipment off and on, the user is encouraged to try to correct the interference by one or more of the following measures:
- Reorient or relocate the receiving antenna
- Increase the separation between the equipment and receiver
- Connect the equipment into an outlet on a circuit different from that to which the receiver is connected
- Consult the dealer or an experienced radio/TV technician for help.
This equipment complies with FCC/ISED radiation exposure limits set forth for an uncontrolled environment.
The user should avoid prolonged exposure within 7.9 in (20 cm) of the antenna, which may exceed FCC/ISED radio frequency exposure limits.
This Class B digital apparatus complies with Canadian ICES-003.
Limited Warranty:
www.lutron.com/TechnicalDocumentLibrary/369-119_Wallbox_Warranty.pdf
For Lutron patents please visit www.lutron.com/patents
Lutron, Claro, Sunnata, LED+, FASS, and Satin Colors are trademarks or registered trademarks of Lutron Electronics Co., Inc. in the US and/ or other countries.
NEC is a registered trademark of National Fire Protection Association, Quincy, Massachusetts.
©2021 Lutron Electronics Co., Inc
Help
How-to videos

Find the right LED
Use our mobile friendly self-paced installation tool:
www.lutron.com/wiringwizard
Find more product information: www.lutron.com/support
– Videos
– Frequently Asked Questions


