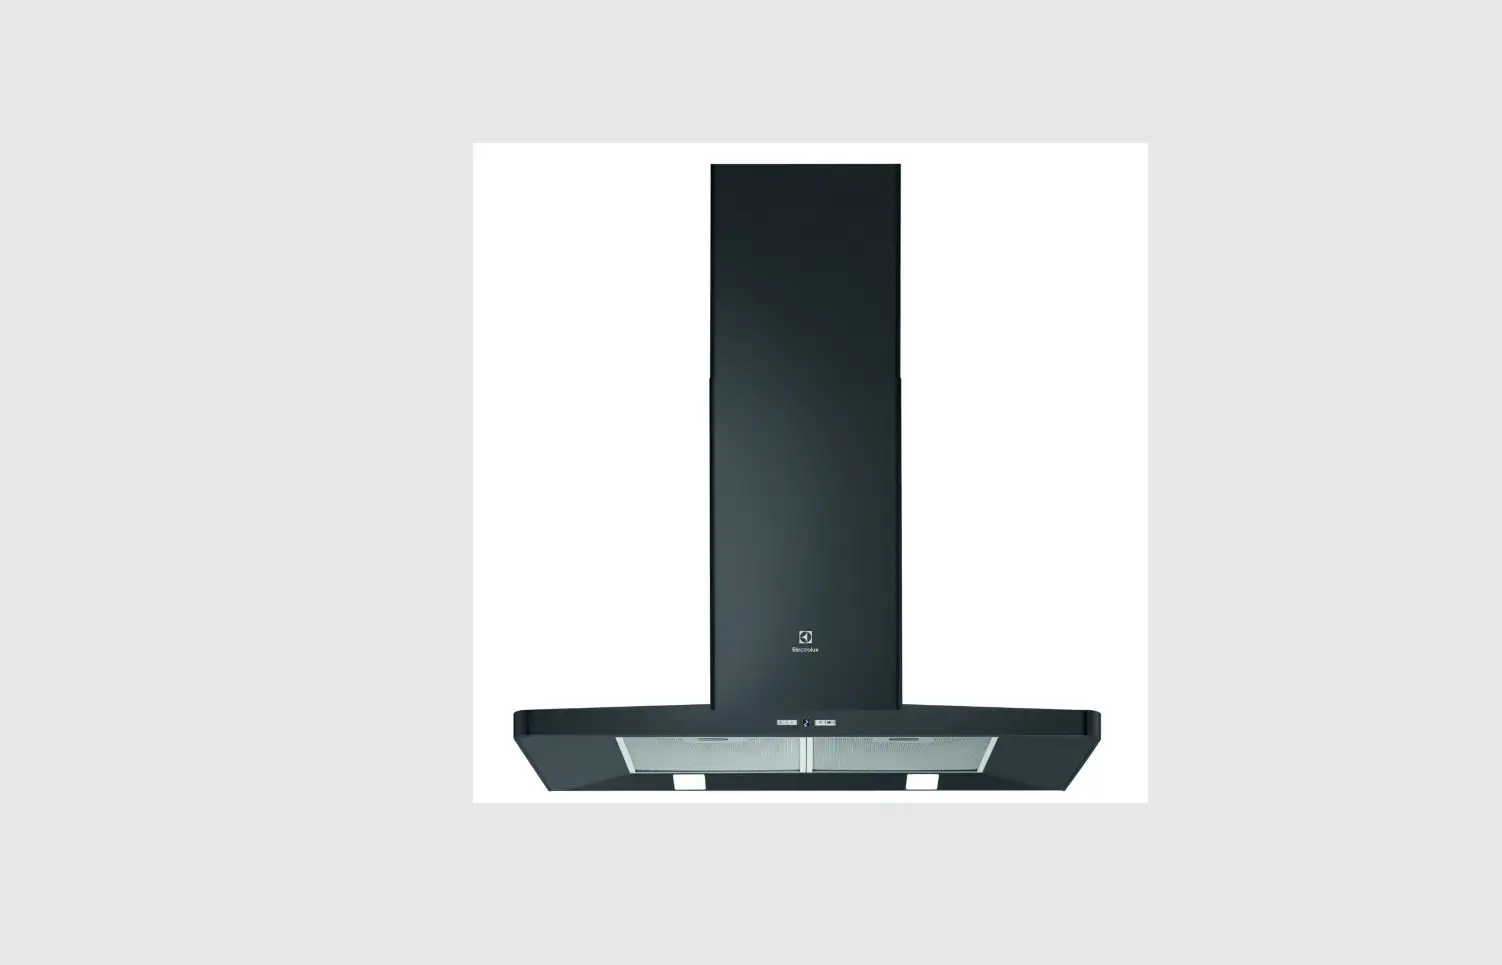
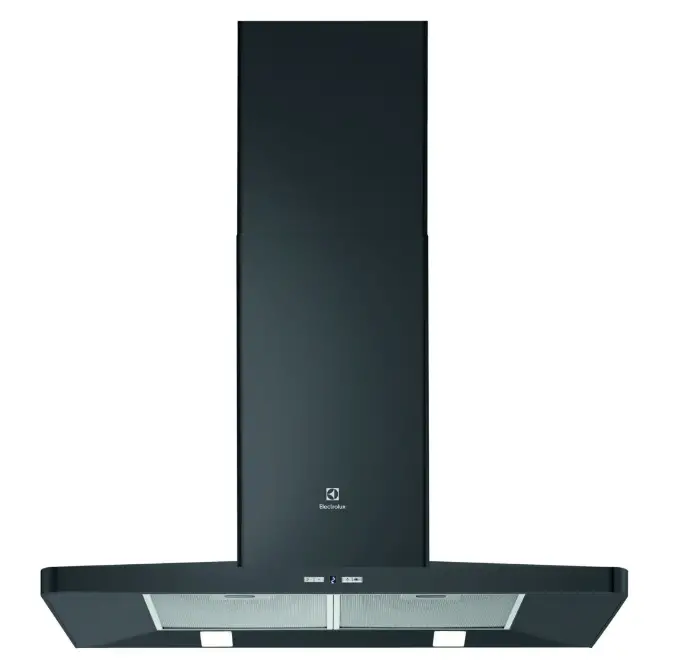
LAPETEK JONA Slim X2 60 60cm Wall Mount Kitchen Hood
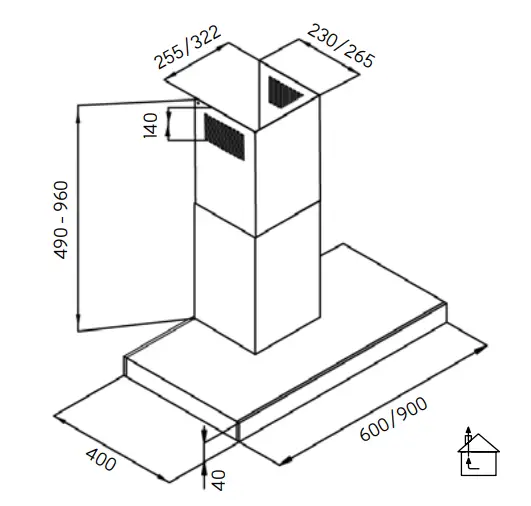
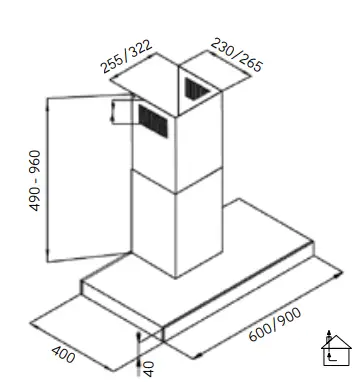
DIMENSION
This installation manual applies to the following products.
| TUOTE/PRODUCT/PRODUKT | KOODI/CODE/KOD | VERSIOT/VERSIONS/VERSIONER |
| 60AC RST/ S/S / RF | 571ACX2 | 001 |
| 60AC VALKOINEN/WHITE/VIT | 572ACX2 | 001 |
| 60AC MUSTA / BLACK/SVART | 573ACX2 | 001 |
| 60EC RST/ S/S / RF | 571ECX2 | 001 |
| 60EC VALKOINEN/WHITE/VIT | 572ECX2 | 001 |
| 60EC MUSTA / BLACK/SVART | 573ECX2 | 001 |
| 90AC RST/ S/S / RF | 574ACX2 | 001 |
| 90AC VALKOINEN/WHITE/VIT | 575ACX2 | 001 |
| 90AC MUSTA / BLACK/SVART | 576ACX2 | 001 |
| 90EC RST/ S/S / RF | 574ECX2 | 001 |
| 90EC VALKOINEN/WHITE/VIT | 575ECX2 | 001 |
| 90EC MUSTA / BLACK/SVART | 576ECX2 | 001 |
For your safety and correct operation of the appliance, read this manual carefully and thoroughly before installation, wiring and use. Always keep these instructions with the appliance.
SAFETY INFORMATION
- All installation work must be carried out by a professional.
- Before installation, make sure neither the appliance nor its parts are damaged. Otherwise, please contact your dealer. Do not install a defective product! An installed appliance is considered tested and approved.
- Always follow the instructions in this manual. Lapetek is not liable for any damage, fires etc., resulting from improper or incorrect installation or use.
- The installation of the appliance must be carried out in a way that the cooker hood can be removed for maintenance without dismantling other room structures. In case of warranty maintenance, Lapetek is not liable for any costs resulting from dismantling other structures.
- The cooker hood may look different from the drawings in this booklet. However, instructions of use, maintenance and installation remain the same. Make sure the product and its version number corresponding to the information in the manual.
- Always wear protective gloves during installation and maintenance procedures.
USE
- The cooker hood is designed for extracting cooking fumes and is for domestic use only.
- Unplug the appliance or remove the fuse before cleaning or maintenance.
- Never use the appliance without a grease filter.
- Do not store or place anything on top of the appliance.
- Make sure there is adequate exchanging air from outside in the room by, for example, opening a window when the hood is in use. Inadequate ventilation prevents the hood from working properly.
- Do not flambé or set an open fire under or near the appliance.
- The amount of grease inside the hood and the grease filters should be monitored regularly by removing the grease filter and cleaning both the appliance and the grease filter when necessary.
- The grease filter must be cleaned regularly (whenever necessary or at least every 3 months) to prevent risk of fire. The grease filter can be washed in a dishwasher. Do not use the longest and hottest washing programs. The grease filters will wear out and should be replaced when their surface/color begins to be worn or faded.
CONTROL PANEL FUNCTIONS
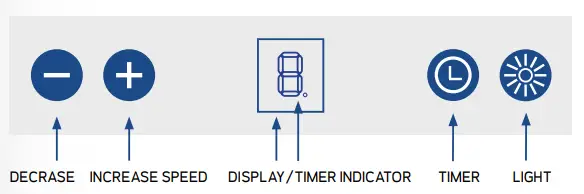
When the appliance is connected to mains power source, the operational mode of the appliance must be set to X2 (within 1 minute of connecting to the mains current) by pressing the![]() keys
keys![]() simultaneously for at least 4 seconds. After, press the or keys until number 2 (= X2 mode chosen) appears on the display. Save the X2 mode by pressing the timer key
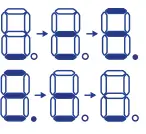
simultaneously for at least 4 seconds. After, press the or keys until number 2 (= X2 mode chosen) appears on the display. Save the X2 mode by pressing the timer key![]() . The operational mode of the appliance can be re-set by disconnecting and re-connecting the appliance to the main current. The opening of the flow control damper is shown on the display: The closing of the flow control damper is shown on the display: The dot after the number on the display is illuminated when the flow control damper. After 180 minutes without any user action, the flow control damper closes.
. The operational mode of the appliance can be re-set by disconnecting and re-connecting the appliance to the main current. The opening of the flow control damper is shown on the display: The closing of the flow control damper is shown on the display: The dot after the number on the display is illuminated when the flow control damper. After 180 minutes without any user action, the flow control damper closes.
 AC-models
Pressing the![]() key briefly turns the lights on/off.
key briefly turns the lights on/off.
EC-models
Pressing the![]() key briefly turns the lights on / off. The lights turn on at full luminous intensity which is suitable for working. In addition, the lights have a three-stage dimming function. When the lights are on at full power, pressing the key for three seconds will dim the lights to general lighting. When pressing the key once more for three seconds, the lights dim to ambient lighting. The lights always turn on at full luminous intensity.
key briefly turns the lights on / off. The lights turn on at full luminous intensity which is suitable for working. In addition, the lights have a three-stage dimming function. When the lights are on at full power, pressing the key for three seconds will dim the lights to general lighting. When pressing the key once more for three seconds, the lights dim to ambient lighting. The lights always turn on at full luminous intensity.
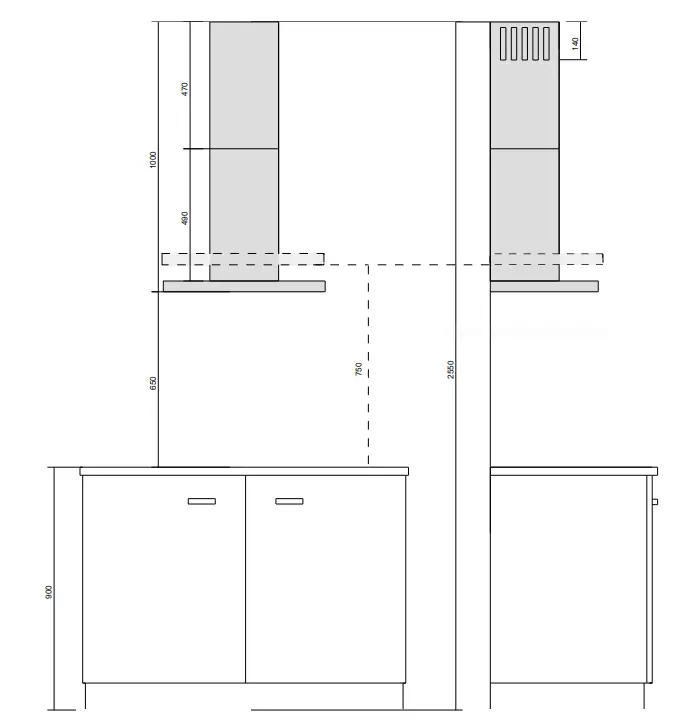
INSTALLATION HEIGHT
- The maximum installation height is 750 mm from the cooker. In this case, the ceiling height of the room can be 2650 mm (please take into account all the other dimensions and measurements in the picture).
- A taller, 860 mm lower part of the chimney pipe is available as an accessory.
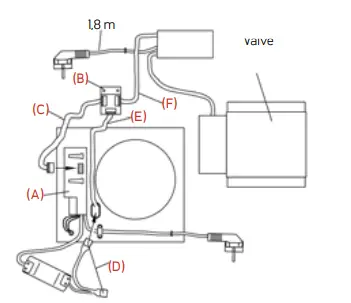
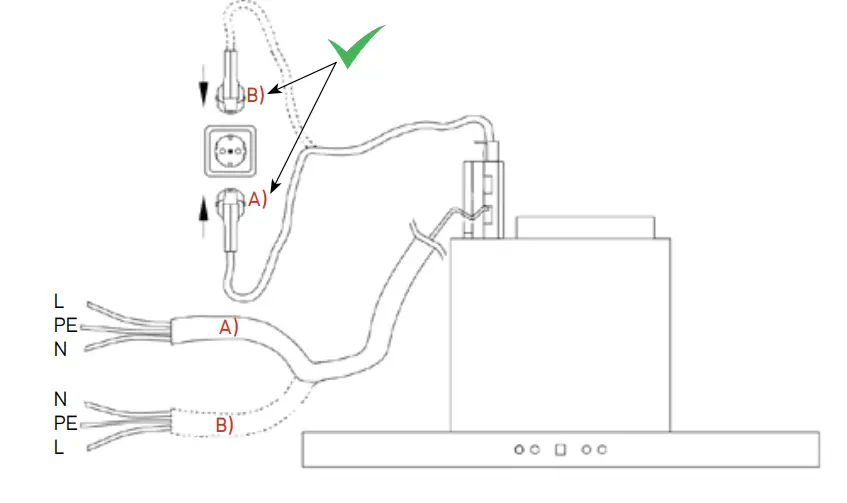
EXTERNAL MOTOR CONNECTIONS X2/AC
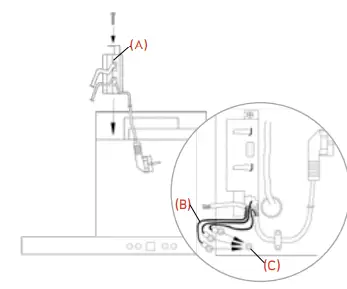
- The Control Unit (A) is attached to the Cooker Hood by screws as shown in the picture. The PE wires of the Control Unit (3 pcs) (B) are attached to the attachment point (C) as shown in the picture.
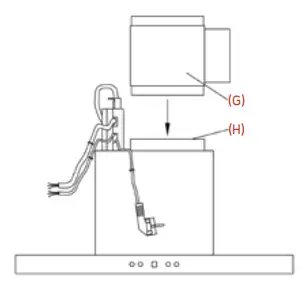
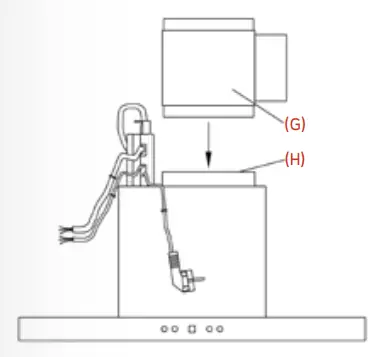
- Press the flow control damper (G) to the duct flue output (H).

- Attach the Junction Box cable (C) to the Control Unit (A) and the Junction Box (B). Connect the keyboard cable (E) and the flow control damper (F) to the Junction Box (B). Push the lamp cable (D) inside the chamber as shown in the picture and connect the lamp cables to the connectors leaving of the lamp unit. Connect the input cables to the AC Roof Fan (picture 4).


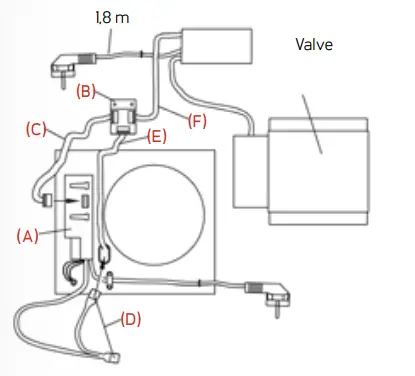
EXTERNAL MOTOR CONNECTIONS X2/EC
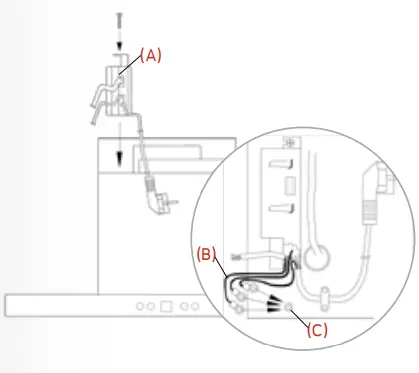
- The Control Unit (A) is attached to the Cooker Hood by screws as shown in the picture. The PE wires of the Control Unit (3 pcs) (B) are attached to the attachment point (C) as shown in the picture.

- Press the flow control damper (G) to the duct flue output (H).

- Attach the Junction Box cable (C) to the Control Unit (A) and the Junction Box (B). Connect the keyboard cable (E) and the flow control damper (F)to the Junction Box (B). Push the lamp cable (D) inside the chamber as shown in the picture and connect the lamp cables to the connectors leaving of the lamp unit. Connect the input cables to the EC Roof Fan (picture 4).
ACCORDING TO THE EXTERNAL MOTOR MANUFACTURER

- YellowGreen
- Blue
- Red
- Blue
- Yellow
10 V POWER SUPPLY IS NEEDED FROM EC MOTOR TO THE HOOD
- YellowGreen
- Blue
- Brown
- Red
- Black
- Brown
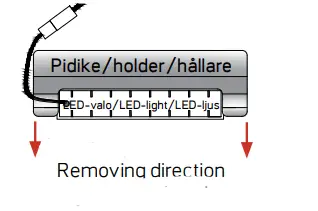
REPLACEMENT OF LIGHTING
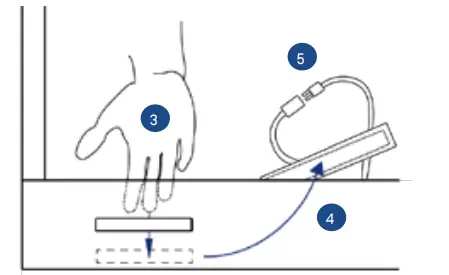
- Remove the grease filters before replacing the lamp
- Push the lamp gently inwards to release it from the body of the hood.

- Gently push the lamp inside the hood in the direction of the arrow pressing from outside at the same time to release it from the holders inside the hood.
- Carefully pull out the lamp.

- Disconnect the cable (quick connector 5) and replace the lamp.

- Install the new lamp in reverse order

- Finally, squeeze the lamp and its holder in place inside the hood to securely attach the lamp to the body of the hood.
WARRANTY AND MAINTENANCE
- Lapetek cooker hoods have a two-year (2) warranty. Lapetek is not liable for any indirect defect or damage. The warranty does not cover consumable parts such as lamps, light sources, filters, etc.
- This device is manufactured in accordance with EU Directive 2012/19/UE (SER).
- Cleaning the grease filter (for further instructions, see installation instructions steps 12-14).
- Replacing the LED-light (for further instructions, see page 8).
- Additional information: lapetek.fi
INSTALLATION

- Remember to wear protective gear.

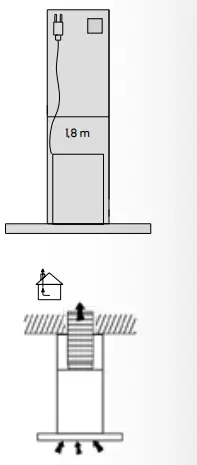
- Flue installation. Includes a 1,8 m long power supply cable and 160 mm flue connection reducing socket.

- Measurements of the appliance.

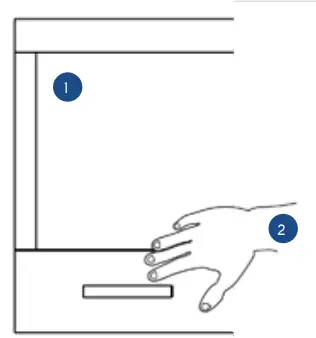
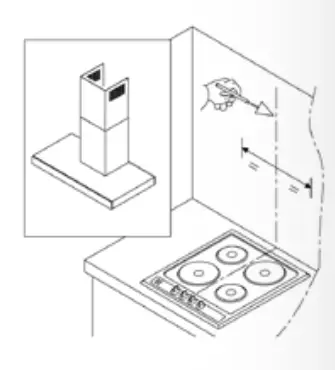
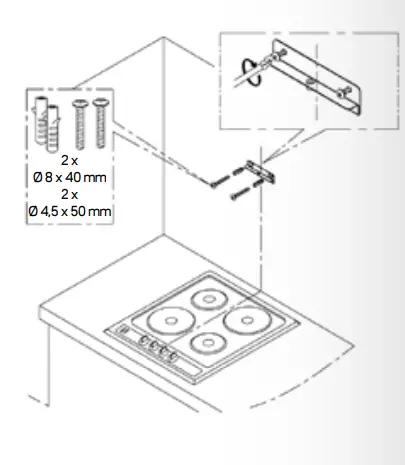
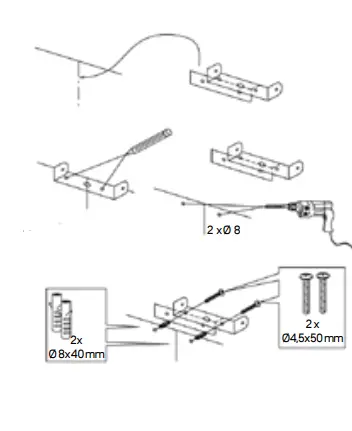
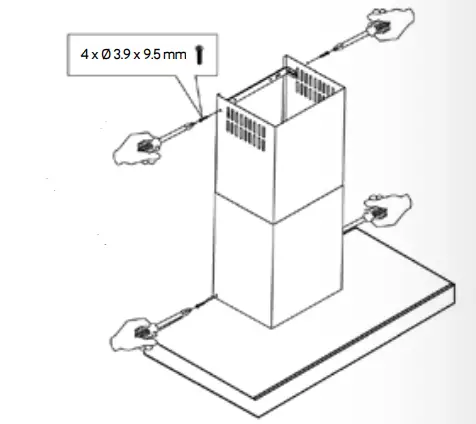
- Measure and mark the locations of the bracketscrews at the same center line as the cooker.

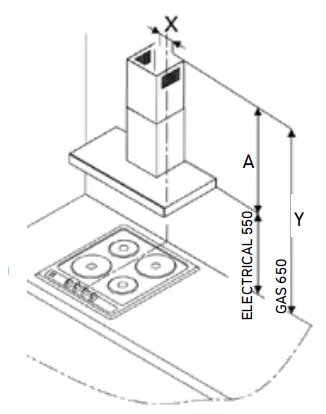
- Minimum distance from the cooker: Electric cooker 55 cm, Gas cooker 65 cm, Recommended max. installation height 75 cm from the cooker.

- For wall mounting, use fasteners recommended by the wall manufacturer, available from hardware stores.

- For mounting the wall bracket for the chimney pipe, use fasteners recommendedby the wall material manufacturer, available from hardware stores.
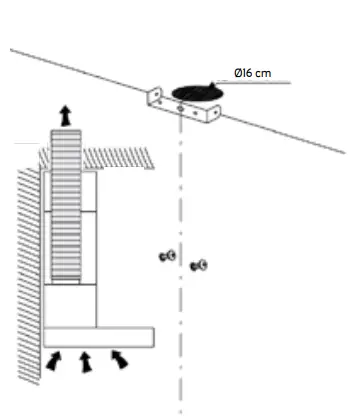
- Note the space required by both the power supply cable and the chimney pipe.

- Lift up the cooker hood into the wall bracket and adjust it horizontally. Finally, attach the middle retaining screw.

- External motor connections (p. 6-7).

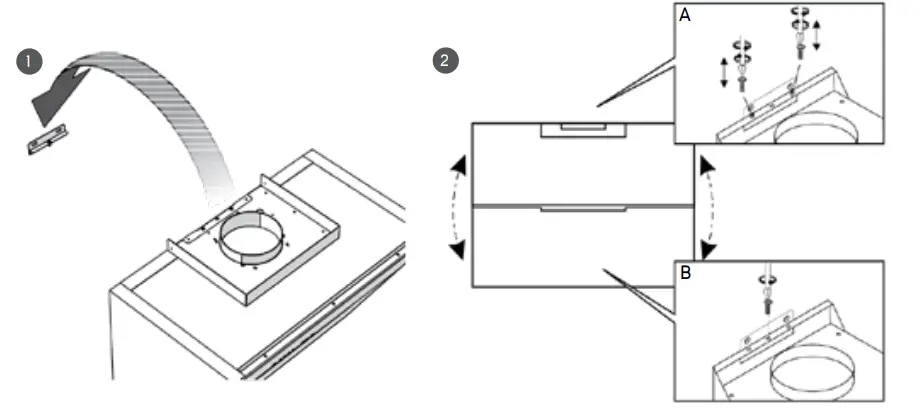
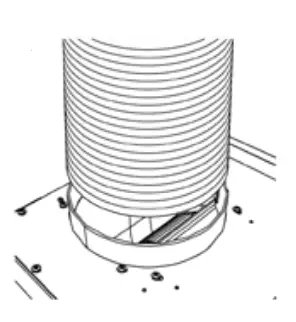
- Attach the chimney duct to the cooker hood before attaching the chimney pipes.

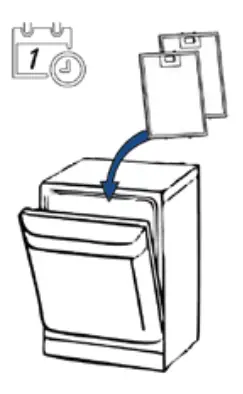
- Secure the chimney pipes with the screws provided.

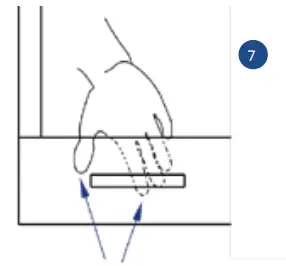
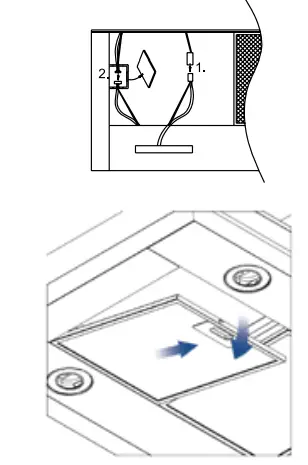
- Remove the grease filter. Connect the cables for the lights and control panel behind the grease filters.
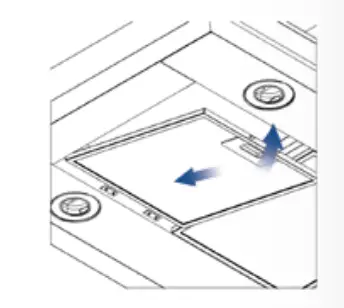
- Inserting the grease filter

- The grease filter can be washed in a dishwasher. Do not use the longest and hottest washing programs. The grease filters will wear out and should be replaced when their surface/color begins to be worn or faded.
PRODUCT TEST DOCUMENT
INSTALLER SIGNED TEST DOCUMENT
INSTALLER SIGNED PRODUCT TEST DOCUMENT
During installation, the installer must must check the checklist below. Please note that the first checkpoints take place before the actual installation. By signing the document, the installer ensures the installation has been carried out in accordance with the installation instructions and that the appliance is functioning properly and is flawless.
Before installation:
- The appliance is externally in good condition when removed from packaging and includes all its parts. The appliance has no imperfections/visible defects/color defects/bumps/scratches/etc.
After installation: - The motor starts and all speeds work properly.
- Check that the suction power is perfect after installation. In case the suction power is poor after installation, Check that power adjustment is OK, external motor works properly and there is nothing in the piping causing decrease of the air flow.
- Flow control damper opens/closes.
- Lights are working.
- Power control of the lights are lights are working (EC models only).
- The device is set to X2 (= the motor cannot be switched off).
- In case any of the checkpoints 1) to 7) above are not in order, the installer must immediately contact the seller/customer as well as Lapetek service at +358 9 2511 030 for further information.
- In case checkpoint 3) is not in order, the installer must contact the customer/seller and let them know that the house has a problem in the ventilation duct that decreases airflow.
- The warranty granted by Lapetek is conditional on the completion of this document and the certification of the condition of the checkpoints. A copy of the test document must be submitted with a product reclamation.
Oy Lapetek Ab
www.lapetek.fi
Sales, technical support and service
[email protected]


