![]() 22kW 3-Phasen EM022AC1OCPP wall box charging station
22kW 3-Phasen EM022AC1OCPP wall box charging station
User Manual 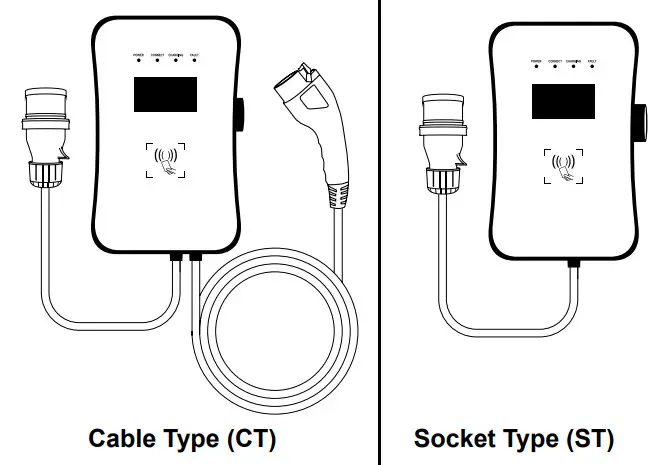 22kW | 3-Phasen EM022AC1OCPP
22kW | 3-Phases EM022AS0OCPP
11kW | 3-Phases EM011AC1OCPP
Thank you for choosing the EM2GO electric vehicle charging station.
With this smart wall box, you have chosen a high-precision charger equipped with many safety-related protection devices, as well as interfaces, which guarantee all-around carefree charging of your vehicle and limitless communication.
Important Note:
Please read these important safety instructions for charging your vehicle.
Please keep this user manual. The charger has many safety functions. Read all safety information and warnings in this manual to become aware of possible dangers.
![]() Warning
Warning
When using electrical products, these basic precautions must always be observed.
- Do not install or use the charger near explosive, corrosive or flammable materials, chemicals or vapors.
- The charger may only be installed on non-flammable surfaces such as concrete, and at least 120cm above the ground.
- The charger must be securely grounded.
- Turn off the power to the charger before installing or servicing the charger.
- The charger is designed only for vehicles that are compatible with the IEC 62196 standard for charging modes.
- Do not use the charger if it is defective or has visible damage.
- Do not attempt to open, disassemble, repair, tamper with, or modify the unit. If you have any questions or need repairs, contact our customer service department.
- Do not use the charger when you are in the vehicle.
- Do not use the charger when exposed to heavy rain, snow, or inclement weather.
- Always exercise caution when transporting the charger.
- Do not touch the charging connector with sharp metallic objects.
- Do not pull the charging cable with force or over sharp objects.
Warning
The device must be installed, adjusted, and serviced by qualified electricians or people who are familiar with the construction and operation of this type of EV-Charger Failure to follow this precaution could result in death or serious injury.
- Incorrect installation and testing of the charger can possibly lead to damage. No liability will be accepted for any resulting damage.
- Ensure that the charging cable is correctly positioned during the charging process and cannot be stepped on, damaged, or stressed.
- Check the wire diameter according to local electrical requirements.
- Turn off the appropriate power supply before beginning installation.
- The charger must be installed and commissioned by qualified personnel.
- Before installation, the supply cable and house connection values must be checked.
Abbreviations
A|Ampere, unit of current
V |Volt, unit of voltage
EV | Electric vehicle
EVSE | Electric Vehicle Supply Equipment EV according to IEC61851-1
RFID | Radio Frequency Identification Card
OCPP | Open Charge Point Protocol, universal communication interface with a central system (backend)
IP | Protection class
RCMU | Residual Current Monitoring Unit
MCB | Miniature Circuit Breaker
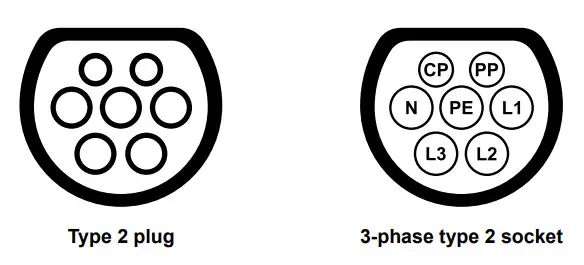
Representation of Type2 plug/socket according to IEC 62196-2
Important Note:
According to §19 NAV of March 21, 2019, the operation of charging devices for electric vehicles must be reported to the responsible electricity provider before use (from 11 KW) and before installation (from 22 KW). This can also be done by the commissioned electrician.
Please contact your electricity provider by phone or online for more information.
Package contents:
- EV charging station and CEE cable
- 2 x RFID card (offline mode)
- Wall mounting incl. screws and dowels
- Instruction manual
Mounting
The EM2GO EV chargers provide a user-friendly operator interface with the appropriate communication interfaces.![]() Warning
Warning
A damaged EV charger must not be installed under any circumstances.
In case of damage, please inform your dealer immediately.
The installation and wiring must be carried out by a specialist company.
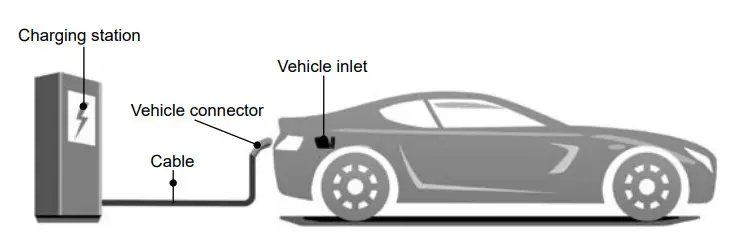
EM2GO EV chargers are equipped with a three-phase CEE plug and can be plugged into a suitably installed and secured CEE socket.![]() The danger of electric shock!
The danger of electric shock!
Make sure that the plug of the CEE cable is not connected to the mains when connecting to the charging station!
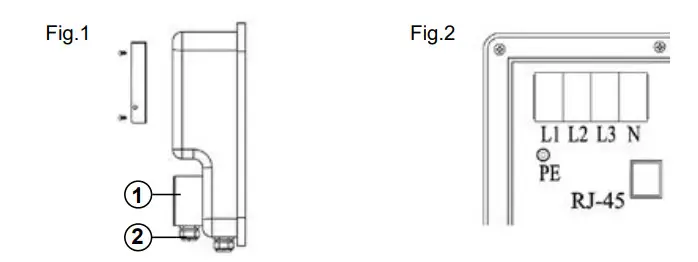
Mounting the supply cables: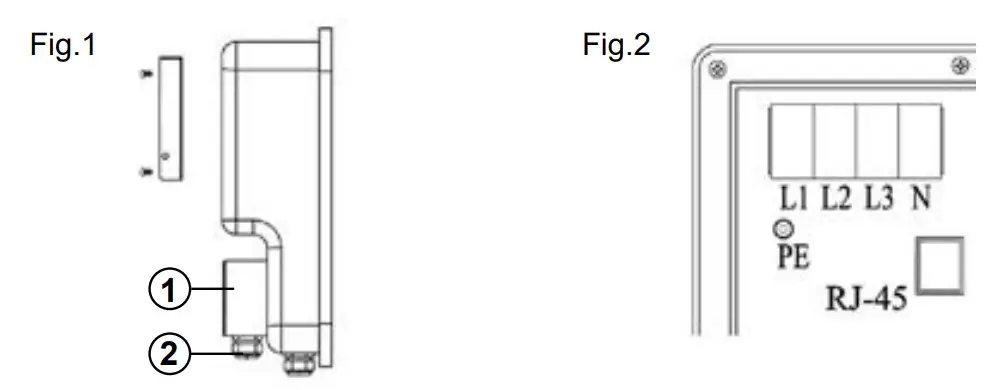
First, mount the wall bracket using the mounting accessories included in the scope of delivery
- Remove the cover (1).
- Feed the input cable through an interface (2).
- Connect the cable plugs to the screw terminal of the charging station as follows and screw this tight (approx. 4Nm): L1 Brown|L2 Black|L3 Gray|N Blue|PE Green-yellow
- Close the cover (1) again.

Wall mounting
NOTE: Please take into account that the length of the connection cable of the charging unit is 150 cm (±5%), and the three-phase junction box should be located in this area.
The charging station is equipped with a built-in AC & DC residual current monitoring unit (RCMU) and a miniature circuit breaker (MCB). Please ensure that your #threephase socket is equipped with the appropriate fuse switch.
Mounting accessories
- Wall mount
- Screws for holder
- Dowels
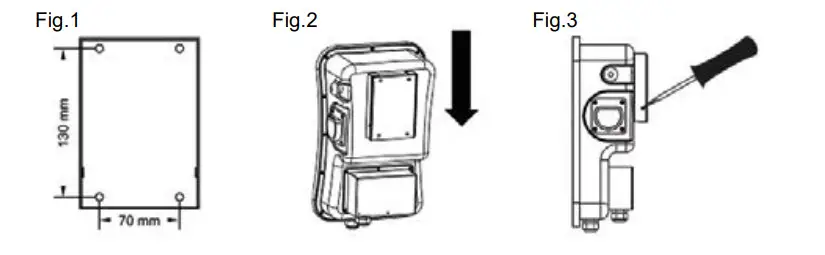
- Place the wall bracket where you want to place the charging station. Make sure that the CEE power connection is within a radius of 1.5 meters. Drill 4 mounting holes with a diameter of 10 mm and a depth of 50 mm at the appropriate height (Fig.1).
- Insert and countersink the dowels into the drilled holes.
- Screw the wall mount to the wall with the screws.
- Place the charging station on the wall bracket with the rear side facing upwards (Fig.2).
- Fasten the left and right screws to secure the wall box to the wall bracket (Fig.3).
No liability will be accepted for any damage caused by incorrect operation.
If you need technical support, please contact our support team via our website www.em2go.de.
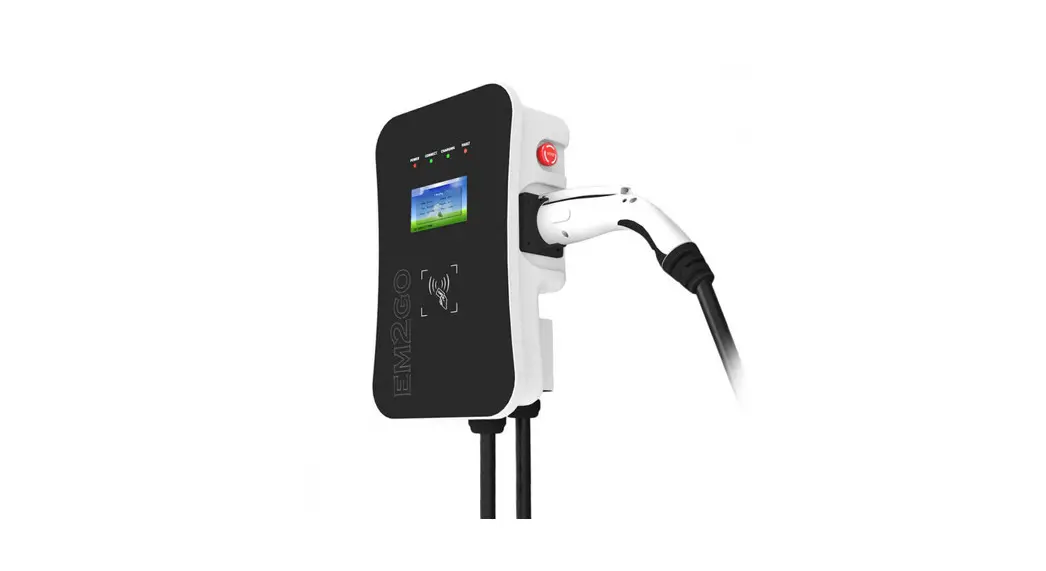
Overview
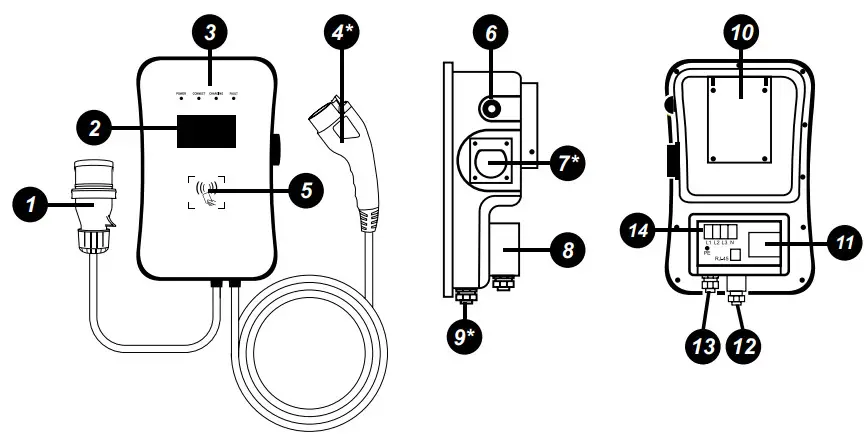
| 1. 1.5-meter connection cable with CEE plug | 8. Input terminal box |
| 2. LCD display | 9. Charging adapter interface (*only CT) |
| 3. LED indicators | 10. Wall bracket |
| 4. Type2 plug (*only CT) | 11. MCB |
| 5. RFID reader | 12. RJ-45 interface (Ethernet, RS-485) |
| 6. Emergency stop | 13. Input cable interface |
| 7. Charging plug holder (CT) / *Type2 connector (ST) | 14. Input connector (L1/ L2/L3/N/PE) |
Display
The high-resolution LCD color display of the EM2GO charging unit shows you the following information:
 | 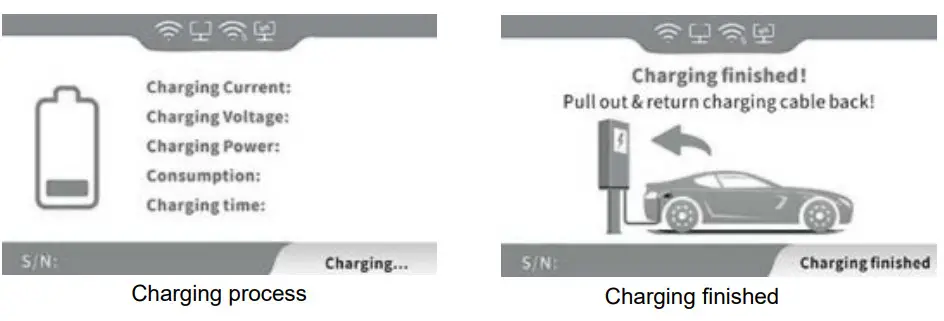 |
| 1. Charging power in real-time | |
| 2. 3-phase data (voltage and current) | |
| 3. Charging time | |
| 4. Power consumption | |
| 5. Status display |
LED indicators
The 4 LEDs indicate the status of the charger:
Power GREEN | Connect GREEN | Charging ORANGE | Fault RED | Description |
| ON | OFF | OFF | OFF | Standby (offline mode) |
| FLASHES | OFF | OFF | OFF | Standby (online mode) |
| OFF | ON | OFF | OFF | The charging adapter is properly connected to the vehicle |
| OFF | FLASHES | OFF | OFF | Checks charging |
| OFF | OFF | FLASHES | OFF | Charging process |
| OFF | OFF | OFF | FLASHES ALTERNATELY | Error code, see the display |
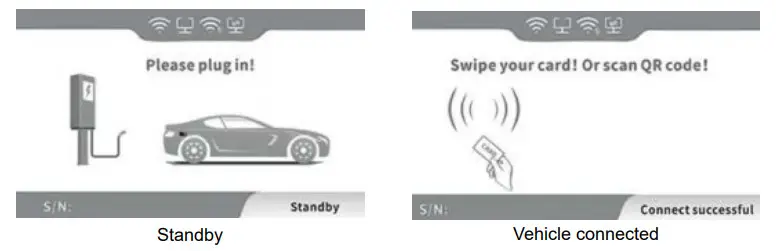
Charge the vehicle
Note: The vehicle to be charged must be parked, switched off and the parking brake engaged.
Switch on:
After installing and checking the charging station, press the toggle lever of the circuit breaker in the input terminal box of the charging station upwards to establish the power supply.
The power LED lights up and the charging station switches to standby mode.
- Remove the type 2 plug from the charging plug holder (CT) and connect it to the vehicle‘s charging port. Please ensure that the vehicle is prepared and set for charging. If you have purchased the charging station as a socket variant (ST), first connect your Type 2 charging cable to the Type 2 socket of the charging station, and then to the charging port of your electric vehicle.
- The charging process starts when a pre-configured RFID card touches the designated area for the RFID application. Also, the charging process can be stopped by touching the area with the RFID card. 3.
- After charging is complete, remove the Type 2 plug from the vehicle‘s charging port. Insert the type 2 plug into the charging plug holder (CT). If you have purchased the charging station as a socket variant (ST), put the protective cap back on type 2 charging plug. If you cannot pull out the plug, press the unlock button of the vehicle or key.
- Emergency stop button Press this button to stop the charging process immediately.
Communication
The charging station has the following interfaces for communication: Wi-Fi, Ethernet, and RS-485.
If the charging station is connected to an internet connection via the Wi-Fi or Ethernet interface, the charging station can be connected to a backend for the management of charging stations vie OCPP (Open Charge Point Protocol). Furthermore, it is possible to control the charging station via ModBus TCP.. The charging station can be programmed, controlled, and monitored via RS-485.
WiFi
Attention: An app for operation is not available.
- Prepare a 2.4 GHz WiFi router and an Android or iPhone smartphone. Make sure that the charging station and the smartphone are in the same WiFi range.
- Turn on the Wi-Fi router, and make sure that the router can connect to the Internet. 3.
- Turn on the smartphone‘s WiFi, connect the smartphone to the router via WiFi, and make sure that the terminal can access the Internet via the router.
- Install the „esp touch“ APP on your smartphone.
esp touch for iOS: https://apps.apple.com/app/espressifesptouch/id1071176700
esp touch for Android:
 https://play.google.com/store/apps/details?id=com.
parts.esp touch
https://github.com/EspressifApp/EsptouchForAndroid/releases/latest
Open the EspTouch app, select „EspTouch“ (not „EspTouch V2“) from the list and grant the app the location authorization.
Now enter the password for the currently connected WiFi network and press „Confirm“ or „Start“ to perform the WiFi configuration. 
Press and rotate to reset the emergency stop button three times in succession until the four indicator lights illuminate in a cycle corresponding to the running lamp mode. At the same time, the LCD screen changes to the WLAN configuration page. Click the „CONFIRM“ button of the APP on the smartphone (Fig.1).
When all the indicator lights flash once in a second, it indicates that the charging station‘s Wi-Fi configuration is completed. At the same time, the LCD screen will display „Successful“ and the name and password of the WLAN SSID (Fig.2).
Note: If the configuration fails, please set the „Multicast“ option in the „EspTouch“ app and repeat the process.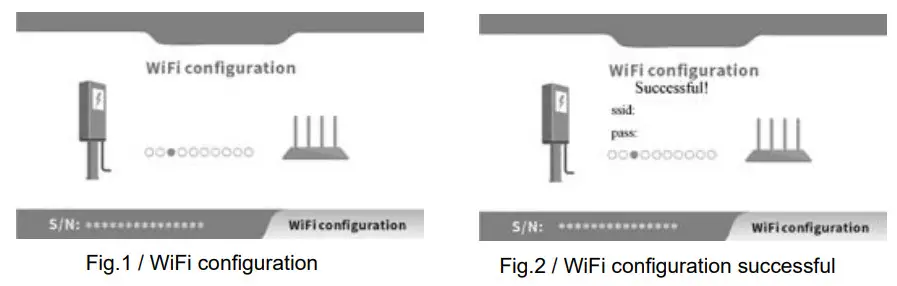
Note: The charging station supports only 2.4GHz wireless networks. Please make sure that your Wi-Fi network operates in the 2.4GHz band.
Note: The IP address of the charging station is negotiated via DHCP. A manual setting is not possible.
RJ-45 connection
The charging station has an RJ-45 connector that can be used for Ethernet and RS-485. Note the pinout for the RJ-45 connector below. Open the cap of the RJ-45 connector and plug in a CAT5e cable or better.
Pinout:
| PIN | 1 | 2 | 3 | 4 | 5 | 6 | 7 | 8 |
| Signal | Ethernet TX+ | Ethernet TX- | Ethernet RX+ | NC | NC | Ethernet RX- | RS-485 A | RS-485 B |
Note: A waterproof housing for an RJ-45 cable is optionally available.
Note: The IP address of the charging station is negotiated via DHCP. A manual setting is not possible.
RFID cards
The charging station is supplied with two RFID cards for offline mode with which charging processes can be started and stopped.
RFID cards for online mode with an OCPP backend are optionally available and have an identification number printed on the card, which must be registered in the OCPP backend. RFID cards for online mode can be personalized by the unique identification number.
Programming of RFID cards (Offline mode)
To program additional RFID cards for offline mode, proceed as follows.
- Switch on the charging station and disconnect the cable from the vehicle.
- Press the emergency stop button.
- Hold the new RFID card (offline mode) against the RFID reader for at least 10 seconds.
The new RFID card is now programmed for the EV charging station.
Change charging mode
By default, the charging process is controlled with RFID cards (see section Charging the vehicle).
To start the charging process directly after inserting the type 2 plug, the charging mode of the charging station must be changed. Proceed as follows:
- Switch on the charging station and disconnect the cable from the vehicle.
- Hold the programmed RFID card against the RFID reader for at least 10 seconds.
Switching the charging mode is signaled by the flashing or solid illumination of the Charging (orange) and Fault (red) LEDs.
Emergency stop button
Only press the emergency stop button during a charging process in an emergency. Charging will stop immediately.
Note: Do not press the emergency stop button to end a normal charging process.
Connect with an OCPP backend
The charging station supports OCPP (Open Charge Point Protocol) JSON 1.6 for communication between charging stations and a central management system (backend).
Before using OCPP, the endpoint URL must be programmed into the charging station.
To do this, please send us the endpoint
URL to be programmed, as well as the serial number of the charging station, which you will find in the display of the charging station, by email to [email protected].
Note: The endpoint URL must start with ws:// or wss://. It may take up to 24 hours for the endpoint URL to be programmed into the charging station and for the charging station to connect to the central management system. Make sure that the charging station is switched on and connected to the Internet during this time.
RS-485
The charging station can be externally programmed, controlled, and monitored via RS-485 using AT commands. For the assignment, see the section RJ-45 connection. All commands are terminated with <CR> (carriage return).
Note: For the connection via RS-485, bias and terminating resistors may be required depending on the cable length. These are not necessary for short cable lengths.
If there are high ground potential differences between the charging station and the RS-485 transmitter, it is recommended to use a ground cable.
| Baud rate | Data bits | Parity | Stop bits | Flow control |
| 115200 | 8 | none | 1 | none |
Commands are sent in the format AT+<cmd><CR> or AT+<cmd>=<value><CR>.
For each command received, the charging station sends a response.
AT commands
| Function | AT command | Response | |
| Start charging | AT+START=0 | AT+START=OK | Start charging process |
| AT+START=ERR,<CODE> | Code 1: Vehicle not connected Code 2: System fault Code 3: Charging in process Code 4: Charaina not available | ||
| Schedule charging | AT+START=1 ,<TIME><TIME> = 2021/01/01 12:30 | AT+START=OK | Charging process scheduled for a given time |
| End charging | AT+STOP | AT+STOP=OK | End charging process |
| Set max. output (Amp) | AT+SETRATE=<VALUE> <VALUE> = 6 to 32 | AT+SETRATE=OK,<VALUE> | Setting successful |
| AT+SETRATE=ERR,<VALUE> | |||
| Monitor charging station | AT+REALDATA | AT+REALDATA=<STA>,<METER_KWH>, <CHARGE KWH>,<VOLTAGE>, <CURRENT>,<TIME>,<TEMP>,<FCODE>, <ECODE>,<RATE>,<FFLG> | STA 0: Standby STA 1: Connected STA 2: Start charging process STA 3: Charging in process STA 4: Error while starting the charging process STA 5: Charging process finished STA 6: Error METER KWH: Total meter reading (KWh) CHARGE KWH: Current meter reading (KWh) VOLTAGE: Charging voltage (V) CURRENT: Charging current (A) TIME: Charging time (Min) TEMP: System temperature (6C) FCODE: See table: Error codes FFLG: See table: Error codes ENCODE: See table: E-Codes RATE: Set output current (A) |
| Charge mode: on RFID autorizat | AT+SETMODE=0 | AT+SETMODE=OK | Setting successful |
| Charge mode: Immediately | AT+SETMODE=1 | ||
| Beep acoustic signal | AT+BEEP=<N> <N> = Number of signals | AT+BEEP=OK | An acoustic signal will be played |
| Get software version | AT+VER | AT+VER=<VERSION> | |
| Get serial number | AT+SN | AT+SN=<SERIALNUMBER> | |
Error codes
| Error | Fault LED | Code | Bit | Description |
| Display off | off | _ | _ | No power supply. Check the circuit breakers and RCDs, as well as the cable connections |
| Communication (CP) | lx slow, lx fast | 11 | 1 | Check the charging plug of the charging station and the vehicle (Control Pilot). Disconnect the plugs and reconnect |
| Emergency stop | lx slow, 2x fast | 12 | 2 | Emergency stop has been pressed. Turn the button to reset |
| Voltage too low | lx slow, 3x fast | 13 | 3 | Check input cable and voltage |
| Voltage too high | lx slow, 4x fast | 14 | 4 | Check input cable and voltage |
| Overheating | lx slow, 5x fast | 15 | 5 | Check the ambient temperature of the charging station |
| Electric meter | lx slow, 6x fast | 16 | 6 | Disconnect the charging station from the power supply and restart it after 10 seconds |
| Leakage current | lx slow, 7x fast | 17 | 7 | Check cable and charging station for damage and moisture |
| Short circuit | lx slow, 8x fast | 18 | 8 | Check cable and charging station for damage and moisture |
| Overcurrent | lx slow, 9x fast | 19 | 9 | Check the correct fit of the charging plug and the function of the vehicle’s electronics |
| Timeout | 2x slow, lx fast | 21 | 10 | Vehicle fully charged or check correct fit of charging plug. Disconnect plug and reconnect. |
| Vehicle not supported | 2x slow, 2x fast | 22 | 11 | Vehicle incompatible with charging station |
| Relay | 2x slow, 3x fast | 23 | 12 | Relay defective |
| RCD | 2x slow, 4x fast | 24 | 13 | RCD defective |
| Protective earth (PE) | 2x slow, 5x fast | 25 | 14 | Charging station not or insufficiently grounded |
| Relay | 2x slow, 6x fast | 26 | 15 | Relay interrupted during charging |
E Codes
| Code | Description |
| 1 | Charging process terminated by vehicle |
| 2 | Loading process stopped by external command |
| 3 | Type 2 plug removed |
| 4 | Loading process ended by error |
| 5 | The charging process ended by an RFID card |
Important note:
According to §19 NAV of March 21, 2019, the operation of charging devices for electric vehicles must be reported to the responsible electricity provider before use (from 11 KW) and before installation (from 22 KW).
This can also be done by the commissioned electrician.
Please contact your electricity provider by phone or online for more information.
Warranty and maintenance
- The warranty period for this charger is two years.
- The warranty expires if:
- No proof of purchase can be provided.
- The warranty period specified by the manufacturer is exceeded.
- The instructions for use, maintenance, and storage are not followed.
- Damage or malfunction is caused by the ingress of foreign objects.
- In case of repair, disassembly, or modification by unauthorized persons.
- Damage caused by force majeure (such as lightning, overvoltage, earthquake, fire, flood, etc.).
- Damage and malfunctions are caused by other avoidable external factors.
- Damage and malfunction caused by improper use of the equipment, such as the ingress of water or other liquids.
- Damage and malfunction caused by the mains power supply and a voltage not specified for use with the charger.
![]() We hereby declare that this device carries the CE mark in accordance with the regulations and standards. It conforms with the fundamental requirements of the RED Directive 2014/53/EU. EMC Directive 2014/30/EU, and the Low Voltage Directive 2014/35/EU. The full text of the EU declaration of conformity is available at the following internet address: www.d-parts.de/Konfo
We hereby declare that this device carries the CE mark in accordance with the regulations and standards. It conforms with the fundamental requirements of the RED Directive 2014/53/EU. EMC Directive 2014/30/EU, and the Low Voltage Directive 2014/35/EU. The full text of the EU declaration of conformity is available at the following internet address: www.d-parts.de/Konfo
Note on environmental protection:![]() After the implementation of the European Directive 2012/19/EU in the national legal system, the following applies:
After the implementation of the European Directive 2012/19/EU in the national legal system, the following applies:
Electrical and electronic devices may not be disposed of with domestic waste.
Consumers are obliged by law to return electrical and electronic devices at the end of their service lives to the public collecting points set up for this purpose or point of sale. Details of this are defined by the national law of the respective country. This symbol on the product, the instruction manual, or the package indicates that a product is subject to these regulations. By recycling, reusing the materials, or other forms of utilizing old devices, you are making an important contribution to protecting our environment.
www.em2go.de
em2go ist eine eingetragene Marke der D-Parts GmbH
D-Parts GmbH Birkenweiher Str. 16 63505 Langenselbold, Germany www.d-parts.de
References
 D-Parts GmbH
-
EU-Konformitätserklärungen
-
EM2GO.de
 apps.apple.com/app/
 GitHub - EspressifApp/EsptouchForAndroid: EspTouch is one way for Android Phone to tell the connected Router's Ssid, Password and etc. to make IOT devices to connect to the same Router. EspTouch is developed and maintained by Espressif Corp.


