![]()
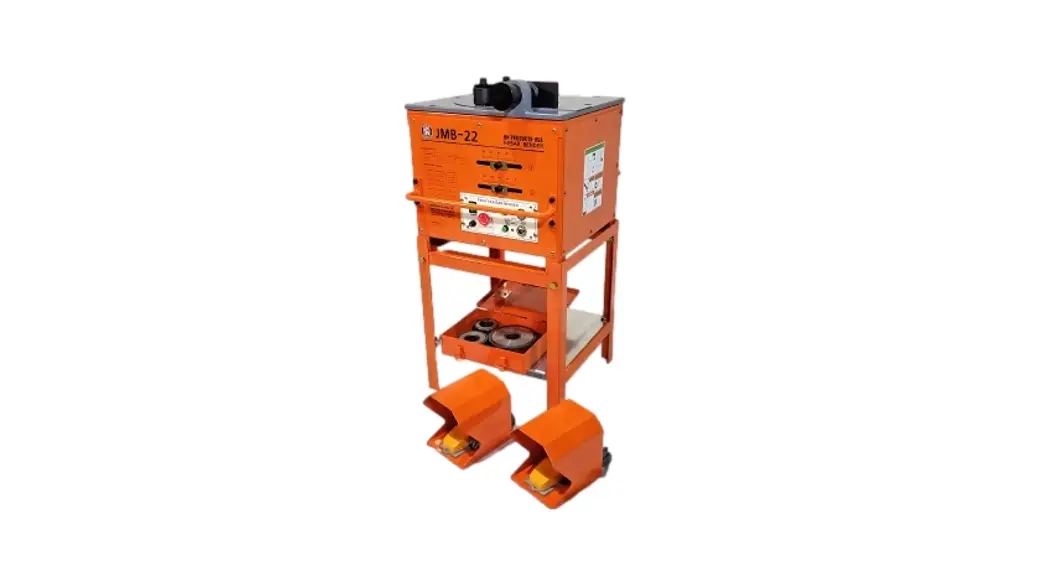
PRODUCT: JMB-22
REBAR BENDER
OPERATIONS MANUAL
JMB-22 2021 HALF LETTER Operations Manual.indd
REV | 11152021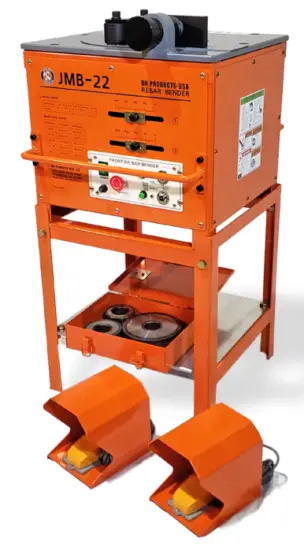 3450 Sabin Brown Road • Wickenburg, AZ 85390
(800) 992-3833 • [email protected]

Thank you for choosing our JMB-22 Rebar Bender
This manual covers the proper operation and maintenance.
Before operating, please read this manual carefully for important procedures and safety.
All technical data and drawings in this manual are consistent with the information on this product. As a result of revisions and other on going updates, the contents of this manual may be slightly different from the actual product. BN Products reserves the right to make changes at any time, without notice and without incurring any obligation, please understand. The copyright of this instruction manual belongs to us. No reproduction is allowed without the written consent from BN Products-USA. All rights are reserved. This manual is a permanent part of this rebar bender and should accompany the rebar bender if it is resold.
Please read this manual carefully to ensure the safe use of this bender. Failure to comply with the instructions in this manual may lead to accidents and injuries. Therefore,
make sure to operate the machine in compliance with these instructions. We are not liable for any damage caused to the machine or injury to the operator resulting from unauthorized modification of the device or the use of parts that are not genuine.
Basic Specifications and Performance
Specifications
| Classification | JMB-22 |
| Power Supply | Single Phase 115V / 60HZ |
| Current | 12 Amp |
| Motor | 2.2 kW |
| Bending Capacity | 22mm ( #7) |
| Bending Angle | 1~180 |
| Bending Time | 180 / 6sec. |
| Weight | 102kg |
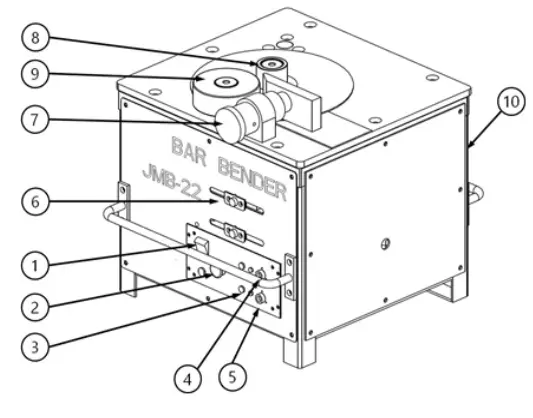
Feature Identification
| 1. Power Switch | 6. Angle Adjustment Handle |
| 2. Emergency Switch | 7. Bar Adjustment Stopper |
| 3. Operation Switch | 8. Center Roller |
| 4. Footing Switch | 9. Moving Roller |
| 5. Footing Switch | 10. Spring Tension Bolt |
Simultaneous Bending Capacity and Number of Bars
(refer to the front panel of the machine)
| Rebar No. | No. 3 | No. 4 | No. 5 | No. 6 | No. 7 |
| JMB-22 | 4 | 3 | 2 | 2 | 1 |
Installation and Work Preparation
Installation
- Install the machine on a level, even surface.
- If the ground is not level, use an auxiliary base capable of supporting the bender rigidly.
Power Connection
- Power cable conductor must be at least 5.5mm2.
- Power cable length must not exceed 50m.
(If it exceeds 50m, use a cable of 8mm2 minimum.)
Work Preparation
- Turn on the power switch. Set the Angle adjustment at about 135, and let the machine run idly for about 3 minutes.
(Warming up should be at least 5 minutes in winter.) - Once warmed up, set the desired angle for bending.
- Select the roller according to the size of the rebar.
| Bar Diameter | Center Roller | Moving Roller |
| 7/8 #7 | No.4 (4.75”) | No.1 (2.17”) |
| 3/4 #6 | No.4 (4.75”) | No.1 (2.17”) |
| 5/8 #5 | No.3 (3.75”) | No.2 (3.12”) |
| 1/2 #4 | No.2 (3.12”) | No.4 (4.75”) |
| 3/8 #3 | No.1 (2.17”) | No.5 (5.91”) |
Periodic Check and Maintenance
Trouble | Inspection and Maintenance |
Excessive noise | Check the precision of the reducing gear. |
| Check for wear or damage of the gears in the gearbox. | |
Bar angle cannot be adjusted | Remove foreign matter from the Angle Adjustment Slide. Check switch for ease of operation. Repair or replace as appropriate. |
Does not rotate | Check Foot Switch connection. |
| Check if Emergency Switch is pressed. | |
| Check gear connection. Take measures as necessary. | |
| If motor output power is reduced, re- place carbon brush of motor. |
Trouble | Inspection and Maintenance |
Electric devices and wiring connection | Check connections from time to time. Fix wiring when necessary. |
| Check switch operation. Remove for- eign matter if necessary. | |
| Check wiring connections. Correct bro- ken or damaged lines. | |
Clean-up | Clean the machine of dust and bar chips with a brush (do not use com- pressed air). |
| Check for cracks or damage in mechan- ical parts. Replace or request after-ser- vice as necessary | |
| After the rainy season or after rain, pull off cover and dry machine completely. | |
| When soaked in water or exposed to rain, there is a danger of electric shock. Do not try to use the machine. Call for service. |
Precautions
- Do not exceed the machine’s capacity for simultaneous bending. If exceeded, machine failure may result.
- When bending rebars while holding them, watch out for your fingers and prevent accidents.
- Depending on the rebar material, it may fracture during bending, resulting in an accident. Therefore, keep your attention fully focused onthe bending work.
- Ensure that no persons or objects are within the radius of the bending rebar.
- Since this machine uses electric power, rain or water may cause an electricity leak. Keep in a dry place or cover with a waterproof film.
- When moving the machine, check that the transportation handle is firmly fixed.
Repairs and Security
- Replacing the carbon brush – Be sure to isolate the power plug from the power source. Check the carbon brush for wear when the machine is not in operation. If the carbon brush in the motor, which is subject to wear and tear, is worn, the motor will lose power or even stop until the power is next turned on. In such cases, the carbon rush(es) must be replaced.
- On the motor inside the machine, unscrew the brush cap with a straight tip screwdriver, and remove the brush together with the spring (replace both of the brushes.)
- When replacing the rotating roller or fixed roller, clean up with a brush.
- Inspection and Security. Check that bolts and nuts are fully tightenedfrom time to time.
- Dry the machine sufficiently after the rainy season or rainfall before operation
- If the rotating roller jolts when returning to its original position, adjust it by unscrewing the spring tension adjustment bolt. If it returns too slowly, tighten the adjustment bolt.
- The machine is ready for operation when the power indicator lamp lights up after power input and power switch. If the lamp is not lit, check the power cable connection.
- If the machine does not start up when the power lamp is lit, check the fuse or check the carbon brush in the motor for wear.
- In the event of other troubles, please call (800) 992-3833
JMB-22 #7 REBAR BENDER: PARTS LIST

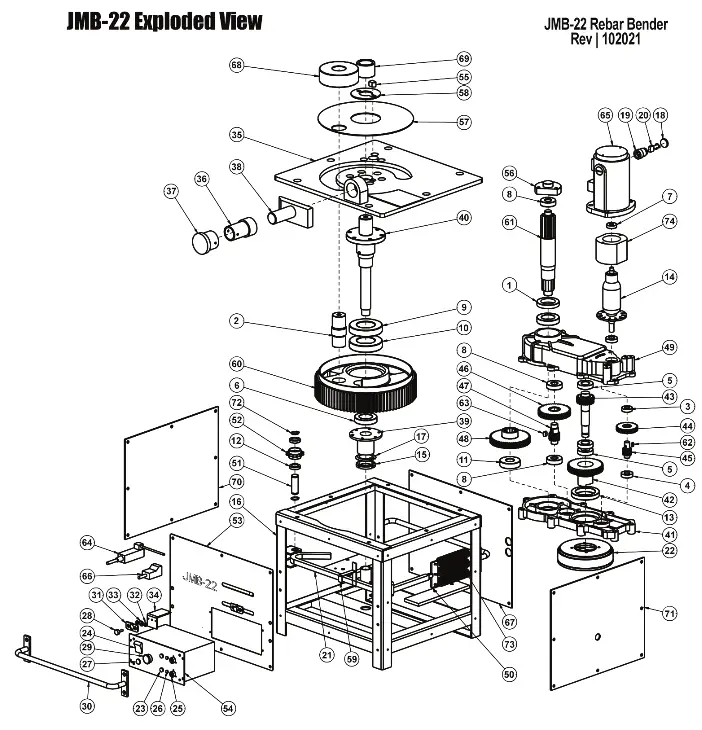
| No. | DESCRIPTION | Qty | No. | DESCRIPTION | Qty | |
| 1 | Oil seal | 1 | 9 | 6211DD bearing | 1 | |
| 2 | Moving roller shaft | 1 | 10 | 6211ZZ bearing | 1 | |
| 3 | 6002ZZ bearing | 1 | 11 | 6305ZZ bearing | 1 | |
| 4 | 6003ZZ bearing | 2 | 12 | 6804ZZ bearing | 4 | |
| 5 | 6005ZZ bearing | 3 | 13 | 6912ZZ bearing | 1 | |
| 6 | 6008ZZ bearing | 2 | 14 | Amature | 1 | |
| 7 | 6200DD bearing | 1 | 15 | AN08 lock nut | 1 | |
| 8 | 6204ZZ bearing | 3 | 16 | Frame body | 1 |
| No. | DESCRIPTION | Qty |
| 17 | ANO8 washer | 1 |
| 18 | Carbon cap | 2 |
| 19 | Carbon Holder | 2 |
| 20 | Carbon brush | 2 |
| 21 | Chain | 1 |
| 22 | Clutch Assembly | 1 |
| 23 | Start button | 1 |
| 24 | On/Off Switch | 1 |
| 25 | Foot S/W connector | 1 |
| 26 | LED light | 1 |
| 27 | Fuse | 1 |
| 28 | Degree knob | 2 |
| 29 | Emergency Switch | 1 |
| 30 | Handle | 2 |
| 31 | Degree indicator | 2 |
| 32 | Degree indicator washer | 4 |
| 33 | Degree indicator washer | 2 |
| 34 | Degree indicator bracket | 2 |
| 35 | Top plate | 1 |
| 36 | Adjustable nut | I |
| 37 | Modulator handle | 1 |
| 38 | Bar stopper | I |
| 39 | Bearing housing | 1 |
| 40 | Center shaft | 1 |
| 41 | Gear box bottom housing | I |
| 42 | 7th gear (Clutch gear) | I |
| 43 | 6th gear (Clutch shaft gear) | I |
| 44 | 9th gear (69phi gear) | I |
| 45 | 8th gear (28phi gear) | 1 |
| 46 | 5th gear (98phi gear) | 1 |
| 47 | 4th gear (34phi gear) | 1 |
| No. | DESCRIPTION | Qty |
| 48 | 3rd gear (123 phi gear) | 1 |
| 49 | Gear box top housing | 1 |
| 50 | Spring holder | 1 |
| 51 | Shaft for chain gear | 1 |
| 52 | Chain sprocket | 1 |
| 53 | Front panne] | 1 |
| 54 | Control box assembly | 1 |
| 55 | Roller stoper (14 key) | 1 |
| 56 | Bearing hausing | 1 |
| 57 | Top dust cover | 1 |
| 58 | Top dust cover | 1 |
| 59 | Sensor detector | 1 |
| 60 | Large Gear (1st gear) | 1 |
| 61 | 2nd Gear (Center Shaft G | 1 |
| 62 | KEY 6•15•2R | 1 |
| 63 | KEY 8•15•2R | 1 |
| 64 | Limit switch | 1 |
| 65 | Motor housing | 1 |
| 66 | Angle sensor | 2 |
| 67 | Rear cover | 1 |
| 68 | Roller #5 | 1 |
| 68-4 | Roller #4 | 1 |
| 68-3 | Roller #3 | 1 |
| 68-2 | Roller #2 | 1 |
| 69 | Roller #1 | 1 |
| 70 | Left cover | 1 |
| 71 | Right cover | 1 |
| 72 | snap ring | 4 |
| 73 | Tension spring | 3 |
| 74 | Stator | 1 |
| Foot switchs | 2 | |
BN PRODUCTS-USA, LLC.
3450 Sabin Brown Road
Wickenburg, AZ 85390
(800) 992-3833
BN Products-USA
www.bnproducts.com


