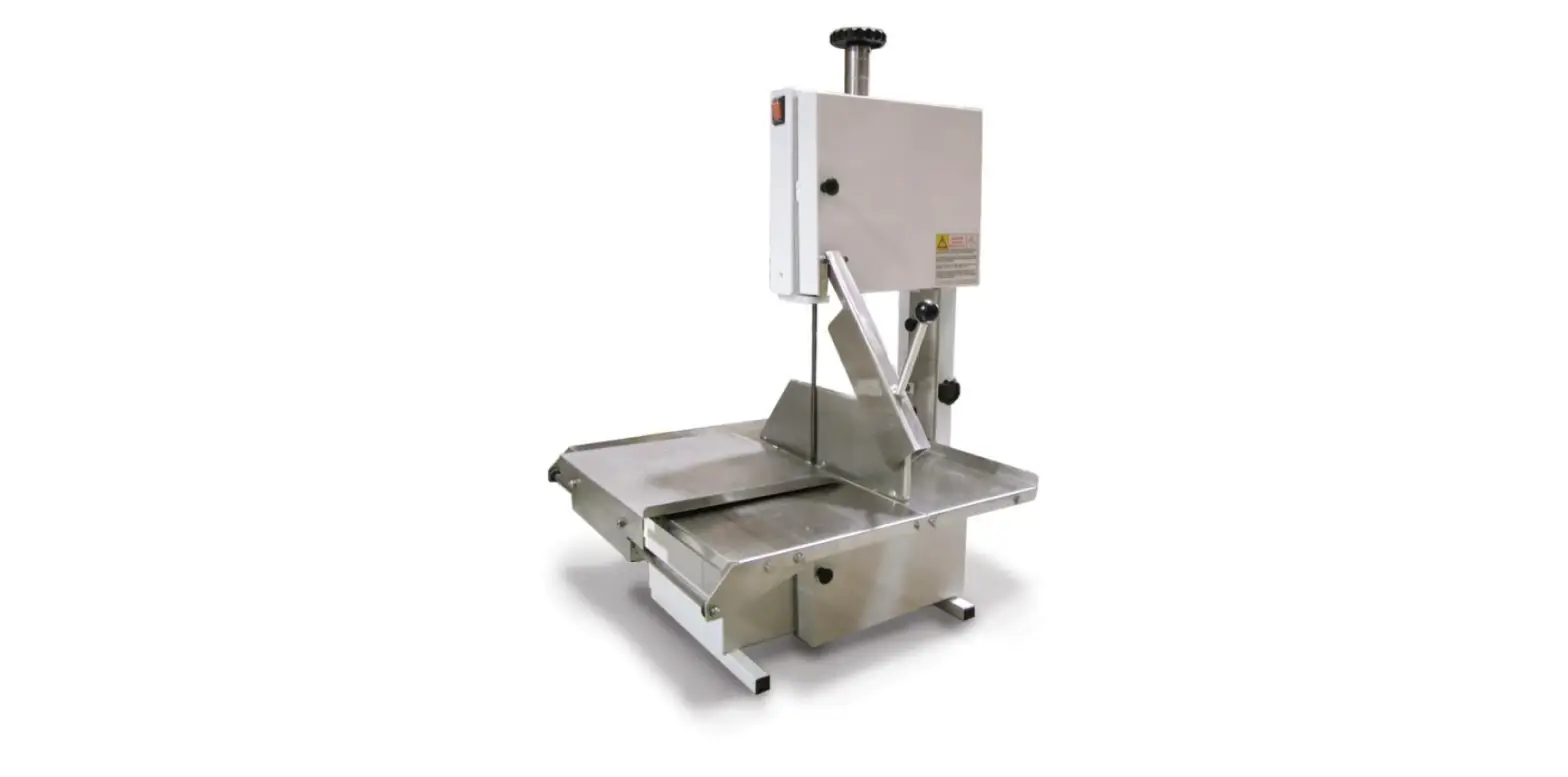
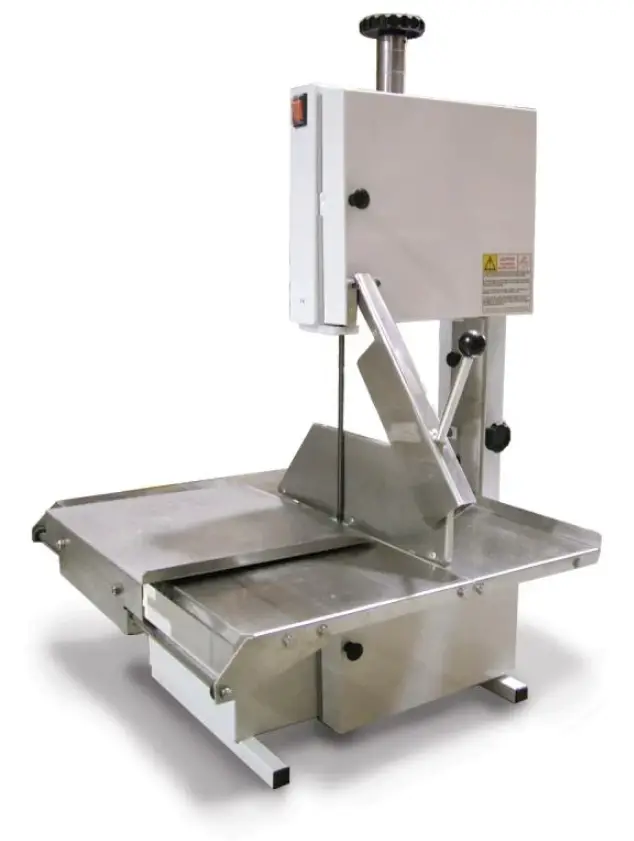
 OMCAN BS-BR-3150-SS Bandsaws
General Information
Omcan Manufacturing and Distributing Company Inc., Food Machinery of America, Inc. dba Omcan and Omcan Inc. are not responsible for any harm or injury caused due to any person’s improper or negligent use of this equipment. The product shall only be operated by someone over the age of 18, of sound mind, and not under the influence of any drugs or alcohol, who has been trained in the correct operation of this machine and is wearing authorized proper safety clothing. Any modification to the \ machine voids any warranty and may cause harm to individuals using the machine or in the vicinity of the machine while in operation.
CHECK PACKAGE UPON ARRIVAL
Upon receipt of an Omcan shipment please inspect for external damage. If no damage is evident on the external packaging, open carton to ensure all ordered items are within the box, and there is no concealed damage to the machine. If the package has suffered rough handling, bumps or damage (visible or concealed), please note it on the bill of lading before accepting the delivery and contact Omcan within 24 hours, so we may initiate a claim with the carrier. A detailed report on the extent of the damage caused to the machine must be filled out within three days, from the delivery date shown in the shipping documents. Omcan has no recourse for damaged products that were shipped collect or third party.
Before operating any equipment, always read and familiarize yourself with all operation and safety instructions. Omcan would like to thank you for purchasing this machine. It’s of the utmost importance to save these instructions for future reference. Also, save the original box and packaging for shipping the equipment if servicing or returning of the machine is required.
Safety and Warranty
SAFETY
If and when the Band Saw is not correctly used it is a potentially DANGEROUS machine. Cleaning, maintenance, and any other service in the machine shall be carried out by duly trained people and only while unplugged. The instructions below must be always followed to avoid ACCIDENTS:
- Remove the electric plug from its socket, before removing any moving part, cleaning, maintenance or any other kind of service.
- Never use any kind of tools not belonging to the Saw to help during operation.
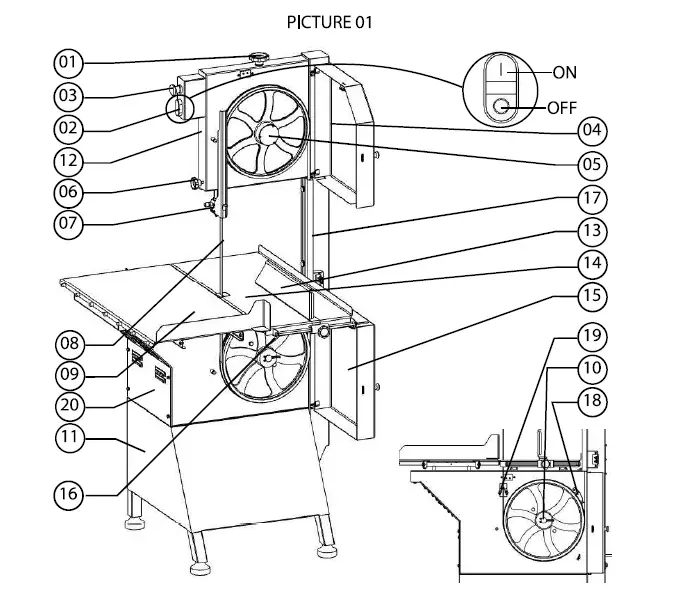
- Never touch blade #08 (Pic.01) when the saw is in operation.
- Never wear loose clothes with wide sleeves mainly around the wrists during operation.
- Never adjust the Thickness Guide #13 (Pic.01) with the saw blade in movement.
- Keep hands away from moving parts.
- Never switch on the Saw with wet clothes or wet feet.
- Ground machine properly during installation.
- The saw has a Thermal Protector for motor protection. The motor and the operator are protected in case of overheating.
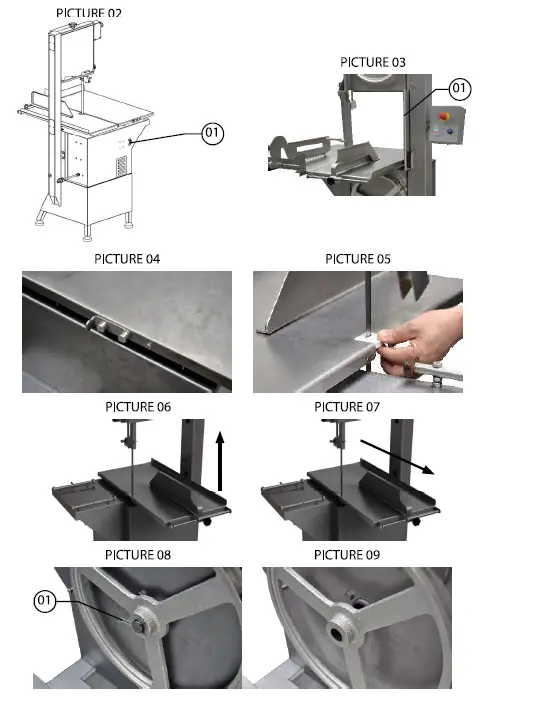
- Therefore if the equipment suddenly STOPS, wait a few minutes, then reset the Thermal Protector by pressing the Button #01 (Pic.02).
IMPORTANT
- In order to improve user safety, the Band Saw is equipped with a safety system, which refrains itself from being activated if the upper door #04 (Pic.01), the lower door #15 (Pic.01) and the blade guard #17 (Pic.01) are not properly in place.
- This equipment must not be used by children or any persons with reduced physical or mental capability, lack of experience, or knowledge, unless they are under supervision or have received from the person responsible for safety, proper instructions on how to use the equipment.
- The cord shall be in perfect condition for use, check it carefully, and change a damaged cord using a new one designed in accordance with the technical specifications.
- The changing shall be made by qualified professionals and shall respect local safety rules.
- In case of emergency use emergency switch #03 (Pic.01). To switch the machine back ON push the green button of ON/OFF Switch #02 (Pic.01).
GENERAL SAFETY PRACTICES
IMPORTANT: If any recommendation is not applicable to your equipment, please ignore it.
The following safety instructions are addressed to both the operator of the machine as well as the person in charge of maintenance. The machine has to be delivered only in perfect conditions of use by the Distributor to the user. The user shall operate the machine only after being well acquainted with the safety procedures described in the present manual. READ THIS MANUAL WITH ATTENTION.
BASIC OPERATION PRACTICES
DANGERS
Some areas of the electric device have parts that are connected or have parts connected to high voltage. These parts when touched may cause severe electrical shocks or even be lethal. Never touch manual commands such as switches, buttons, turning keys, and knobs with your hands wearing wet clothes and/or wet shoes. By not following these instructions operator could be exposed to severe electrical shocks or even to a lethal situation.
Safety and Warranty
WARNINGS
- The operator has to be well familiar with the position of the ON/OFF Switch to make sure the Switch is easy to be reached when necessary.
- Before any kind of maintenance, physically remove the plug from the socket.
- Provide space for a comfortable operation thus avoiding accidents.
- Water or oil spilled on the floor will become a slip hazard. Make sure the floor is clean and dry.
- Before using any commands (switch, buttons, lever), be sure it is the correct one. In case of doubt, consult this manual.
- Never touch any manual commands (switch, buttons, lever) unadvisedly.
- If any work is to be made by two or more persons, coordination signs will have to be given for each operation step. Every step of the operation shall be taken only if a sign has been made and responded.
ADVICE
- In case of power shortage, immediately switch the machine off.
- Use recommended or equivalent lubricants, oils, or greases.
- Avoid mechanical shocks, once they may cause damage or bad functioning.
- Avoid water, dirt, or dust contact with the mechanical and electrical components of the machine.
- DO NOT change the standard characteristics of the machine.
- DO NOT remove, tear off or damage any safety or identification labels stuck on the machine.
- If any labels have been removed or are no longer legible, contact your nearest dealer for replacement.
SAFETY PROCEDURES AND NOTES BEFORE SWITCHING THE MACHINE ON
IMPORTANT: Carefully read ALL INSTRUCTIONS of this manual before turning the machine ON. Be sure to fully understand all the information contained in this manual. If you have any questions contact your supervisor or your nearest Dealer.
DANGER
- An electric cable or electric wire with a damaged jacket or bad insulation might cause electrical shocks as well as electrical leaks. Before use, check the conditions of all wires and cables.
ADVICE
Be sure to fully understand all the information contained in this manual. Every operation function or procedure has to be thoroughly clean. Before using any commands (switch, buttons, lever), be sure it is the correct one. In case of doubt, consult this manual.
PRECAUTIONS
The electric cable has to be compatible with the power required by the machine. Cables touching the floor or close to the machine need to be protected against short circuits. The oil reservoirs have to be filled until the indicated level. Check and refill if necessary.
ROUTINE INSPECTION
ADVICE
When checking the tension of the belts or chains, DO NOT insert your fingers between the belts and the pulleys and nor between the chain and the gears.
PRECAUTIONS
Check the motor and sliding or turning parts of the machine in case of abnormal noises. Check the tension of the belts and chains and replace the set when belts or chains show signs of wearing. When checking the tension of belts or chains DO NOT insert your fingers between belts and pulleys, nor between the chains and gears. Check protections and safety devices to make sure they are working properly.
WARNING
Electrical or mechanical maintenance has to be undertaken by qualified personnel. The person in charge of maintenance has to be sure that the machine is under TOTAL SAFETY conditions when working.
1 YEAR PARTS AND LABOUR WARRANTY
Within the warranty period, contact Omcan Inc. at 1-800-465-0234 to schedule an Omcan authorized service technician to repair the equipment locally. Unauthorized maintenance will void the warranty. The warranty covers electrical and part failures, not improper use.
Please see https://omcan.com/disclaimer-for-complete-info.
WARNING
The packaging components are classified as normal solid urban waste and can therefore be disposed of without difficulty. In any case, for suitable recycling, we suggest disposing of the products separately (differentiated waste) according to the current norms.
DO NOT DISCARD ANY PACKAGING MATERIALS IN THE ENVIRONMENT!
Technical Specifications
| Model | BS-BR-3150-SS | BS-BR-2820-SS |
| Electrical | 230V / 60Hz / 1 | |
| Current | 14.7A | 9.5A |
| Power | 3 HP | 2 HP |
| Consumption per Hour | 2.2 kW | 1.47 kW |
| Max Cutting Height | 14.1” / 359mm | 12.75” / 324mm |
| Max Cutting Width | 12.25” / 311mm | 10” / 254mm |
| Dimensions | 72.9” x 42.1” x 36.3” 1851 x 1070 x 921mm | 73.6” x 36.3” x 38.6” 1870 x 921 x 981mm |
| Packaging Dimensions | 81.9” x 47.6” x 49.2” 2080 x 1210 x 1250mm | 81.9” x 43.7” x 44.9” 2080 x 1110 x 1140mm |
| Weight | 264 lbs. / 119.7 kgs. | 240 lbs. / 108.9 kgs. |
| Packaging Weight | 407 lbs. / 184.6 kgs. | 339 lbs. / 153.8 kgs. |
| Item Number | 20236 | 20237 |
Installation
RECEIVING AND UNPACKING
As soon as the equipment is received check the packaging integrity. If packaging is damaged, check if there has been some damage to the equipment during transportation. If damage has been found, keep the packaging and contact immediately the transporter.
PLACING THE SAW
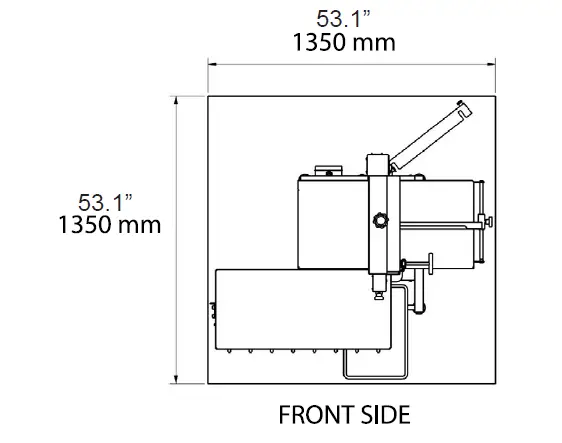
- The Saw must be installed over a firm working surface. See below drawing the recommended area.

ELECTRIC INSTALLATION
- The equipment has been designed to operate 230 Volts. When you receive the equipment check the voltage indicated on the cord label. The power plug has 3 pins the middle pin is the ground. All the 3 pins must be properly connected.
IMPORTANT: Make sure the network voltage is the same as indicated on the cord label.
BLADE
The Blade shall be installed with the teeth turned toward the saw front side, and downward. To stretch blade #08 (Pic.01) turn clockwise the Blade Tension Regulator Handle #01 (Pic.01) until it stops. The number of teeth in a band saw will influence both, the cutting speed and the number of remains produced during the cutting procedure.
BLADE GUIDE
With the saw switched OFF turn the Handle #06 (Pic.01) counterclockwise to lose the Blade Guide #07 (Pic.01). Adjust the Blade Guide height to meet the meat piece thickness and not more. Then tighten handle #06 (Pic.01).
TRAY
The Saw has a Tray #16 (Pic.01) placed under the saw, to collect residues. To remove the tray pull it sideways until it is completely out. To replace it follow the inverse procedure and push until it is completely in.
SCRAPERS
The saw has two scrapers, the wheel scraper #18 (Pic.01) and the blade scraper #19 (Pic.01).
The Wheel Scraper: This scraper cleans the bone dust or the residues from the Lower Wheel during operation. The scraper may be removed for cleaning (see Cleaning). The Blade Scraper: This scraper cleans the bone dust or the residues from the blade during the operation. The scraper may be removed for cleaning (see Cleaning).
LOWER WHEEL
The Lower Wheel is assembled on the lower bearing shaft and fixed by staple #10 (Pic.01). The staple shall always be placed in the shaft slot. The lower wheel may be removed for cleaning after removing the blade (see Cleaning).
UPPER WHEEL
The Upper Wheel #05 (Pic.01) frame has its own shaft and bearings. Therefore the Upper Wheel has to be removed with the shaft and bearing for cleaning (see Cleaning), only after the Blade has been taken off.
PRE-OPERATION
Check if the saw is standing firm in its position. Adjust the Blade Guide #07 (Pic.01) height to meet the meat piece thickness.
DOORS AND BLADE GUARD
The upper door #04 (Pic.01), the Lower Door #15 (Pic.01) and the Blade Guard #17 (Pic.01) shall be closed and in their right position while the saw is operating.
THICKNESS GUIDE
To obtain several slices with the same thickness, adjust the Thickness Guide #13 (Pic.01) as desired. Turn the Thickness Guide Handle counterclockwise loosing the Thickness Guide, and drive it to the desired thickness. Then tighten back the handle.
CONTROL BOARD
The ON/OFF Switch #02 (Pic.01) and the Emergency Button Switch #03 (Pic.01) are placed on a control board, on the motor housing’s upper front side. To turn ON the saw press the ON/OFF Switch (green) button to position “I”. To stop the saw operation press the ON/OFF Switch (red) button to position “O”. If an emergency case arises, press the EMERGENCY button, immediately stopping the saw operation.
OPERATING PROCESS
BEFORE STARTING THE SAW
- Pull totally the Movable Table #09 (Pic.01) toward the saw front side.
- Place the meat on the Movable Table.
- Choose the slice thickness and adjust the Thickness Guide #13 (Pic.01).
- Adjust the Blade Guide #07 (Pic.01) height to meet the meat piece thickness.
- Take place in front of the saw, to have a frontal view of the blade.
STARTING THE SAW
- To start the saw press the ON/OFF Switch green button.
- Push the meat toward the Thickness Guide, touching it.
- Place the left hand on the table protection guard and slide the Movable Table against the Blade, slicing the meat at a constant and uniform speed.
- After cutting the slice remove it using the right hand. The slice must always be removed behind the blade to avoid the hand touching the blade cutting side.
IMPORTANT: Do never remove the slices by the blade’s front side.
- Place and store the slices on the Fixed Table #14 (Pic.01).
- Bring back the Movable Table toward the front side of the machine and repeat the above-mentioned steps until the whole meat has been sliced.
- After having finished the last slice switch OFF the saw pressing the red button “0”.
CLEANING AND SANITIZATION
IMPORTANT: Unplug the saw before to start Cleaning.
When the saw must go through a complete cleaning and sanitization process:
- Before it’s first use.
- After every day end of operations.
- When the saw is not going to be used for a long period of time.
- Before starting operation after a long period it has not been used.
Many parts may be removed for cleaning:
- Upper Door.
- Lower Door.
- Blade Guard.
- Movable Table.
- Fixed Table Block.
- Fixed Table.
- Blade.
- Upper Wheel.
- Lower Wheel.
- Blade Scraper.
- Wheel Scraper.
- Blade Tension Regulator.
Follow the below instructions to remove the above-mentioned parts:
UPPER DOOR: Open door #04 (Pic.01), and lift it.
LOWER DOOR: Open door #15 (Pic.01), and lift it.
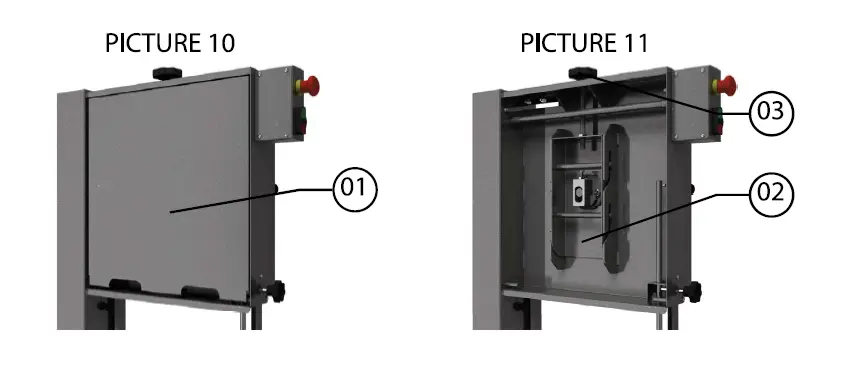
BLADE GUARD: Turn counterclockwise the two handles, just enough to lose the Blade Guard #01 (Pic.03), then remove the Blade Guard pulling it towards the saw front side.
MOVABLE TABLE: Pull the Movable Table #09 (Pic.01) towards the saw front side. Displace the end plate, (see Picture 04), and slide the Movable Table completely out of the rollers.
FIXED TABLE BLOCK: Remove the Fixed Table Block lifting the block above the Fixed Table (see Picture 05).
FIXED TABLE: Lift vertically the Fixed Table front side, (Picture 06 see the arrow) until the lower trigger is loose. Then pull the Fixed Table towards the front, (Picture 07 see the arrow) until the table is completely removed.
BLADE: Turn the Blade Tension Regulator Handle #01 (Pic.01) counterclockwise, until the blade gets loose, for removal.
Maintenance
IMPORTANT: Use steel gloves to hold the blade.
UPPER WHEEL: Remove the blade, after, hold strongly the Upper Wheel #05 (Pic.01), push it vertically up and then pull it towards the saw front side.
LOWER WHEEL: Remove Staple #01 (Pic.08) hold strongly the Lower Wheel and pull it towards the saw front side (Pic.09).
BLADE SCRAPER: Slide the Blade Scraper sideways until it gets out.
WHEEL SCRAPER: Remove the Lower Wheel, then pull the Scraper towards the saw front side until it gets out.
BLADE TENSION REGULATOR: Stand behind the saw and remove the Upper Back Cover #01 (Pic.10). Turn the Blade Tension Regulator Handle #02 (Pic.11) counterclockwise until the Blade Tension Regulator #01 (Pic.11) gets free to be removed. Also, remove the Blade Tension Regulator Handle #02 (Pic.11). Wash all the parts with water and neutral ph detergent.
IMPORTANT: Do not spray water directly on the Lower Bearing, the Control Board, and Motor Housing #20 (Pic.01), principally at the ventilation points. Use clean clothes or soft brushes to remove residues. Washing and sanitization shall be regularly performed and then all parts shall be carefully dried. To assemble the several parts removed proceed inversely as above instructed, make sure all parts to be properly assembled.
CAUTIONS WITH STAINLESS STEEL
The Stainless Steel may present rust signs, which ARE ALWAYS CAUSED BY EXTERNAL AGENTS, especially when the cleaning or sanitization is not constant and appropriate. The Stainless Steel resistance towards corrosion is mainly due to the presence of chrome, which in contact with oxygen allows the formation of a very thin protective coat. This protective coat is formed through the whole surface of the steel, blocking the action of external corrosive agents. When the protective coat is broken, the corrosion process begins, being possible to avoid it by means of constant and adequate cleaning. Cleaning must always be done immediately after using the equipment. For such results, use water, neutral soap or detergent, and clean the equipment with a soft cloth or a nylon sponge. Then rinse it with plain running water, and dry immediately with a soft cloth, this way avoiding humidity on surfaces and especially on gaps. The rinsing and drying processes are extremely important to prevent stains and corrosion from arising.
IMPORTANT: Acid solutions, salty solutions, disinfectants, and some sterilizing solutions (hypochlorites, tetravalent ammonia salts, iodine compounds, nitric acid and others), must be AVOIDED, once it cannot remain for long in contact with the stainless steel. These substances attack the stainless steel due to the CHLORINE on its composition, causing corrosion spots. Even detergents used in domestic cleaning must not remain in contact with the stainless steel longer than necessary, being mandatory to remove it with plain water and then dry the surface completely.
USE OF ABRASIVES: Sponges or steel wool and carbon steel brushes, besides scratching the surface and compromising the stainless steel protection, leave particles that rust and react contaminating the stainless steel. That is why such products must not be used for cleaning and sanitization. Scrapings made with sharp instruments or similar must also be avoided.
MAIN SUBSTANCES THAT CAUSE STAINLESS STEEL CORROSION: Dust, grease, acid solutions such as vinegar, fruit juices, blood, detergents (except for the neutral ones), common steel particles, a residue of sponges or common steel wool, and also other abrasives.
Troubleshooting
PROBLEMS, CAUSES, AND SOLUTIONS
The Saws have been designed to need minimum maintenance, however, some performance failures may happen due mainly to naturally wear out, caused by the use of the Saw. If some problems arise with your Band Saw check the table below where there are detailed some possible solutions.
| PROBLEM | CAUSES | SOLUTIONS |
| The saw does not switch on. | The saw is unplugged. | Plug it. |
| Thermal Protector is activated. | Wait a few minutes and reset the Thermal Protector. | |
| Lack of power. | Check if there is electric power. | |
| Problem with the internal or external circuits of the Saw. | Call Technical Assistance. | |
| Smoke or burn smell. | Problem with the internal or external electric circuits of the Saw. | Call Technical Assistance. |
| Machine switch on but when product touches blade #08 (Pic.01) it stops or runs slowly. | Belt slipping on pulleys. | Call Technical Assistance. |
| Damaged capacitor. | Call Technical Assistance. | |
| Unusual noises. | Blade slipping on wheels. | Turn the blade tension regulator handle #01 (Pic.01) to increase pressure between the blade and wheels. |
| The blade was incorrectly welded. | Change the blade. | |
| The blade frequently tears. | Blade or wheels dirty. | Clean the saw. |
| Faulty wheels. | Change the wheels. |
| Difficulty to cut the product. | Blade or wheels dirty. | Clean the saw. |
| Wrong tension on the blade. | Regulate blade tension. | |
| The blade is off the center of the wheel. | Call Technical Assistance. | |
| Blade blunt. | Change the blade. |
Figure Drawings
Parts Breakdown
Model: BS-BR-3150-SS 20236
Model: BS-BR-3150-SS 20236
| Item No. | Description | Position | Item No. | Description | Position | Item No. | Description | Position |
| AF877 | Shaft Retainer Ring 20×1.2 DIN 471 for 20236 | 00105.8 | 38282 | Screw M3x10 DIN 84 Stainless Steel for 20236 | 12491.5 | 38412 | PFS M4x5 DIN 7985 INOX for 20236 | 23932.1 |
| 21579 | Central Shaft Pin 6×50 DIN1481 for 20236 | 00267.4 | AF881 | Backboard for 20236 | 12581.4 | AF896 | Nut M8 DIN 1587 DIREITA LATAO NIQUELADO for 20236 | 24842.8 |
| 21836 | Clip for 20236 | 00435.9 | AF882 | Motor Pulley SK (Primer) for 20236 | 12612.8 | AF897 | Contactor.CWM18.10 220V 50/60Hz for 20236 | 25072.4 |
| 38502 | Seal 01604BR for 20236 | 00741.2 | 38044 | Nut M3 DIN 934 Stainless Steel for 20236 | 12853.8 | 27720 | Omcan Logo (Machines) for 20236 | 27154.3 |
| AE670 | Term. Eyelet for 20236 | 01137.1 | AF883 | Fluted Handle M6x15mm INOX for 20236 | 13069.9 | AF898 | Screw M8x40 DIN 916 FOSF. for 20236 | 27180.2 |
| 38469 | Cover for 20236 | 02313.2 | 38086 | Screw M8x16 DIN 933 Stainless Steel for 20236 | 13238.1 | AF899 | Articulation Sheet Big for 20236 | 29180.3 |
| 38534 | PFS M8x25 DIN 933 ZB for 20236 | 02728.6 | 16432 | Screw 1/4×1/2 for 20236 | 13361.2 | AF900 | Articulation Sheet Small for 20236 | 29181.1 |
| 38557 | Screw Nut DIN 934 ZB for 20236 | 02729.4 | AF884 | Collecting Box 522 for 20236 | 13458.9 | AF901 | Shutter 25x5x100 for 20236 | 29260.5 |
| 27696 | Nylon Cover CN 4478 for 20236 | 03678.1 | 67029 | Screw M6x10 DIN 933 Stainless Steel for 20236 | 13759.6 | AF902 | Sheave for 20236 | 29286.9 |
| 38464 | Door Knob for 20236 | 03792.3 | AF885 | Washer.L 1/2″ INOX for 20236 | 13773.1 | AF903 | Handle with Stem M8x12mm INOX for 20236 | 31020.4 |
| 78587 | PFS M6x16 DIN 916 FOSF. for 20236 | 03856.3 | 16435 | Screw M4x10 for 20236 | 14463.0 | 67038 | Grounded Wire Label for 20236 | 31140.5 |
| 27699 | Cramp T 18R Small for 20236 | 04203.0 | AF886 | Shaft Retainer Ring 25×1.2 DIN 471 for 20236 | 14802.4 | AF904 | Screw M4x8 DIN 7985 INOX for 20236 | 32433.7 |
| 27702 | PFS M6x20 DIN 965 INOX for 20236 | 08779.3 | AF887 | Screw B.3.5×9.5 DIN 7981 INOX for 20236 | 15599.3 | AF905 | Thermal Protector Protection for 20236 | 32629.1 |
| 38482 | Screw M5x10 DIN 84 INOX for 20236 | 09197.9 | 30048 | Washer L.A4.3 for 20236 | 16798.3 | 67040 | Instruction Manual Label for 20236 | 32832.4 |
| AF878 | Screw M4x10 DIN 912 INOX for 20236 | 09198.7 | 38045 | Washer L.A3.2 DIN 125 Stainless Steel for 20236 | 17181.6 | AF906 | Thermal Protector Label Ingles for 20236 | 33161.9 |
| 38404 | Nut M4 DIN 934 for 20236 | 09205.3 | AF888 | Bushing Dry-Met 15x17x15 1TFP015017015 RK for 20236 | 17353.3 | AF907 | Attention Ear Wire Label Ingles/Frances for 20236 | 33170.8 |
| 38055 | Nut M5 DIN 934 Stainless Steel for 20236 | 10471.0 | 38084 | Screw M8x40 DIN 933 Stainless Steel for 20236 | 18351.2 | AF908 | Attention Warning Label I/F for 20236 | 33303.4 |
| AF879 | Emergency Label ESP./INGL./PORT. for 20236 | 10789.1 | AF889 | Reed Switch NA Importado for 20236 | 20032.8 | AF909 | Attention 110/220/380V Certificate Label for 20236 | 33305.0 |
| 67026 | Screw M10x30 DIN 933 Stainless Steel for 20236 | 12346.3 | 38096 | Encapsulated Magnet for 20236 | 20033.6 | AF910 | Warning Label INGL./FRANC. for 20236 | 33307.7 |
| 38207 | Washer.L.A10.5 DIN 125 Stainless Steel for 20236 | 12347.1 | 38087 | Washer L.A5.3 DIN 125 INOX for 20236 | 20194.4 | AF911 | Movable Table Drag Pin for 20236 | 33617.3 |
| 38489 | Nut M10 DIN 934 Stainless Steel for 20236 | 12350.1 | 38613 | PFS M3x6 DIN 7985 INOX for 20236 | 21639.9 | AF912 | Lower Wheel (VERNIZ) for 20236 | 33866.4 |
| 16416 | Screw M6x12 DIN 933 Stainless Steel for 20236 | 12384.6 | AF890 | Nut M6 DIN 1587 INOX for 20236 | 22200.3 | AF913 | Identification Label Motor/Resist Certific. ETL for 20236 | 35474.0 |
| AF880 | Screw M10x20 DIN 933 INOX for 20236 | 12434.6 | AF891 | Elastic Pin 8×60 DIN 1481 for 20236 | 22574.6 | AE579 | CB.3×2.1mm2 SJX2M CERTIF. for 20236 | 35738.3 |
| 16419 | Washer L.A6 4 125 INOX for 20236 | 12442.7 | AF892 | Elastic Pin 5×60 DIN 1481 for 20236 | 22575.4 | AF914 | Plug Americano CERT.20A 250V (1X991) for 20236 | 36075.9 |
| 16421 | Screw Nut M8 934 INOX for 20236 | 12445.1 | AF893 | Lower Tree SKLG for 20236 | 22576.2 | AF915 | Foot 7/8″ TB.QUADR.40 APOIO Anti- Skid for 20236 | 36303.0 |
| 38281 | Screw Nut M6 DIN934 INOX for 20236 | 12448.6 | 38593 | Screw M5x6 DIN 84 Stainless Steel for 20236 | 22996.2 | AF916 | V-Ring 55xDI.24×8 for 20236 | 36546.7 |
| 16422 | Screw M8x20 DIN 933 Stainless Steel for 20236 | 12455.9 | AF894 | Handle with Stem M12x160mm for 20236 | 23406.0 | AF917 | Upper Wheel Washer for 20236 | 36558.0 |
| 16423 | Washer L.A8.4 Stainless Steel for 20236 | 12460.5 | 67033 | Screw M4x10 DIN 933 Stainless Steel for 20236 | 23739.6 | AF918 | Movable Table Set SI-315HD CERT. for 20236 | 36814.8 |
| 30045 | Bracer K22-LM(T-80I) for 20236 | 12469.9 | AF895 | Handle with Stem M8x55mm INOX for 20236 | 23844.9 | AF919 | Spiral Protection 1/2″x600mm for 20236 | 36918.7 |
Model: BS-BR-3150-SS 20236
| Item No. | Description | Position | Item No. | Description | Position | Item No. | Description | Position |
| AF920 | ETIQ.ETL Listed for 20236 | 36958.6 | AF943 | Retainer Ring with Hole 62×2 DIN 472 for 20236 | 42901.5 | AF966 | Nylon Screw for 20236 | 50797.0 |
| AF921 | Lower Assembly (Grey) for 20236 | 37598.5 | AF944 | Closure Sheet TS for 20236 | 42906.6 | AF967 | Electric Box Set for 20236 | 50799.7 |
| AF922 | Complete Lower Assembly for 20236 | 37641.8 | AF945 | Stationary Table Back Support for 20236 | 43025.0 | AF968 | Electric Box Closure for 20236 | 50809.8 |
| AF923 | Screw M3x8 DIN 965 INOX for 20236 | 37881.0 | AF946 | Scrapper Sheet for 20236 | 43032.3 | AF969 | Wire Pass-Through GR. 19×31.8mm for 20236 | 50819.5 |
| AF924 | Bearing 6004 Z DIN 625 NSK/TK Di.20xDe.42xL.12 for 20236 | 39080.1 | AF947 | Scrapper Guide for 20236 | 43033.1 | AF970 | Pass-Through Tube Set for 20236 | 51301.6 |
| AF925 | Wheels Lid for 20236 | 39718.0 | AF948 | Scrapper Blade for 20236 | 43034.0 | AF971 | Structure Set for 20236 | 51327.0 |
| AF926 | Wheels Scrapper Peg for 20236 | 40315.6 | AF949 | Scrapper Lock PI for 20236 | 43039.0 | AF972 | Press Cord HSK-K PG07 (C209070115) for 20236 | 51328.8 |
| 67042 | Emergency Button 2NF (Pull to Unlock) for 20236 | 40640.6 | AF950 | Scrapper Guide Pin for 20236 | 43040.4 | AF973 | Sensor Support for 20236 | 51329.6 |
| AF927 | Double Button CSWBDNANFBIDL (10046334) for 20236 | 40642.2 | AF951 | Complete Wheel Scrapper for 20236 | 43047.1 | AF974 | Cut Regulator Set for 20236 | 51712.7 |
| AF928 | Protection APBD (10046217) for 20236 | 40645.7 | AF952 | Complete Blade Scrapper for 20236 | 43048.0 | AF975 | Complete Cut Regulator for 20236 | 51713.5 |
| AF929 | Screw M8x12 DIN 933 INOX for 20236 | 40736.4 | AF953 | Wheel Scrapper Sheet for 20236 | 43064.1 | AF976 | Nut M3 DIN 1587 INOX for 20236 | 51735.6 |
| AF930 | Blade Guide for 20236 | 42112.0 | AF954 | Complete Upper Wheel 400mm for 20236 | 43375.6 | AF977 | Column Closure for 20236 | 51736.4 |
| AF931 | Certified Stand Set for 20236 | 42146.4 | AF955 | Upper Wheel Shaft for 20236 | 43410.8 | AF978 | Actuators Spacer for 20236 | 51737.2 |
| AF932 | Door Lock Shaft for 20236 | 42557.5 | AF956 | Upper Wheel 400mm (VERNIZ) for 20236 | 43430.2 | AF979 | Actuators Washer Sheet for 20236 | 51738.0 |
| AF933 | Housing Closure for 20236 | 42656.3 | AF957 | Stretcher Assembly for 20236 | 43696.8 | AF980 | Screw M4x16 DIN 933 INOX for 20236 | 51739.9 |
| AF934 | Certified Stationary Table Set for 20236 | 42659.8 | AF958 | Stretcher Set for 20236 | 43697.6 | AF981 | Housing Set for 20236 | 51753.4 |
| AF935 | Stationary Table Frontal Support for 20236 | 42703.9 | AF959 | Spacer 0.5mm for 20236 | 44645.9 | AF982 | Upper Door Set 315 for 20236 | 51755.0 |
| AF936 | Stationary Table Lock Pin for 20236 | 42715.2 | AF960 | Motor 3CV 60Hz Single Phase W (with Ther.Protec.) for 20236 | 45172.0 | AF983 | Lower Door Set 315 for 20236 | 51756.9 |
| AF937 | Regulator Shaft for 20236 | 42727.6 | AF961 | Screw M3x12 DIN 7985 INOX for 20236 | 45536.9 | AF984 | Blade Protection Seet SI-315HD for 20236 | 51757.7 |
| AF938 | Complete Blade Guide for 20236 | 42734.9 | AF962 | Rollers Shaft Set for 20236 | 46765.0 | AF985 | Moved Pully Diam.180mm for 20236 | 58872.5 |
| AF939 | Stem SI-315HD CERT. for 20236 | 42736.5 | AF963 | Movable Table Stop for 20236 | 46766.9 | AF986 | L3150344DS-*Blade 3.150mm 3/4″ 4DPP S | 58877.6 |
| AF940 | Blade Protection Set for 20236 | 42737.3 | 67049 | Stop M6 for 20236 | 49458.5 | AF987 | Belt A 34 (Goodyear) for 20236 | 58880.6 |
| AF941 | Blade Guide Support for 20236 | 42807.8 | AF964 | Table Lock for 20236 | 49459.3 | AF988 | Thermal Protector 14602422 for 20236 | 69425.8 |
| AF942 | Bearing 6305 DDU Di.25xDe.62xL.17 FAG/NSK for 20236 | 42900.7 | AF965 | Table Peg for 20236 | 50779.2 |
Model: BS-BR-2820-SS 20237
Model: BS-BR-2820-SS 20237
| Item No. | Description | Position | Item No. | Description | Position | Item No. | Description | Position |
| AF877 | Shaft Retainer Ring 20×1.2 DIN 471 for 20237 | 00105.8 | 16432 | Screw 1/4×1/2 for 20237 | 13361.2 | AF899 | Articulating Sheet Big for 20237 | 29180.3 |
| 69355 | Helmet K22 (T-50R) (Half) (Comp) for 20237 | 00210.0 | 67029 | Screw M6x10 DIN 933 Stainless Steel for 20237 | 13759.6 | AF900 | Articulating Sheet Small for 20237 | 29181.1 |
| 21836 | Clip for 20237 | 00435.9 | AF885 | Washer.L 1/2″ INOX for 20237 | 13773.1 | AF901 | Shutter 25x5x100 for 20237 | 29260.5 |
| 38502 | Retainer Di.25xDe.42xL.6 (F.126) 01604BR* for 20237 | 00741.2 | 16435 | Screw M4x10 for 20237 | 14463.0 | AF902 | Sheave for 20237 | 29286.9 |
| AF989 | Belt AX 33 (Goodyear) for 20237 | 00872.9 | AF886 | Shaft Retainer Ring 25×1.2 DIN 471 for 20237 | 14802.4 | AF995 | Rubber Feet Bor.Red.C/PFS M10x30 D.69x33x48 ALT. for 20237 | 29381.4 |
| 38469 | Cover for 20237 | 02313.2 | AF990 | Screw M6x40 DIN 912 INOX for 20237 | 15048.7 | AF903 | Handle with Stem M8x12mm INOX for 20237 | 31020.4 |
| 38534 | PFS M8x25 DIN 933 ZB for 20237 | 02728.6 | AF991 | Nut Borb.M6 DIN 315 INOX for 20237 | 15049.5 | 67038 | Grounded Wire Label for 20237 | 31140.5 |
| 38557 | Screw Nut DIN 934 ZB for 20237 | 02729.4 | AF992 | Screw M8x30 DIN 933 INOX for 20237 | 16639.1 | AF996 | Lower Set (Grey) for 20237 | 31697.0 |
| 66186 | Term. Pre-Isol.AN-2434 for 20237 | 03283.2 | 30048 | Washer L.A4.3 for 20237 | 16798.3 | AF997 | Complete Lower Set for 20237 | 31702.0 |
| 27696 | Nylon Cover CN 4478 for 20237 | 03678.1 | 38045 | Washer L.A3.2 DIN 125 Stainless Steel for 20237 | 17181.6 | AF998 | Set Support Sheet for 20237 | 32030.7 |
| 38464 | Door Knob for 20237 | 03792.3 | AF888 | Bushing Dry-Met 15x17x15 1TFP015017015 RK for 20237 | 17353.3 | AF905 | Thermal Protector Protection for 20237 | 32629.1 |
| 78587 | PFS M6x16 DIN 916 FOSF. for 20237 | 03856.3 | AF993 | Nut M8 DIN 985 ZB for 20237 | 17612.5 | 67040 | Instruction Manual Label for 20237 | 32832.4 |
| 27702 | PFS M6x20 DIN 965 INOX for 20237 | 08779.3 | AF994 | Screw M6x10 DIN 7985 INOX for 20237 | 18515.9 | AF906 | Thermal Protector Label Ingles for 20237 | 33161.9 |
| AF878 | Screw M4x10 DIN 912 INOX for 20237 | 09198.7 | AF889 | Reed Switch NA Importado for 20237 | 20032.8 | AF907 | Attention Ear Wire Label Ingles/Frances for 20237 | 33170.8 |
| 38404 | Nut M4 DIN 934 for 20237 | 09205.3 | 38096 | Encapsulated Magnet for 20237 | 20033.6 | AF908 | Attention Warning Label I/F for 20237 | 33303.4 |
| 38055 | Nut M5 DIN 934 Stainless Steel for 20237 | 10471.0 | 38087 | Washer L.A5.3 DIN 125 INOX for 20237 | 20194.4 | AF909 | Attention 110/220/380V Certificate Label for 20237 | 33305.0 |
| AF879 | Emergency Label ESP./INGL./PORT. for 20237 | 10789.1 | 27711 | Screw M5x10 DIN 933 Stainless Steel for 20237 | 21081.1 | AF910 | Warning Label INGL./FRANC. for 20237 | 33307.7 |
| 38207 | Washer.L.A10.5 DIN 125 Stainless Steel for 20237 | 12347.1 | 38613 | PFS M3x6 DIN 7985 INOX for 20237 | 21639.9 | AF999 | Washer Diam.30xDiam.8.5 for 20237 | 33360.3 |
| 38489 | Nut M10 DIN 934 Stainless Steel for 20237 | 12350.1 | AF890 | Nut M6 DIN 1587 INOX for 20237 | 22200.3 | AF911 | Moveable Table Drag Pin for 20237 | 33617.3 |
| AF880 | Screw M10x20 DIN 933 INOX for 20237 | 12434.6 | AF891 | Elastic Pin.8×60 DIN 1481 for 20237 | 22574.6 | AG000 | Wheel INF.350 (VERNIZ) for 20237 | 33865.6 |
| 16419 | Washer L.A6 4 125 INOX for 20237 | 12442.7 | AF892 | Elastic Pin.5×60 DIN 1481 for 20237 | 22575.4 | AE579 | CB.3×2.1mm2 SJX2M Certif. for 20237 | 35738.3 |
| 16421 | Screw Nut M8 934 INOX for 20237 | 12445.1 | AF893 | Lower Tree SKLG for 20237 | 22576.2 | AF914 | Plug Americano Cert.20A 250V (1×991) for 20237 | 36075.9 |
| 38281 | Screw Nut M6 DIN934 INOX for 20237 | 12448.6 | 38593 | Screw M5x6 DIN 84 Stainless Steel for 20237 | 22996.2 | AF916 | V-Ring 55xDI.24×8 for 20237 | 36546.7 |
| 16422 | Screw M8x20 DIN 933 Stainless Steel for 20237 | 12455.9 | AF894 | Handle with Hoop M12x160mm for 20237 | 23406.0 | AF917 | Upper Wheel Washer for 20237 | 36558.0 |
| 16423 | Washer L.A8.4 Stainless Steel for 20237 | 12460.5 | 67033 | Screw M4x10 DIN 933 Stainless Steel for 20237 | 23739.6 | AF920 | Etiq.ETL Listed for 20237 | 36958.6 |
| 38282 | Screw M3x10 DIN 84 Stainless Steel for 20237 | 12491.5 | AF895 | Handle with Hoop M8x55mm INOX for 20237 | 23844.9 | AF923 | Screw M3x8 DIN 965 INOX for 20237 | 37881.0 |
| AF882 | Moving Pulley SK (Primer) for 20237 | 12612.8 | 38412 | PFS M4x5 DIN 7985 INOX for 20237 | 23932.1 | AF924 | Bearing 6004 Z DIN 625 NSK/TK Di.20xDe.42xL.12 for 20237 | 39080.1 |
| 38044 | Nut M3 DIN 934 Stainless Steel for 20237 | 12853.8 | AF896 | Nut M8 DIN 1587 DIREITA LATAO NIQUELADO for 20237 | 24842.8 | AG001 | Spacer 3.0mm for 20237 | 39712.1 |
| AF883 | Fluted Handle M6x15mm INOX for 20237 | 13069.9 | 27720 | Omcan Logo (Machines) for 20237 | 27154.3 | AF925 | Wheels Lid for 20237 | 39718.0 |
| 38086 | Screw M8x16 DIN 933 Stainless Steel for 20237 | 13238.1 | AF898 | Screw M8x40 DIN 916 FOSF. for 20237 | 27180.2 | AF926 | Wheel Scrapper Peg for 20237 | 40315.6 |
Model: BS-BR-2820-SS 20237
| Item No. | Description | Position | Item No. | Description | Position | Item No. | Description | Position |
| 67042 | Emergency Button 2NF (Pull to Unlock) for 20237 | 40640.6 | AF953 | Wheel Scrapper Sheet for 20237 | 43064.1 | AF969 | Wire Pass-Through GR. 19×31.8mm for 20237 | 50819.5 |
| AF927 | Double Button CSWBDNANFBIDL (10046334) for 20237 | 40642.2 | AG002 | Upper Wheel 350mm (VERNIZ) for 20237 | 43374.8 | AG014 | Pass-Through Tube Set for 20237 | 51303.2 |
| AF928 | Protection APBD (10046217) for 20237 | 40645.7 | AF957 | Stretcher Assembly for 20237 | 43696.8 | AG015 | Complete Upper Wheel 350mm for 20237 | 51325.3 |
| AF929 | Screw M8x12 DIN 933 INOX for 20237 | 40736.4 | AF958 | Stretcher Set for 20237 | 43697.6 | AG016 | Upper Wheel Shaft for 20237 | 51326.1 |
| AF930 | Blade Guide for 20237 | 42112.0 | AG003 | Motor 2CV 60Hz W (C/Protetor Termico) for 20237 | 45170.3 | AF972 | Press Cord HSK-K PG07 (C209070115) for 20237 | 51328.8 |
| AF932 | Door Lock Shaft for 20237 | 42557.5 | AG004 | Base Set for 20237 | 45344.7 | AF973 | Sensor Support for 20237 | 51329.6 |
| AF935 | Stationary Table Frontal Support for 20237 | 42703.9 | AG005 | Housing Closure for 20237 | 45523.7 | AF974 | Cut Regulator Set for 20237 | 51712.7 |
| AF936 | Stationary Table Lock Pin for 20237 | 42715.2 | AF961 | Screw M3x12 DIN 7985 INOX for 20237 | 45536.9 | AF975 | Complete Cut Regulator for 20237 | 51713.5 |
| AF938 | Complete Blade Guide for 20237 | 42734.9 | AG006 | Screw M8x135 DIN 933 INOX for 20237 | 45739.6 | AG017 | Housing Set for 20237 | 51714.3 |
| AF939 | Stem SI-315HD Cert. for 20237 | 42736.5 | AG007 | Moved Pulley (Lavada) for 20237 | 45880.5 | AG018 | Stationary Table Set for 20237 | 51717.8 |
| AF940 | Blade Protection Set for 20237 | 42737.3 | AG008 | Motor Support (Grey) for 20237 | 47844.0 | AG019 | Blade Protection Set SI-282HDE for 20237 | 51719.4 |
| AF941 | Blade Guide Support for 20237 | 42807.8 | AG009 | Cut Regulator Shaft for 20237 | 49040.7 | AG020 | Structure Set for 20237 | 51720.8 |
| AF942 | Bearing 6305 DDU Di.25xDe.62xL.17 FAG/NSK for 20237 | 42900.7 | 67049 | Stop M6 for 20237 | 49458.5 | AG021 | Upper Door Set for 20237 | 51725.9 |
| AF943 | Retainer Ring with Hole 62×2 DIN 472 for 20237 | 42901.5 | AF964 | Table Lock for 20237 | 49459.3 | AG022 | Lower Door Set for 20237 | 51727.5 |
| AF945 | Stationary Table Back Support for 20237 | 43025.0 | AG010 | Mini Cont.CWC016-01-30×26 220V 60Hz for 20237 | 50513.7 | AF976 | Nut M3 DIN 1587 INOX for 20237 | 51735.6 |
| AF946 | Scrapper Sheet for 20237 | 43032.3 | AG011 | Closure Sheet for 20237 | 50763.6 | AF977 | Column Closure for 20237 | 51736.4 |
| AF947 | Scrapper Guide for 20237 | 43033.1 | AG012 | Movable Table Set SI-282HD for 20237 | 50773.3 | AF978 | Actuator Spacer for 20237 | 51737.2 |
| AF948 | Scrapper Blade for 20237 | 43034.0 | AF965 | Table Peg for 20237 | 50779.2 | AF979 | Actuator Washer Sheet for 20237 | 51738.0 |
| AF949 | Scrapper Lock PI for 20237 | 43039.0 | AG013 | Rollers Shaft Set for 20237 | 50790.3 | AG023 | Cord Press PG13.5 HSK-K Complete for 20237 | 55660.2 |
| AF950 | Scrapper Guide Pin for 20237 | 43040.4 | AF966 | Nylon Screw for 20237 | 50797.0 | AG024 | L2820344DS-*Blade 2.820mm 3/4″ 4DPP S for 20237 | 58876.8 |
| AF951 | Complete Wheel Scrapper for 20237 | 43047.1 | AF967 | Electric Box Set for 20237 | 50799.7 | AG025 | Thermal Protector 12561307 for 20237 | 69424.0 |
| AF952 | Complete Blade Scrapper for 20237 | 43048.0 | AF968 | Electric Box Closure for 20237 | 50809.8 |
Model: BS-BR-3150-SS 20236
Model: BS-BR-2820-SS 20237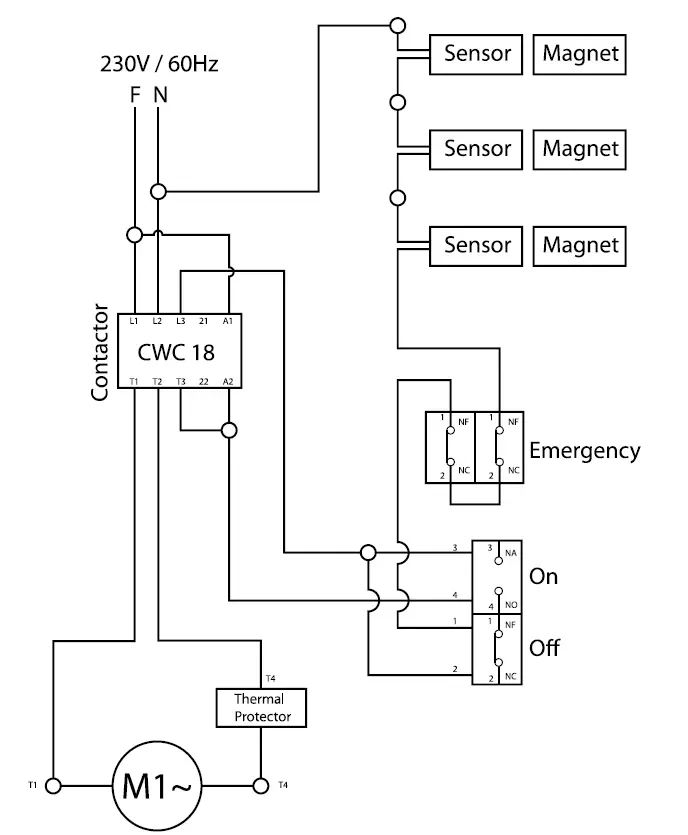
Warranty Registration
Thank you for purchasing an Omcan product. To register your warranty for this product, complete the information below, tear off the card at the perforation and then send it to the address specified below. You can also register online by visiting: https://omcan.com/warranty-registration/
For mailing in Canada
OMCAN
- PRODUCT WARRANTY REGISTRATION
- 3115 Pepper Mill Court,
- Mississauga, Ontario
- Canada, L5L 4X5
For mailing in the US
OMCAN
- PRODUCT WARRANTY REGISTRATION
- 4450 Witmer Industrial Estates, Unit 4,
- Niagara Falls, New York
- USA, 14305
or email to: [email protected]
Purchaser’s Information
- Name:
- Company Name:
- Address:
- Telephone:
- City:
- Province or State:
- Postal or Zip:
- Email Address:
- Country:
- Type of Company:
- Dealer from which Purchased:
- Butcher Supermarket Caterer:
- Dealer City:
- Dealer Province or State:
- Institution (specify):
- Invoice:
- Other (specify):
- Model Name:
- Model Number:
- Serial Number:
- Machine Description:
- Date of Purchase (MM/DD/YYYY):
- Date of Installation (MM/DD/YYYY):
Would you like to extend the warranty?
- Yes
- No
Thank you for choosing Omcan
Since 1951 Omcan has grown to become a leading distributor of equipment and supplies to the North American food service industry. Our success over these many years can be attributed to our commitment to strengthen and developing new and existing relationships with our valued customers and manufacturers. Today with partners in North America, Europe, Asia, and South America, we continually work to improve and grow the company. We strive to offer customers exceptional value through our qualified local sales and service representatives who provide convenient access to over 5,000 globally sourced products.


