
discoverwithdrcool A061-1200500UD HOBBY TUMBLER

Safety Information
- The toy must only be used with the recommended transformer (Model A061-1200500UD) [UK MODEL: A062-1200500BC] if the transformer is not supplied.
- The transformer is not a toy and shall not be used as a toy.
- Please inspect the transformer regularly for damage to the cord, plug, enclosure and other parts, and in the event of such damage, must not be used until the damage has been repaired.
- Do not connect the tumbler to more than the recommended number of power supplies.
- Waste electrical products should not be disposed of with household waste. Please recycle where facilities exist. Check with your local authority or retailer for recycling advice.
- Read warnings on individual component packaging carefully. This set contains items that may be harmful if misused. Adult supervision is required.
This device complies with Part 15 of the FCC Rules. Operation is subject to the following two conditions:
- this device may not cause harmful interference.
- this device must accept any interference received, including interference that may cause undesired operation.
Please note that changes or modifications not expressly approved by the party responsible for compliance could void the user’s authority to operate the equipment.
NOTE: This equipment has been tested and found to comply with the limits for a Class B digital device, pursuant to Part 15 of the FCC Rules. These limits are designed to provide reasonable protection against harmful interference in a residential installation. This equipment generates, uses and can radiate radio frequency energy and, if not installed and used in accordance with the instructions, may cause harmful interference to radio communications. However, there is no guarantee that interference will not occur in a particular installation. If this equipment does cause harmful interference to radio or television reception, which can be determined by turning the equipment off and on, the user is encouraged to try to correct the interference by one or more of the following measures:
- Reorient or relocate the receiving antenna.
- Increase the separation between the equipment and receiver.
- Connect the equipment into an outlet on a circuit different from that to which the receiver is connected.
- Consult the dealer or an experienced radio/TV technician for help.
Before You Begin
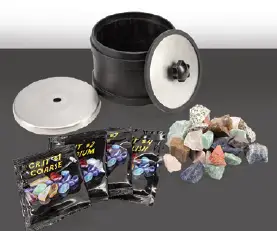
Confirm that all the following parts have been included with your kit. For concerns, including missing part inquiries, please contact: [email protected].
- Rock tumbler base
- Tumbling barrel
- Grit (inside barrel)
- Rough gemstones (inside barrel)
- Power cord
- Strainer
- Jewelry fastenings
- Learning Guide and Instructions
NOTE: The grit and rough gemstones come packaged inside the tumbling barrel.
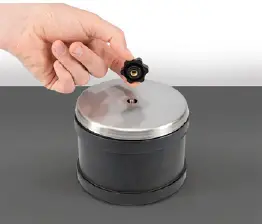
Follow these steps to open the tumbling barrel
- Unscrew and remove the outer black knob.
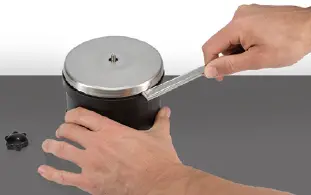
- Pop off the stainless steel housing. If you have trouble, try using something flat—like a silverware handle—to pry it off.
- Reattach the black knob and use it to pull off the inner lid.
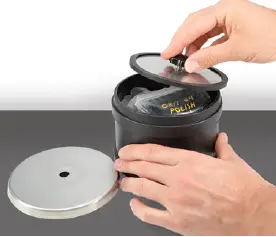
- Remove the rough gemstones and grit.
Polishing Instructions
Caution: Grit can wreak havoc on plumbing, so never pour the used grit down any household drain. It is best to wash your gritty stones and barrel outside with a garden hose.
- Add your rocks and grit #1 to the tumbler barrel.
- Fill with water until the water just covers the top of the rocks.
- Tightly close the lid and place the barrel on the tumbler base.
- Plug in the tumbler and select the desired number of days (see “Suggested Tumbling Times” below).
- When the cycle is over and you’re satisfied with your results, pour the contents of the tumbler into the strainer, and rinse the rocks and barrel with water, removing all grit.
- Repeat the steps above with grits #2, 3, & 4 (in that order). This process will gradually polish your rough rocks into smooth gemstones.
Remember that oceans and rivers take thousands or even millions of years to produce polished stones. This rock tumbler speeds up that process, but you should still expect about 4 weeks of tumbling for great polishing results. So remember to be patient, as the best results come to those who wait.
Tips for getting the best results
Tip #1: Don’t overload the tumbler.
The action of the rocks crashing into each other will give you the best tumbling results. If the tumbler is too full, the rocks can’t move as freely and won’t polish as well. For best results, fill your tumbler barrel about 1/2 to 2/3 full. If you overfill the tumbler, the built-in sensor will automatically protect the motor inside by turning the tumbler off. If this happens, you should remove some of the rocks, unplug the tumbler, and plug it in again. This will reset the tumbler.
Tip #2: Use your own judgment.
Use the tumbling guide below as a place to start, but use your own judgment to determine if your rocks need more time on each grit cycle (especially when you’re tumbling new types of rocks). Some rocks are harder than others, so they’ll take more time to polish than softer rocks.
Tip #3: Always wash a few “test” stones before changing grit.
The purpose of the roughest grit (#1) is to completely round all of the edges. Whenever you finish a grit cycle, always grab a few test stones and rinse them off before you dump out all of the grit and water. Carefully inspect these test rocks to determine if you think they’re smooth enough. If you don’t think they’re finished, simply put them back in the barrel and run the batch for more time. Repeat this process with each grit. Each grit will get you a smoother and smoother polish. Generally speaking, longer is always better.
Tip #4: Adding a small bit of mineral oil to your finished stones will help give them a nice shiny look.
Suggested Tumbling Times
- Grit #1: 3–5 days (until the stones have all lost their sharp edges and feel smooth)
- Grit #2: 6–8 days
- Grit #3: 6–8 days
- Grit #4: 7–10 days (the long polishing time will help you get the best results)
FAQ’s
Question: Will this work with glass to create “sea glass” like you find at the beach?
Answer: Yes. We recommend doing a little research to determine the appropriate tumbling times and optimal type of grit.
Question: Can I buy spare parts separately? Where can I get more stones and grit?
Answer: You can find refill packs containing stones, grit, and jewelry fastenings at our Amazon store at http://goo.gl/xLjX08. If you need a replacement part please contact us at [email protected] and we’ll be happy to assist you.
One final note: You can always experiment with adjusting the duration of your tumbling. Every rock material is different, and this is a fun hobby that encourages experimentation. Rock on!
©2016 JMW Sales, Inc. Todos los derechos reservados.
1 (855) 437-2665 Servicio al Cliente
Hecho e importado por JMW Sales, Inc.
993 Siskiyou Blvd. Suite 1, Ashland OR 97520


