
MITSUBISHI ELECTRIC PAC-SG73RJ-E Joint Pipe Instruction Manual
Photo

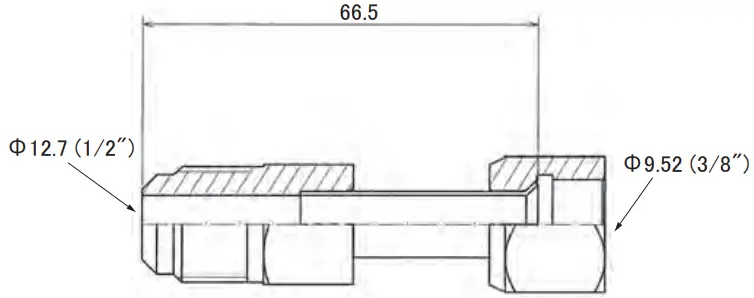
Dimensions
Unit: mm (inch)
Descriptions
A part to connect refrigerant pipes of the different diameter.
(Unit 9.52 → 12.7)
Applicable Models
- PUHZ-ZRP60,71VHA2
- PUHZ-ZRP100,125,140VKA3
- PUHZ-ZRP100,125,140YKA3
- PUHZ-ZRP200YKA3
[R410A type]
Specifications
| Pipe diameter | 9.52 |
| Pipe material | C 1220T – OL |
How to Use / How to Install
Make sure that you have all the following parts, in addition to this manual in this box:
Joint Pipe
PAC-SG72RJ-E (unit side:ø6.35 diameter, onsite pipe side:ø9.52 diameter)
PAC-SG73RJ-E (unit side:ø9.52 diameter, onsite pipe side:ø12.70 diameter)
PAC-SG74RJ-E (unit side:ø12.70 diameter, onsite pipe side:ø15.88 diameter)
PAC-SG75RJ-E (unit side:ø15.88 diameter, onsite pipe side:ø19.05 diameter)
Unit side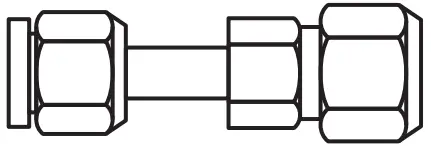
Onsite piping side
Installation procedure
(carefully read the following before installing.)
This optional part is used to connect indoor/outdoor unit to onsite pipes of different diameters.
![]() When installing this optional part, be sure to read
When installing this optional part, be sure to read
“Refrigerant pipe connection” in the installation manual attached to outdoor unit.
Apply flare processing to onsite pipes to adapt to R410A, according to the table on the right.Use optional accessory flare nut at this time.
![]() Check the installation manual attached to the outdoor unit for advisability on whether or not onsite (existing) pipes can be used.
Check the installation manual attached to the outdoor unit for advisability on whether or not onsite (existing) pipes can be used.
![]() When pipe of 19.05 diameter is used, be sure to turn ON the SW8-1 on outdoor unit control board.
When pipe of 19.05 diameter is used, be sure to turn ON the SW8-1 on outdoor unit control board.
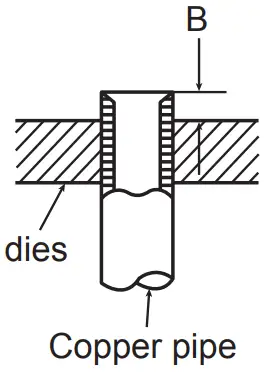 | Pipe diameter (mm) | B size (mm) | |
| R410A flare tool | R22/R407C flare tool | ||
| Clutch type | |||
| ø 6.35(1/4”) | 0 – 0.5 | 1.0 – 1.5 | |
| ø 9.52(3/8”) | 0 – 0.5 | 1.0 – 1.5 | |
| ø12.70(1/2”) | 0 – 0.5 | 1.0 – 1.5 | |
| ø15.88(5/8”) | 0 – 0.5 | 1.0 – 1.5 | |
| ø19.05(3/4”) | 0 – 0.5 | 1.0 – 1.5 | |
![]() When flare processing for refrigerant R410A is applied using current tool, refer to the table above. B size can be secured using copper pipe gauge for margin adjustment.
When flare processing for refrigerant R410A is applied using current tool, refer to the table above. B size can be secured using copper pipe gauge for margin adjustment.
| Outer diameter of copper pipe (mm) | Processing size of flare section (mm) | Flare shape |
| ø6.35 | 8.7 – 9.1 | 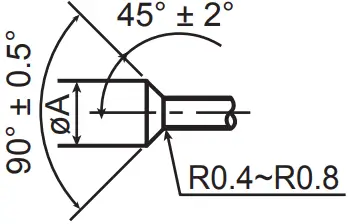 |
| ø9.52 | 12.8 – 13.2 | |
| ø12.70 | 16.2 – 16.6 | |
| ø15.88 | 19.3 – 19.7 | |
| ø19.05 | 23.6 – 24.0 |
Remove caps (both ends) for protection against mixing of foreign materials from optional part, and thinly apply refrigerat or oil (locally procured) on flare surface.
Refrigerator oil application point
Apply refrigerator oil to entire circumference of flare sheet surface.
![]() Do not apply to thread section. (If applied to threads, flare nut can easily be loosened.)
Do not apply to thread section. (If applied to threads, flare nut can easily be loosened.)
Securely tighten flare nut using torque wrench according to the table on the right.
Proper tightening torque using torque wrench
| Outer diameter of copper pipe (mm) | Tightening torque N•m (kgf•cm) |
| ø6.35 | 14 – 18(140 – 180) |
| ø9.52 | 34 – 42(340 – 420) |
| ø12.70 | 49 – 61(490 – 610) |
| ø15.88 | 68 – 82(680 – 820) |
| ø19.05 | 100 – 120(1000 – 1200) |
After refrigerant pipe is connected, be sure to perform gas leakage
inspection for onsite connection pipes (including this optional part)
and indoor/outdoor unit.
Heat insulation is necessary for this optional part: Wrap heat insulator (locally procured) around the onsite pipes and also the optional part (for dewdrop dripping prevention).
Perform test run according to the installation manual of the unit, making sure to also perform operation check.
![]()


