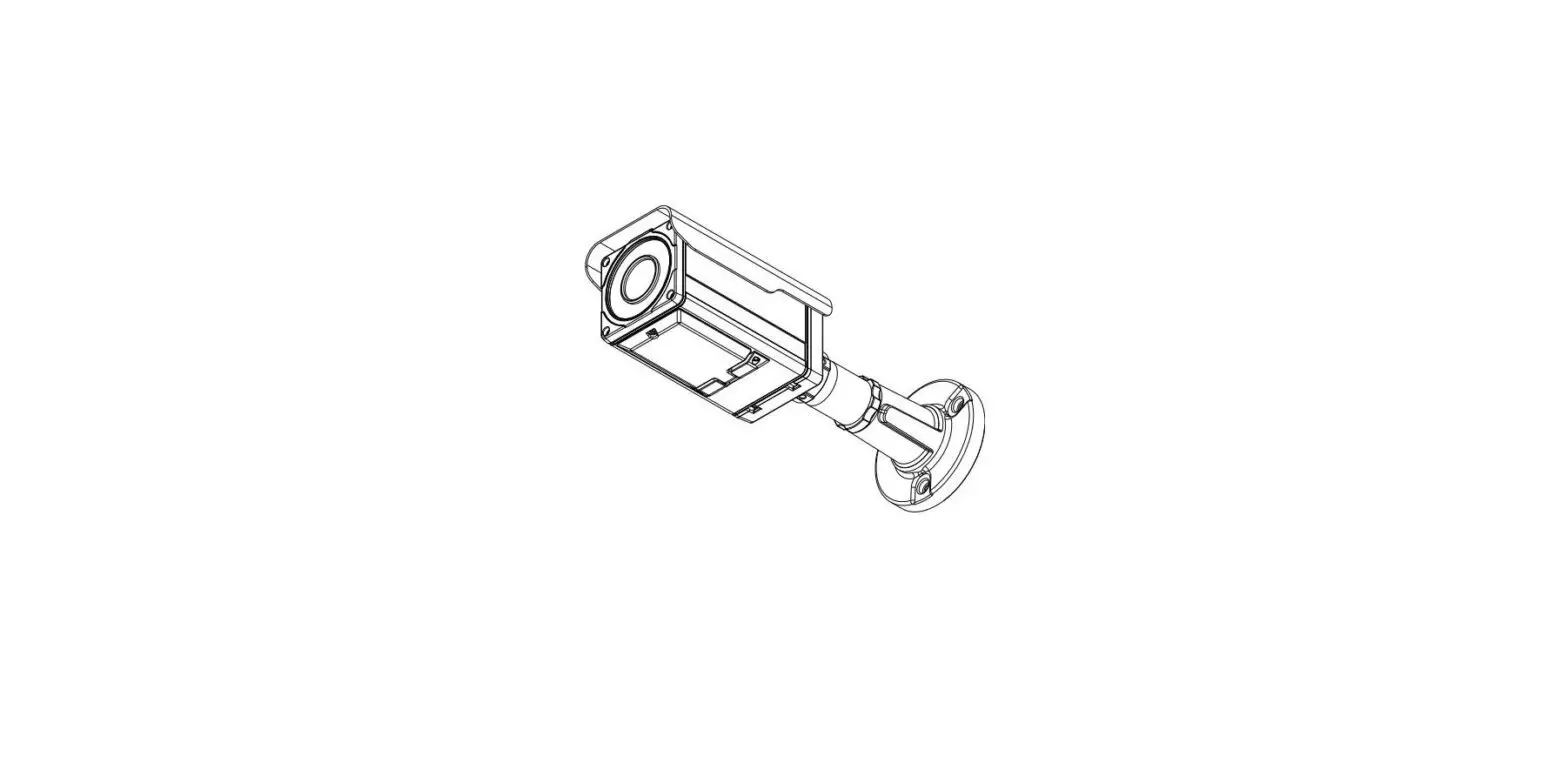
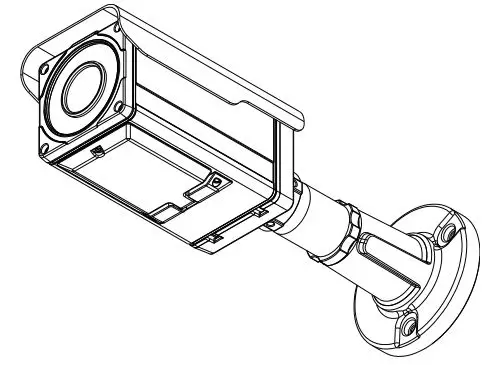
Visualint VI-3100 Outdoor Camera

FEATURES
Camera
- Indoor/Outdoor IR Bullet IP Camera
- 1/2.7” 1080p CMOS
- ICR type true day & night
- ONVIF Support
Streaming
- Dual streaming mode (such as different codec/resolution/bit rate and so on.)
- Burnt-‐in text supported
- Unicast/Multicast supported
Video/Audio
- Video compression: H.264/MJPEG, 25/30FPS@1080p(PAL/NTSC)
- Analog video out for external monitors
- Video Motion Detection supported
Network
- RTSP/ HTTP protocol supported
- 10/100 Base-‐T Ethernet
Additional Features
- OSD for camera control supported
- VCA presence
PACKAGE CONTENTS

PART NAMES
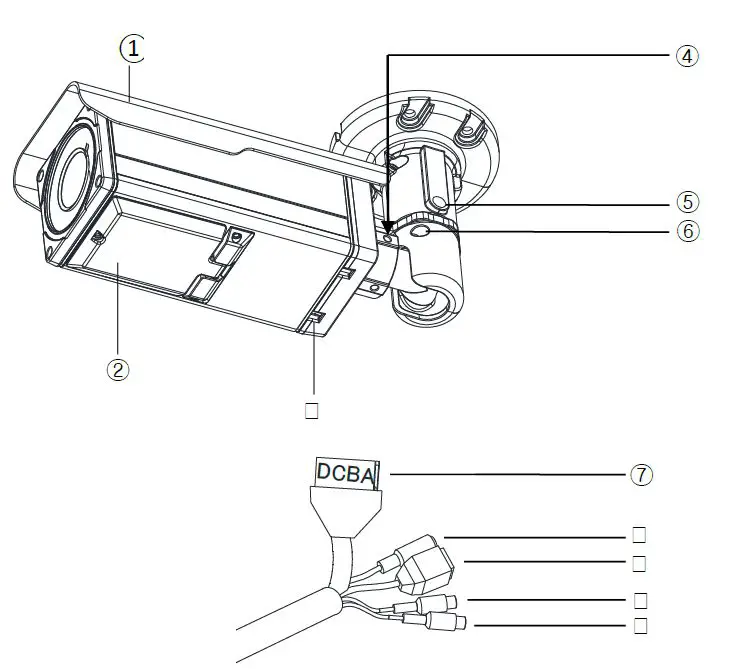
- Sunshield
Position the sunshield to prevent direct sunshine. - Control panel
Open the control panel to control LEDs, OSD menus, extra video output, and reset button. To learn how to reset your device, refer to 6.3. Reset. - Ventilation hole
The ventilation holes help to reduce the temperature difference between inside and outside and prevent water from being condensate. - Joint for 3 axis
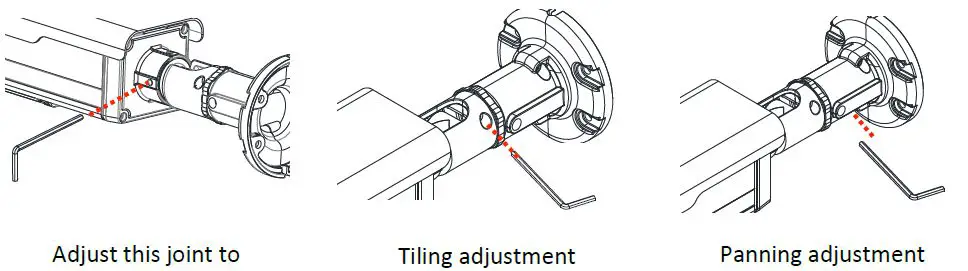
Use this part to adjust the camera to the desired position. Refer to 4. Installation for more details. - Panning joint
Use this part for panning adjustment. Refer to 4. Installation for more details. - Tilting adjustment
Use this part for tilting adjustment. Refer to 4. Installation for more details. - 4 Pin Connector
A: DO,-‐ B: DO+, C: DI+, D: DI-‐ - Power Adaptor Connector
The camera needs DC 12V for power supply. - Network Port
Use this RJ45 LAN connector for connecting the camera to network. - Audio In
Connect to the audio input device such as a mike. - Audio Out
Connect to the audio output device such as the amplifier speaker.
INSTALLATION
- Place the installation desired position of installation.
- Drill four holes on the template and insert anchor blocks into the holes. Fasten the camera with screws.
- Make sure the cables are properly connected to the camera.
- Adjust the camera to the desired angle by unscrew the joints by referring to the following pictures.

Installation Template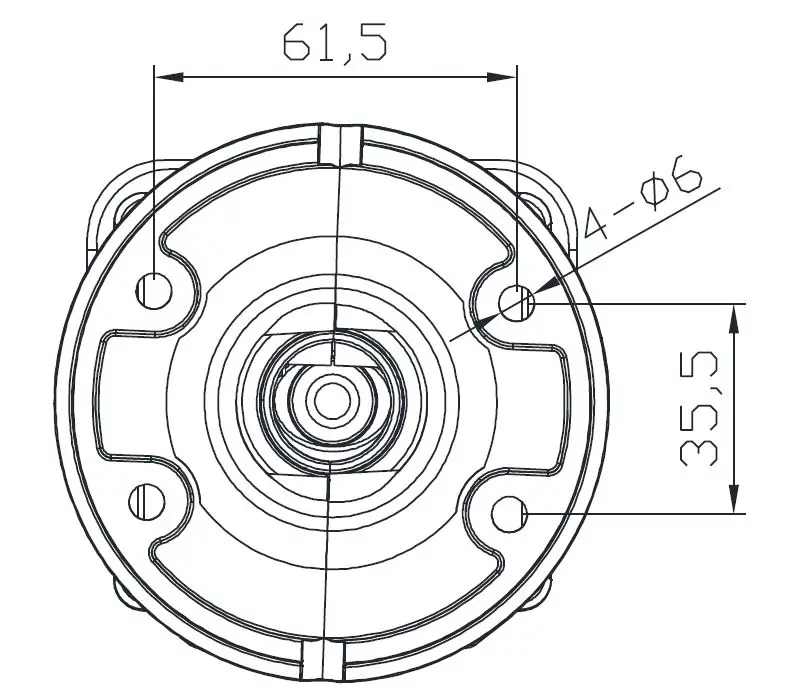
Adjusting LED options and lens focus
Adjust the zoom and focus of the lens with the lever of ① and ② on the following picture.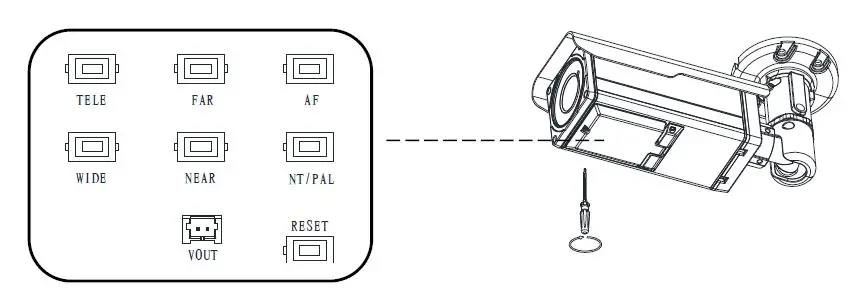
- TELE/WIDE: Uses for zoom
- FAR/NEAR: Uses for focus
- AF: Autofocus
- NT/PAL: NTSC, PAL button
- Vout: Uses only for installation
Setting the Image Attribute
You can set the image attribute of camera through the webpage. The menu of image attribute can be seen under Setup > Video & Audio > Camera. Brightness, contrast, saturation and sharpness can be adjusted.
CABLE CONNECTIONS
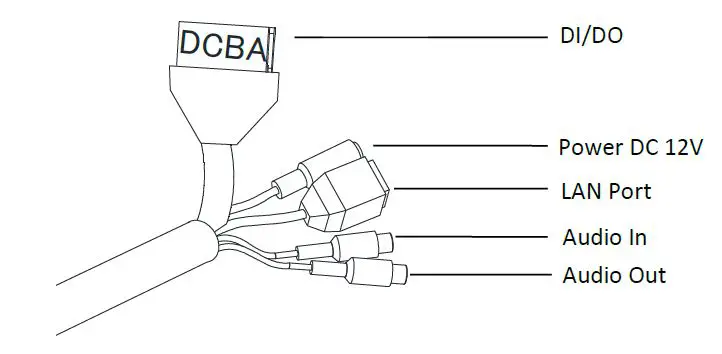
DI/DO Connection
A: DO-‐, B: DO+ , C: DI+ , D: DI-‐
Sensor (DI) connection
The camera provides 1 channel D/I. It can be connected to either a voltage type sensor or a relay type sensor as the following figures. It can be selected by software.
- Input voltage range: 0VDC minimum to 5VDC maximum, Max 50mA
- Input voltage threshold: 1.5V

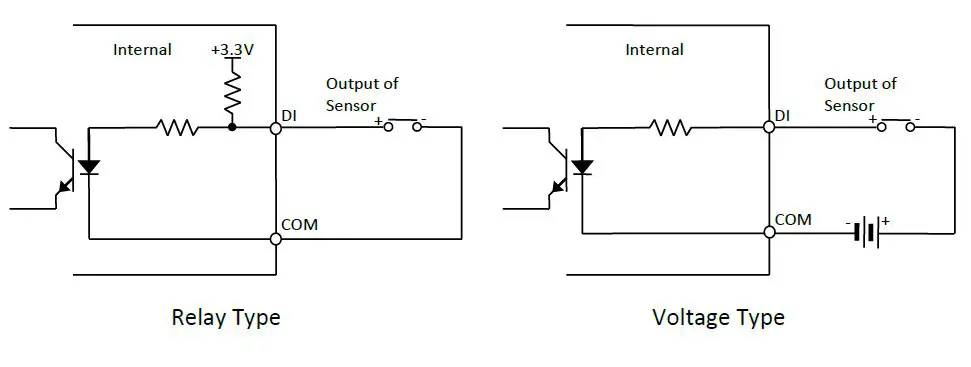
Caution: Do not exceed the maximum input voltage or relay rate.
Alarm (DO) connection
Only the relay type is supported. Relay Rating: Max 24VDC 50mA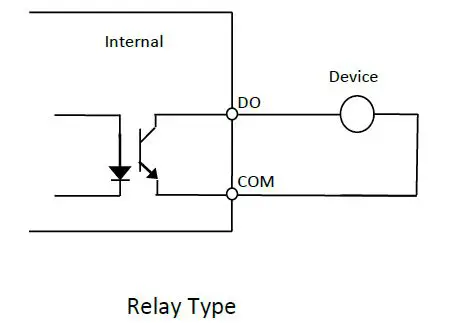
Power Connection
A 12 DC power connector is required for this device.
Network Connection
This is a RJ45 LAN connector for 10/100 Base-‐T Ethernet. Connect a LAN cable.
Audio Input/Output Connection
Connect the audio input device such as a mike to the audio input port and the audio output device such as the amplifier speaker to the audio output port.
- Audio Input : Linein, 1.43Vp-‐p(M in 1.35Vp-‐p, max 1.49 Vp-‐p), 39 KΩ
- Audio Output: Lineout, 46mW Power, 16 Ω
CONFIGURATION
Set up network environment
The default IP address of the device is 192.168.XXX.XXX. Users can identify the IP address of the device from converting the MAC address’s hexadecimal numbers, which is attached to the device. Be sure that the device and PC are on a same area network before running the installation.
- IP address : 192.168.xxx.xxx
- Subnet mask: 255.255.0.0
Generic IP Environment
In case of generic private network environment where IP address 192.168.XXX.XXX are used, users may view the live streaming images on a web page using the device’s default IP address:
- Convert the device’s MAC address to the IP address. Refer to the Hexadecimal-‐Decimal Conversion Chart at the end of the manual.(The MAC address of the device is attached on the side or bottom of the device.)

- Start the Microsoft® Internet Explorer web browser and enter the address of the device.
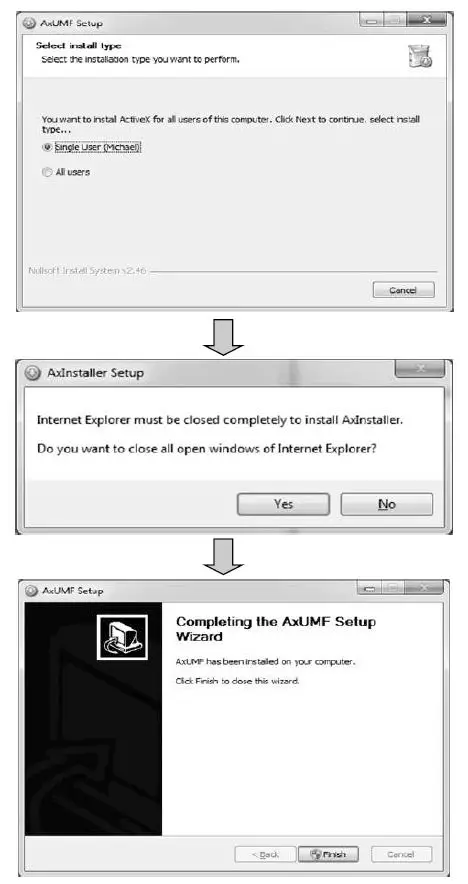
- Web streaming and device configurations are supported through ActiveX program. When the ActiveX installation window appears, authorize and install the ActiveX.

Custom IP Environment
IPAdminTool is provided in Dealer Portal
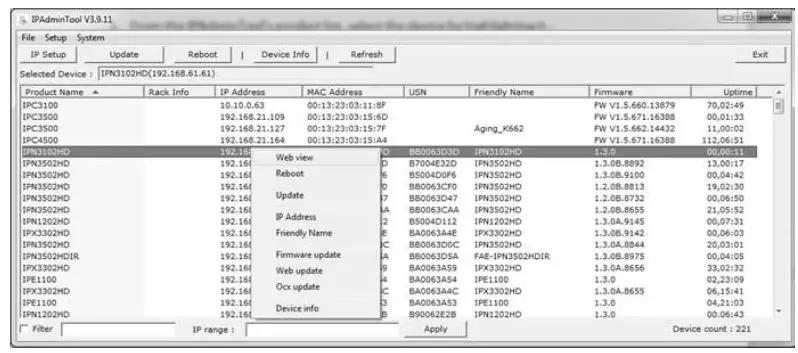
IPAdminTool is a management tool, which automatically scans all of the network products for users to perform administrative tasks, which includes network configurations, firmware update, device reboot, and device organizations.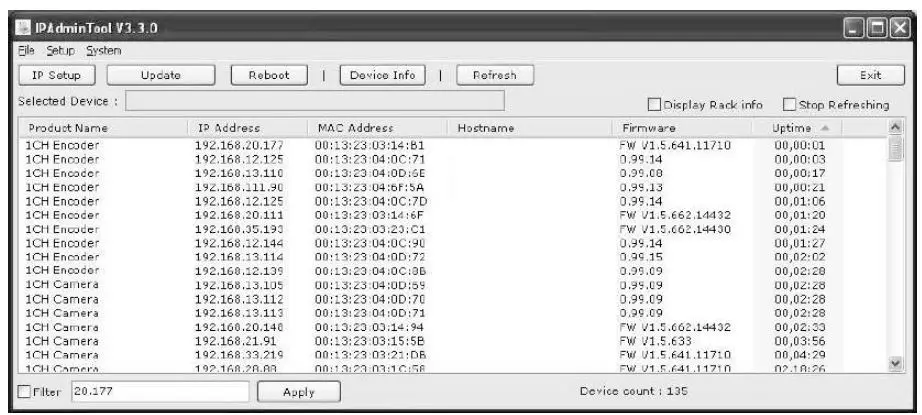
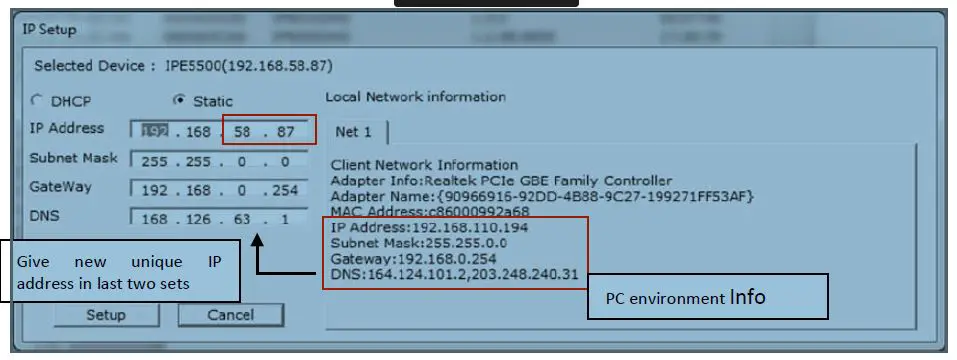
To modify the device’s default IP address for customized network area;
- Find the device from the IPAdminTool’s list and highlight the device’s name.
- Right-‐click the mouse and select “IP Address”; IP Setup window appears.

- In the IP Setup’s window, information under ‘Local Network information’ displays the user/PC’s network area information. Those information need to be incorporated to the IP Address, Subnet Mask, Gateway, and DNS boxes, except the last 2 sets of IP Address, which are to be the unique numbers for the device. Refer to the image above for the setting
- Click ‘Setup’ to complete the modification.
View video on web page
Type the proper IP address to view the live streaming images through a web browser. The default username and password is root/pass.
- The browser asks to install the ActiveX. Click Allow.
- Setup.exe installation link or pop-‐up window appears, depends on Microsoft® Internet Explorer version. Proceed with rest of setup installation.

- Follow the instructions of the dialog boxes and complete the installation. Once the installation is complete, start the web browser again and check if video stream is displayed in the main view frame.
Access through IPAdmin Tool
IPAdminTool automatically searches all activated network encoders and IP cameras and shows the product name, IP address, MAC address and etc.
- From the IPAdminTool’s product list, select the device by highlighting it.
- Right-‐click the mouse and select web-‐view

Reset
- While the device is in use, press the Reset button.
- Wait for the system to reboot.
Factory Default
- Press reset button and hold.
- Release the Reset button after 5 seconds until LED blinks.
- Wait for the system to reboot.
The factory default settings can be inferred as follows:
- IP address: 192.168.xx.yy
- Network mask: 255.255.0.0
- Gateway: 192.168.0.1
- User ID: root
- Password: pass
APPENDIX (A): SPECIFICATIONS
Summary
| Camera Module | |
| Image Sensor | OV2715 CMOS |
| Effective Pixels | 768 x 494 (NTSC) /752 x 582 (PAL) |
| TV System | NTSC / PAL |
| Horizontal Resolution | TBD |
| Zoom | X16 Digital Zoom |
| White Balance | ATW / AWC / Manual / Outdoor / Indoor |
| Scanning System | 2:1 Interlace |
| Sync System | Internal |
| Min. Illumination | TBD |
| Lens | 3.0 – 9.0mm Vari-‐Focal F1.2 Motorized Focus & Zoom |
| Focus | Motorized |
| Iris | Auto |
| Day & Night | COLOR / B/W / AUTO |
| Shutter Speed | 1/60s ~ 1/120,000s |
| S / N Ratio | 52 dB (AGC off) |
| AGC | Low / High / Off (Selectable) |
| BLC | BLC / HLC / Off |
| DNR | On/Off (1~32 Level Adjustable) |
| Video | |
| Compression | H.264, MPEG-‐4, MJPEG Selectable per Stream |
| Number of Streams | Dual stream, Configurable |
| Resolution | 1920×1080, 1280×720, 800×450, 480×270, 320×180 |
| Compression FPS | 25/30 fps @ D1 (PAL/NTSC) |
| De-‐interlacing | Supported (DSP) |
| Motion Detection | Supported |
| Burnt-‐in Text(digital) | Supported (DSP) |
| Analog Video Output | PAL/NTSC (Auto off) |
| Audio | |
| Input / Output | 1/1 |
| Compression | PCM, G.711 |
| Function | |
| IR Range | Internal Use: 30M External Use: 20M |
| Network | 10/100 Base-‐T |
| Power over Ethernet | 802.3af (Normal) |
| DI / DO | 1 / 1 ch |
| RS-‐232C/RS-‐485 | Not available |
| Protocol | TCP/IP, UDP/IP, HTTP, RTSP, RTCP, RTP/UDP, RTP/TCP, SNTP, mDNS, UPnP, SMTP, IGMP, DHCP, FTP, DDNS, SSL v2/v3, IEEE 802.1X, SNMP v2/v3 |
| Local Storage | Not available |
Electrical Characteristics
| Poser source | DC 12V |
| Power consumption | 1200mA (Heater ON) |
| Analog Video Output | 1 Vp-‐p, 75Ω, Composite |
| Audio Input | Linein, 1.43Vp-‐p(Min 1.35Vp-‐p, max 1.49 Vp-‐p), 39 KΩ |
| Audio Output | Lineout, 46mW Power, 16 Ω |
| Sensor(D/I) | Max 50mA@5VDC, TTL level 1.5V threshold |
| Alarm(D/O) | Max 50mA@24VDC or 1A@12VDC On-‐state resistance: 50 Ω (max continuous) |
Environment Condition
|
Operating Temperature | Operating Range DC12V : -‐40˚C ~ 50˚C (-‐40˚F ~ 122˚F) PoE : 0 ˚C ~ 50 ˚C (32˚F ~ 122˚F) Cold Start DC12V : -‐20˚C (-‐4˚F) PoE: 0 ˚C (32˚F) |
| Operating Humidity | Up to 85% RH |
Environment Condition
| Dimensions | 83mm x 82mm x 194mm (Without bracket) |
| Color | Ivory |
| Weight | Net: 1.5Kg |
APPENDIX DIMENSIONS 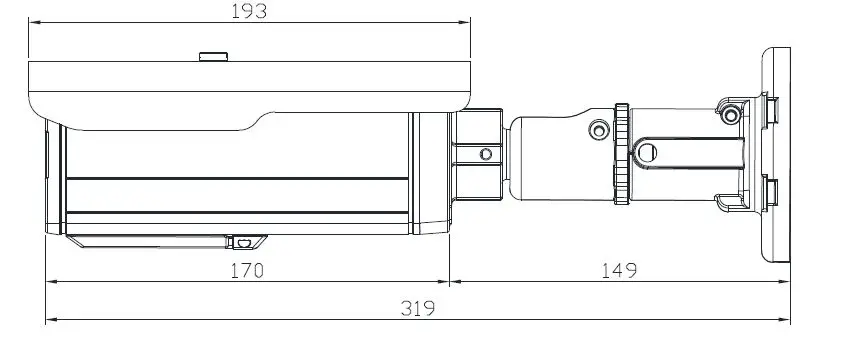
APPENDIX (C): HEXADECIMALDECIMAL CONVERSION TABLE
REVISION HISTORY
| MAN# | DATE(M/D/Y) | Comments |
| D1A.01 | 04/20/2012 | Preliminary version |
| 01A.01 | 05/02/2012 | Power consumption revise |
| 01A.02 | 06/28/2012 | DI/DO power update |
| 01A.03 | 07/03/2012 | Supporting protocol revised. (removed SOCK and SSH) |
| 01A.04 | 08/31/2012 | Camera invert-‐install warning and Chapter 6 update |
| 01A.05 | 09/05/2012 | Audio Input & Output spec revised |


