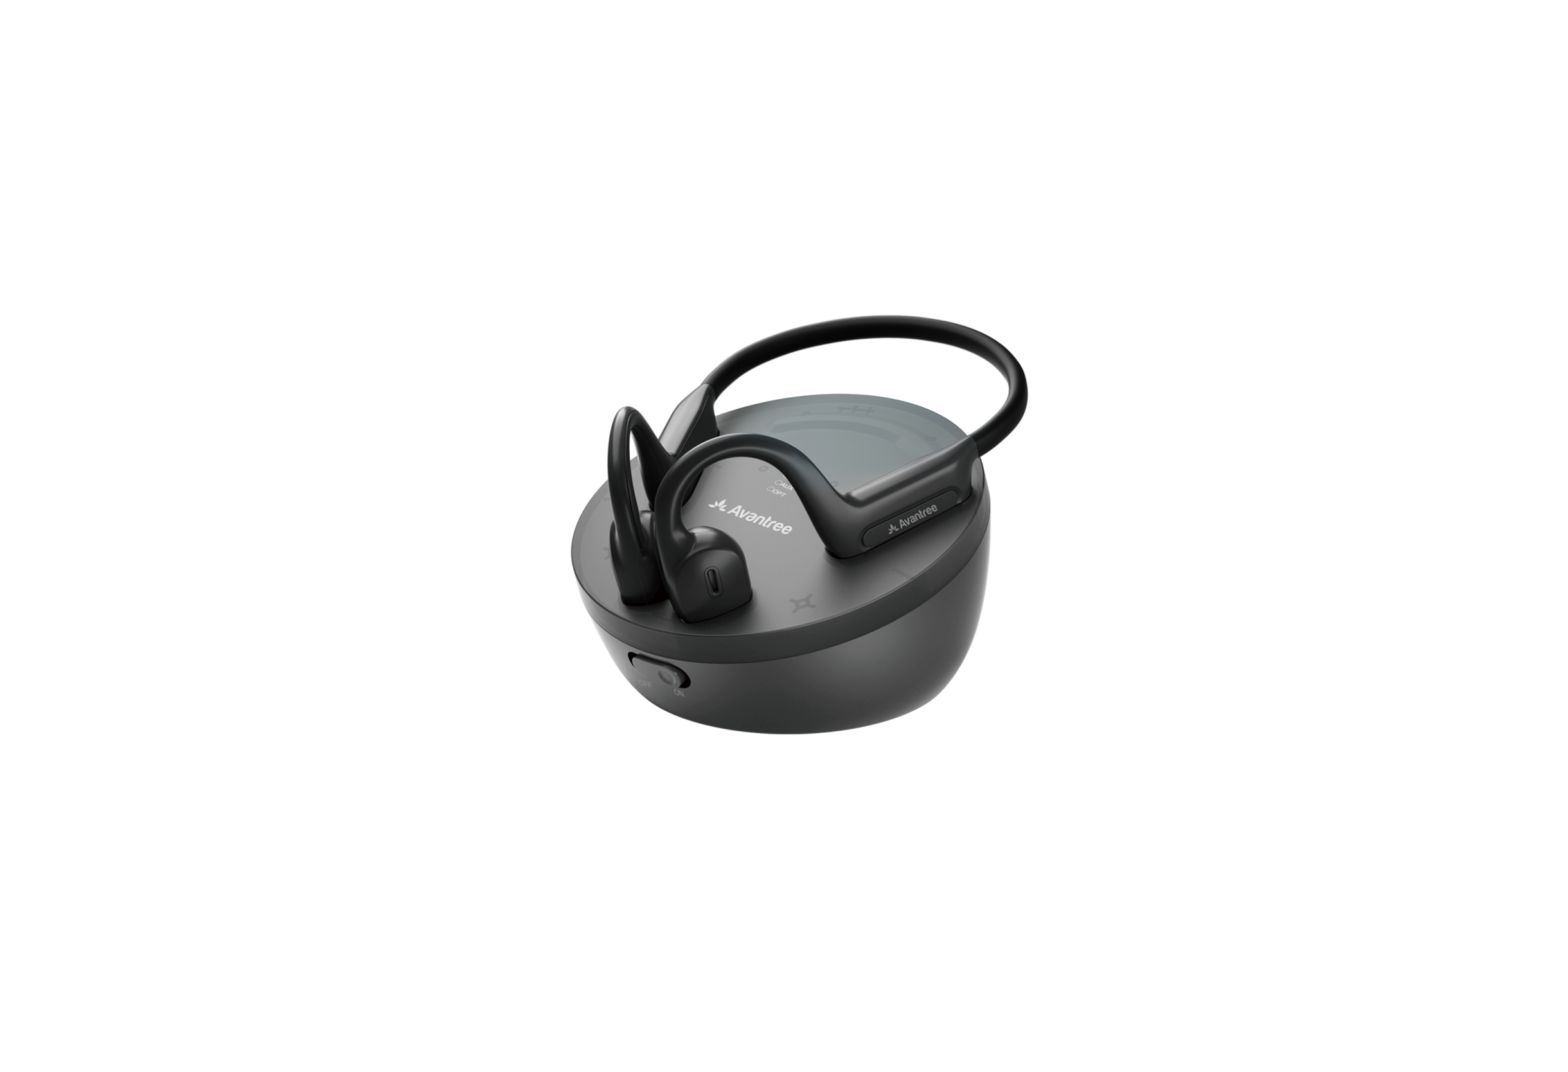
Avantree BTHT-6015 Medley Air Open-Ear Wireless Earbuds
Video Guide
Prefer to watch a video tutorial? Scan the QR code below or visit avantree.com/medley-air/video for a step-by-step guide.
Book an Appointment
 You can also book a 1-on-1 setup appointment with one of our support agents at avantree.com/book-a-call
Box Contents
- Wireless Transmitter & Charging Dock

- NB15T Open-Ear Earphones
- USB Wall Adapter

- Type C Power Cable for Transmitter
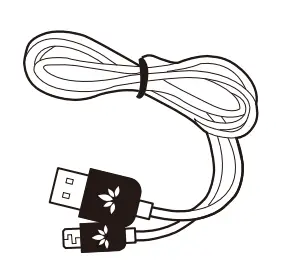
- Type C Charging Cable for Earphones

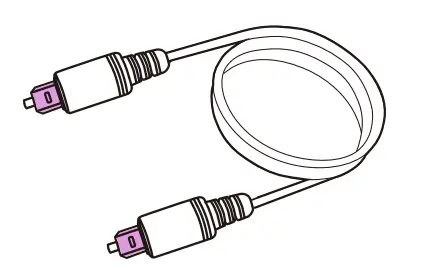
- Optical Audio Cable
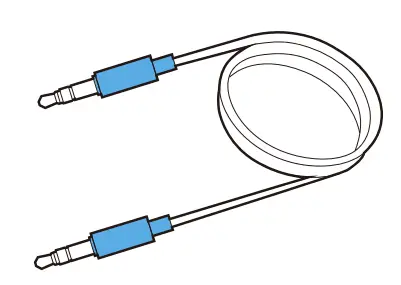
- 3.5mm AUX Cable
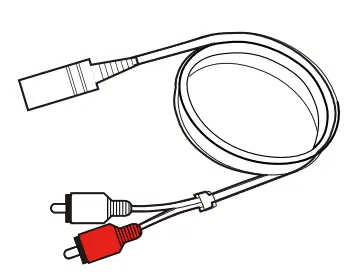
- 3.5mm AUX to RCA Adapter
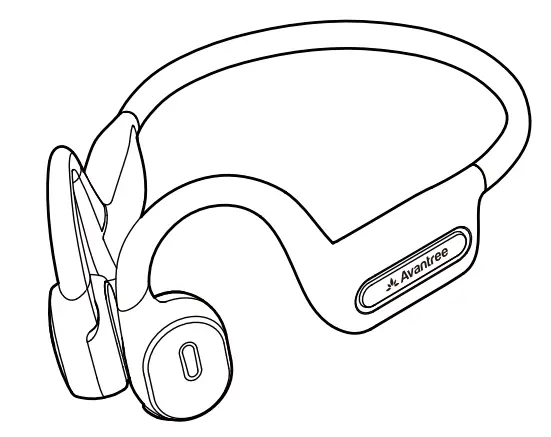
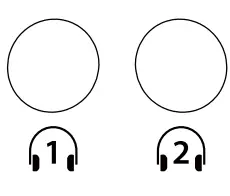
Product Introduction (Earphones)
Product Overview
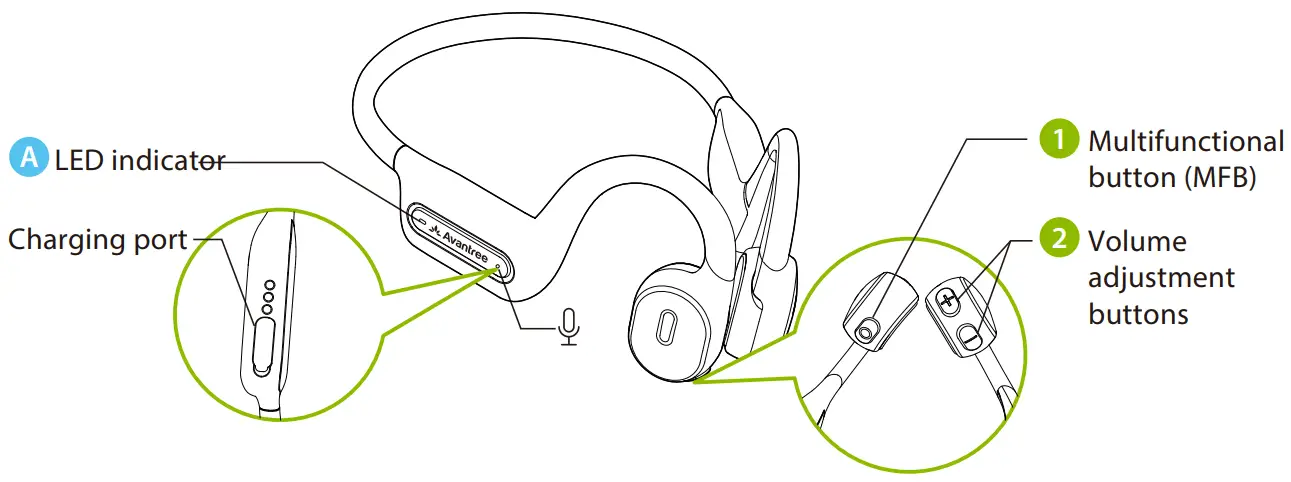
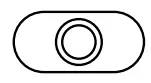
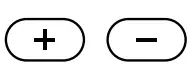
Button Functions
| No. | Button | Functions |
|
| Press & hold for 2 seconds to power on / off |
| From off, press & hold for 5 seconds to enter pairing mode | ||
| Tap once to play / pause | ||
| Tap once to accept / end call | ||
| Press & hold for 2 seconds to reject call | ||
| Double-tap to activate voice assistant (i.e. Siri / Google Assistant) | ||
|
| Tap “+ / -” once to increase / decrease volume |
| Press & hold “+ / -” for 2 seconds to skip / replay track | ||
| Press & hold both for 5 seconds to clear pairing history |
LED Indicators
| No. | Indicators & Voice Prompts | Status |
A | Solid blue for 1 second | Power on |
| Solid red for 1 second then off | Power off | |
| Solid red, “LOW BATTERY” voice indicator | Low battery | |
| Solid red | Charging | |
| LED off | Fully charged | |
| Alternate red & blue flashes, “PAIRING” voice indicator | Pairing | |
| Solid blue, “CONNECTED” voice indicator | Connected | |
| Blue flashes every 5 seconds | Disconnected | |
| Solid pink for 2 seconds then alternate red & blue flashes | Pairing history cleared |
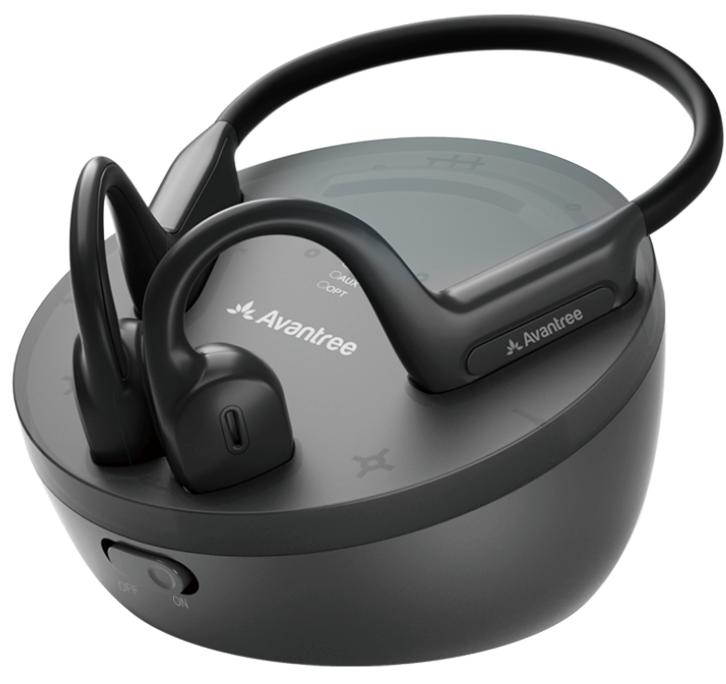
Product Introduction (Transmitter & Charging Dock)
Product Overview
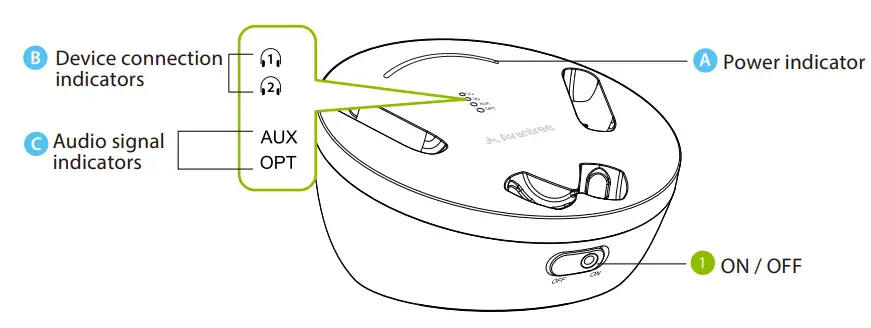
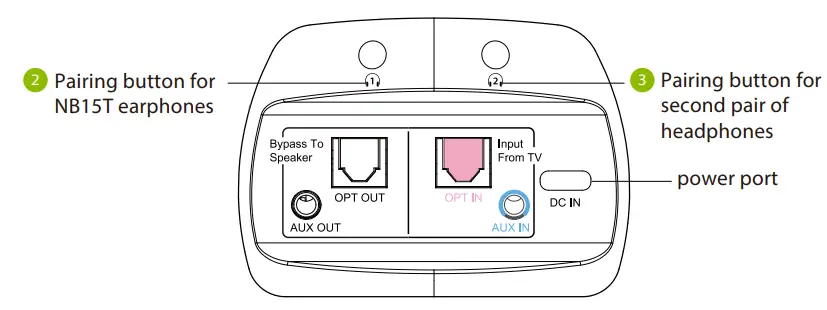
Button Functions
| No. | Button | Functions Power on |
|  | Switch to “ON / OFF” position to turn the transmitter on / off |
|
| Press & hold Press & hold |
| Once connected, press & hold for 8 seconds to lock the connection with the headphones ( | ||
| Press & hold both simultaneously for 5 seconds to clear pairing history | ||
| Tap |
LED Indicators
| No. | Indicators | Status |
| Solid red | Charging |
| LED off | Fully charged | |
| Power on | |
| Connected to the NB15T earphones | ||
| Connected to a second pair of headphones | ||
| Pairing history cleared | ||
| Solid blue | Valid audio signal |
| Red flashes every second | Invalid audio signal |
Setting Up
Connecting to Your TV
The transmitter dock must be connected to a power source via the provided power cable in order to function. Plug the transmitter dock into either:
1. A TV’s USB power port, OR 2. A nearby wall outlet via the USB adapter included (we recommend this so that it can still provide power to the dock to charge the NB15T earphones when the TV is not in use)
Once the transmitter dock is connected to its power source, you can connect it to your TV. You can choose one of 3 different ways to do this:
OPTION 1 : Optical port (recommended)
Plug the provided optical audio cable into the TV’s optical OUT or “OPT OUT” port, then plug the other end into the transmitter’s optical port in the “INPUT FROM TV” section.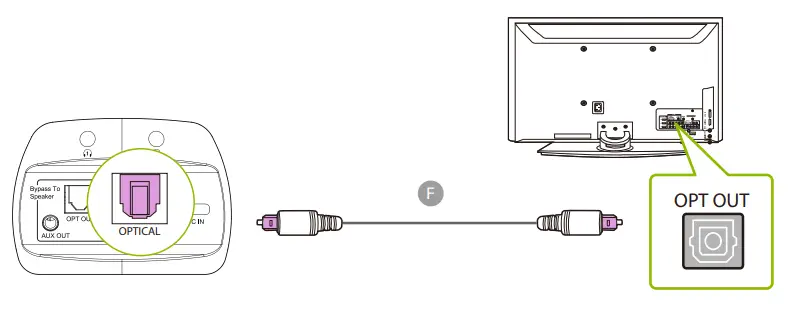
NOTE: Most TVs support audio output through only one digital output port at a time, so if your TV’s HDMI ARC port is in use, the optical port may be disabled. You can either unplug the HDMI ARC, or try connecting the transmitter via RCA / AUX.
OPTION 2 : AUX 3.5mm port
Plug the provided AUX 3.5mm audio cable into the TV’s AUX 3.5mm output port, then plug the other end into the transmitter’s AUX 3.5mm port in the “INPUT FROM TV” section.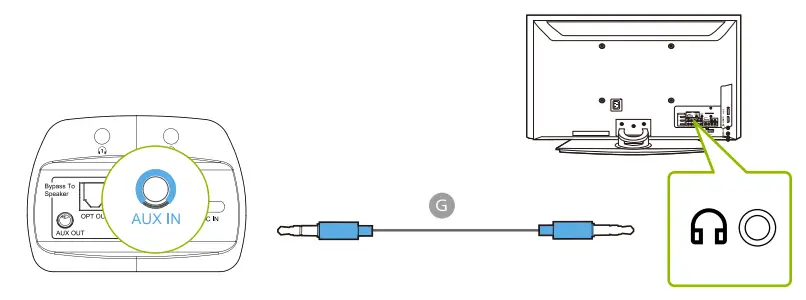
OPTION 3 : RCA port
Connect the provided RCA adapter to the AUX 3.5mm audio cable. Plug the red & white RCA connectors into the TV’s “AUDIO OUT” ports, then plug the other end into the transmitter’s AUX 3.5mm port in the “INPUT FROM TV” section.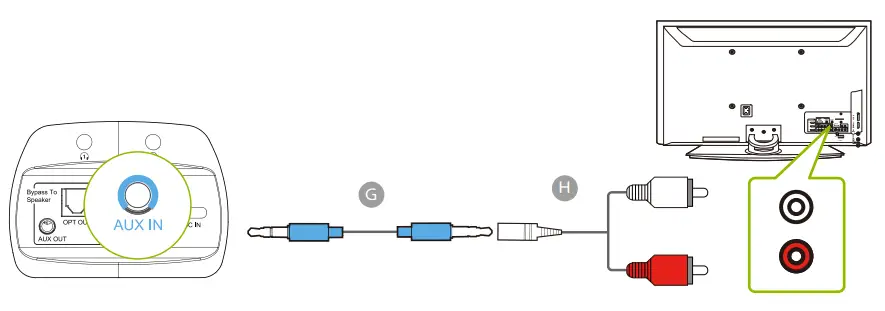
Connecting the Earphones to the Transmitter
Now that the transmitter is all set up, you can connect the NB15T earphones to the transmitter.
STEP 1
Power on the transmitter by sliding the switch to the “ON” position.
STEP 2
Remove the NB15T earphones from the transmitter dock; they will turn on automatically.
STEP 3
Wait for a few seconds and the NB15T earphones will connect to the transmitter automatically. Once connected, both the LED indicators on the earphones and the indicator on the transmitter will turn solid blue.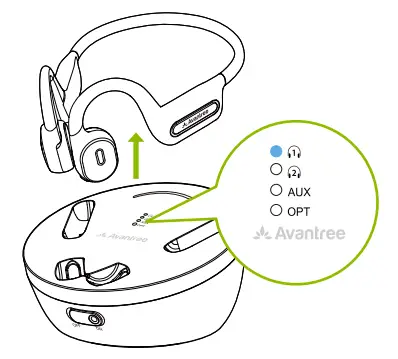
NOTE 1: For subsequent use, if the NB15T earbuds fail to reconnect with the transmitter, you can manually initiate reconnection by tapping the transmitter’s ![]() button once and waiting for a few seconds.
button once and waiting for a few seconds.
NOTE 2: Some smart TVs will automatically scan for and try to pair with any Bluetooth devices in its vicinity. If your TV prompts you to connect your Bluetooth headphones or the Medley Air, please “DENY” the request so that your device can properly pair with the transmitter.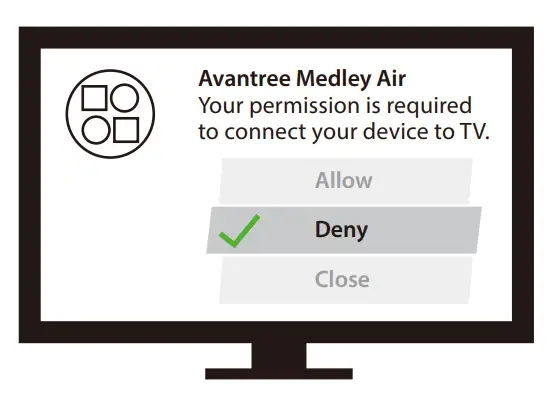
Setting Up Your TV (FOR OPTICAL CONNECTIONS ONLY)
If you connected to your TV via the optical OUT or “OPT OUT” port, you’ll need to configure your TV settings before you can receive audio.
STEP 1
Using your TV’s remote control, press the SETTINGS button and navigate to the AUDIO tab within the settings menu. (Please note that there may be differences in the setting names depending on your brand of TV).
STEP 2
Proceed to AUDIO OUTPUT and select “OPTICAL OUT / DIGITAL OUT”. Many TVs will do this automatically; skip this step as needed.
STEP 3
Set the AUDIO OUTPUT format to “PCM / STEREO” ON or “DOLBY ”OFF.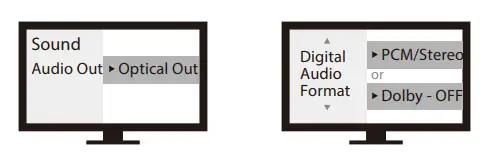
If you’re having trouble finding these settings, you can scan the QR code corresponding to your TV’s brand OR visit avantree.com/medley-air/tv-audio-settings for a more detailed guide.
 |  |  |  |
NOTE 1: Smart TVs automatically reset their settings after system updates. Make sure your audio output / input format is set to “PCM” and NOT “AUTO” or “Dolby.”
NOTE 2: When using Netflix or Amazon Prime, you may need to start the movie / show before changing the audio settings to “PCM.
Advanced Features
Listening with a Soundbar
The Medley Air’s pass-through function allows you to listen through both the headphones and an external soundbar / stereo AVR simultaneously.
STEP 1
Plug an additional optical, 3.5mm AUX, or RCA audio cable into the corresponding audio port in the transmitter’s “BYPASS TO SPEAKER” section.
STEP 2
Plug the other end into your external sound system, then you’re good to go.
NOTE: Bypass only works with the same type of input / output, i.e. if you connect to your TV via OPT, you’ll need to connect to your speaker via OPT as well.
Adding a Second Pair of Headphones
You can connect and simultaneously listen through two pairs of headphones if desired. Visit avantree.com/medley-air/video if you’d prefer to watch a video guide on this process.
STEP 1
Connect the NB15T earphones to the transmitter by following the steps in the “Connecting the Earphones to the Transmitter” section (Page 11).
STEP 2
Once the NB15T earphones are successfully connected, put your transmitter into PAIRING mode by pressing & holding the![]() button until the
button until the![]() LED flashes red & blue alternately.
LED flashes red & blue alternately.
STEP 3
Put your second pair of Bluetooth headphones into PAIRING mode. Please refer to your headphones’ user manual for more details if necessary.
STEP 4
Keep the transmitter & your second device close together and wait for 5-10 seconds or until they connect. Once connected, the ![]() LED will turn a solid blue.
LED will turn a solid blue.
NOTE: To easily reconnect to the second pair of headphones, you can lock the second pair of headphones’ connection to the transmitter by pressing & holding the ![]() button for 8 seconds. The
button for 8 seconds. The ![]() LED will turn a solid pink for 5 seconds, indicating that they have been successfully locked.
LED will turn a solid pink for 5 seconds, indicating that they have been successfully locked.
For subsequent use, make sure your second pair of headphones are not connected to another device. Then, turn on your headphones, and click the button once. The Medley Air transmitter will reconnect with your second pair of headphones automatically.
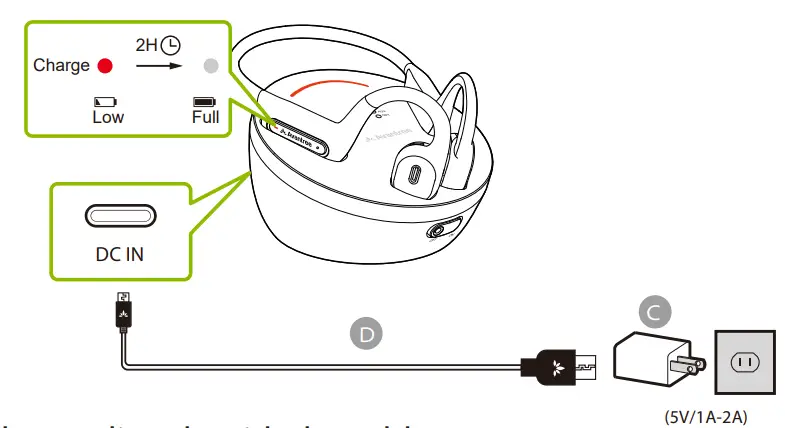
Charging the Earphones
The earphones’ LED will turn a solid red to indicate low battery. You can choose one of 2 dierent ways to charge the earphones:
OPTION 1 : Charge on the transmitter dock
Plug the transmitter dock into a wall outlet with the included USB wall adapter, then place the earphones on the dock to charge. Solid red lights on both the earphones and the transmitter indicate that charging is in progress; once the lights turn off your earphones will be fully charged .
OPTION 2 : Charge directly with the cable
Plug the provided type C charging cable into the earphones’ charging port, then plug the other end into a wall outlet via the included USB wall adapter or into a PC USB port.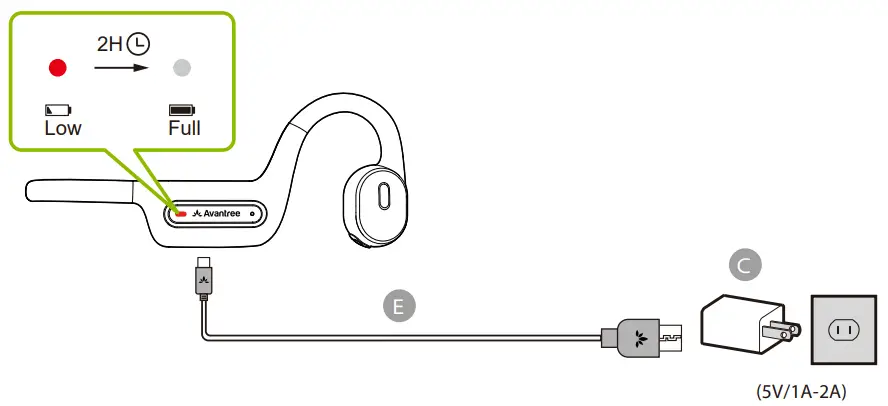
Specifications
Transmitter
| Bluetooth version | v5.0 |
| Supported audio codecs | aptX-Low Latency, aptX, FastStream, |
| Supported profiles | SBC |
| Operating range | A2DP, AVRCP |
| Supported sampling rate in optical | Up to 100ft / 30m |
| mode | 48KHz, 16bit |
| FSupported audio format in optical | PCM / LPCM |
| mode | Type C |
| Power port | DC5V/500mA~2.0A |
| Rated input | 206g |
Earphones
| Bluetooth version | v5.0 |
| Audio codec support | FastStream, SBC |
| Supported profiles | A2DP, AVRCP, HFP |
| Operating range | Up to 30ft / 10m |
| Play time | Up to 8 hrs |
| Max volume | 120dB |
| Charging time | ~1.5hrs |
| Drivers | 16.2mm |
| Impedance | 22 Ω |
| Power port | Type C |
| Rated input | DC5V/500mA~2.0A |
| Weight | 41g |
FAQ
Below are some of the most common questions people have during setup.
Can I have audio through my TV’s speakers and wireless headphones at the same time?
This completely depends on whether or not your TV supports the ability to output audio to 2 sources simultaneously. You can try a few different methods to test if your TV is capable of this or not – please refer to avantree.com/medley-air/sound for more details.
The volume is too low, how can I make it higher?
First, make sure both your TV and earphones are at max volume. If the max volume is not sufficient for you and your Medley Air was connected to your TV via OPT output, you can try connecting the transmitter to your TV’s AUX audio output port instead. Normally the volume from AUX outputs is louder than the OPT port. Please also note that due to the Medley Air’s open-ear design, it will inherently have slightly lower volumes than in-ear or over-ear headphones.
What should I do if the earphones are too small?
We are working on a larger version with a longer headband. Please contact us at [email protected] if you’d like a sample!
Why aren’t I getting sound from my headphones?
Why aren’t I getting sound when watching Netflix / Amazon Prime?
……
For answers to questions like these and for a full FAQ list, you can visit avantree.com/support/medley-air, or you can contact us directly for additional assistance.
Contact Us
![]() Support Tickets avantree.com/submit-a-ticket
Support Tickets avantree.com/submit-a-ticket
 Support Email [email protected]
 USA / CA +1800 232 2078 (9am-6pm PST, Mon-Fri )
UK +44 20 8068 2023 (9am-6pm, GMT, Mon-Sat)
DE +49 32221097297 (11am-9pm, CET, Mon-Sat )
FR + 33 176340312 (11am-9pm, CET, Mon-Sat )
IT +39 06 9480 3330 (9am-6pm, CET, Mon-Sat )
ES + 34 931786261 (9am-6pm, CET, Mon-Sat )
AU + 61 2 8310 9897 (11am-7pm, AEST, Mon-Fri)
 FAQ avantree.com/support/medley-air
 Video Guide avantree.com/medley-air/video
![]() Product Registration avantree.com/product-registration
Product Registration avantree.com/product-registration
References
 Avantree - Book a Call
-
Medley Air Product Support
-
Medley Air Product Support
-
Medley Air Product Support
-
Avantree - Product Registration
-
Search results for: 'shift tv audio settings'
-
Medley Air Product Support
-
Avantree - Book a Call
-
Search results for: 'medley air sound'
-
Medley Air Product Support
-
Medley Air Product Support
-
Medley Air Product Support


