![]() BD 38/12 C Bp
BD 38/12 C Bp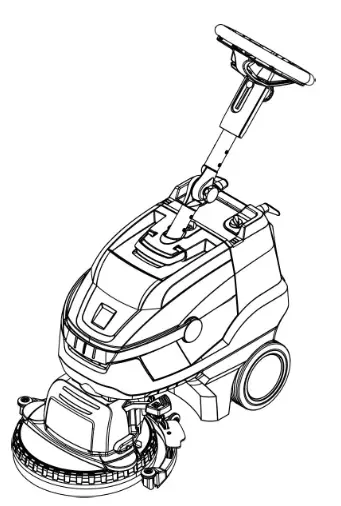
![]()
![]() Register your product
Register your product
www.kaercher.com/welcome
![]()
![]()
![]() Please read and comply with these original instructions prior to the initial operation of your appliance and store them for later use or subsequent owners.
Please read and comply with these original instructions prior to the initial operation of your appliance and store them for later use or subsequent owners.
Safety instructions
Before using the appliance for the first time, read and observe these operating instructions and the accompanying brochure: Safety information for brush cleaning units, 5.956-251.0.![]() WARNING
WARNING
Do not use the appliance on inclines. The appliance may only be operated when the container and all lids are closed.
Hazard levels![]() DANGER
DANGER
Pointer to immediate danger, which leads to severe injuries or death.![]() WARNING
WARNING
Pointer to a possibly dangerous situation, which can lead to severe injuries or death.![]() CAUTION
CAUTION
Pointer to a possibly dangerous situation, which can lead to minor injuries.
ATTENTION
Pointer to a possibly dangerous situation, which can lead to property damage.
Information on battery (accumulator) and charger
Lithium-ion batteries are installed in the appliance. These are subject to special criteria.
The removal and installation as well as the examination of defective batteries may only be performed by the Kärcher aftersales service or a specialist.
Only batteries approved by Kärcher may be used. Recommended battery6.654-494.0.
Information on storage and transport can be obtained from your Kärcher aftersales service.![]() DANGER
DANGER
– Alterations and modifications on the appliance are prohibited.
– Do not open the battery, as there is a risk of an electrical shock; also, irritating or caustic vapors can escape.
Do not expose the battery to direct sunlight, heat or fire, there is a risk of explosion.
– Do not operate the charger in an explosive environment.
– Do not use the charger if dirty or wet.
– Ensure sufficient ventilation during the charging process.
– Do not work with open flames, or generate sparks or smoke in the vicinity of a battery or a battery charging room. The danger of explosion.![]() WARNING
WARNING
– Check the appliance and the power cable for damage prior to every use. Do not use damaged appliances and have damaged parts repaired by specialists only.
Keep children away from batteries and chargers.
Do not charge damaged batteries. Have damaged batteries been replaced by the Kärcher aftersales service?
– Do not discard defective batteries in the domestic waste, inform Kärcher aftersales service.
– Avoid contact with liquids oozing out of defective battery packs. Rinse thoroughly if you accidentally come in contact with the fluid. Also, consult a doctor if the fluid comes in contact with your eyes.
CAUTION
– These operating instructions must be observed unconditionally. Observe recommendations of the lawmaker for handling batteries.
– The mains voltage must correspond with the voltage indicated on the type plate of the appliance.
– Use the charger only to charge approved battery packs.
– The accumulator may only be operated with this appliance. It is dangerous and prohibited to use it for other purposes.
Safety installations
If the safety switch is released, the brush drive shuts off.
Function
The scrubbing vacuum cleaner is used for the wet cleaning of level floors.
It can be easily adjusted to the cleaning task by setting the water quantity.
Working width of 380 mm and a capacity of 12 l in the fresh and wastewater tank each enable effective cleaning with long action times.
The battery can be charged on a 230V power outlet by means of an integrated charger.
Proper use
This appliance is suited for commercial use, e.g. in hotels, schools, hospitals, factories, shops, offices, and rental companies. Use this appliance only as directed in these operating instructions.
– The appliance should only be used for cleaning level floors that are not affected by moisture.
– This appliance is intended for inside use.
– The appliance is not suited for the cleaning of frozen grounds (e.g. in cold stores).
– The appliance may only be equipped with original accessories and spare parts.
Environmental protection
![]() The packaging material can be recycled.
The packaging material can be recycled.
Please do not place the packaging into the ordinary refuse for disposal, but arrange for the proper recycling.![]() Old appliances contain valuable materials that can be recycled. Please arrange for the proper recycling of old appliances. Please dispose of your old appliances using appropriate collection systems.
Old appliances contain valuable materials that can be recycled. Please arrange for the proper recycling of old appliances. Please dispose of your old appliances using appropriate collection systems.
Notes about the ingredients (REACH)
You will find current information about the ingredients at: www.kaercher.com/REACH
Warranty
The warranty terms published by our competent sales company are applicable in each country. We will repair potential failures of your accessory within the warranty period free of charge, provided that such failure is caused by faulty material or defects in fabrication. In the event of a warranty claim please contact your dealer or the nearest authorized Customer Service center. Please submit the proof of purchase.
Spare parts
– Only use accessories and spare parts which have been approved by the manufacturer.
The exclusive use of original accessories and original spare parts ensures that the appliance can be operated safely and trouble-free.
– For information about accessories and spare parts, please visit www.kaercher.com.
Control elements
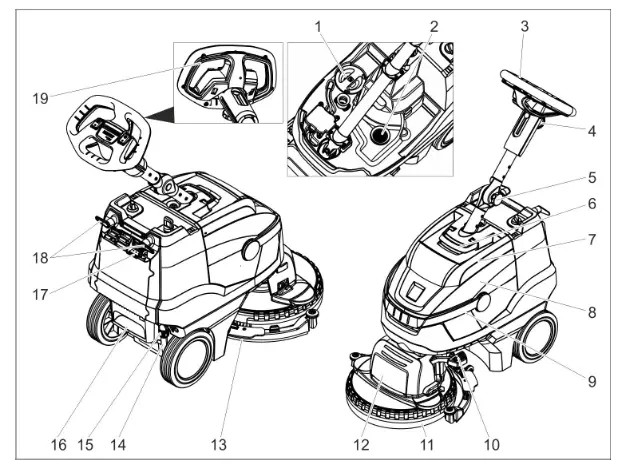
| 1 Fresh water tank cover 2 Fluff filter 3 Push handle 4 Star knob, height adjustment of the push rod 5 Star knob, transport position of the push rod 6 Unlocking device, cover waste water tank 7 Cover dirt water reservoir 8 waste water tank 9 Carrying handle for waste water tank | 10 Vacuum bar lift pedal 11 Splash guard 12 Cleaning head 13 Vacuum bar 14 Fresh water level display 15 Coupling for draining the freshwater 16 Step depression 17 Battery charging display 18 Cable hook, rotating 19 Safety button |
Colour coding
– The operating elements for the cleaning process are yellow.
– The controls for the maintenance and service are light gray.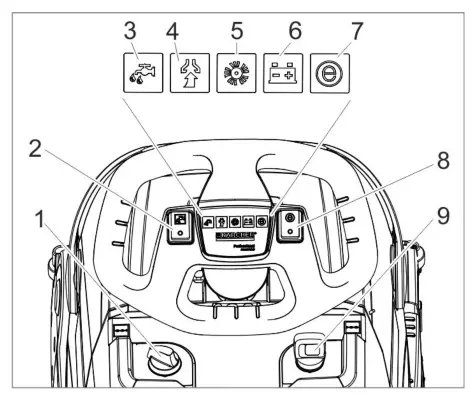
- Dosage cleaning solution
- Switch for detergent solution
- Control lamp to apply detergent solution
- Indicator lamp vacuuming Green: Suction turbine in operation Orange, flashing: Suction turbine overloaded
- Indicator lamp brush drive Green: Brush is rotating Orange, flashing: Brush overloaded
- Battery status display Green Battery charged Orange: Battery almost empty Red Appliance switches off: Load battery
- Indicator lamp Eco mode
- Switch Eco mode
- Power switch
Before Startup
Charging battery
Note: The device is equipped with a safety mechanism to prevent total discharge, i.e. when the permissible minimum capacity is reached, the machine will be shut off.
The charging process takes approx. 3 hours. The charger automatically switches off the charging process.
If necessary, the appliance can be used again before the battery has been fully charged.
Insert the mains plug into the socket.
Battery charging display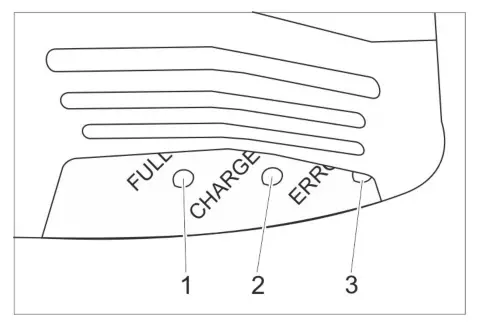
- The battery is charged (green)
- The battery is being charged (yellow, flashing)
- Malfunction (red)
Operation
- Release the star knob for the transport position.
- Adjust the push rod to the desired height.
- Tighten the star handle.
- Install the disc brush (see “Maintenance and Servicing”)
Filling in detergents
ATTENTION
Risk of damage. Only use the recommended detergents. With other detergents, the operator bears the increased risk regarding the operational safety, risk of accident, and reduced service life of the appliance. Only use detergents that are free of solvents, hydrochloric acid, and hydrofluoric acid.
Follow the safety instructions for using detergents.
Note:
Do not use highly foaming detergents.
Observe the dosing notes.
- Swivel up the carrying handle of the waste water tank.
- Lift out the waste water tank and put it aside.
- Remove the lid from the fresh water reservoir.
- Fill in fresh water (maximum 50 °C).
- Add detergent. Follow dosing instructions for detergent.
Recommended detergents:
| Application | Detergent |
| Regular cleaning (even for floors sensitive to alkalies) | RM 745 RM 746 |
| Cleaning dirt from grease | RM 69 ES ASF RM 69 ASF |
| Basic cleaning (stripping) of alkali-resistant hard coatings | RM 752 |
| Basic cleaning (stripping) of linoleum | RM 754 |
| Base cleaner, acidic | RM 751 |
| Disinfection cleaning | RM 732 |
Detergents are available in specialized stores.
- Close the cover of the freshwater reservoir.
- Place the waste water tank on the appliance.
Settings
- Release the star knob for the height adjustment of the push rod.
- Adjust the push handle to the desired height.
- Tighten the star handle.
- Adjust the dosing of the cleaning solution in accordance with the soiling and the type of flooring material.
- Bring the Eco mode switch into the desired position. Normal operation: The appliance works at the maximum brush speed and the highest suction performance.
Eco: The appliance works at reduced brush speed and suction performance. This also reduces energy consumption. The possible action time with one charging cycle increases.
Cleaning
ATTENTION
Risk of damage to the floor covering. Do not operate the appliance on the spot. Risk of damage. Lift the vacuum bar before pulling the appliance backward over a longer distance.
- Set the appliance switch to “I”.
- Switch on the “Detergent” button.
- Push the pedal of the suction bar lifting device simultaneously down and to the left and allow it to go up in order to lower the suction bar.
- Pull the safety switch towards the push handle, and the brush drive and the application of the cleaning solution are switched on (if preset).
- Move the appliance over the surface to be cleaned.
Shutting Down the Appliance
- Release the safety switch.
- Drive the appliance forward for another 1-2 m to draw off residual water.
- Push down the pedal of the vacuum bar lifting device to raise the vacuum bar.
- Set the appliance switch to “0”.
Emptying the waste Water tank![]() WARNING
WARNING
Please observe the local provisions regarding wastewater treatment.
- Swivel the handle of the wastewater tank up and let it snap into place.
- Remove the waste water tank.
- Remove the cover of the waste water tank.
- Empty the waste water tank. Swivel the waste water tank sideways during emptying so that the tank is completely drained.
- Rinse the waste water tank with clear water.
- Reattach the waste water tank to the appliance.
Emptying the Fresh Water Tank![]() WARNING
WARNING
Please observe the local provisions regarding wastewater treatment.
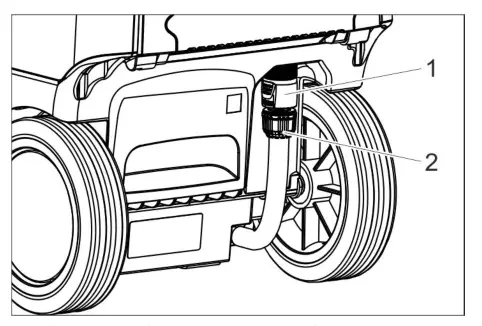
- Coupling for draining the freshwater
- Fresh water level display
- Slide the coupling down.
- Remove the hose of the level indicator and swivel it downwards.
Frost protection
In case of danger of frost:
- Empty the fresh and waste water tank.
- Briefly take the device with the empty fresh water tank into operation so that the water system in the device is also emptied.
- Store the appliance in a frost-protected room.
Folding down the push rod
To reduce the space requirements for transport and storage, the push rod can be folded down.
- Release the star knob for the transport position.
- Swivel the push rod all the way to the front.
- Tighten the star handle.
Transport
![]() CAUTION
CAUTION
Risk of personal injury or damage! Mind the weight of the appliance during transport.
- When transporting in vehicles, secure the appliance according to the guidelines from slipping and tipping over.
Shutting down
- Completely charge the battery prior to longer operational breaks extending over several weeks.
- Set the appliance switch to “0”.
ATTENTION
Risk of damage to the battery due to total discharge. Always switch the power switch to “0” during operational breaks.
Storage
![]() CAUTION
CAUTION
Risk of personal injury or damage! Consider the weight of the appliance when storing it. This appliance must only be stored in interior rooms.
Care and maintenance
![]() DANGER
DANGER
Risk of injury. Turn the appliance switch to “0” and pull the mains plug of the charger prior to performing any work on the appliance.
ATTENTION
Risk of damage for the appliance due to leaking water. Drain the wastewater and remaining fresh water prior to performing tasks on the appliance.
- Park the machine on an even surface.
Maintenance schedule
After the work
ATTENTION
Risk of damage. Do not sluice the appliance with water and do not use aggressive detergents.
- Drain off dirt water.
- Remove the lid of the waste water tank and wash the inside of the lid and the float with water.
- Rinse the waste water tank with clear water.
- Clean the vacuum bar.
- Clean the outside of the appliance with a damp cloth that has been soaked in mild detergent.
- Clean the vacuum lips, check for wear and replace them if required.
- Clean brush.
- Check the brush for wear and replace if required (see “Maintenance tasks”).
- Charge the battery if required.
Weekly
- Freshwater filter
- Fluff filter
- Clean the fresh water filter.
- Clean the fluff filter.
Monthly
- Check the condition of the seals between the waste water tank and cover, and replace if required.
Yearly
- Has the prescribed inspection been carried out by customer service?
Maintenance Works
Replacing the suction lips
- Compress the fastening devices and pull the vacuum lips out of the vacuum bar towards the bottom.
- Remove the vacuum lips from the holder.
Note:
Thanks to the perforation pattern the vacuum lips cannot be mixed up. They cannot be turned and reinstalled. - Replace vacuum lips.
- Insert the holder with the vacuum lips into the vacuum bar and snap it into place.
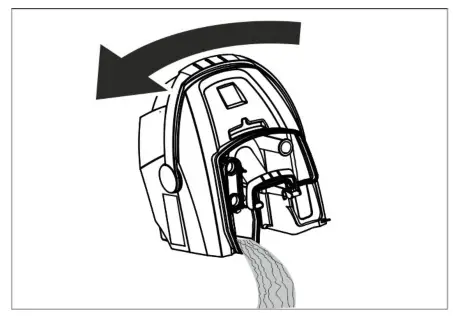
Exchanging the brush
- Empty the freshwater reservoir.
- Remove the waste water tank.
- Tilt the appliance backward and store it on the pushing handle.

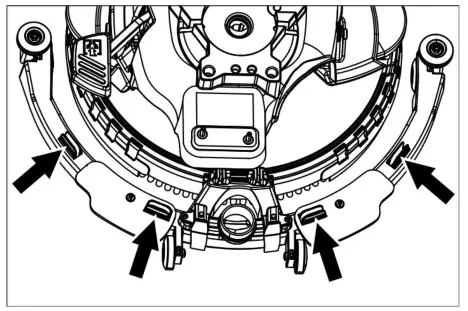
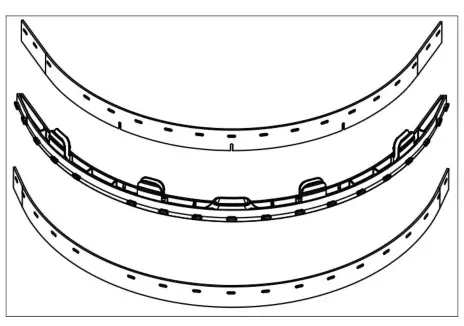
Replace splash guard
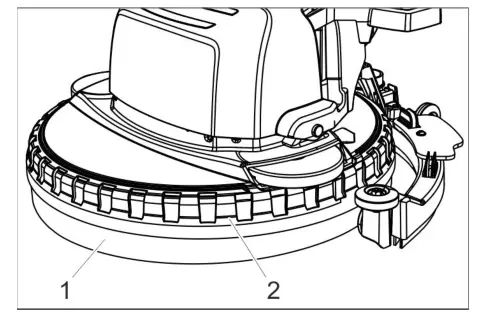
- Splash guard
- Holding ring
- Pull the retaining ring with the splash guard of the cleaning head towards the top.
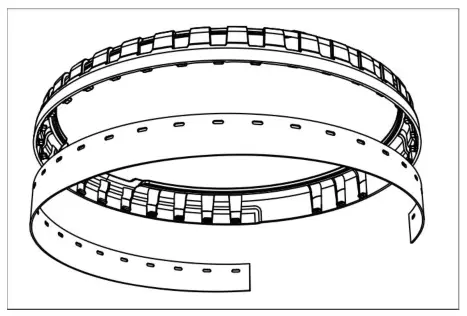
- Remove the worn splash guard from the retaining ring and dispose of it.
- Push the new splash guard onto the knobs of the retaining ring.
- Attach the retaining ring with the splash guard to the cleaning head.
Maintenance contract
To ensure a reliable operation of the appliance maintenance contracts can be concluded with the competent Kärcher sales office.
Disposal
Removing the battery![]() DANGER
DANGER
The removal of the battery may only be performed by the Kärcher aftersales service or a specialist.
The evaluation, of whether the battery is damaged or not, is done by an authorised aftersales technician
The Chapter “Safety instructions” for handling accumulators must be observed unconditionally.
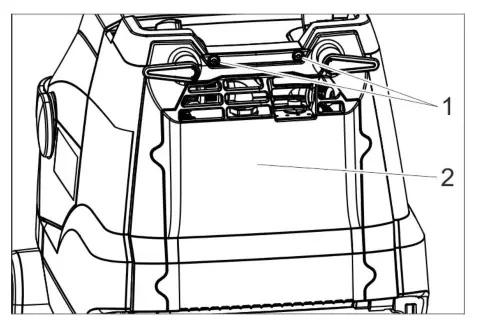
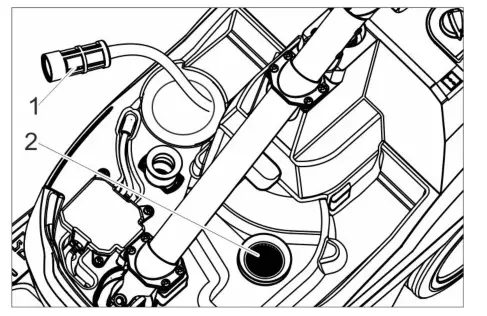
- Screw
- Cover
- Unscrew 2 screws.
- Swivel the lid downwards.
- Loosen and remove the battery plug.
- Remove the battery.
- Dispose of used batteries in accordance with the applicable provisions.
Faults
![]() DANGER
DANGER
Risk of injury. Turn the appliance switch to “0” and pull the mains plug of the charger prior to performing any work on the appliance.
ATTENTION
Risk of damage for the appliance due to leaking water. Drain the wastewater and re- remaining fresh water prior to performing tasks on the appliance. In case of faults that cannot be remedied using the table below please contact customer service.
| Fault | Remedy |
| The appliance cannot be started | Switch on the appliance switch, wait 3 seconds, check the charge condition of the battery. |
| Insufficient water quantity | Check the fresh water level, and refill the tank if necessary. |
| Switch on the “Detergent” button. | |
| Open the dosing device for the cleaning solution. | |
| Clean the fresh water filter. | |
| Insufficient vacuum perform-mance | Lower the vacuum bar. |
| Empty the waste water tank. | |
| Clean the seals between the waste water tank and cover and check for tightness, replace if required. | |
| Clean the vacuum lips on the vacuum bar, and turn or replace if required | |
| Check if the suction hose and vacuum bar are chocked, clean if required | |
| Check the suction hose for tightness; replace if required. | |
| Insufficient cleaning result | Check the brush type and the detergent for their suitability. |
| Check the brushes for wear, and replace if required. | |
| The brush does not turn | Pull the safety switch towards the steering wheel. |
| Check the brush for blockage by foreign objects; remove the foreign objects. Switch off the switch for the brush drive, wait for a short pe- riod of time, and switch the switch back on. |
Accessories
The appliance can be equipped with various accessories depending on the cleaning task. Please request our catalog or visit us on the Internet at www.kaercher.com.
| Description | Part no.: | Description |
| Disk brush, white | 6.907-154.0 | For polishing and cleaning sensitive floors. |
| Disk brush, red (medium, standard) | 6.907-151.0 | For cleaning slightly dirtied or sensitive floors. |
| Disk brush, black (hard) | 6.907-152.0 | For cleaning heavily dirtied floors. |
| Disk brush, natural (white) | 6.907-153.0 | For polishing floors. |
| Pad driving disk | 6.907-150.0 | For the intake of pads. |
| Pad, microfibre | 6.905-060.0 | Especially suited for the cleaning of linoleum and fine stone tiles. |
| Pad, black | 6.369-001.0 | Deep cleaning of PVC, vinyl, synthetic resin coatings, dark marble, granite, terrazzo, and ground smooth. |
| Pad, green | 6.369-002.0 | Maintenance cleaning of all water-resistant floors. |
| Pad, red | 6.369-003.0 | Deep cleaning of linoleum, tiles, clinker, glazed, and stoneware. |
| Diamond pad, white | 6.371-250.0 | For polishing floors. |
| Diamond pad, yellow | 6.371-251.0 | For removing fine scrapes. |
| Diamond pad, green | 6.371-235.0 | For cleaning heavily dirtied floors. |
| Fill hose | 6.680-124.0 | For filling the fresh water tank |
| Suction lip kit | 4.037-059.0 | As replacement |
| Vacuum bar | 4.037-067.0 | As replacement |
Technical specifications
| Power | ||
| Nominal voltage | V | 26. |
| Battery capacity | Ah (5h) | 22 |
| Battery type | Li-ion | |
| Average power consumption | W | 500 |
| Suction engine output | W | 280 |
| Brush engine output | W | 260 |
| Operating temperature range | °C | 0…40 |
| Vacuuming | ||
| Cleaning power, air quantity | Ws | 20 |
| Cleaning power, negative pressure | kPa | 8 |
| Cleaning brushes | ||
| Working width | mm | 380 |
| Brush diameter | mm | 380 |
| Brush speed | 1/min | 180 |
| Charger | ||
| Voltage | V/Hz | 220…240/50…60 |
| Power Input | W | 300 |
| Dimensions and weights | ||
| Theoretical surface cleaning performance | m2/h | 1520 |
| Fresh/waste water tank volume | I | 12 |
| Permissible overall weight | kg | 48 |
| Transport weight | kg | 36 |
| Length x width x height | mm | 940x500x 1100 |
| Values determined as per EN 60335-2-72 | ||
| Total oscillation value | m/s2 | <2.5 |
| Uncertainty K | m/s2 | 0.2 |
| Sound pressure level LpA | dB(A) | 65 |
| Uncertainty KpA | dB(A) | 2 |
| Sound power level LWA + Uncertainty KWA | dB(A) | 85 |
EU Declaration of Conformity
We hereby declare that the machine described below complies with the relevant basic safety and health requirements of the EU Directives, both in its basic design and construction as well as in the version put into circulation by us. This declaration shall cease to be valid if the machine is modified without our prior approval.
Product: Scrubbing vacuum cleaner
Type: 1.783-xxx
Relevant EU Directives
2006/42/EC (+2009/127/EC)
2014/30/EU
2011/65/EU
2014/53/EU (TCU)
Applied harmonized standards
EN 60335–1
EN 60335–2–72
EN 60335-2-29
EN 55012: 2007 + A1: 2009
EN 55014-1:2006 + A1: 2009 + A2:2011
EN 55014–2: 1997 + A1: 2001 + A2: 2008
EN 61000–3–2: 2014
EN 61000–3–3: 2013
EN 61000–6–2: 2005
EN 62233: 2008
EN IEC 63000: 2018
Applied national standards TCU
EN 301 511 V12.5.1
EN 300 440 V2.1.1
EN 300 328 V2.2.2
EN 300 330 V2.1.1
The signatories act on behalf of and with of the authority of the company management.

Alfred Kärcher SE & Co. KG
Alfred-Kärcher-Straße 28-40
71364 Winnenden (Germany)
Tel.: +49 7195 14-0
Fax: +49 7195 14-2212
Winnenden, 2021/02/01
Declaration of Conformity
We hereby declare that the product described below complies with the relevant provisions of the following UK Regulations, both in its basic design and construction as well as in the version put into circulation by us. This declaration shall cease to be valid if the product is modified without our prior approval.
Product: Scrubbing vacuum cleaner
Type: 1.783-xxx
Currently applicable UK Regulations
S.I. 2008/1597 (as amended)
S.I. 2016/1091 (as amended)
S.I. 2012/3032 (as amended)
2014/53/EU (TCU)
Applied designated standards
EN 60335–1
EN 60335–2–72
EN 60335-2-29
EN 55012: 2007 + A1: 2009
EN 55014-1:2006 + A1: 2009 + A2:2011
EN 55014–2: 1997 + A1: 2001 + A2: 2008
EN 61000–3–2: 2014
EN 61000–3–3: 2013
EN 61000–6–2: 2005
EN 62233: 2008
EN IEC 63000: 2018
Applied national standards TCU
EN 301 511 V12.5.1
EN 300 440 V2.1.1
EN 300 328 V2.2.2
EN 300 330 V2.1.1
The signatories act on behalf of and with of the authority of the company management.

Documentation supervisor: S. Reiser
Alfred Kärcher SE & Co. KG
Alfred-Kärcher-Straße 28-40
71364 Winnenden (Germany)
Tel.: +49 7195 14-0
Fax: +49 7195 14-2212
Winnenden, 2021/02/01
![]() THANK YOU!
THANK YOU!
MERCI! DANKE! iGRACIAS!
Registrieren Sie Ihr Produkt and profitieren Sie von vielen Vorteilen. Register your product and benefit from many advantages.
Bewerten Sie Ihr Produkt und sagen Sie uns Ihre Meinung.
Rate your product and tell us your opinion.

www.kaercher.com/dealersearch
Alfred Kärcher SE & Co. KG
Alfred-Kärcher-Str. 28-40
71364 Winnenden (Germany)
Tel.: +49 7195 14-0
Fax: +49 7195 14-2212

http://kaer.ch/er/?l=TwSoJtl9IUOwZyAe1rHDyw
2-2-NN-A5-GS-03323
References
 Cleaning equipment and pressure washers | Kärcher International
-
The domain name mogelijk.de is for sale
 solo.si
-
Cleaning equipment and pressure washers | Kärcher International
-
Dealer Search | Kärcher International
-
Home Garden Warranty Registration Karcher North America USA | Kärcher
-
Reinigungsgeräte und Hochdruckreiniger | Kärcher
-
Cleaning equipment and pressure washers | Kärcher International


