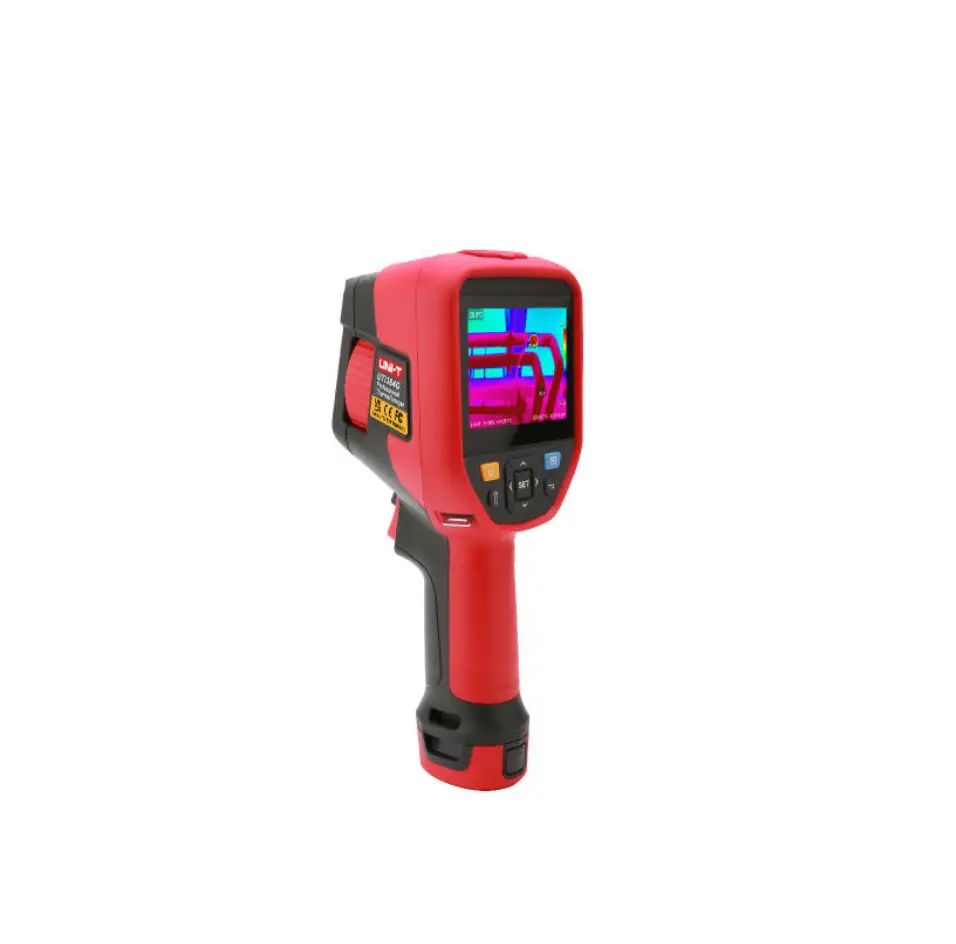
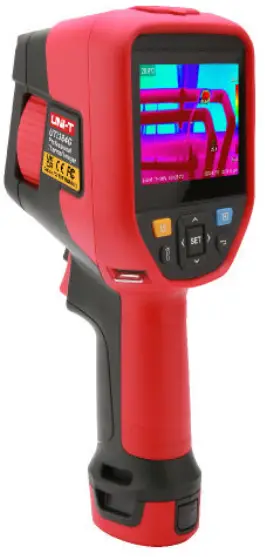
UNI-T UTi384G Professional Enhanced Thermal Camera
Preface
Dear user,
Hello! Thank you for purchasing the new UTi256G /UTi384G Professional Thermal laager. In order to use this product correctly, please read the full text of this manual carefully before using it, especially the content of the “Warning” part. If you have read the full text of this manual, it is recommended that you keep this manual properly and place it with the accessories of the thermal imager or in a place where you can refer to it at any time for future use.
Limited Warranty and Limited Liability
The company guarantees that this product will be free from any defects in materials and workmanship within one year from the date of purchase. This guarantee does not apply to damage caused by accident, negligence, misuse, modification, pollution and abnormal operation or handling. The distributor has no right to give any other guarantee in the name of the company. If you need warranty service during the warranty period, please contact your nearest authorized service center to obtain the product return authorization information; Then send the product to the service center, and attach the product problem description.
This guarantee is the only compensation you can get. In addition, the company does not provide any express or implied warranty, such as the implied warranty applicable to a special purpose. At the same time, the company will not be responsible for any special, indirect, incidental or consequential damage or loss caused by any reason or speculation. Since some states or countries do not allow limitations on implied warranty and incidental or consequential damage, the above limitations and provisions of liability may not apply to you.
Warnings
- Please try to keep the device stable and avoid violent shaking during its use;
- Please do not use or store the instrument at a temperature higher than the permitted operating temperature or storage temperature of the device;
- Please do not direct the thermal camera at very high intensity radiation sources such as the sun, carbon dioxide lasers or arc welders etc.;
- Please do not block the holes on the device;
- Do not knock, throw or shake the instrument and accessories to avoid damage;
- Please do not disassemble the device by yourself, which may cause its damage and loss of warranty rights;
- Please do not use soluble or similar liquids for the device and cables, which may cause damage to the device;
- Please do not use the device at a temperature higher than its operating temperature, which may cause damage;
- Please observe the following measures when wiping the device:
• For the non-optical surface, use a clean soft cloth to wipe the non-optical surface of the thermal camera when necessary;
• For the optical surface, please avoid staining the optical surface of the lens when using the thermal camera and especially avoid touching the lens with your hands because sweat stains on your hands will leave a mark on the lens glass and may corrode the optical coating on the glass surface When the surface of the optical lens is contaminated, wipe it carefully with specialized lens paper; - Please do not place the battery in a high temperature environment or near high-temperature objects;
- Please do not make the positive and negative poles of the battery short-circuited;
- Please do not place the battery in a humid environment or water.
- Do not expose the equipment to dust or damp environment. When using in the environment with water, avoid splashing water on the instrument. Cover the lens cover when not using the instrument.
- When this equipment is not used, please put the instrument and all accessories in a special packing box.
- Avoid using the random SD card for other purposes.
- The graphic information of the goods used in the product introduction. The actual products have differences in materials and details due to different batches. Please understand, and please subject to the receipt of specific physical objects.
- The experimental data provided in the page are theoretical values, which are all from the internal laboratory of our company, and it’s only for reference.
Customers cannot use it as a reference for ordering and shopping. It is hereby explained! If you have any questions, please contact customer service for detailed consultation.
Chapter 1 Technical Specifications
| Devices | UTi256G | UTi384G |
| Detector Type | Uncooled Focal Plane | |
| Spectral Range | 7. 5-14µm | |
| Pixel Size | 17µm | |
| IR Resolution | 256×192 | 384×288 |
| FOV | 28°x20° | 42°x30° |
| Image Frame Rate | 30Hz | |
| NETO | 40mk | |
| Spatial Resolution | 1. 91mrad | |
| Focus | Manual | |
| Temperature Measurement Range | – 20°C- 550°C | |
| Accuracy | ±2°C/ ± 2% ( t ake the maximum value, – 10°C- 550°C normal temperature 25°C ) | |
| Display | 3. 5″ Touch Screen (640×480) | |
| Digital Camera Resolution | 5MP | |
| Photo Capture | ||
| Video Recording | X | |
| Hi/Lo Spot Tracking | ||
| Fusion | ||
| PIP | ||
| On Screen Analyzer | 3 Points/3 Rectangles/3 Circles/3 Lines | 5 Points/5 Rectangles/5 Circles/5 Lines |
| Parameter | Emissivity, Optical Transmittance, Reflection Temperature, Dew Point | |
| Digital Zoom | 2x, 4 x | |
| Color Alarm | When the set temperature threshold is exceeded, the cursor color changes to alarm. |
| Palette | Red hot, High Contrast Rainbow, Rainbow, Lava, lronbow, Black hot.White hot |
| Bluetooth | |
| Voice Recording | |
| WiFi Photo Download | |
| WiFi Live Video | |
| Mobile APP | |
| PC Analysis Software | |
| Temperature Unit | K/’ C/ °F |
| Language | Engli sh, French, German, Italian, Spanish, Swedish, Czech, Polish, Russian, Portuguese, Arabic, Japanese, Korean |
| Auto Power Off | Off, 5 minutes, 10 minutes, 15 minutes, 20 minutes |
| Storage | Internal Storage 8 GB, External Storage Micro SD Card 32GB |
| USB | Type-C |
| LED Light | |
| Laser Pointer | Class 2 Laser, red |
| Button | Power Button, Lighting Button, Setting Button, Direction Button, Library Button, Return Button, Camera Trigger Button, Laser Trigger Button |
| Battery Type | Replaceable Battery Pack |
| Battery Operating Time | About 5 Hours |
| Charging System | Type-C Direct Charging |
| Working Temperature | – 10°C- 50°C |
| Storage Temperature | -40°C- 60°C |
| Drop Proof | 2m |
| IP Rating | IP54 |
| Certificates | CE, FCC, UKCA, RoHS |
Chapter 2 Introduction to Product Components
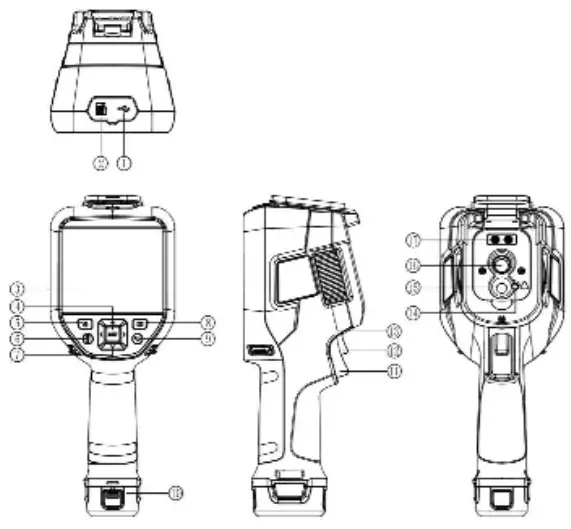
Item | Description | Item | Description |
1 | USB Type-C Interface | 10 | Battery Assembly |
2 | Micro SD Card Slot | 11 | Camera Trigger |
3 | LCD | 12 | Laser Trigger |
4 | SET Button | 13 | Focusing Wheel |
5 | Power Button | 14 | Laser |
6 | Lighting Button | 15 | Visible Light Camera Window |
7 | Direction Button | 16 | Infrared Thermal Image Window |
8 | Library Button | 17 | LED Light |
9 | Return Button |
Chapter 3 List of Interface Areas
Real-Time Image Interface
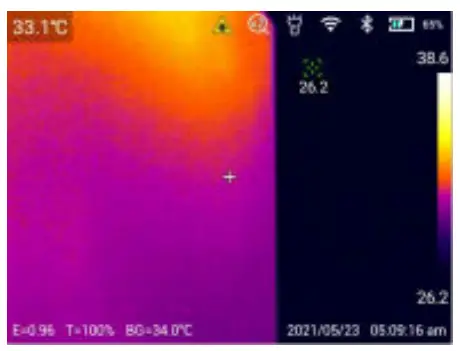
- Top Status Bar: Display laser, digital zoom, flashlight, WiFi, Bluetooth, battery power and charging status;
- Bottom Status Bar: Display emissivity, optical transmittance, reflection temperature, date and time;
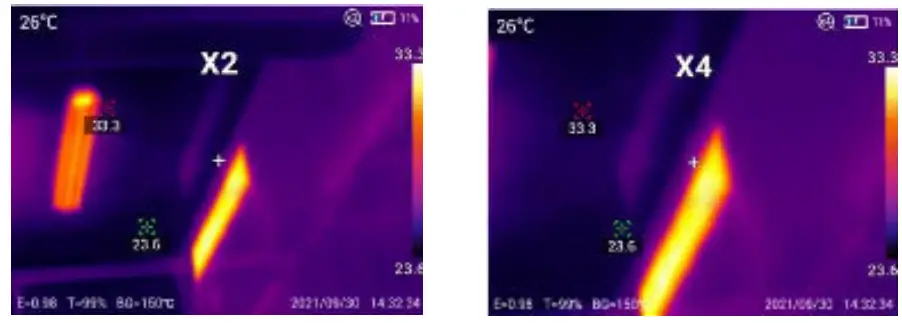
- Digital Zoom: Double finger zoom in or out for electronic zoom in or out, supporting 2x/4x zoom;

- Color Band: The image is consistent with the color band;
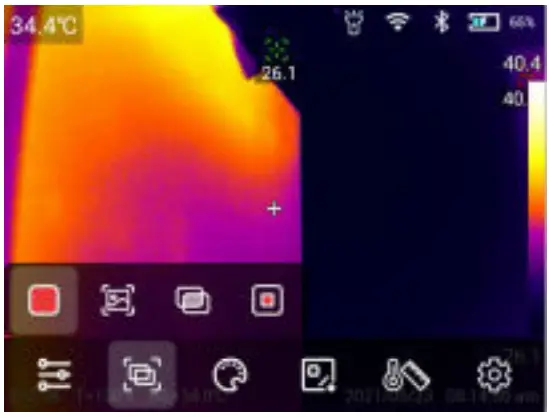
- Menu Bar: Click the screen to open the hidden menu bar to set parameters;
- Slide Menu: Slide screen at the top, enter the slide menu interface, and you can make quick settings.
Click the screen in the real-time image interface to open the menu bar, which includes: temperature measurement parameters, image mode, palette, temperature analysis, isotherm, and shortcut operations for setting.
- Temperature Measurement Parameters: Emissivity, optical transmittance, reflection temperature and dew point can be set according to the target temperature;

• Emissivity: Click to enter the emissivity interface. Select [custom]. Slide the corresponding value to modify. The range is controlled within 0.01-1.00.
Touch other areas or press the return key to exit and save;
Click [material], and you can select according to the emissivity of the target.
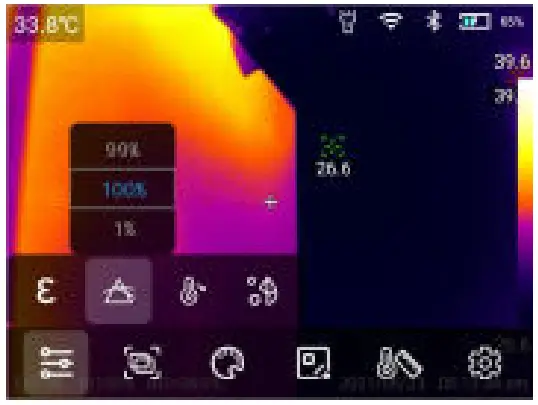
• Optical Transmittance: Select in the range of 1% – 100%.
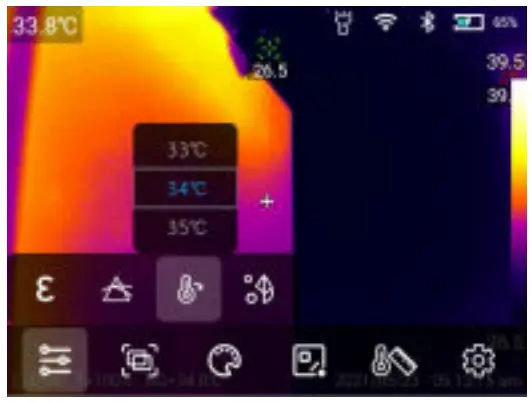
• Reflection Temperature: Select in the range of -40~2000°C.
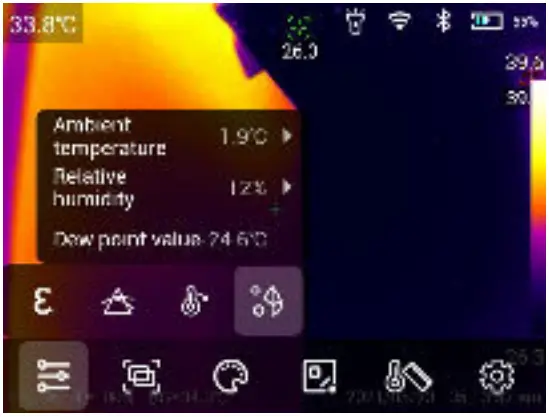
• Dew Point: The ambient temperature and relative humidity can be set in the dew point interface. Given the ambient temperature and relative humidity , the dew point value can be figured out.
- Image Mode: Including Thermal, Visual Image, Fusion, PIP
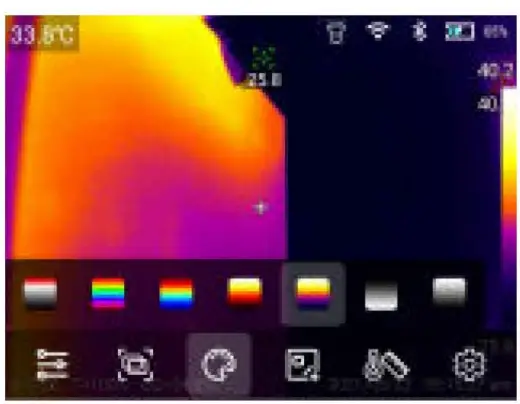
- Palette: Red hot, high contrast rainbow, rainbow, lava, ironbow, black hot, white hot;

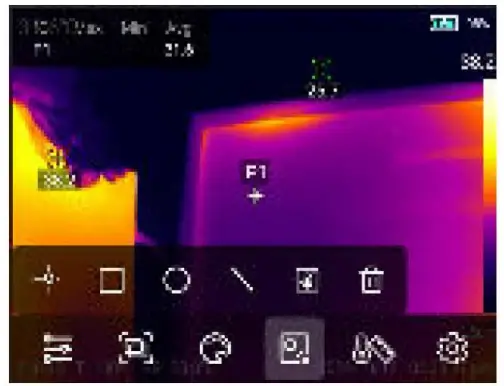
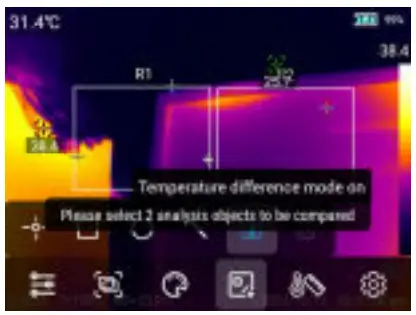
- On Screen Analyzer: Point, rectangle, circle and line graphics can be added, and the temperature differences of the analysis objects can be compared;

• Add / delete analysis object: click the corresponding analysis object icon to add an analysis object; Click the [ l icon to delete the analysis object;
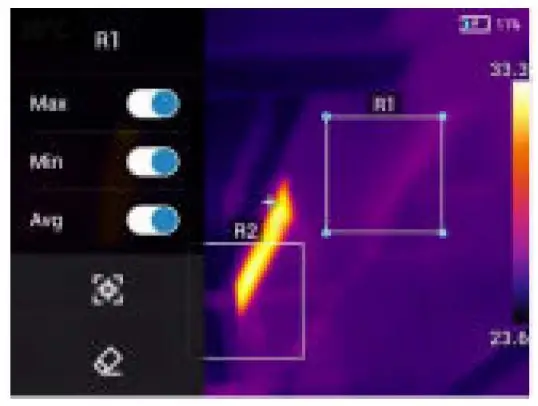
• Long press any analysis object through the touch screen, and the system will automatically pop up the object editing page;
Temperature mark: Maximum temperature, minimum temperature and average temperature; Center: Center the analysis object
Delete: Deletes the current analysis object.
• Change the size of the analysis object: touch to select the circular, rectangular and line analysis objects, and the nodes are in the selected state and the color is blue. Move any node to change the area range of the analysis object.
• Temperature Difference Mode: Add at least 2 analysis objects, click the [ ] icon, select the analysis object to compare and display the temperature difference.
- Isotherm: Upward isotherm line, downward isotherm line, isotherm outside the interval and isotherm inside the interval can be set for automatic dimming, and manual dimming can be set manually.
• In Automatic Dimming Mode:
Upward Isotherm: click [ ] to enter the upward isotherm image mode;
Downward Isotherm: click [ ] to enter the downward isotherm image mode;
Isotherm outside the interval: click [ ] to enter the isotherm image mode
outside the interval;
Isotherm inside the interval: click [] to enter the isotherm image mode in
the interval.
• In Manual Dimming Mode:


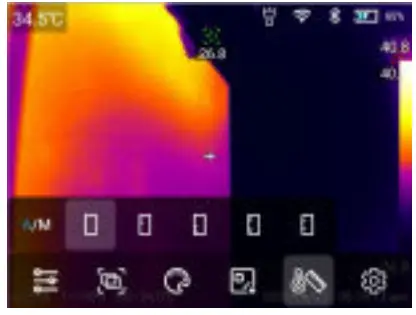
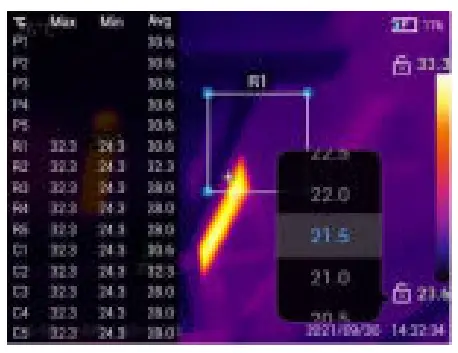
Touch and click the highest or lowest temperature value on the ribbon bar to pop up the corresponding value option. Select the appropriate high or low temperature value, and the image dimming changes synchronously.
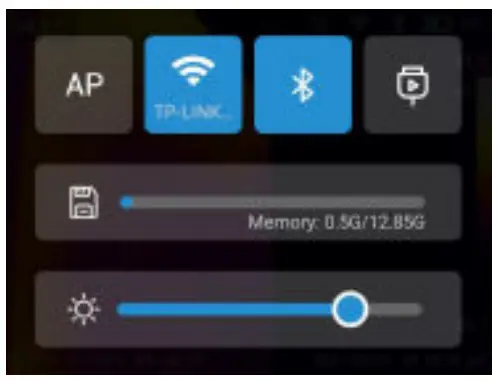
In the real-time image interface, the finger slides down from the top of the
screen to pop up the sliding menu. In this interface, users can view the storage capacity of the local memory or external SD card, and can also perform some shortcut operations, including brightness, AP, WiFi, Bluetooth, USB virtual network card and other settings.
Chapter 4 Shooting
Photo Capture
In the setting menu, set the photographing mode to photographing. In the real time preview state, press the [Trigger] button to take photos.
Video
In the setting menu, set the photographing mode to video recording. In the real-time preview state, press the [Trigger] button to record, and then press the [Trigger] button again to end the recording.![]() Note: Only UTi384G supports video recording.
Note: Only UTi384G supports video recording.
Timer/Time-lapse Photography
In the setting menu, set the photographing mode as timed photography, and set the time and number. Press the [Trigger] button in the real-time preview state to start timed photography, and press the [Trigger] button again to end photographing.
Chapter 5 Gallery
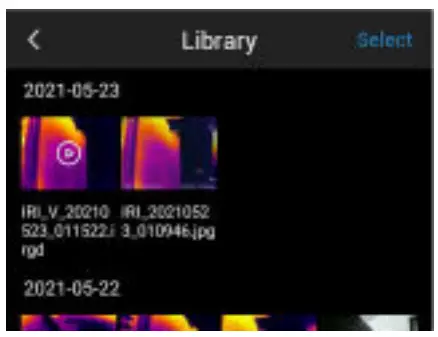
Gallery Playback
- Press the [Library] button to enter the gallery preview interface;

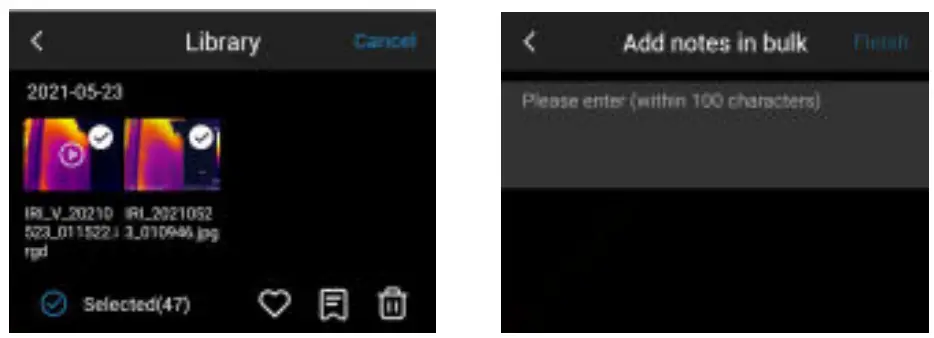
- Click [ Select] in the upper right corner to select pictures, and then carry out batch collection, batch annotation, and batch deletion of pictures.

Picture Editing
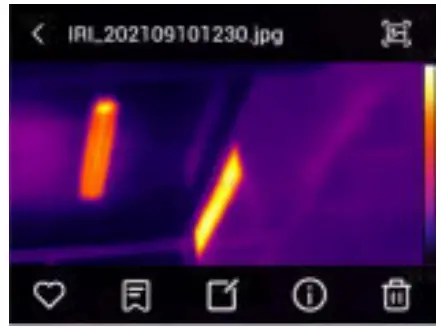
- Click any picture in the gallery to enter the large picture display interface;
- Click [
 ] button to view the visible light picture corresponding to the current picture;
 - Click [] button to collect the current picture;
- Click [] button to annotate the current picture, including text annotation,
voice annotation and visible light annotation; - Click [] button to view the specific information of the current picture;
- Click [
 ] in the lower right corner to delete the current picture;
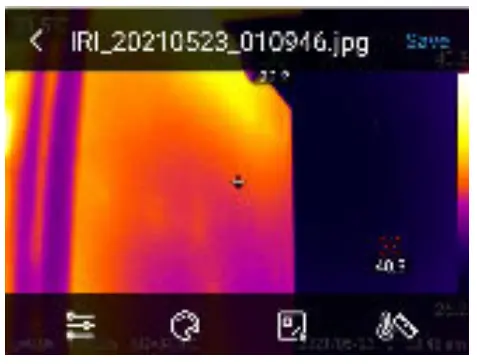
 - Click [
 ] button to enter the picture editing;
 - In the picture editing interface, you can modify the temperature measurement parameters, palette, temperature analysis and isotherm of the picture, and save the modified picture. Refer to the setting method in the menu bar.

- Image Saving: you can choose the way to save the image, including cancel,
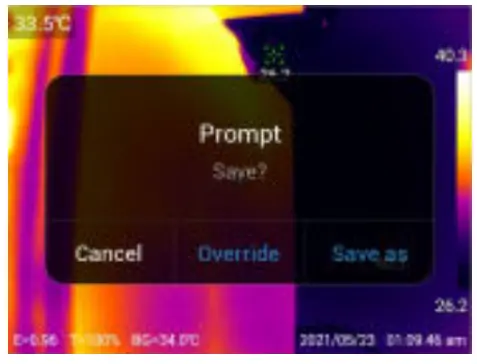
Video Editing
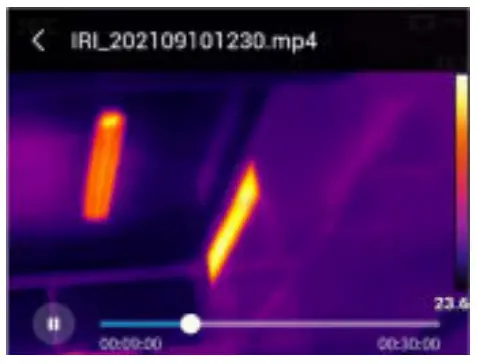
- Click MP4 video in the gallery to enter the video interface;
• MP4 Video: It can be played, dragged and paused. - Click lord video in the gallery to enter the video interface;

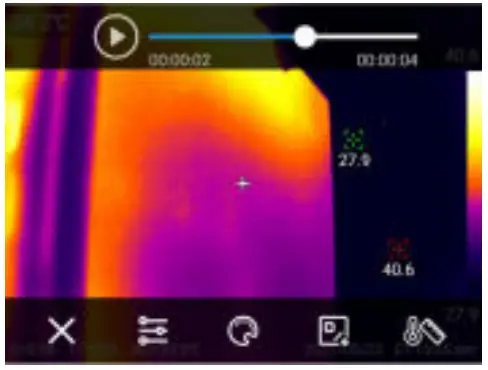
- lord video operation: you can play, pause and drag the video to play, and you can modify the temperature parameters of the video. Refer to the setting method in the menu bar.
Chapter 6 Setting
Click [![]() ] in the menu bar to enter the setting interface.
] in the menu bar to enter the setting interface.
Photo Mode
You can choose the photographing mode: photo capture, video recording and time-lapse photography.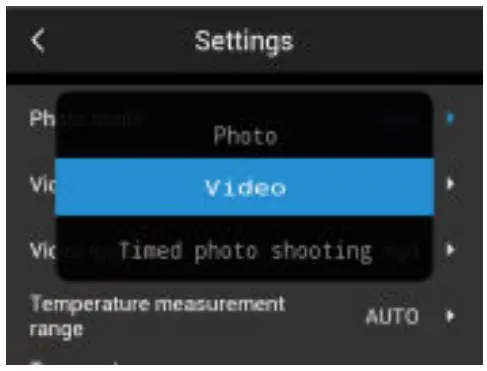
In the photo capture mode, you can choose whether to keep the current JPG/ visible light resolution;
In video recording mode, you can choose video storage method and video format;
In the time-lapse photography mode, you can select the time interval, the number of images, and whether to retain only the current JPG/visible light resolution.
Temperature Alarm
The alarm temperature thresholds are divided into high temperature and low temperature:
Turn on the high temperature alarm switch, and the user can set the alarm temperature threshold as required, such as (35°C). Return to the real-time image interface. If the temperature in the scene is higher than 35°C, the device will have a high temperature icon to alarm until the alarm ends;
Turn on the low temperature alarm switch, and the user can set the alarm temperature threshold as required, such as (32°C). Return to the real-time image interface. If the temperature in the scene is lower than 32°C, the device will have a low temperature icon to alarm until the alarm ends;
If the high temperature alarm and low temperature alarm switches are turned on at the same time, the high temperature + low temperature alarm will be triggered.
Brightness
Slide to adjust the brightness of the screen.
Data Connection
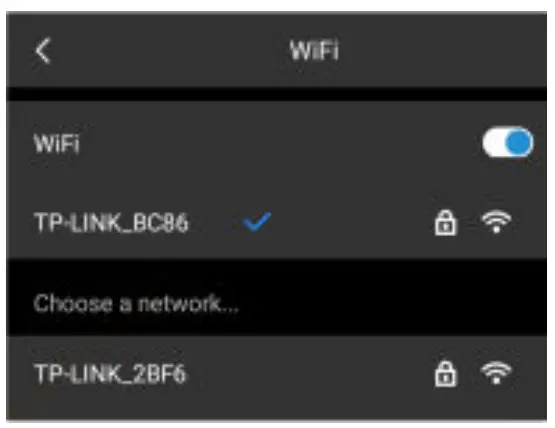
- Turn on the WiFi switch to search the nearby network;
- Select the network to be connected. Enter the password and connect.
 Note: To ensure reliable WiFi signal connection and stable data transmission, please to ensure that the connection distance is within 10m and there are no obstacles (such as partition walls).
Local hotspot
In the configuration interface, enter a valid hotspot name camera, password 12345678, and click OK to save it successfully. Click to open the hotspot switch, and the hotspot can be searched for connection.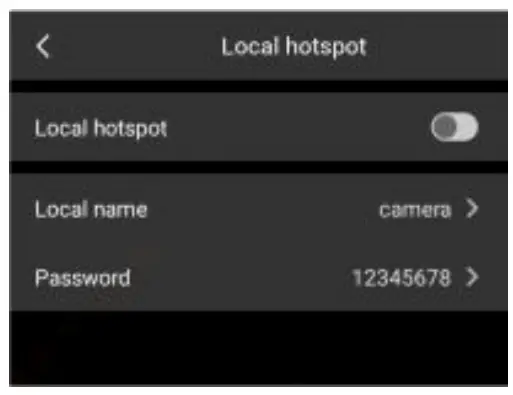
Bluetooth
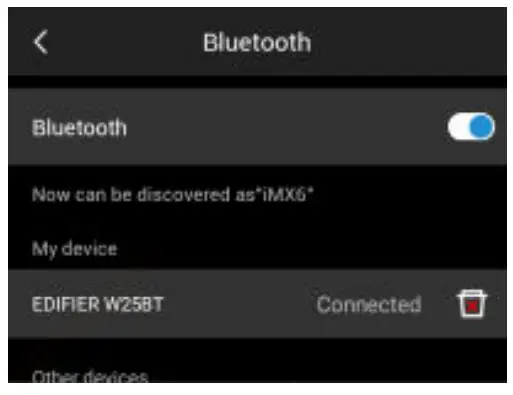
- Turn on the Bluetooth headset, press and hold the call button for 3 seconds to enter the pairing mode;
- Turn on the Bluetooth switch, and the system will automatically search for Bluetooth devices, and select Bluetooth headsets in the device list for pairing;
- After pairing, the headset will try to reconnect each time it is turned on.
Image Tag
Click the image tag to tum on the temperature, emissivity, reflection temperature, optical transmittance, color band, time and date, battery power, and display it on the real-time image.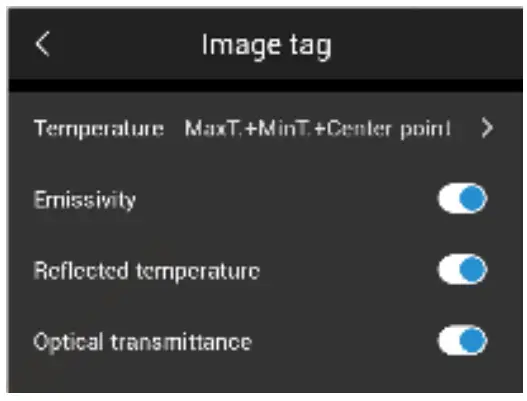
Unit Switching
Users choose the temperature units according to their own operating habits:
Celsius, Fahrenheit, Kelvin.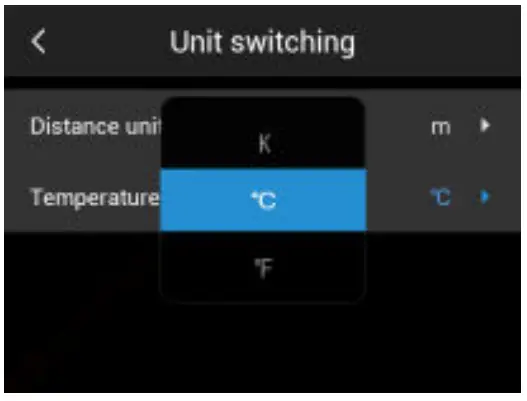
Users choose the distance unit according to their own operation habits: meters and yards.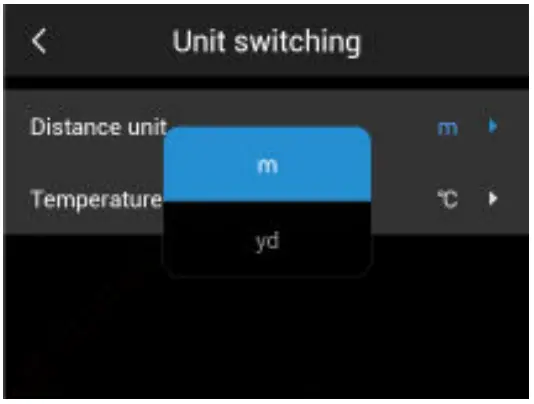
Target Distance
The distance can be selected within the range of 0.5~3.0m according to the distance of the target.
Auto Power Off
Users set automatic shutdown according to their own operating habits, including: off /5min/1 0min/15min/20min.
Language Switch
Users can choose to store images to TF card or memory according to their own needs.
Language
Provide multi language switching.
Date and Time
Manually set the system date and time.
Local Upgrade
Put the upgrade package in the /gcamera/update directory. Click “start upgrade”, and the latest upgrade package is detected. Click “upgrade”, and restart the device to upgrade to the latest version after the upgrade.![]() Note: Maintain sufficient power during the upgrade. If you have any questions during the upgrade process, contact the manufacturer in time.
Note: Maintain sufficient power during the upgrade. If you have any questions during the upgrade process, contact the manufacturer in time.
Restore Factory
Please operate carefully to restore the machine to the factory state.
Synchronize Data
Deal with the problem that files cannot be viewed due to factors such as changing SD cards and using each other.
Version Information
You can view the product software version and other related information.
Chapter 7 Connection With External Equipment
This product can use USB data cable to connect with external devices.
View internal storage files.
After connecting the USB cable to the computer, open my computer, check the internal storage disk information. Click to enter the memory device, and find the folder where the pictures are stored. The specific path is … UNIT\ Internal Storage Device \DCIM\GCamera\Sourceimage.![]()
Note: The file name beginning with IRI is infrared image, and the file name beginning with VIS is visible image.
Check the TF card file.
If you need to save the captured pictures into a TF card, first enter settings – image storage. Select the storage medium as a TF card, and then take photos to save the files into the TF card.
Use the USB cable to connect to the computer. Open my computer, and check the internal storage disk information. Click to enter the memory device, and the path is … \UNIT\ SD Card \DCIM\GCcamera\Sourceimage![]()
Note: The file name beginning with IRI is infrared image, and the file name beginning with VIS is visual image.
Chapter 8 PC Analysis Software
Please refer to the download guide to log in to the official website of our company to download the PC software and complete the installation.
Note: For the operation method of PC software, you can open user manual from the help option of the software operation interface.
Chapter 9 Mobile APP Software
Please search “Thermal link” in the app store for IOS devices.
Android devices have the following ways to obtain apps:
- Please search for “Thermal link” in the play store;
- Please refer to the download guide and log in to the official website of Uni-Trend to download.
Note: For the operation method of the APP software, you can open the app
user’s operation manual from the help option of the software setting interface.
Chapter 10 Summary of Common Problems
| Problems | Reasons | Measures |
| Unable to power on | Low battery | Recharge the battery before using it |
| Poor battery contact | Take out the battery, put ii back into the battery compartment and install it in place | |
| The plug of the external power supply is not plugged in | Unplug the power plug, reinsert it and push it into place | |
| The battery power indication deviates greatly from the actual use | Battery drain | Replace the fully charged battery |
| Battery life has expired | Replace with a new battery | |
| The infrared image is not clear | No focus | Manual focusing makes the image clear |
| The lens is covered with moisture or polluted | Clean the lens with professional equipment | |
| The visible light image is not clear | The environment is too dark | Take appropriate lighting measures |
| The visible light lens is covered with moisture or polluted | Clean the visible light lens with professional equipment | |
| Inaccurate temperature measurement | No focus on the target | Focus manually to make the image clear, and then read the temperature |
| The parameters related to temperature measurement are not set correctly | Change the parameter settings, or directly restore the default parameter values | |
| Measure temperature immediately after startup | In order to ensure the accuracy of temperature measurement, we recommend that you turn on the thermal imager and wait 5-10 minutes before starting the temperature measurement |
![]() NOTE: This equipment has been tested and found to comply with the limits for a Class A digital device, pursuant to part 15 of the FCC Rules. These limits are designed to provide reasonable protection against harmful interference when the equipment is operated in a commercial environment. This equipment generates, uses, and can radiate radio frequency energy and, if not installed and used in accordance with the instruction manual, may cause harmful interference to radio communications. Operation of this equipment in a residential area is likely to cause harmful interference in which case the user will be required to correct the interference at his own expense.
NOTE: This equipment has been tested and found to comply with the limits for a Class A digital device, pursuant to part 15 of the FCC Rules. These limits are designed to provide reasonable protection against harmful interference when the equipment is operated in a commercial environment. This equipment generates, uses, and can radiate radio frequency energy and, if not installed and used in accordance with the instruction manual, may cause harmful interference to radio communications. Operation of this equipment in a residential area is likely to cause harmful interference in which case the user will be required to correct the interference at his own expense.
UNI-TREND TECHNOLOGY (CHINA) CO., LTD.
No.6, Gong Ye Bei 1st Road,
Songshan Lake National High-Tech Industrial
Development Zone, Dongguan City,
Guangdong Province, China