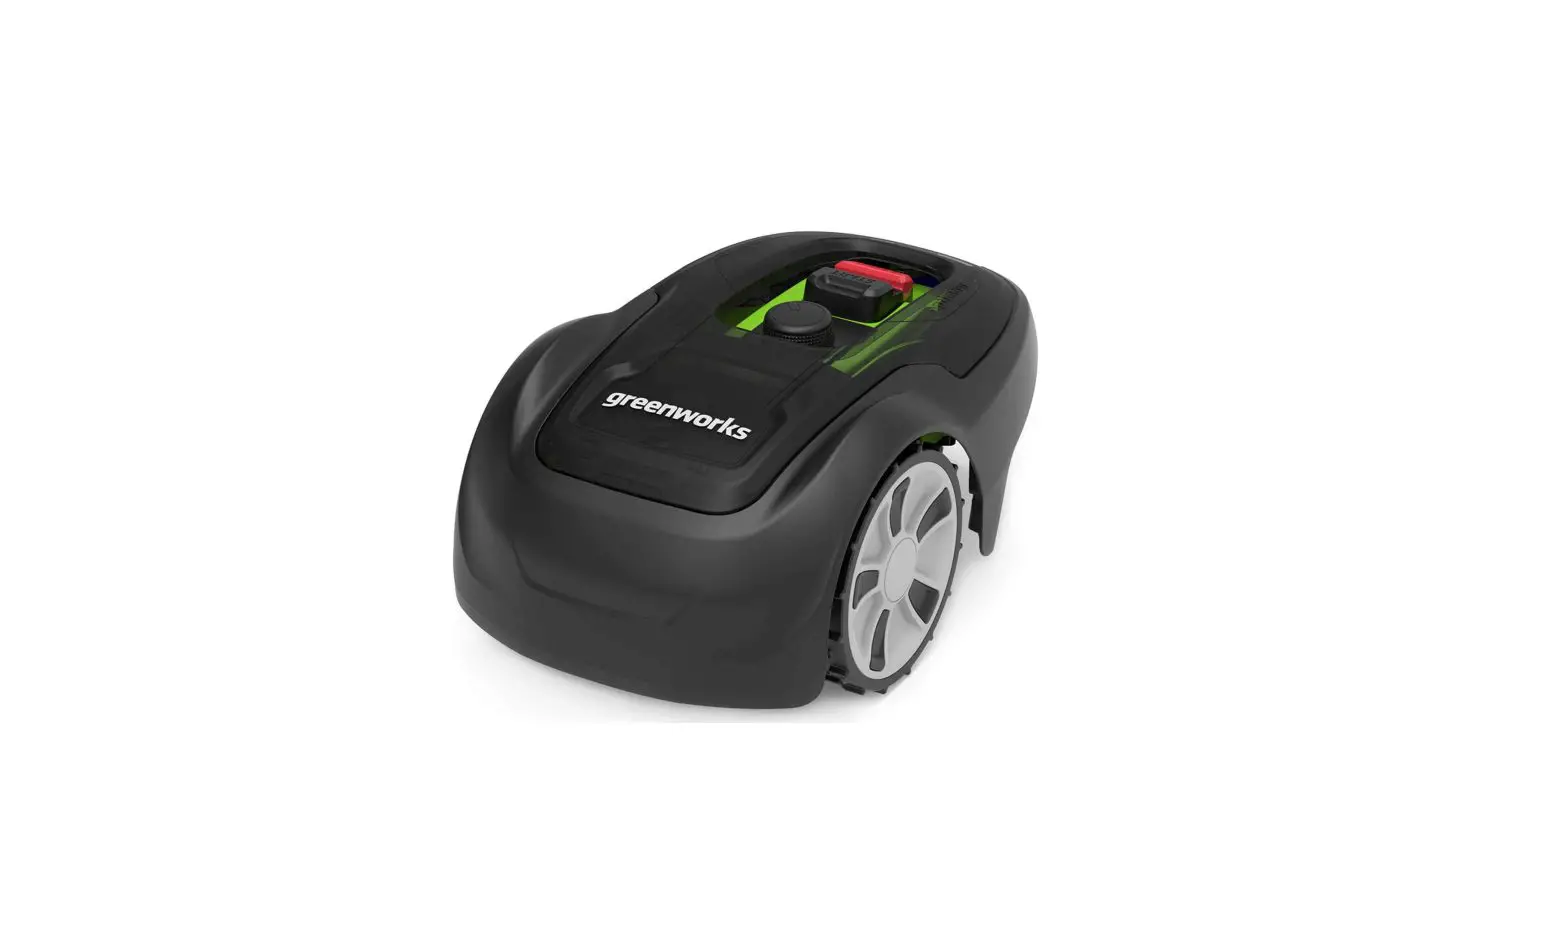
greenworks Optimow 4 Robotic Lawnmower User Manual
The following pages contain safety instructions, servicing and maintenance. For the operation please see the quick guide supplied with the machine.
Carefully read and review all safety instructions, warnings and cautions contained in this manual and the quick guide.
Failure to read and follow these instructions, warnings and cautionary statements may result in severe injury or death to persons and pets or damage to personal property.
The full instruction manual is available on Website: https://url.globetools.systems/pE5an
QR code: 
Installation


CONNECTING THE POWER SUPPLY
Connect the power supply in a cool, dry environment; out of direct sunlight.
If the power supply is connected to an electrical socket outdoors, it must be approved for outdoor use.
The low voltage cable can cross the operating area if it is stapled down or buried.
CAUTION: Do not cut, splice, or alter the low voltage cable. Altering product gurantee.
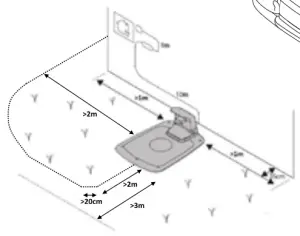
INSTALLING THE BOUNDARY WIRE
Lay down the loop wire reel at the charging station.
Go back around the boundary of the operating area and secure the boundary wire either using pegs or buried in the ground. Pegs are recommended since this allows for adjustment during the first few weeks of operation.
When securing the boundary wire with pegs:
- Cut the grass very low with a standard lawnmower or a trimmer where the wire is to be laid.

- Lay the boundary wire on the ground and secure with pegs close together.

- Push or hammer the pegs into the ground.

Do not push the pegs so far into the ground so that they strain the boundary wire.
When burying the boundary wire:
- Bury the boundary wire 1—20 cm into the ground.
Product Safety
As a complement to this operator manual, more information is available on the website: www.greenworkstools.eu
EXPLANATION OF SYMBOLS ON THE MOWER

This is a dangerous power tool. Use care when operating and follow all safety instructions and warnings.- Read the operator manual carefully before operating the mower.

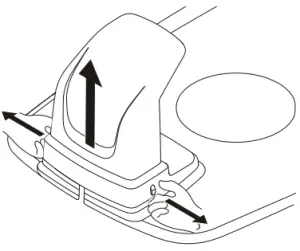
Remove the safety key before working on or lifting the mower.- Hazard of thrown objects during operation.
Keep a safe distance from the mower when operating and keep people, especially children, pets and bystanders away from the area where mower is being operated.
Do not ride on the mower.
Class III appliance


READING THE OPERATOR MANUAL
The following symbols are important for reading and understanding the operating instructions.
 Wear protective gloves
The following system is used in the operator manual to make it easier to understand:
- WARNING! Warning texts alert users and consumers to the existence and nature of hazards so that they can prevent injury by appropriate conduct during use of the product.
- CAUTION: Caution texts alert users and consumers to the existence and nature of product risks so that they can prevent damaging the product by appropriate conduct during use of the product.
- NOTE: Notes inform users and consumers about additional information about product use.
- Text written in bold italics refers to another section in the operator manual.
- Text written in bold refers to settings on the mower.
IMPORTANT
READ CAREFULLY BEFORE USE! KEEP FOR FUTURE REFERENCE!
Training
WARNING! Automatic lawnmower! Supervise children!
- Read the instructions carefully. Be familiar with the controls and the proper use of the machine.
- Never allow people unfamiliar with these instructions or children to use the machine. Local regulations may restrict the age of the operator.
- The operator or user is responsible for accidents or hazards occurring to other people or their property.
Preparation
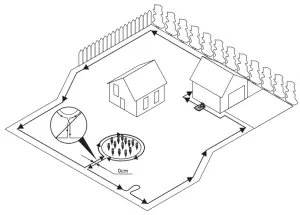
- Ensure the correct installation of boundary and guide wires as instructed.
- Periodically inspect the area where the machine is to be used and remove all stones, sticks, wires, bones, and other foreign objects.
- Periodically visually inspect to see that the blades, blade bolts and cutter assembly are not worn or damaged. Replace worn or damaged blades and bolts in sets to preserve balance.
Operation
- Never operate the machine with defective guards, or without safety devices, for example the body, in place.
- Do not put hands or feet near or under rotating parts.
- Never pick up or carry an machine while the motor is running.
- Remove (or Operate) the disabling device from the machine
- before clearing a blockage;
- before checking, cleaning or working on the machine.
- Do not leave the machine to operate unattended if you know that there are pets, children or people in the vicinity.
Maintenance and storage
- Keep all nuts, bolts, and screws tight to be sure the machine is in safe working condition.
- Replace worn or damaged parts for safety.
- Ensure that only replacement cutting means of the right type are used.
- Ensure that batteries are charged using the correct charger recommended by the manufacturer. Incorrect use may result in electric shock, overheating or leakage of corrosive liquid from the battery.
- In the event of leakage of electrolyte flush with water/neutralizing agent, seek medical help if it comes into contact with the eyes, etc.
- Servicing of the machine should be according to manufacturers’ instructions.
Operation
STARTING AND STOPPING THE MOWER
To start the mower:
- Insert the safety key and rotate counter clockwise to position ”1”.
- Slide the START button latch backwards.
- Press down the START button.
To stop the mower:
Press the STOP button on the mower.
SWITCHING OFF THE MOWER
Press the STOP button on the mower and remove the safety key.
WARNING! Always remove the safety key when performing maintenance or if the mower must be moved.
OPERATIONAL SAFETY
This operator manual contains all of the basic information concerning the safe operation and maintenance of the mower.

Carefully read all the safety precautions and instructions in this operator manual before operating the mower. Save this operator manual for future reference. Follow manufacturer instructions regarding installation, operation, maintenance, and repair.- This mower is designed to mow grass in open and level areas. Use only equipment recommended by the manufacturer. All other types of use are incorrect.

This mower conforms to CE safety standards and directives concerning electromagnetic compatibility, machines, and low voltage.
The mower is not intended for use by persons (including children) with reduced physical, sensory, or mental capabilities, or lack of experience and knowledge, unless they have been given supervision or instruction concerning use of the appliance by a person responsible for their safety.- Children should be supervised to ensure that they do not play with the appliance.
- The mower must only be operated, maintained, and repaired by persons that fully understand its special characteristics and safety regulations.
- Start the mower in accordance with the instructions. When the safety key is in the Enabled position, keep your hands and feet away from the rotating blades.
- Never put your hands and feet under the mower.
- Do not modify the original design of the mower. All modifications void the guarantee.
- Switch off mower using the STOP button on the mower when persons, especially children, or pets are in the cutting area. It is recommended that the mower be programmed for use during hours when the area is free from persons or pets.
- Remove objects from the operating area such as branches, toys, stones, tools that can damage the blades. The mower can fasten on objects in the operating area and help may be required to remove the object before the mower can continue mowing.
- Never lift up the mower or carry it with the safety key inserted.
- Always switch off the mower using the STOP button when the mower is not in use. The mower can only start when the safety key is inserted and the START button is pressed.
- Do not use the mower with a defective blade disc or body.
- Do not let persons who do not know how the mower works and behaves use it.
- Do not put anything on top of the mower or its charging station.

Always wear protective gloves when working with the mower’s blades.


Environmental Protection
 According to the European law 2012/19/EU, electrical and electronic equipment that is no longer usable, and according to the European law 2006/66/EC, defective or used battery packs/batteries, must be collected separately and disposed of in an environmentally correct manner.
The symbol on the mower or its packaging indicates that this product cannot be treated as domestic waste. It should instead be left at a suitable recycling center to recycle its electronic components and batteries.
The batteries are enclosed in the chassis under the mower.
By ensuring that this product is taken care of correctly, you can help to counteract the potential negative impact on the environment and people that can otherwise result through the incorrect waste management of this product.
For more detailed information about recycling this product, contact your municipality, your domestic waste service or the shop from where you purchased the product.
 Separate collection of used machine and packaging let you recycle materials and use them again. Use of the recycled materials helps prevent environmental pollution and decreases the requirements for raw materials.
 Batteries:At the end of their useful life, discard batteries with a precaution for our environment. The battery contains material that is dangerous to you and the environment. You must remove and discard these materials separately at a equipment that accepts lithium-ion batteries.
Troubleshooting
This section also presents some symptoms that can guide you if the mower does not work as expected.
INDICATOR LEDS ON MOWER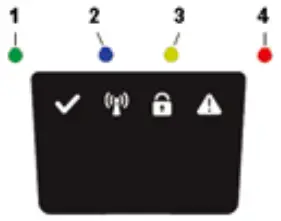
LED | STATUS | MEANING | ACTION |
| 1. Operating (Green) | Flashing | Recovery mode | Place the robot in charging station with a mobile with the Greenworks tools App close to the mower for software update of mower. This can take up to 1 hour until the green LED to stop flashing. If LED doesn’t stop flash then restart the robot outside the CS and try again. |
| On | Mower in operation mode (charging, parked in Charging station, paused, mowing or searching) | ||
| Off | Mower stopped with Stop button on mower, safety key in Disabled position, mower in error state or mower waiting for PIN code. | ||
| 2. Connectivity (Blue) | Flashing | Mower not ready for Bluetooth connection | If mower stopped with error the mower need to be restarted with the Start button to allow Bluetooth connection again |
| On | Mower ready for Bluetooth connection with Mobile App | ||
| Off | Mower not in ”Power on mode” | ||
| 3. Security (Yellow) | Flashing | PIN code authorization required | … via Mobile App. |
| Off | No pin required | No action required | |
| 4. Error (Red) | Flashing | Mower stopped with error | Check the reason for the error and then restart by pressing the Start button on the mower. |
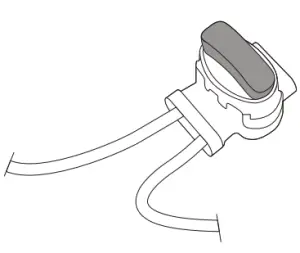
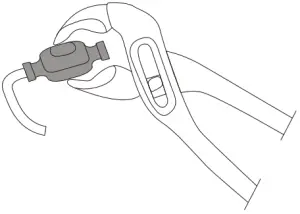
BREAKS IN BOUNDARY WIRE AND GUIDE WIRE
Breaks in the boundary wire and guide wire (if installed) are usually the result of unintentional physical damage.
Inspect the entire boundary wire from the charging station and back.
Inspect the guide wire (if installed) from the charging station to the splice into the boundary wire.
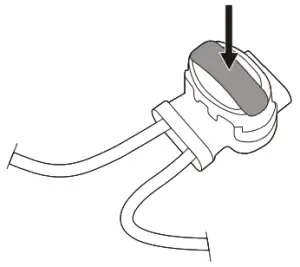
Inspect that all the couplings have been properly squeezed to make connections.
Technical Data
| Optimow 4 | Optimow 5 | Optimow 7 | |
Dimensions: | |||
Height | 25 cm | 25 cm | 25 cm |
| Length | 57 cm | 57 cm | 57 cm |
Width | 36 cm | 36 cm | 36 cm |
| Weight | 7.2 kg | 7.2 kg | 7.2 kg |
Electrical system: | |||
Battery, Special Lithium-Ion battery | 20 V / 2.0 Ah, Part No. T0100110-00 | 20 V / 2.0 Ah, Part No. T0100110-00 | 20 V / 2.0 Ah, Part No. T0100110-00 |
Power supply | 220-240 V/32 VDC | 220-240 V/32 VDC | 220-240 V/32 VDC |
| Low voltage cable length | 10 m | 10 m | 10 m |
Mean energy consumption at maximum use | 5 kWh/month for a working area of 400 m2 | 6 kWh/month for a working area of 500 m2 | 9 kWh/month for a working area of 700 m2 |
Charge current | 1.3 A DC | 1.3 A DC | 1.3 A DC |
| Average charging time | 150 minutes | 120 minutes | 70 minutes |
Average cutting time | 60 minutes | 60 minutes | 60 minutes |
Noise emissions: *) | |||
Measured sound power noise level **) | 58 dB (A) | 58 dB (A) | 58 dB (A) |
| Guaranteed sound power noise level | 61 dB (A) | 61 dB (A) | 61 dB (A) |
Sound pressure noise level ***) | 47 dB (A) | 47 dB (A) | 47 dB (A) |
Mowing: | |||
Cutting system | Three pivoted cutting blades | Three pivoted cutting blades | Three pivoted cutting blades |
| Average power consumption during cutting | 25 W ± 20% | 25 W ± 20% | 25 W ± 20% |
Cutting height | 2-6 cm | 2-6 cm | 2-6 cm |
| Cutting width | 17 cm | 17 cm | 17 cm |
Narrowest possible passage | 60 cm | 60 cm | 60 cm |
| Maximum angle for cutting area | 30% | 30% | 30% |
Maximum angle for boundary wire | 15% | 15% | 15% |
| Maximum length boundary wire | 800 m | 800 m | 800 m |
Maximum working capacity | 450 m2 | 550 m2 | 750 m2 |
| Recommended area capacity | 0 – 350 m2 | 200 – 450 m2 | 300 – 650 m2 |
IP classification: | |||
| Mower | IPX5 | IPX5 | IPX5 |
Charging station | IPX2 | IPX2 | IPX2 |
| Power supply | IP67 | IP67 | IP67 |
RADIO FREQUENCY DATA SHEET | ||
| Bluetooth (NINA-B112) | Short Range Devices (SRD) (Boundary Wire) | |
Frequency Bands | 2400.0 – 2483.5 MHz | 0~148.5KHz |
| Power Class | Class 1.5 (6 dBm) | NA |
The noise emission declarations conforms to EN 50636-2-107
- **) uncertainties KWA, 3 dB (A)
- ***) uncertainties KPA, 3 dB (A)
CE Declaration of Conformity
 (Only applicable to European versions)
- Name and address of manufacturer:
- Manufacturer: GLOBGRO AB, Globe Group Europe
- Address: Riggaregatan 53, 211 13 Malmö, Sweden
- Name and address of the person authorized to compile the
- technical file:
- Name: Peter Söderström
- Address: Riggaregatan 53, 211 13 Malmö, Sweden
Herewith we declare that the product:
Category: | Robotic Lawnmower |
| Model: | Optimow 4 / 5 / 7 |
Serial number: | See product rating label. |
| Serial No | See product rating label. |
- Is in conformity with the provisions of the following other directives:
2014/30/EU2014/53/EU
2006/42/EC
2011/65/EU & (EU) 2015/863
2014/35/EU
- The following (parts/classes of) European harmonized standards have been used:
EN 60335-1, EN 50636-2-107, EN 60335-2-29, EN 62233, EN 55014-1, EN 55014-2, EN 61000-3-2, EN 61000-3-3 EN 61558-1, EN 61558-2- 16, EN 62311, EN 303 447, EN 300328, EN 301 489-1, EN 301 489-3, Draft EN 301 489-17 IEC 62321-7-2, IEC 62321-4 , IEC 62321-5, IEC 62321-6, IEC 62321-7- 1, IEC 62321-8, IEC 62321-3-1
Ted Qu Haichao
Quality Director
Malmö, 22. 09. 2020