
greenworks MO80L00 Lawn Mower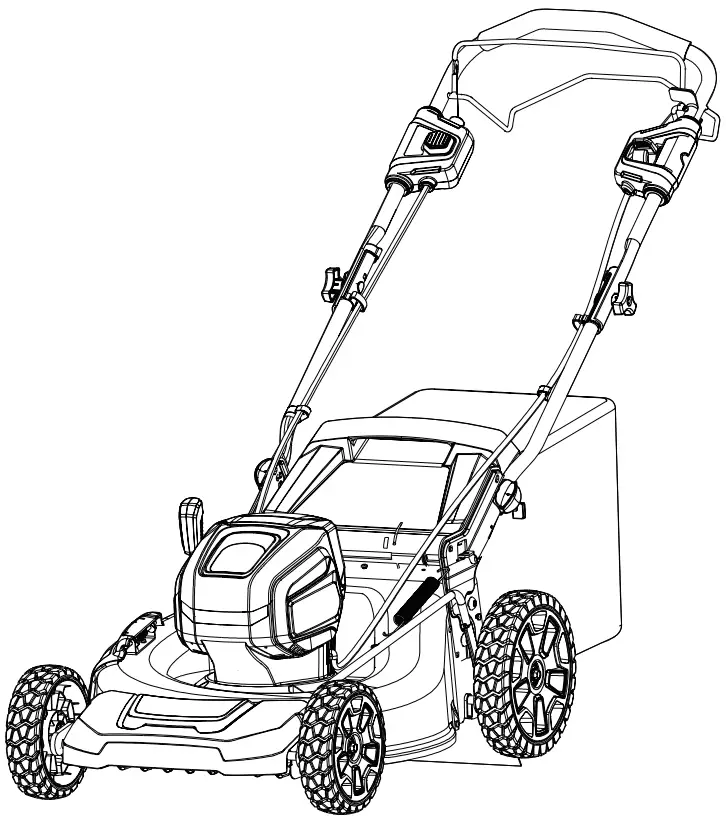
PURPOSE
This machine is used for domestic lawn mowing. The cutting blade must be approximately parallel to the ground. All four wheels must touch the ground while you mow.
OVERVIEW
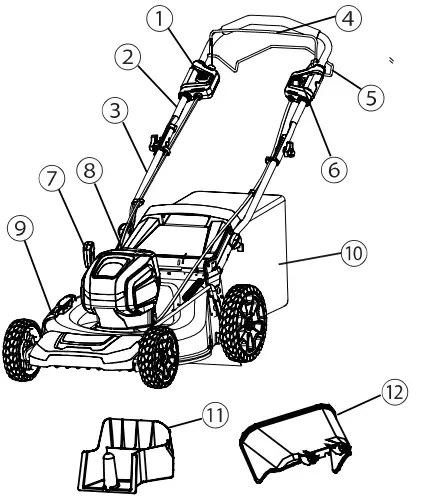
- Start button
- Upper handle
- Lower handle
- Bail switch
- Self-propel lever
- Speed control button
- Height adjustment lever
- Battery door
- Side discharge door
- Grass catcher
- Mulch plug
- Side discharge chute
READ ALL INSTRUCTIONS
![]() DANGER This machine was built to be operated according to the rules for safe operation included in this manual. As with any type of power equipment, carelessness or error on the part of the operator can result in serious injury. This machine is capable of amputating hands and feet and throwing objects. Failure to observe all safety instructions could result in serious injury or death.
DANGER This machine was built to be operated according to the rules for safe operation included in this manual. As with any type of power equipment, carelessness or error on the part of the operator can result in serious injury. This machine is capable of amputating hands and feet and throwing objects. Failure to observe all safety instructions could result in serious injury or death.
![]() NOTE When using electric lawn mowers, basic safety precautions should always be followed to reduce the risk of fire, electric shock, and personal injury. These basic precautions include the following:
NOTE When using electric lawn mowers, basic safety precautions should always be followed to reduce the risk of fire, electric shock, and personal injury. These basic precautions include the following:
CHILDREN AND BYSTANDERS
Tragic accidents can occur if the operator is not alert to the presence of children or bystanders.
- Keep the area of operation clear of all persons, particularly small children, and pets.
- Use extreme care when approaching blind corners, doorways, shrubs, trees, or other objects that may obscure your vision of a child or bystander. Keep children, bystanders, helpers and pets at least 100 feet (30m) from the mower while it is in operation.
Stop the machine if anyone enters the area. - Never allow children under 14 years old to operate a power mower. Operators 14 years old and over should fully read and understand the operator’s manual and safety rules. Only responsible individuals who are familiar with these rules of safe operation should be allowed to use this machine.
GENERAL OPERATION
- Read this operator’s manual carefully in its entirety before assembling or operating this machine. Read, understand, and follow all instructions on the machine and in the manuals before operation.
Familiarize yourself with the controls and proper use of this machine before operation. Save this manual for future and regular reference. - Do not use the lawn mower for any job except that for which it is intended. Your lawn mower has been designed to perform only one job: cut grass.
- Never attempt to make a wheel height adjustment while the motor is running.
- Don’t force the lawn mower, it will do the job better and more safely at the rate for which it was designed.
- Don’t overreach, keep proper footing and balance at all times. Many injuries occur as a result of the mower being pulled over the foot during a fall caused by slipping or tripping. A slip and fall can cause serious personal injury. If you feel you are losing your footing, release the control handle immediately and the blade will stop rotating within three seconds.
- Thoroughly inspect the area where the equipment is to be used and remove all stones, sticks, wires, bones, and other foreign objects.
- Prevent unintentional starting. Ensure the switch is in the off-position before connecting to battery pack, picking up or carrying the appliance. Carrying the appliance with your finger on the switch or energizing appliance that have the switch on invites accidents.
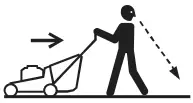
- Never pull the mower back toward you while you are walking. If you must back the mower away from a wall or obstruction, first look down and behind you to avoid tripping, and then follow these steps:
- Step back from the mower in order to fully extend your arms.
- Be sure that you are well balanced.
- Pull the mower back slowly.
- Disconnect the battery pack from the appliance before making any adjustments, changing accessories, or storing appliance. Such preventive safety measures reduce the risk of starting the appliance accidentally.
- Before and while moving backwards with the mower, look behind and down for small children and other people.
- Do not operate the mower while under the influence of alcohol or drugs. Stay alert and watch what you are doing at all times. Use common sense and do not operate the lawn mower when you are tired.
- Always wear safety glasses or safety goggles during operation and while performing an adjustment or repair to protect your eyes. Thrown objects that ricochet can cause serious injury to the eyes. Always use a face or dust mask if the operation is dusty.
- Keep clear of the discharge opening at all times. Do not put hands or feet near rotating parts or under the cutting deck. Contact with the blade can amputate hands and feet.
- Plan your mowing pattern to avoid discharge of material toward roads, sidewalks, bystanders and the like. Also, avoid discharging material against walls or obstructions, which may cause discharged material to ricochet back toward the operator.
- To help avoid the blade or an injury from a thrown objects, stay in the operator zone behind the handles.
- A missing or damaged discharge cover can cause blade contact or injuries from thrown objects.
- Objects struck by the lawn mower blade can cause severe injuries to persons. The lawn should always be carefully examined and cleared of all objects prior to each mowing.
- Stop the blade when crossing gravel drives, walks or roads.
- Follow all charging instructions and do not charge the battery pack or appliance outside of the temperature range specified in the instructions.
Charging improperly or at temperatures outside of the specified range may damage the battery and increase the risk of fire. - If lawn mower strikes a foreign object, follow these steps:
- Release the bail switch to disengage the motor.
- Remove the battery.
- Inspect for damage.
- Repair any damaged parts before restarting and operating the lawn mower.
- Have servicing performed by a qualified repair person using only identical replacement parts. This will ensure that the safety of the product is maintained.
- Dress properly, do not wear loose clothing or jewelry that can be caught in moving parts. Use of safety gloves and proper footwear is recommended when working outdoors. Wear sturdy, rough-soled work shoes and close-fitting slacks and shirts. Shirts and pants that cover the arms and legs and steel-toed shoes are recommended. Never operate this machine in bare feet, sandals, slippery or lightweight (e.g., canvas) shoes.
- Do not modify or attempt to repair the appliance or the battery pack (as applicable) except as indicated in the instructions for use and care.
- Wear protective hair covering to contain long hair.
- Avoid dangerous environments, do not use the lawn mower in damp/wet locations or if it is raining.
- Store Idle Lawn Mower Indoors — When not in use, appliances should be stored indoors in dry, and high or locked-up place — out of reach of children. Always remove the battery from the mower before storing.
- Mow only in daylight or good artificial light. Walk, never run while operating.
- If the equipment should start to vibrate abnormally, immediately stop the motor, remove the battery and check for the cause. Vibration is generally a warning that the machine is not functioning properly.
- Check bag frequently for deterioration and wear, and replace worn bags. Check that replacement bags comply with the original manufacturer’s recommendations or specifications.
- Before cleaning the machine, unclogging or removing the grass bag, mulching insert, or side discharge chute, turn the motor off and wait until the blade comes to a complete stop, then remove the battery pack. The cutting blade continues to rotate for a few seconds after the motor is shut off. Never perform these functions until you are sure the blade has stopped rotating.
- Keep cutting edges clean and sharp to ensure best performance.
- Periodically inspect safety devices and cords for damage. If damaged do not operate the unit until it has been repaired by an authorized service professional.
- Never operate the mower without the proper discharge cover, grass bag, mulching insert, side discharge chute, or other safety devices in place and working. Never operate the mower with damaged safety devices. Failure to do so can result in personal injury.
- Use only approved batteries and chargers. Non approved batteries and chargers may cause damage to the mower or injure the operator.
- Do not dispose of the battery in a fire. The cells could catch fire or explode. Check with local codes and waste management for proper disposal instructions.
- When battery pack is not in use, keep it away from other metal objects, like paper clips, coins, keys, naiIs, screws or other small metal objects, that can make a connection from one terminal to another. Shorting the battery terminals
together may cause burns or a fire. - Do not open or mutilate the battery. Electrolytes contained within the battery are corrosive and may cause damage to eyes or skin if released. It may be toxic if swallowed.
- Under abusive conditions, liquid may be ejected from the battery; avoid contact. If contact accidentally occurs, fIush with water. If liquid contacts eyes, additionaIIy seek medical help. Liquid ejected from the battery may cause irritation or burns.
- Do not expose a battery pack or appliance to fire or excessive temperature. Exposure to fire or temperature above130°Cmay cause explosion. The temperature of 130°C can be replaced by the temperature of 265°F.
- Exercise care in handling batteries to avoid shorting the battery with conducting materials such as rings, bracelets, keys, etc. The battery or conductor may overheat and cause burns if contact with said materials is made.
- Do not use a battery pack or appliance that is damaged or modified. Damaged or modified batteries may exhibit unpredictable behavior resulting in fire , explosion or risk of injury.
SERVICE/MAINTENANCE
- Check the blade and the motor (machine) mounting bolts at frequent intervals for proper tightness.
- Replace the blade if it is bent or cracked. An unbalanced blade causes vibration that could damage the motor drive unit or cause personal injury.
- Keep all nuts, bolts, and screws tight in order to ensure the equipment is in safe working condition.
- Do not wash with a hose; avoid getting water in motor and electrical connections.
- Never remove or tamper with safety devices. Check their proper operation regularly. Never do anything to interfere with the intended function of a safety device or to reduce the protection provided by a safety device.
- Keep machine free of grass, leaves, or other debris build up. Allow machine to cool before storing.
- Never make any adjustments or repairs with the motor running.
- Always remove battery pack from mowers before adjusting, cleaning, or repairing.
- Check grass catcher components and the discharge guard frequently and replace with manufacturer’s recommended parts, when necessary.
- Sharpen a dull blade equally at each end to maintain the balance.
- Keep guards in place and in working order. Mower blades are sharp, and can cut. Wrap the blades or wear gloves, and use extra caution when servicing.
- Clean the blade thoroughly and check its balance by supporting it horizontally on a thin nail through its centre hole. The nail should also be in a horizontal position. If either end of the blade rotates downward, remove some metal from the heavy or lower end until the blade is balanced. It is balanced when neither end drops.
- Use identical replacement blades only.
- Maintain Lawn Mower With Care — Keep cutting edges sharp and clean for best and safest performance. Follow instructions for lubricating and changing accessories. Inspect lawn mower cord periodically and if damaged, have it repaired by an authorized service facility.
- If situations occur that are not covered in this manual, use care and good judgment or contact Customer Service for assistance.
- Never operate the mower without proper guards, plates, or other safety protective devices in place.
The recommended ambient temperature range:
| Item | Temperature |
| Mower storage temperature range | 14°F (-10°C) – 104°F (40°C) |
| Mower operation temperature range | 32°F (0°C) – 104°F (40°C) |
| Battery charging temperature range | 39°F (4°C) – 104°F (40°C) |
| Charger operation temperature range | 39°F (4°C) – 113°F (45°C) |
| Battery storage temperature range | 1 year: 32°F (0°C) – 73°F (23°C) |
| 3 months: 32°F (0°C) – 113°F (45°C) | |
| 1 months: 32°F (0°C) – 140°F (60°C) | |
| Battery discharging temperature range | 6.8°F (-14°C) – 167°F (75°C) |
SLOPE OPERATION
Slopes are a major factor related to slip-and-fall accidents, which can result in severe injury. Operation on slopes requires extra caution. If you feel uneasy on a slope, do not mow it.
Do:
- Mow across the face of slopes; never mow up and down. Exercise extreme caution when changing direction on slopes.
- Watch for holes, ruts, rocks, hidden objects, or bumps which can cause you to slip or trip. Tall grass can hide obstacles.
Do not:
- Do not mow excessively steep slopes.
- Do not mow near drop-offs, ditches or embankments; you could lose your footing or balance.
- Do not mow slopes greater than 15 degrees.
Do not mow on wet grass. Unstable footing could cause slipping.
SYMBOLS ON THE PRODUCT
Some of the following symbols may be used on this tool.
Please study them and learn their meaning. Proper interpretation of these symbols will allow you to operate the tool better and safer.
| Symbol | Name | Explanation |
| V | Volt | Voltage |
| A | Amperes | Current |
| Hz | Hertz | Frequency (cycles per second) |
| W | Watt | Power |
| min | Minutes | Time |
| /min | Per Minute | Revolutions, strokes, surface speed, orbits etc., per minute |
| Alternating Current | Type of current | |
| Direct Current | Type or a characteristic of current | |
| n0 | No Load Speed | Rational speed, at no load |
 | Safety Alert | Precautions that involve your safety. |
 | Eye Protection | Always wear eye protection with side shields marked to comply with ANSI Z87.1 when operating this equipment. |
 | WARNING — Wet Conditions | Do not expose the product to rain or moist conditions. |
| Symbol | Name | Explanation |
 | Read Opera- tor’s Manual | To reduce the risk of in-j.ury, user must read and understand operator’s manual before using this product. |
 | Maintain Safety Devices | Do not open or remove safety devices while the tool is running. |
 | Looking Be- hind While Backing | Look down and behind first to avoid tripping when pulling back. |
 | DANGER — Keep Hands and Feet Away | To reduce the risk of injury, keep hands and feet away from rotating parts. Do not operate unless discharge cover or grass bag is in its proper place. If damaged, replace immediately. |
 | DANGER — Keep By-standers Away | All visitors should be kept at a distance from work area. |
 | DANGER — Thrown Debris | Remove objects that can be thrown by the blade in any direction. Wear safety glasses. |
 | DANGER — Steep Slope Hazard | Use extra caution on slopes. do not mow slopes greater than 15 degrees. |
RISK LEVELS
The following signal words and meanings are intended to explain the levels of risk associated with this product.
| SYMBOL | SIGNAL | MEANING |
| DANGER | Indicates an imminently hazardous situation, which, if not avoided, will result in death or serious injury. | |
| WARNING | Indicates a potentially hazardous situation, which, if not avoided, could result in death or serious injury. | |
| CAUTION | Indicates a potentially hazardous situation, which, if not avoided, may result in minor or moderate injury. | |
| CAUTION | (Without Safety Alert Symbol) Indicates a situation that may result in property damage. |
PROPOSITION 65
WARNING
This product contains a chemical known to the state of California to cause cancer, birth defects or other reproductive harm. Some dust created by power sanding, sawing, grinding, drilling, and other construction activities contains chemicals known to cause cancer, birth defects or other reproductive harm. Some examples of these chemicals are:
- Lead from lead-based paints;
- Crystalline silica from bricks and cement and other masonry products;
- Arsenic and chromium from chemically treated lumber.
Your risk of exposure to these chemicals varies depending on how often you do this type of work. To reduce your exposure to these chemicals, work in a well-ventilated area, and work with approved safety equipment, such as dust masks that are specially designed to filter out microscopic particles.
Save these instructions.
INSTALLATION
WARNING
Do not change or make accessories that are not recommended by the manufacturer.
WARNING
Do not put in the safety key or the battery pack until you assemble all the parts.
UNPACK THE MACHINE
WARNING
Make sure that you correctly assemble the machine before use.
WARNING
- If the parts have damage, do not use the machine.
- If you do not have all the parts, do not operate the machine.
If the parts are damaged or missing, speak to the service center.
- Open the package.
- Read the documentation in the box.
- Remove all the unassembled parts from the box.
- Remove the machine from the box.
- Discard the box and package in compliance with local regulations.
UNFOLD THE LOWER HANDLE
- Pull and turn the handle knobs (13) 90°.
- Unfold the lower handle (3).
- Line up the handle knobs in one of the three positions (14) on the brackets.
- Turn the handle knobs 90° until they engage the holes in the brackets.
![]() NOTE
NOTE
Make sure that the two handle knobs are in the same position.
WARNING
Do not damage or pinch the cables when you fold or unfold the handle.
INSTALL THE UPPER HANDLE
- Align the holes in the upper handle (2) and the lower handle (3).
- Put the bolts (15) through the holes.
- Tighten the knobs (16) onto the bolts.
- Do the same operation on the other side.
INSTALL THE GRASS CATCHER
- Remove the mulch plug.
- Remove the side discharge chute.
- Open the rear discharge door (17) and hold it.
- Hold the the grass catcher (10) by its handle (20) and engage the hooks (19) on the door rod (18).
- Close the rear discharge door (17).
INSTALL THE MULCH PLUG
- Remove the grass catcher
- Open the rear discharge door (17) and hold it.
- Hold the mulch plug (11) by its handle (21) and fit it in the discharge chute.
- Close the rear discharge door.
INSTALL THE SIDE DISCHARGE CHUTE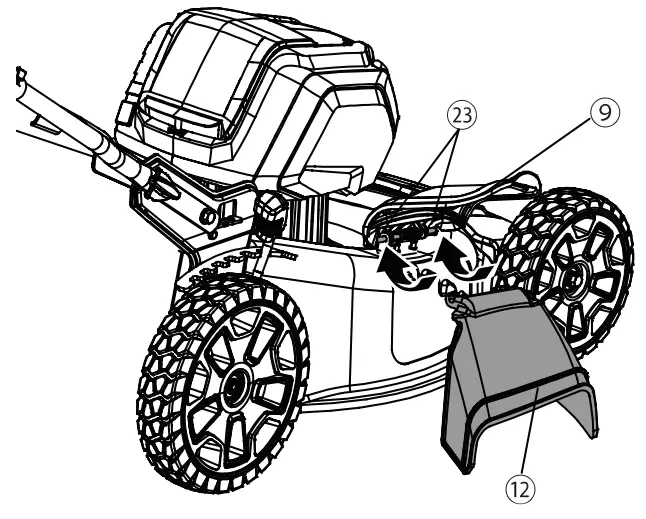
WARNING
When you use the side discharge chute,
- do not install the grass catcher.
- keep the mulch plug installed.
- Open the side discharge door (9) and hold it.
- Line up the recesses of the side discharge chute (12) below the pivot (23).
- Close the side discharge door (9).
SET THE BLADE HEIGHT
The machine can be set to different blade heights.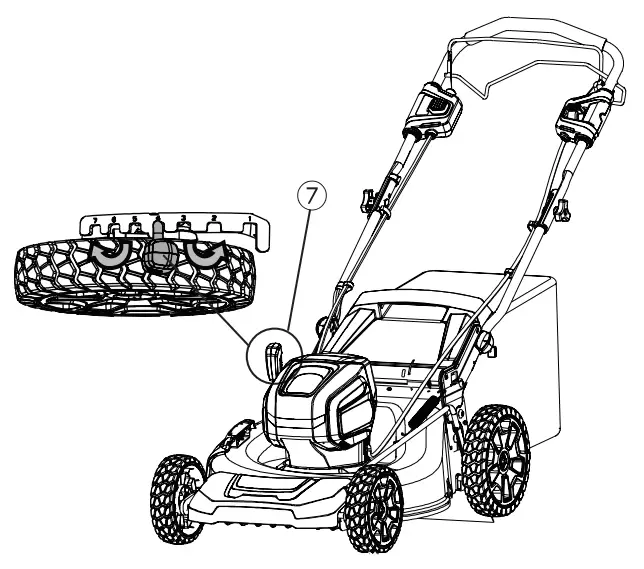
- Pull the height adjustment lever (7) rearward to increase he blade height.
- Pull the height adjustment lever forward to decrease the blade height.
INSTALL THE BATTERY PACK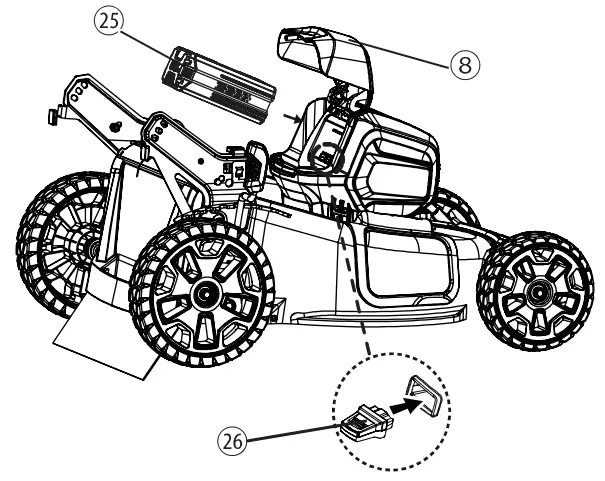
WARNING
- If the battery pack or charge is damaged, replace the battery pack or the charger.
- Stop the machine and wait until the motor stops before you install or remove the battery pack.
- Read, know, and follow the instructions in the battery and charger manual.
- Open the battery door (8).
- Align the lift ribs on the battery pack (25) with the grooves in the battery compartment.
- Push the battery pack into the battery compartment until the battery pack locks into place.
- When you hear a click, the battery pack is installed.
- Close the battery door.
![]() NOTE The motor starts only when you put in the safety key (26).
NOTE The motor starts only when you put in the safety key (26).
REMOVE THE BATTERY PACK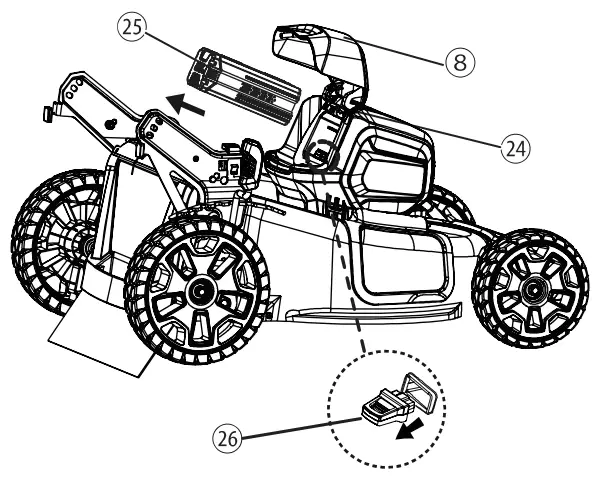
- Open the battery door (8).
- Remove the safety key (26).
- Push and hold the battery release button (24).
- Remove the battery pack (25) from the machine.
OPERATION
WARNING
START THE MACHINE
- Push and hold the start button (1).
- While you hold the start button (1), pull the bail switch (4) in the direction of the handle bar.
- Once the machine has started you can release the start button (1).
STOP THE MACHINE
- Release the bail switch to stop the machine.
WARNING Wait until the blades fully stop before you start the machine again. Do not quickly turn the machine off and on.
WARNING Always remove the battery pack after you complete the work.
OPERATE THE SELF-PROPEL SYSTEM
![]() NOTE
NOTE
The machine is built with a thermal protector to stop the self-propelled motor when overload occurs. It’s a device calibrated to open the self-propelled motor circuit upon reaching a certain temperature/current.
Re-setting the protector requires both cool down below the calibration point and removal of power supply. When the protection happens, the operator should release the self-propel bail lever (5) immediately ,then restart self-propel operation after at least 30 minutes.
- Start the machine.
- While you hold the bail switch (4), push the self propel lever (5) in the direction of the handle bar.
- Hold the bail switch (4) and the self-propel lever (5) at the same time with your right hand.
- Adjust the speed control button (6) with your left hand.
• Push the speed control button in the direction of the Rabbit Symbol to increase the speed.
• Pull the speed control button in the direction of the Turtle Symbol to decrease the speed. - Release the self-propel lever (5) to close the self propel system.
EMPTY THE GRASS CATCHER
- Stop the machine.
- Remove the battery pack.
- Open the rear discharge door and hold it.
- Hold the grass catcher by its handle and unhook it from the door rod.
- Close the rear discharge door.
- Empty the grass catcher.
OPERATE ON SLOPES
WARNING
Do not mow on the slopes with incline more than 15°.
If you are not comfortable, do not mow on a slope.
WARNING
Please keep a low self-propelled speed when you mow on a slope.
- Do not go up and down on a slope, mow across the face of the slope. Be careful when you change the direction on a slope.
- Monitor the holes, ruts, rocks, and other hidden objects that can cause you to fall. Remove all obstacles such as rocks and tree limbs.
- Make sure that your footing is stable. If you are out of balance, release the bail switch immediately.
- Do not mow near drop-offs, ditches, or embankments.
OPERATION TIPS
- Do not try to override the operation of the start button or bail switch.
- Do not tilt the machine when you start it.
- Do not put hands or feet near or below the turning parts.
Keep the discharge chute clean. - Do not cut wet grass.
- Higher blade height is necessary for new or thick grass.
- Clean the bottom of the mower deck after each use.
Remove grass clippings, leaves, dirt, and other debris.
MAINTENANCE
WARNING
Remove the safety key and battery pack from the machine before maintenance.
WARNING
Keep the motor and battery pack free from grass, leaves or too much grease.
CAUTION
Use only approved replacement parts.
CAUTION
Do not let brake fluids, gasoline, petroleum-based materials touch the plastic parts. Chemicals can cause damage to the plastic, and make the plastic unserviceable.
CAUTION
Do not use strong solvents or detergents on the plastic housing or components.
GENERAL MAINTENANCE
- Before each use, examine the machine for damaged, missing, or loose parts such as screws, nuts, bolts and caps.
- Tighten correctly all the fasteners and caps.
- Clean the machine with a dry cloth. Do not use water.
REPLACE THE BLADE
WARNING
Use only approved replacement blades.
WARNING
Wear heavy gloves or wind cloth around the blade when you touch the blade.
- Stop the machine.
- Make sure that the blade fully stops.
- Remove the safety key and battery pack.
- Turn the machine to its side.
- Use a piece of wood (27) to prevent the movement of the blade.
- Remove the mounting screw (30) with a wrench (28) or socket.
- Remove the blade (29) and the fan (31).
- Put back the fan.
- Position a new blade with the cutting edges toward the ground.
- Tighten the mounting screw.
STORE THE MACHINE
- Clean the machine before storage.
- Make sure the motor is not hot when you store the machine.
- Make sure that the machine does not have loose or damaged parts. If it is necessary, do these steps/ instructions:
- Replace the damaged parts.
- Tighten the bolts.
- Speak to a person at an approved service center.
- Store the machine in a dry area.
- Make sure that children cannot come near the machine.
STAND THE MACHINE ON END
- Remove the grass catcher.
- Pull and turn the handle knobs (13) 90°.
- Fold down the handle.
- Turn the handle knobs 90° to lock the handle into position.
- Stand the machine on end and make sure that the brackets touch the floor.
Storage Switch
The machine has a storage switch (22) that prevents its startup in the storage position.
It is necessary to remove the safety key and the battery pack to prevent accidental startup or unapproved use.
The storage switch does not replace this function.
TROUBLESHOOTING
| Problem | Possible cause | Solution |
| The handle is not in position. | The bolts are not engaged correctly. | Adjust the height of the handle and make sure that the knobs and bolts are aligned correctly. |
| The machine does not start. | The battery capacity is low. | Charge the battery pack. |
| The bail switch is defective. | Replace the bail switch. | |
| The battery key is not put in. | Put in the battery key. | |
| The machine cuts grass un-evenly. | The lawn is rough. | Examine the mowing area. |
| The blade height is not set correctly. | Move the wheels to a higher position. | |
| The machine does not mulch correctly. | Wet grass clip-pings attach to the deck. | Wait until the grass dries be-fore mowing. |
| The mulch plug is missing. | Install the mulch plug. | |
| The machine is hard to push. | The grass is too tall, or the blade height is too low. | Increase the blade height. |
| The grass catch-er and the blade drags in thick grass. | Empty the grass clippings from the grass catch-er. | |
| There is a high vibration in the machine. | The blade is un-balanced and worn. | Replace the blade. |
| The motor shaft is bent. | 1. Stop the motor. 2. Remove the safety key and battery pack. 3. Disconnect the power source. 4. Inspect for damage. 5. Repair the machine be-fore you start it again. |
| Problem | Possible cause | Solution |
| The machine stops during mowing. | The blade height is too low. | Increase the blade height. |
| The battery pack is out of power. | Charge the battery pack. | |
| The grass clip- pings attach to the deck or the blade. | Remove the battery pack and check the deck. | |
| Operation temperature of the machine is too high. | Cool the machine. |
” If you cannot find the solution to these problems, go to the service center.
TECHNICAL DATA
| Voltage | 80 V |
| Battery model | 2902502/2902402 and other BAB series |
| Charger model | 2901402/GCH8040 and other CAB series |
| No load speed | 2800 RPM |
| Height adjustments | 1 3/8 – 3 3/4″ (3.5 – 9.5) cm |
| Self-propelled speed | 2.24-4.32 fps (0.7-1.35) m/s |
| Functions | 3-in-1 Mulch & Rear Bag & Side Discharge |
| Weight (without battery pack) | 62.8 lbs (28.5) kg |
| Double-insulated construction |  |
LIMITED WARRANTY

Greenworks hereby warranties this product, to the original purchaser with proof of purchase, for a period of four (4) years against defects in materials, parts or workmanship. Greenworks, at its own discretion will repair or replace any and all parts found to be defective, through normal use, free of charge to the customer.
This warranty is valid only for units which have been used for personal use that have not been hired or rented for industrial/commercial use, and that have been maintained in accordance with the instructions in the owners’ manual supplied with the product from new.
ITEMS NOT COVERED BY WARRANTY:
- Any part that has become inoperative due to misuse, commercial use, abuse, neglect, accident, improper maintenance, or alteration; or
- The unit, if it has not been operated and/or maintained in accordance with the owner’s manual; or
- Normal wear, except as noted below;
- Routine maintenance items such as lubricants, blade sharpening;
- Normal deterioration of the exterior finish due to use or exposure.
HELPLINE:
Warranty service is available by calling our toll-free helpline, at 1-855-345-3934.
TRANSPORTATION CHARGES:
Transportation charges for the movement of any power equipment unit or attachment are the responsibility of the purchaser. It is the purchaser’s responsibility to pay transportation charges for any part submitted for replacement under this warranty unless such return is requested in writing by Greenworks.
EXPLODED VIEW
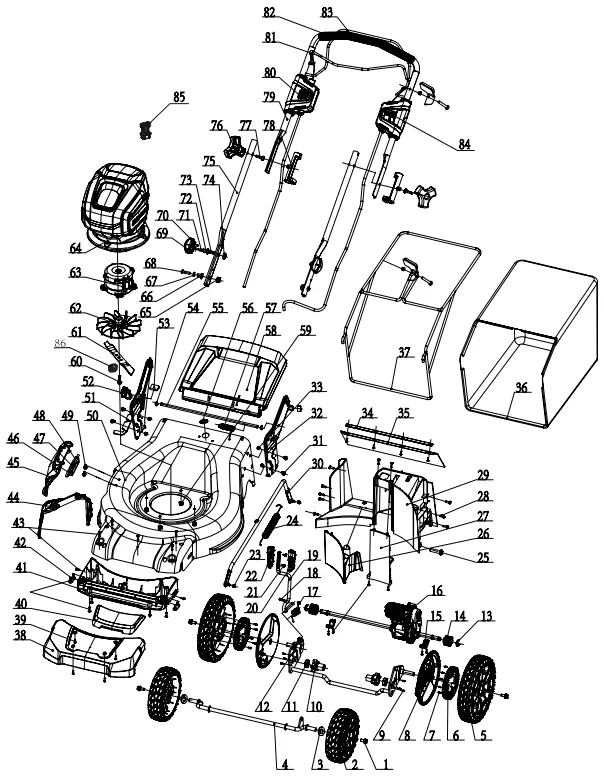
| No. | Part No. | Description | Qty. |
| 1 | 32202390A | Bolt | 2 |
| 2 | 341281179 | 8″ Wheel assembly | 2 |
| 3 | 332211179 | Washer | 2 |
| 4 | 311021179 | Front wheel axle | 1 |
| 5 | 341602376AB | 10″ Wheel assembly | 2 |
| 6 | 341041531 | Big gear | 2 |
| 7 | 322081163 | Screw | 30 |
| 8 | 341021531AD | Dust cover | 2 |
| 9 | 3220505D | Screw | 6 |
| 10 | 341221531 | Bearing holder | 2 |
| 11 | 321011531 | Bearing | 2 |
| 12 | 311083431 | Rear wheel axle | 1 |
| 13 | 32905302A | Retaining ring | 4 |
| No. | Part No. | Description | Qty. |
| 14 | 332071531 | Small gear | 2 |
| 15 | 332131531V | Press plate | 2 |
| 16 | 311033451 | Reducer | 1 |
| 17 | 33401222 | Torsinal spring | 1 |
| 18 | 3290135 | Cotter pin | 1 |
| 19 | 333111555 | Height adjustment bar assembly | 1 |
| 20 | 341211179 | Height adjustment handle housing (left) | 1 |
| 21 | 322041546 | Screw | 2 |
| 22 | 341221179 | Height adjustment handle housing (right) | 1 |
| 23 | 3220343 | Nut | 2 |
| 24 | 332011179 | Height adjustment tension spring | 1 |
| 25 | 322061505 | Screw | 1 |
| 26 | 341043431 | Mulching plug | 1 |
| 27 | 341051577 | Cover | 1 |
| 28 | 322021519 | Screw | 10 |
| 29 | 341033431 | Rear baffle | 1 |
| 30 | 332081531 | Height adjustment link bar | 1 |
| 31 | 3221637 | Bolt | 4 |
| 32 | 333041519D | Height adjustment bracket (left) | 1 |
| 33 | 32910131 | Nut | 4 |
| 34 | 332041179 | Press board (rear shield) | 1 |
| 35 | 342011179 | Rear shield | 1 |
| 36 | 349011179K | Gear box | 1 |
| 37 | 332031179 | Gear box bracket | 1 |
| 38 | 341061179C | Bumper | 1 |
| 39 | 3220504 | Screw | 4 |
| 40 | 341331179J | Bumper cover | 1 |
| 41 | 341021179 | Front panel | 1 |
| 42 | 33307470 | Axle press plate | 2 |
| 43 | 3220951 | Screw | 7 |
| 44 | 341241179C | Side discharge chute | 1 |
| 45 | 341231179C | Side discharge cover | 1 |
| 46 | 33308250A | Side discharge axle | 1 |
| 47 | 33331250 | Torsinal spring (Side discharge cover) | 1 |
| 48 | 33307250A | Side discharge bracket | 1 |
| 49 | 3220136 | Bolt | 2 |
| 50 | 333013431A | Deck | 1 |
| 51 | 333031577 | Right raised plate welding | 1 |
| No. | Part No. | Description | Qty. |
| 52 | 312011560 | Mechanical vertical switch assembly | 1 |
| 53 | 342031179 | Washer | 2 |
| 54 | 3290506 | Clip washer | 2 |
| 55 | 332021179 | Rear cover axle | 1 |
| 56 | 341061577 | Rubber plug | 1 |
| 57 | 332111179 | Torsinal spring (rear cover) | 1 |
| 58 | 341251179A | Rear cover | 1 |
| 59 | 32243563 | Nut | 4 |
| 60 | 341261179 | Bolt | 1 |
| 61 | 333041179 | Blade | 1 |
| 62 | 341191179B | Fan | 1 |
| 63 | 361011511W | Motor | 1 |
| 64 | C1100376-00 | Power head assembly | 1 |
| 65 | 32201467 | Nut | 2 |
| 66 | 332101179C | Block | 2 |
| 67 | 32233684 | Washer | 2 |
| 68 | 322031179 | Bolt | 2 |
| 69 | 341151546 | Knob | 2 |
| 70 | 332061179 | Spring pin | 2 |
| 71 | 332071179C | Limit column | 2 |
| 72 | 332081179C | Fixed base (limit pillar) | 2 |
| 73 | 332051179 | Compression spring | 2 |
| 74 | 341381179 | Washer | 2 |
| 75 | 333121179A | Lower handle | 2 |
| 76 | 341291179 | Knob | 2 |
| 77 | 322041179 | Bolt | 2 |
| 78 | 341031555 | Insulation sleeve | 2 |
| 79 | 332151531 | Upper handle | 1 |
| 80 | 311071179 | Switch box assembly | 1 |
| 81 | 333061179 | Upper lever | 1 |
| 82 | 342021179 | Sponge | 1 |
| 83 | 333012382A | Lower lever | 1 |
| 84 | 312021512 | Speed switch assembly | 1 |
| 85 | 311051479 | Key assembly | 1 |
Greenworks Tools
PO Box 1238
Mooresville, NC 28115


