![]()
Preface and Precautions
1.1 Preface
Thank you for purchasing the Elitech EMG series intelligent manifold gauge. Elitech digital manifold EMG series are not consumer products. Only qualified personnel trained in service and installation of A/C and/or refrigeration equipment shall use this product. Read and understand this user manual in its entirety before using your manifold to prevent injury or damage to you or your equipment.
1.2 Precautions
Descriptions![]() Incorrect operation may cause serious injury.
Incorrect operation may cause serious injury.![]() Incorrect operation may cause minor injury.
Incorrect operation may cause minor injury.![]() Incorrect operation may damage the device.
Incorrect operation may damage the device. Caution
![]() This product is not suitable for the maintenance of an ammonia (ammonia-containing) refrigerant system.
This product is not suitable for the maintenance of an ammonia (ammonia-containing) refrigerant system.![]() This product contains batteries. Do not place the product in a high-temperature environment or place it in a fire. Otherwise, it will explode.
This product contains batteries. Do not place the product in a high-temperature environment or place it in a fire. Otherwise, it will explode.![]() Do not use this product during thunderstorms to avoid being struck by lightning causing life danger and product damage.
Do not use this product during thunderstorms to avoid being struck by lightning causing life danger and product damage.![]() Strictly obey the safety cautions of the refrigeration system.
Strictly obey the safety cautions of the refrigeration system.![]() Please put on goggles and protective gloves while using the product. Please read the maintenance instruction of the system unit carefully before connecting the device to the system.
Please put on goggles and protective gloves while using the product. Please read the maintenance instruction of the system unit carefully before connecting the device to the system.![]() Please contact us in time if the product is damaged. Do not dismantle the product on your own to avoid further damage to the product that might cause battery fire or explosion.
Please contact us in time if the product is damaged. Do not dismantle the product on your own to avoid further damage to the product that might cause battery fire or explosion.![]() When using other power adapters, the output voltage must not exceed SV, otherwise, the instrument will be damaged.
When using other power adapters, the output voltage must not exceed SV, otherwise, the instrument will be damaged.![]() The magnet embedded at the back of the product is to position the folded hook. Do not try to attach the product to any metal surface to avoid the product from falling and damage.
The magnet embedded at the back of the product is to position the folded hook. Do not try to attach the product to any metal surface to avoid the product from falling and damage.
Environmental Protection
Please comply with local environmental protection policies. Refrigerants should not be directly discharged into the atmosphere and must be recycled with professional equipment. At the end of the product service life, please recycle it according to the local regulations. Do not dispose randomly to avoid environmental pollution.
Product Profile
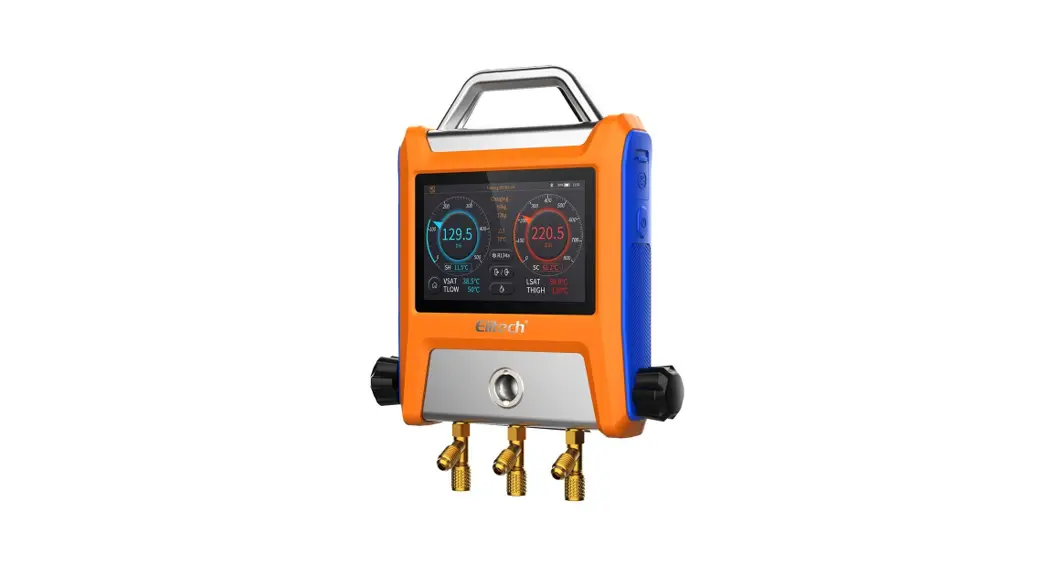
2.1 Products Introduction EMG series of intelligent manifold gauges integrates the functions such as pressure and temperature measurement, pressure holding measurement, vacuum measurement, refrigerant weight measurement, and data logging. It is suitable for daily inspection and maintenance of the HVAC/R system.
- Simple & easy operation with 5″ smart touch screen, clear data display.
- Support App Operation by Bluetooth, data view, and analysis in real-time.
- Support USB to read and export data.
- Auto heat pump mode without changing the refrigerant hoses.
- Detect the vacuum leakage, monitoring the vacuum value precisely.
![]() The refrigerant weight measurement function work with Elitech refrigerant electronic scales. Please purchase the scale separately if necessary.
The refrigerant weight measurement function work with Elitech refrigerant electronic scales. Please purchase the scale separately if necessary.
2.2 Product Overview
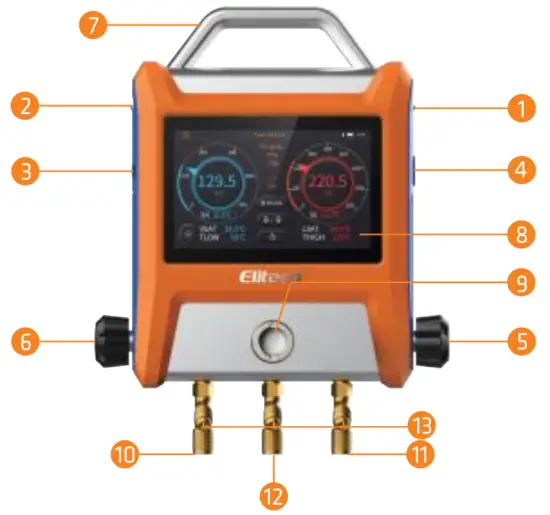
EMG-20V Product Details
- High-temperature clamp sensor interface ( with sealed plug )
- Low-temperature clamp sensor interface ( with sealed plug )
- Type-C power interface (with sealing plug)
- Power button
- High-pressure control valve
- Low-Pressure Control Valve
- Metal handles
- 5 inches IPS capacitive color touch screen
- Sight window
- Low-pressure refrigerant pipe interface ( 1/4 SAE port)
- High-pressure refrigerant pipe interface (1/4 SAE port)
- Refrigerant charging interface (1/4 SAE port)
- Refrigerant pipe bracket
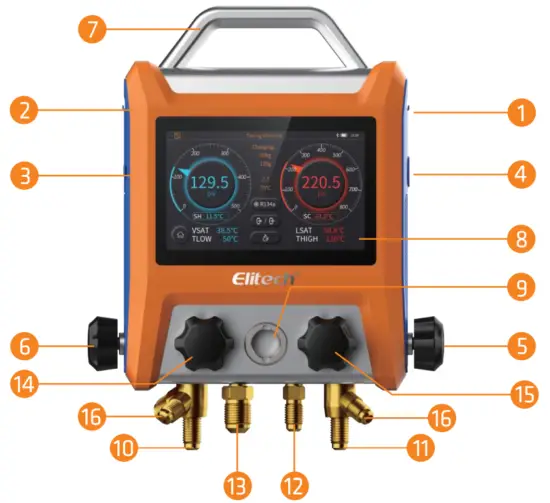
EMG-40V Product Details
- High-temperature clamp sensor interface ( with sealed plug )
- Low-temperature clamp sensor interface ( with sealed plug )
- Type-C power interface (with sealing plug)
- Power button
- High-pressure control valve
- Low-Pressure Control Valve
- Metal handles
- 5 inches IPS capacitive color touch screen
- Sight window
- Low-pressure refrigerant pipe interface ( 1/4 SAE port)
- High-pressure refrigerant pipe interface ( 1/4 SAE port)
- Refrigerant charging interface (1/4 SAE port)
- Vacuum refrigerant pipe interface (3/8 SAE port)
- Vacuum control valve
- Charging control valve
- Refrigerant pipe bracket

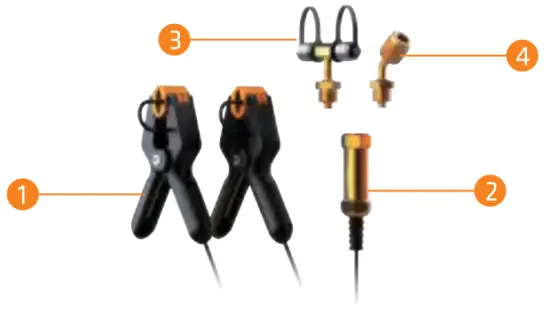
Accessories
- Temperature clamps
- Vacuum transmitter
- Transmitter T-joints
- Transmitter bending joint
Specifications
3.1 Manifold
| Pressure measurement range Accuracy | -14.5-800psi/-1.0-55.2bar/-0.1-5.5MPa/-1.0-56.2kg/cm2 O. SWOPS |
| Resolution | 0.5psi/0.03bar/0.003MPa/0.03kg/cm? |
| Sampling frequency | O.Ss |
| Pressure unit | psi. kg/cm2. cm. inHg. bar. kPa. MPa |
| Overload | 1000psi/69bar/6.8MPa/70kg/cm? |
| Pressure interface | 1/4SAE*3 3/8 SAE*1(EMG-40V) |
| Sensor interface | PS/2*2(the left interface is temperature and vacuum probe multiplexing) |
| USB Interface | Type-C*1(for data export and charging) |
| Charging parameter | SV2A |
| Battery capacity | 5000mAh |
| Recording time | 800h(Interval time 30s) |
| Screen parameter | SIPS capacitive touch screen |
| BLE distance | 30m |
| Dimensions | 254’215’46mm (EMG-20V) 254’215•71mm (EMG-40V) |
| Weight | 3.5Ib /1.59kg ( EMG-20V) 3.8Ib /1.73kg (EMG-40V) |
| Working temperature | -14-122°F/-10-50°C |
| Storage temperature | -4-140°F/-20-601 |
Data is exported via a USB cable connect ted to a computer.
3.2 Vacuum
| Vacuum measurement range | 1-19000 microns | |
| Accuracy | 1-10000 microns: ±10% of reading / ±10 microns 10000-19000 microns: ±20% of reading | |
| Resolution | 0-400 1 micron 400-3000 10 microns 3000-10000 100 microns 10000-19000 250 microns | |
| Vacuum unit | micron inHg. Torr. psia ,mbar,mTorr,pa, kPa | |
| interface | 1/4SAE port | |
3.3 Temperature Clamp
| Temperature Measurement Range | -40302°F/-40-150°C |
| Accuracy | ±0.9*F/±0.5°C |
| Resolution | 0.2°F/0.1°C |
| Temperature unit | °F/°C/K |
| Interface | PS/2 |
Quick Start Guide
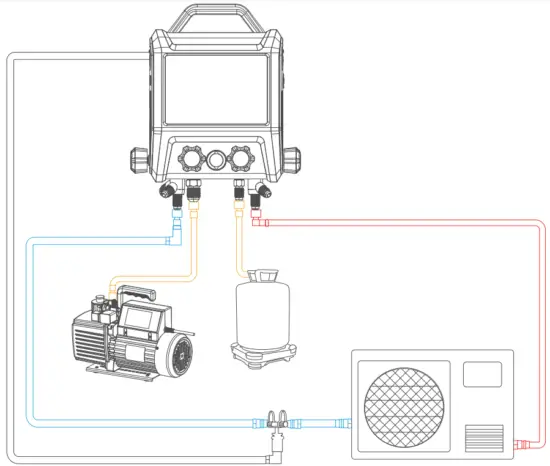
4.1 Pressure and Temperature Measurement (for charging, recovery, maintenance monitoring, etc.)
- Press the power button to turn it on and enter the main menu.
- Connect the high and low-pressure temperature clamp on both sides of the mainframe and clamp the temperature sensor to measure the temperature of the corresponding system.
- Connect the high pressure and low-pressure interface of the system to the corresponding interface of the instrument.
- Click on the
 to enter the pressure-temperature measuring interface.
 - Select the refrigerant by
 .
. - Choose the corresponding working mode according to the current system, usually the refrigeration mode.
- After the setup is done, you may check the accurate status of the system through the interface.
 Only selected refrigerant scale models can support the manifold, please check with the seller for details.
42 Pressure Holding Measurement
- Fill the system with the appropriate amount of nitrogen.
- Close the High-Pressure Side Valves.
- Connect the measuring system to the high-pressure side of the instrument.
- Click the to enter the pressure-holding test.
- Click the
 and set the desired parameters.
 - Press the
 to enter the pressure-holding test.
4.3 Vacuum Measurement
- Connect vacuum transmitters to the system and connect the communication cable to the manifold.
- Open the low-pressure side and high-pressure side valves. (applicable to EMG-20, EMG-40 series). Open the low-pressure side, high-pressure side valve, and vacuum valve, and close the charging valve. (applicable to EMG-40 series).
- Click the to then enter the vacuum interface and set the desired value and working time.
- Turn on the vacuum pump and pump to the set value.
- Click the to set the alarm.
- Close all valves.
- Click the to enter the leak test.
Interface Details
5.1 Main Interface
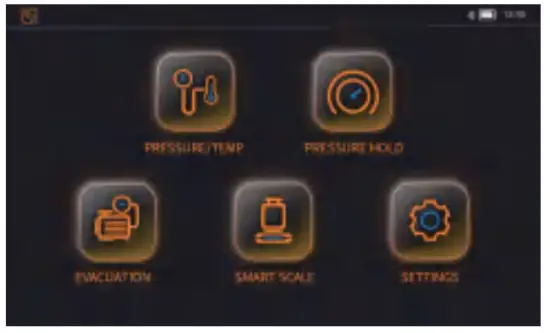
This is the main interface display once the device is turned on. There are “Pressure and Temperature Measurement”, “Pressure Holding Measurement”, “Evacuation Measurement”, “Electronic Refrigerant Scale” and “Setting” for selection. Click on the icon to enter each of the corresponding functions. The status bar on top of the page displayed the time, power/ battery indicator, wireless connection, and recording status.
Icon instructions
 Bluetooth has been turned on Bluetooth has been turned on |  The record function has been turned on The record function has been turned on |
| Bluetooth has been turned off | The record function has been turned off |
5.2 Setting Interface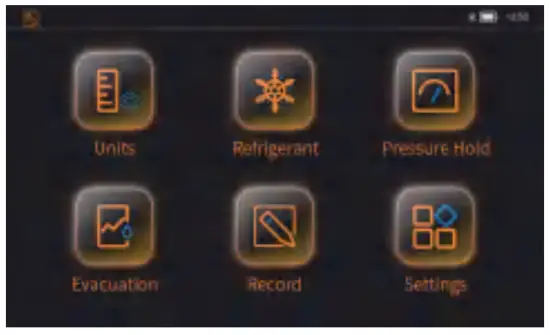
The setting interface includes “Unit Settings”, “Refrigerant Selection”, “Pressure Holding Setting”, “Evacuation Setting”, “Record-Setting”, “System Setting”. Click the icon to enter the corresponding setting page.
5.2.1 Unit Settings
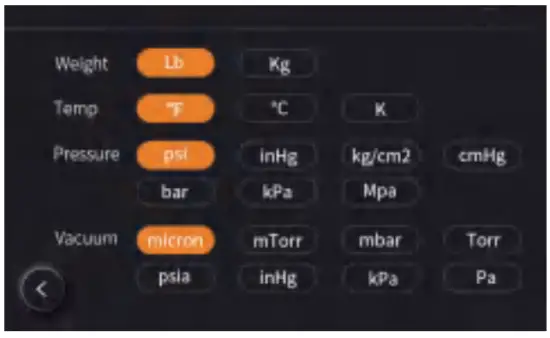
The unit of weight, temperature, pressure, and vacuum can be set. Click ![]() to go back to the previous page. The parameters are saved automatically.
to go back to the previous page. The parameters are saved automatically.
5.2.2 Refrigerant Selection
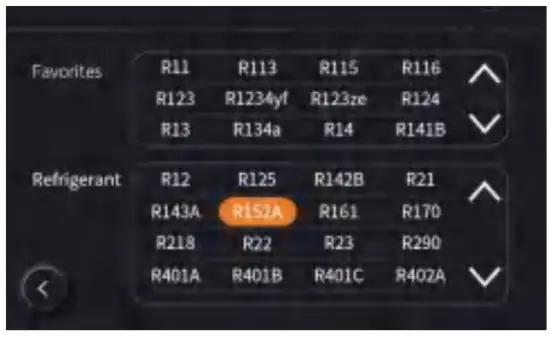 Users may select the desired refrigerant from the refrigerant selection box. The selected refrigerant will be added to Favourites automatically. A maximum of 20 refrigerants can be added.
![]() If the number exceeds 20, the earliest refrigerant will be replaced with the latest refrigerant that has been selected.
If the number exceeds 20, the earliest refrigerant will be replaced with the latest refrigerant that has been selected.
5.2.3 Pressure Holding Settings
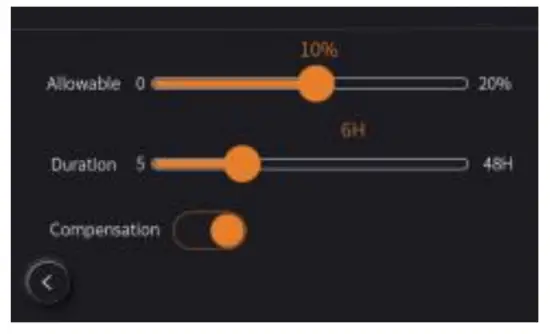 Pressure decay ratio, pressure holding time, and temperature compensation can be set on this page. Click
 ![]() to go back to the previous page. The parameters are saved automatically.
to go back to the previous page. The parameters are saved automatically.
5.2.4 Evacuation Settings
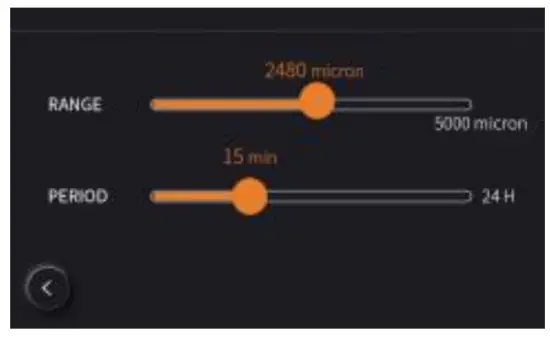 The alarm and duration for refrigerant leaks can be set. Click
 ![]() to go back to the previous page. The parameters are saved automatically.
to go back to the previous page. The parameters are saved automatically.
5.2.5 Record Settings
 Users may enable/disable recording, recording intervals, and clear record history on this page. Press the “Format” button to clear the recorded history.
![]() The recording will stop automatically when it reaches the maximum capacity. Please export the data in time and clear the recorded history.
The recording will stop automatically when it reaches the maximum capacity. Please export the data in time and clear the recorded history.
5.2.6 System Settings
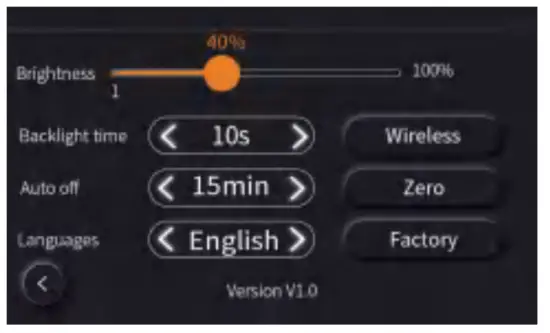 Users may set the backlight brightness, backlight time, system auto-shutoff, and system language on this page. Press
 ![]() to enter the next page to enable/disable Bluetooth. Press
to enter the next page to enable/disable Bluetooth. Press ![]() to zero of the high and low pressure. Press a to factory reset.
to zero of the high and low pressure. Press a to factory reset.![]() Please place the device in the atmospheric environment while calibrating.
Please place the device in the atmospheric environment while calibrating.
5.3 Pressure and Temperature Measurement 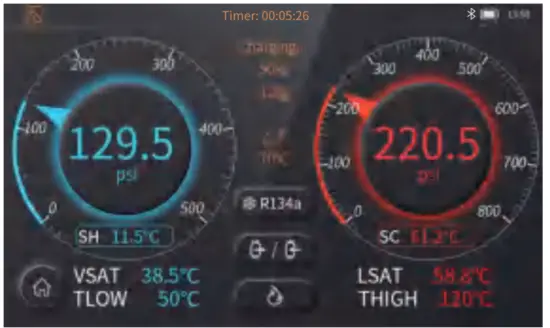
Icon Instruction
| Icon display status | Instruction |
 Selected refrigerant Selected refrigerant |  Refrigerant scale setting Refrigerant scale setting |
 Refrigeration mode Refrigeration mode |  Heat pump mode Heat pump mode |
 Automatic mode Automatic mode |
The timer on the status bar on top starts timing automatically once the user enters this page. The purpose is to record the time user spend on this page.
Choose the right refrigerant first to avoid affecting the temperature calculation. Click to select the desired refrigerant. The selected refrigerant will be shown on the icon.
The pressure and temperature measurement interface to measure and display the pressure for the low-pressure side, the corresponding evaporation saturation temperature, low-pressure pipeline temperature and superheat as well as the pressure for the high-pressure side, the corresponding condensation saturation temperature, high-pressure pipeline temperature and supercooling. Other than these, the different temperatures of the low-pressure pipe and high-pressure pipe, and charging/recovery weight value can be measured and displayed as well.
There are three measurement modes on the page: refrigeration mode, heat pump mode, and automatic mode. Refrigeration mode: This is the regular mode.
Heat pump model: VSAT parameters and LSAT parameters will be switching display positions.
Automatic mode: The display position of the corresponding parameters will be switched automatically when the pressure of the low-pressure side is 1 bar higher than the high-pressure side.
Switching Between Dial Mode and Curve Mode
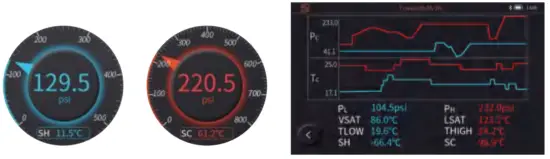
Simply click on the middle of the dial meter to switch to curve mode. Click ![]() to switch back to dial mode.
to switch back to dial mode.
Charging and Recovery Function Shows the current status and weight, press in to enter the charging and recovery settings page. After the setting is done, click
![]() to save the setting and return to the pressure-temperature measurement page. There is no weight display if the current device is not connected to the refrigerant scale.
to save the setting and return to the pressure-temperature measurement page. There is no weight display if the current device is not connected to the refrigerant scale.
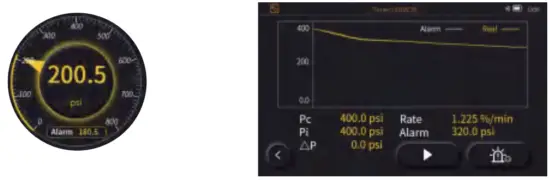
5.4 Pressure Holding Measurement
 The timer on the status bar on top starts timing automatically once the user enters this page. The purpose is to record the time user spend on this page.
 indicate the temperature compensation has been enabled or disabled. It can be set in the pressure-holding settings interface.Temperature compensation enabled: The device will monitor the current ambient temperature in real-time to reduce the pressure variation error caused by the change in the ambient temperature.
- Temperature compensation disabled: The device calculate based on the measured pressure.
- Click to set decay ratio and pressure-holding time and choose if to enable or disable the temperature compensation based on the actual situation.
- Click to start the pressure-holding test. The countdown timer starts to elapse according to the duration that has been set. During the process, the device calculates the pressure variants and the deflation rate automatically based on the current and initial value. The test failed if the current value is less than the alarm value; the test passed if the current value is greater than the alarm value and exceeds the pressure-holding duration.
 The timer on the status bar on top starts timing automatically once the user enters this page. The purpose is to record the time user spend on this page.
Switching Between Dial Mode and Curve Mode
Simply click on the middle of the dial meter to switch to curve mode. Click![]() to switch back to dial mode.
to switch back to dial mode.
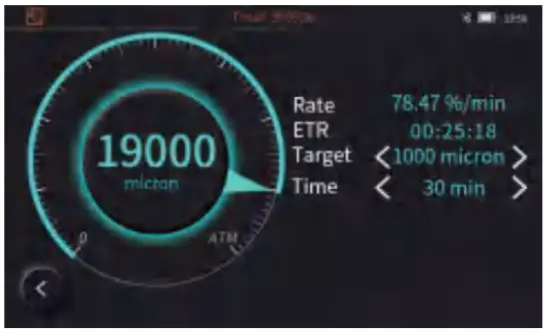
5.5 Vacuum Measurement
 The timer on the status bar on top starts timing automatically once the user enters this page. The purpose is to record the time user spend on this page. The “Start” and “Alarm Setting” button is not displayed yet.
- Click ≺ or ≻ to select the preset vacuum target value. The device calculates the remaining time based on the targeted value and rate.The remaining time rest is for reference only.
- Working time: It is to set the current vacuum duration. The alarm goes off if the duration has exceeded without achieving the targeted value.
- If the duration is not exceeded and the targeted value is reached, it prompts that the leak test can be performed.
- The “Starts” and “Alarm Settings” are displayed now.
- Clickto enters the alarm setting interface
- Click to enter the leak test based on the alarm set value. The parameters displayed in the vacuum interface will be switched to speed, test duration, and alarm value. During the leak test duration, if the leakage is greater than the set alarm value, the leak warning will be prompted. Otherwise, the test is passed.
 The timer on the status bar on top starts timing automatically once the user enters this page. The purpose is to record the time user spend on this page. The “Start” and “Alarm Setting” button is not displayed yet.
Switching Between Dial Mode and Curve Mode
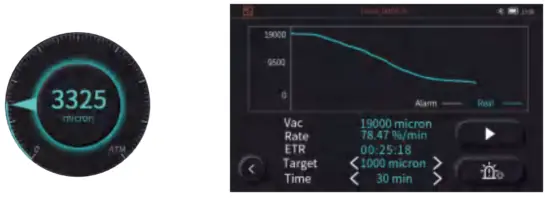
Simply click on the middle of the dial meter to switch to curve mode. Click ![]() to switch back to dial mode.
to switch back to dial mode.
- This function has to work with the vacuum transmitter. Please plug the transmitter into the socket at the left of the device.
- The timer on the status bar will be reset if the Working Time was re-set.
5.6 Refrigerant Electronic Scale
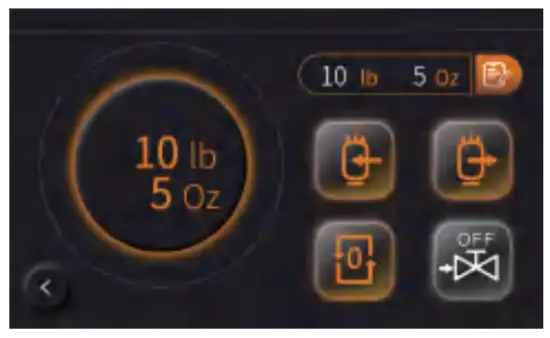
- The timer on the status bar on top starts timing automatically once the user enters this page. The purpose is to record the time user spend on this page. This function works only if the device is connected to the refrigerant scale. It is to control and set up the scale.
 Reset button, to reset the current weight.
 Set to Charging mode
 Set to Recovery Mode
 To manually control the solenoid valve to be opened or closed. The OFF/ON button on the icon indicates the current status of the solenoid valve. This function is only available for the scale that includes a solenoid valve.
- The solenoid valve automatically shuts off when the charging/recovery amount reaches the set target value.
 Displays the last set charging or recovery value.
 Reset button, to reset the current weight.
Charging and recovery settings
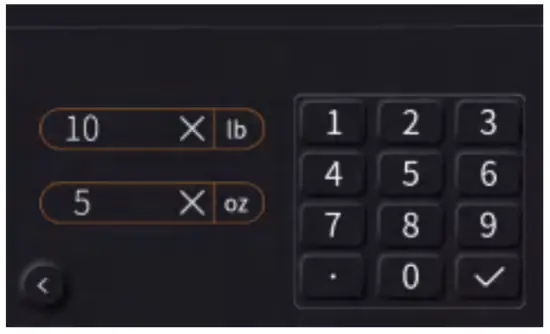
Press  to enter the charging/recovery setting interface
The 2 groups of units: lbs and oz, kg and g.
Choose the units and click to enter the weight, click ![]() to save. Click
to save. Click![]() to delete and reset the value. Press the Return key, and the charging/ recovery setting is completed.
to delete and reset the value. Press the Return key, and the charging/ recovery setting is completed.
![]() Min weight: 1.4 oz.
Min weight: 1.4 oz.
Max weight: the maximum measured weight of the current refrigerant scale.
5.7 APP QR Code

![]() Please check the APP operation instructions in Help.
Please check the APP operation instructions in Help.
5.8 Parameters
| Parameter | Description |
| SH | Superheating |
| VSAT | Vapor saturation temperature |
| TLOW | The temperature of the low side |
| SC | Subcooling |
| LSAT | Liquid saturation temperature |
| THIGH | The temperature of the high side |
| △ T | SLOW-THIGH |
| Factory | Factory reset |
| Parameter | Description |
| TC ON | Temp compensation enable |
| TC OFF | Temp compensation disable |
| TC | Temp compensation |
| ENTER | Estimated time remaining |
| Pc | Current pressure |
| Pi | Initial pressure |
| △ P | Pc-Pi |
Help
6.1 Troubleshooting
| Problem | Possible causes/solutions |
| Failed to turn on the device | Connect the device to the charger and try to turn it on after 5 minutes. |
| The touch screen doesn’t work | Make sure the environment temperature is within the working temperature range (-14-122°F/-10-5C°C). |
| The measured temperature shows “– | Check if the temperature clamp is fully connected or if the measuring temperature is out of the measurement range. |
| Pressure zone display “E02” | Pressure uncalibrated |
| The pressure value shows a large error | Please place the device in the atmospheric environment to calibrate zero. |
| Vacuum display “—-“ | The system has a large leak, or the vacuum transmitter data is abnormal. |
| No response after clicking the interface button | System crashes. Long press the Power button for 7s to restart the system. |
6.2 Operation and Maintenance
- Storage: It is recommended to store the fully charged device or disconnect the battery if not using it frequently.
- Cleaning: Please wipe the device with a damp cloth, Do not wash it directly.Note: Do not use any corrosive solvents!
- Keep the connectors clean and remove the surface dirt regularly.
- Check the device for any leaks regularly. It is recommended to check once a year.
6.3 Accessories
| Product and Accessories | Quantity |
| EMG-20V/EMG-40V intelligent manifold gauge | 1 |
| Vacuum transmitter (T-joint) | 1 |
| Temperature clamp | 2 |
| Bent joint | 1 |
| Refrigerant Hoses | 3(EMG-20V) 4(EMG-40V) |
| Power adapters | 1 |
| USB-C Cable | 1 |
| Instructions | 1 |
![]()


