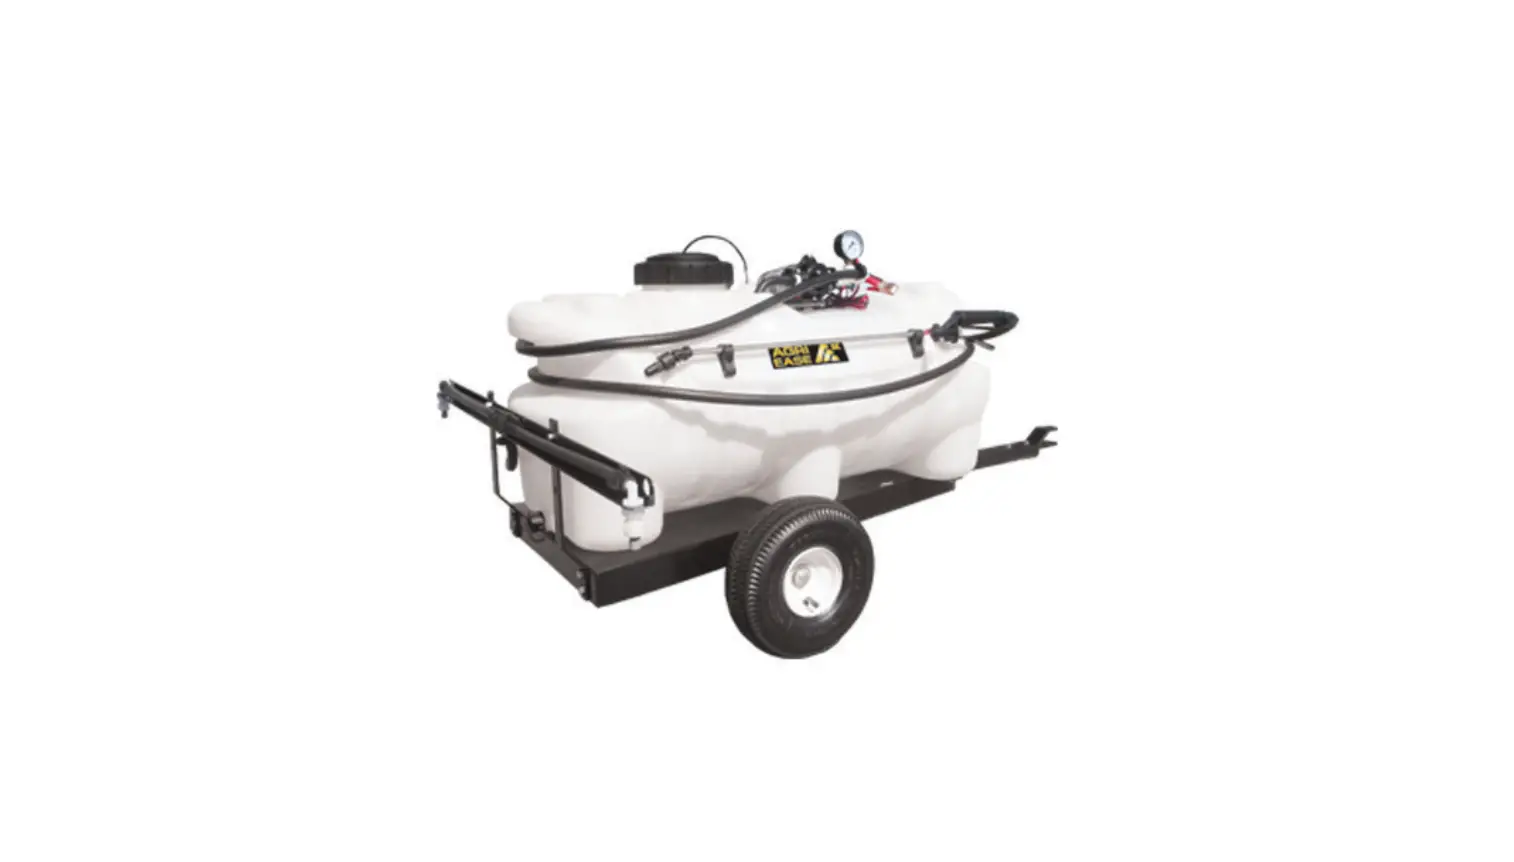
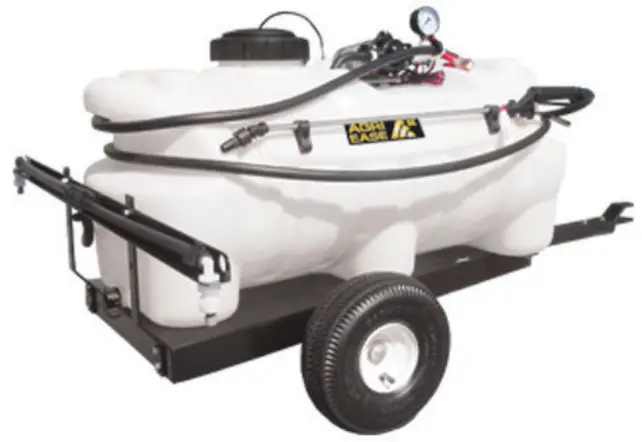
Braber Equipment 90.800.150 15-Gallon Trailer Sprayer
For Models:
- 90.800.150
- 90.800.250
INTRODUCTION
Your sprayer has been manufactured to provide years of dependable and efficient use. Proper operation and maintenance will ensure long satisfactory service. Study this manual carefully to become familiar with the operation and maintenance instructions. Keep your manual in a safe, convenient place for future reference. Always mention the model and part number in any correspondence. To ensure correct parts service, be sure to use part number and description when ordering.
ASSEMBLY
- Remove the sprayer from the carton and place on flat surface.
- Slide wheels onto axles. Place one axle push-nut over the end of the axle and hit lightly with a hammer until the push-nut is secure. Repeat with other side of axle.
- Attach the tongue to the unit with bolts previously installed. Unscrew the 5/16” nuts and insert tongue onto bolts, replace the nuts and tighten securely. Bolt the upper and lower hitch to the tongue with (2) 5/16” bolts and nuts provided. The hitch can be reversed to raise or lower the tongue to better fit your lawn tractor height.
- Attach the boom mount uprights to the back of the frame with (4) 5/16” bolts and nuts provided. Attach the pre-assembled boom to the boom uprights with the (2) 5/16” bolts and nuts provided. Tighten securely. Thread the hose fitting from the boom onto the garden hose valve located on the pump manifold.
- Screw the gun clips on the side of the tank with the (2) 10-24 screws provided. Place the hose clamp over the spray gun hose and push the hose onto the barbed fitting on the pump manifold. Using pliers, squeeze the clamp until secure.
- Slide the “T” end of the cap tether through the hole located on the top of the tank and through the hole located in the top of the cap. Place the tank drain cap tether over the threads of the tank drain opening and tighten the cap to the tank.
- Plug the wiring harness to the pump.
OPERATION
Operating power is obtained from a 12-Volt direct source. Be sure to connect the read to the positive (+) source and attach the black to the negative (-) source.
IMPORTANT: Before spraying chemicals, fill the tank half full of plain water to allow familiarization with the
Sprayer Maintenance
This sprayer is a carefully designed and built machine that should provide many years of reliable service if properly cared for. The main rule in caring for any sprayer is: KEEP IT CLEAN. Neglect costs dollars in repairs wasted spray material and premature replacement of the sprayer.
Cleaning & Storage
Most spray materials are highly corrosive. The most important aspect of long dependable service from the sprayer is a thorough cleaning immediately following each use. In addition, the residue of one type of chemical could cause an undesirable effect when a different chemical is used for a different purpose. The most effective cleaning method is to pump several rinses of clean water through the tank, pump, hoses, boom spray, etc.
A neutralizing agent such as a solution of Nutra-Sol, a detergent or household ammonia as recommended by the chemical manufacturer can assist in the removal of a persistent chemical. When the system is thoroughly cleaned drain the tank, suction line, pump, hoses, etc.
The following steps should be followed for the maintenance and storage of your sprayer
- Wash and flush out the sprayer after completion of each phase of your program. Flush out the sprayer when changing chemicals if there is a possibility of the chemicals being incompatible. The use of a detergent is advisable if the chemical manufacturer does not make specific cleaning recommendations. The flush system completely, including nozzles. Never use metal objects to open clogged nozzles.
- Clean the sprayer thoroughly before storing at the end of the spraying season. Permanent type anti-freeze added to the final rinse will leave rust inhibiting film in parts of the sprayer.
PARTS LIST
15/25 GALLON SPOT SPRAYER PARTS LIST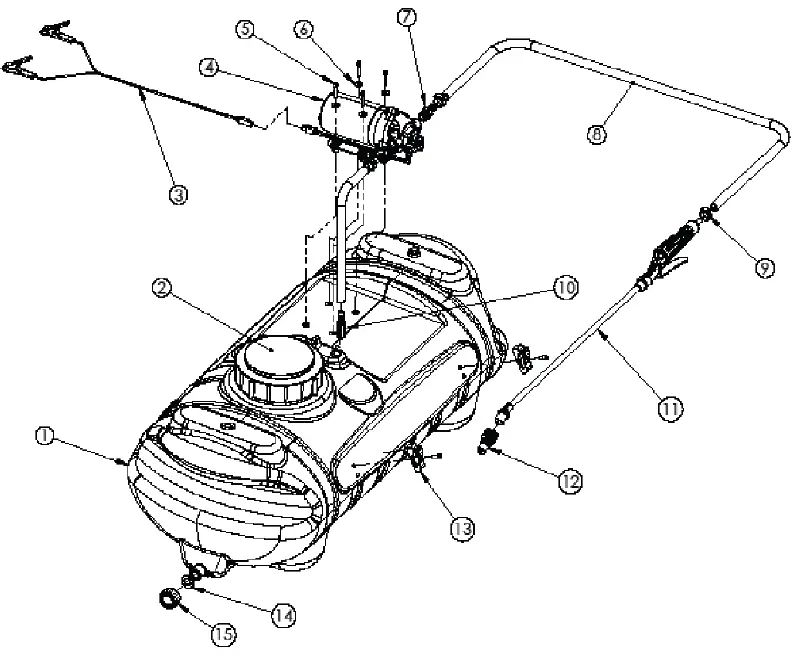
| REF NO. | PART NO. | DESCRIPTION | QTY |
| 1 | 33-103231 | Tank, 15 Gallon | 1 |
| 33-103230 | Tank, 25 Gallon | 1 | |
| 2 | TL-6B | Lid, Tank | 1 |
| 3 | 33-103234 | Harness, Wire, SS | 1 |
| 4 | 33-103208 | Pump, Delavan, 1 GPM, 15 Gallon | 1 |
| 33-103209 | Pump, Delavan, 2 GPM, 25 Gallon | 1 | |
| 5 | 33-103126 | Screw, Machine, 10-24×5/8, 15 Gal | 4 |
| 33-103127 | Screw, Machine, 10-24×1”, 1.8 & 2.0 GPM Pumps | 4 | |
| 6 | 33-103131 | Washer #10, 1.8 & 2.0 GPM Pumps Only | 4 |
| 7 | A38 | Fitting, 3/8” MNPTx3/8”HB 1.8 & 2.0 GPM Pumps | 2 |
| REF NO. | PART NO. | DESCRIPTION | QTY |
| 8 | 3204-1407 | Hose, Rubber, 3/8” | 15 ft |
| 9 | SHC-F | Clamp, Hose | 3 |
| 10 | 33-103121 | Strainer, Inlet | 1 |
| 11 | SG-4507F | Wand, w/Filter | 1 |
| 12 | SG-45ASSY-18 | Nozzle, Assembly | 1 |
| 13 | GC-100-KIT | Clip, Gun (pair) | 1 |
| 14 | W406-V | Washer, Garden Hose | 1 |
| 15 | 3N34 | Cap, Garden Hose | 1 |
| 3204-1407 | Hose, Rubber, 3/8” Inlet to Pump | 18” | |
| SS-MANUAL-MM | Manual (not shown) | 1 |
FRAME, LAWN TRAILER KIT (SSFK-1525)
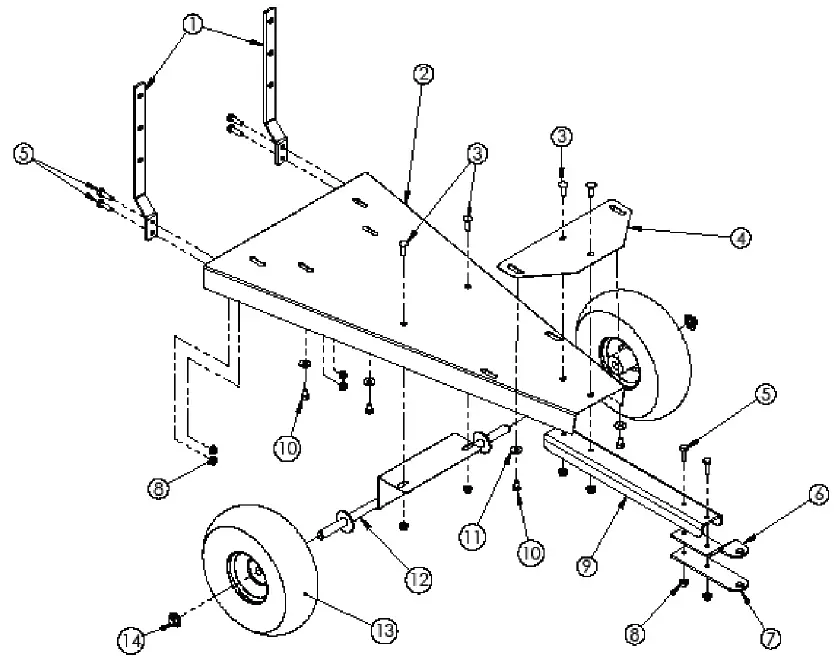
| REF NO. | PART NO. | DESCRIPTION | QTY |
| 1 | 31-100119 | Boom Mount | 2 |
| 2 | 31-100116 | Frame | 1 |
| 3 | 33-100112 | Carriage Bolt, 5/16-18 x 1” | 4 |
| 4 | 31-100115 | Front Tank Mount (25 Gallon Tank) | 1 |
| 5 | 33-100116 | Bolt, 5/16-18 x 1” | 6 |
| 6 | 31-100121 | Top Hitch Plate | 1 |
| 7 | 31-100138 | Bottom Hitch Plate | 1 |
| 8 | 33-100113 | Nut, Serrated, 5/16” | 10 |
| 9 | 31-100114 | Tongue, 15 & 25 Gallon Sprayer | 1 |
| 10 | 33-100114 | Bolt, 5/16-18 x 1” | 4 |
| 11 | 33-100115 | Washer, 5/16 | 4 |
| 12 | 32-100119 | Axle, 15 & 25 Gallon Sprayer | 1 |
| 13 | TWA410/350-4 | Tire Assembly, 10” | 2 |
| 14 | PW-625019-50H | Push Nut | 2 |
7 FOOT BOOM ASSEMBLY (34-140052)
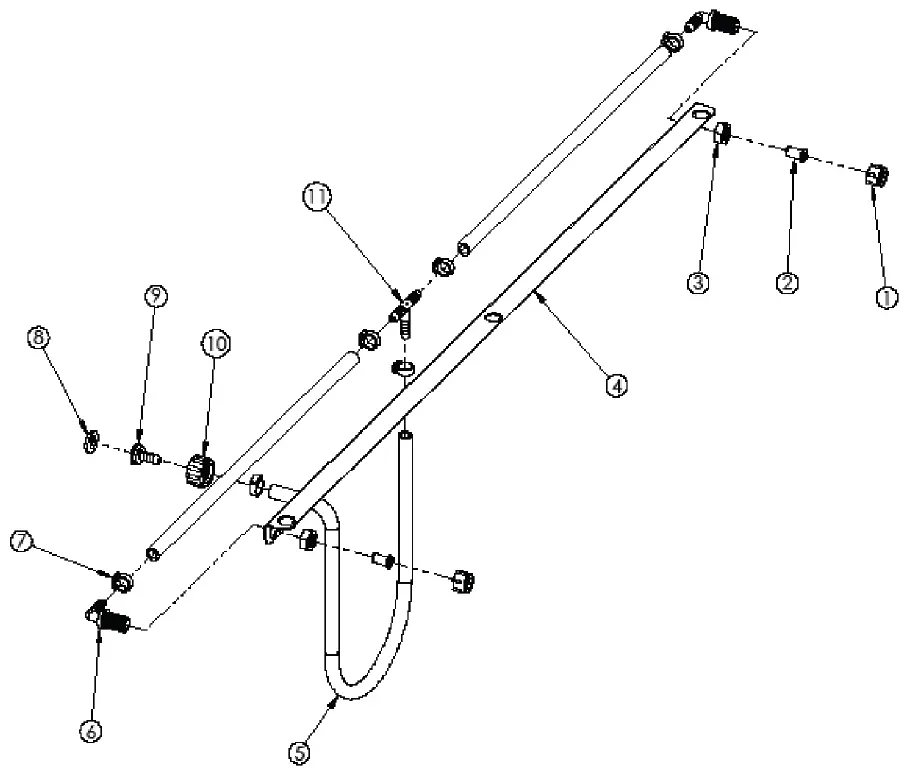
| REF NO. | PART NO. | DESCRIPTION | QTY |
| 1 | 8027 | Nozzle Nut | 2 |
| 2 | NS-50 | Nozzle Strainer, 50 Mesh | 2 |
| 3 | B12 | Nozzle Body Retaining Nut | 2 |
| 4 | 31-100120 | Boom, 7ft (2m) | 1 |
| 5 | 3204-1407 | Center Hose, Rubber, 3/8” x 38” Long | 1 |
| Nozzle Hose, Rubber, 3/8” x 19” Long | 2 | ||
| 6 | NTL38-C | Nozzle Body, Elbow, 3/8 HB | 2 |
| 7 | SHC-F | Snapper Hose Clamp “F” | 6 |
| 8 | W406V | Garden Hose Washer | 1 |
| 9 | C38 | Flat Seat 3/8” Hose Barb | 1 |
| 10 | B34 | Knurled Garden Hose Swivel Nut | 1 |
| 11 | T38 | Tee, 3/8” HB | 1 |
REGULATOR ASSY, SPRAYER, MINUS OUTLET (34-140158) BE-90.800.xxx
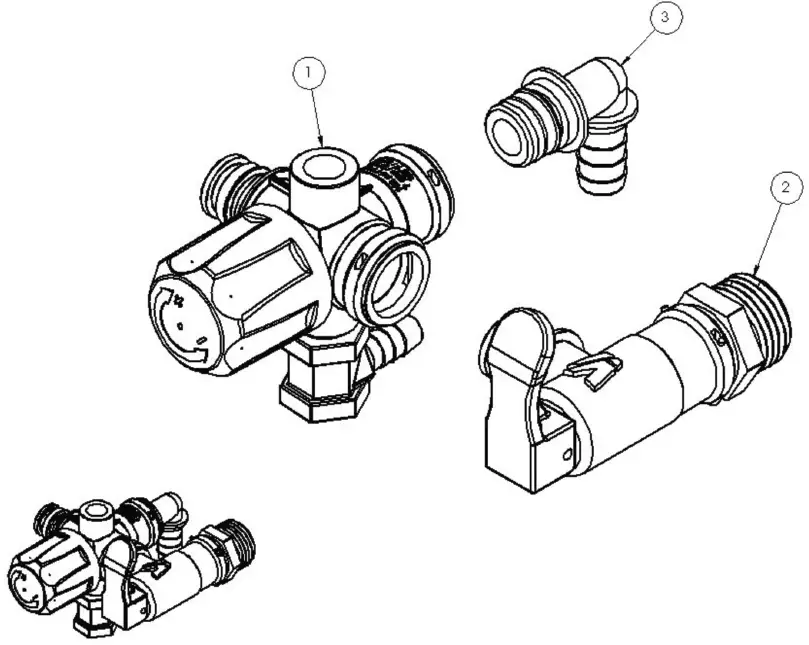
| REF NO. | PART NO. | DESCRIPTION | QTY |
| 1 | 34-140118 | Regulator, Assy, Sprayer | 1 |
| 2 | 34-140161 | Valve, ON/OFF, Male QA x Female QA Ports | 1 |
| 3 | EF-QC-EL12 | Fitting, Elbow, QA x 1/2” HB, Black | 1 |
15 & 25 GALLON LAWN SPRAYER
Approximate application rate with (2) DF3.0 Nozzles and 50 mesh filter.
| GALLONS PER ACRE (40” SPACING) (US GALLONS) | ||||||||
| PSI | FLOW (GPM) | 3 MPH | 4 MPH | 5 MPH | 6 MPH | 7 MPH | 8 MPH | 9 MPH |
| 15 | 0.74 | 36.4 | 27.2 | 21.8 | 18.2 | 15.6 | 13.6 | 12.2 |
| 20 | 0.84 | 42 | 31.4 | 25.4 | 21 | 18 | 15.8 | 14 |
| 30 | 0.94 | 47 | 35.2 | 28.2 | 23.4 | 20.2 | 17.6 | 15.6 |
| 40 | 1.04 | 51.4 | 38.6 | 25.8 | 25.8 | 22 | 19.2 | 17.2 |
| 60 | 1.12 | 55.6 | 41.6 | 27.8 | 27.8 | 23.8 | 20.8 | 18.6 |


