V1.1 KIT Electric Atomrc Fixed Wing Dolphin
Product Information
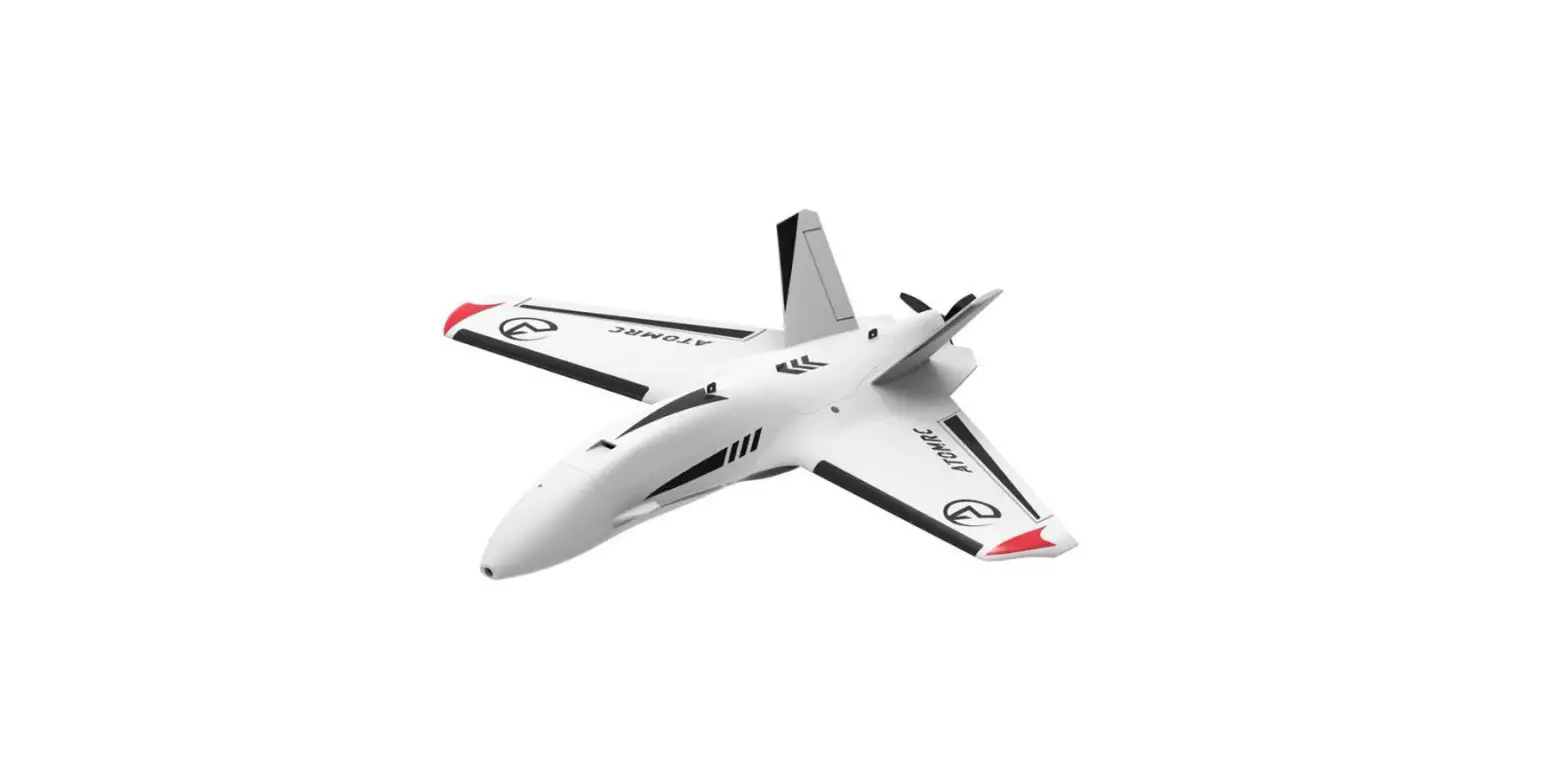
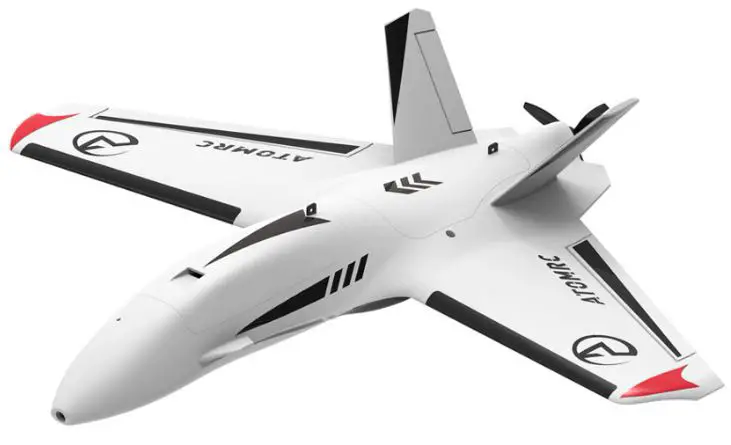
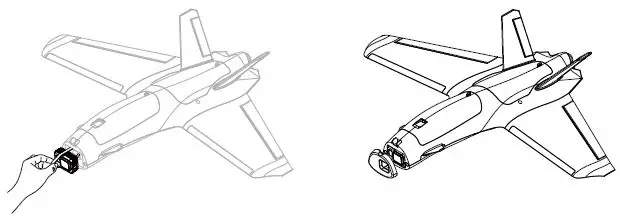
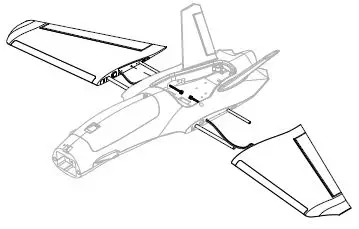
The Dolphin is a sweep forward fly wing, designed to be stable both at high and low speeds. It features a large fuselage that provides ample space for electronic installation. The wings are detachable, making them easy to transport, and the V-tail design enhances stability while cruising. The product comes in four versions: Basic Pack, KIT, PNP, and RTH FPV.
Product Specifications
- Wingspan: 845mm
- Length: 710mm
- Wing Area: 15.24d
- Material: EPP
- Recommended Motor: 2207/2306
- Recommended ESC: BLS 30A 2~4S
- Recommended Propeller: 6~7inch
- Servo: 9g Servo*2PCS
- Recommended Battery: 21700 4S1P300g
Product Kit Contents
- FA: Front Hatch Cover
- FB: Gopro Cover
- FCL: Lower Fuselage
- FD: Front Hatch
- FEL: Left Wing
- FF: Rear Hatch
- FGL: V Tail V (Left)
- FCU: Upper Fuselage
- FER: Right Wing
- FGR: V Tail V (Right)
Product Usage Instructions
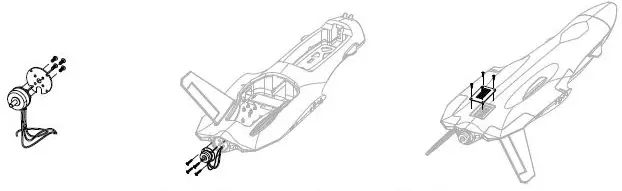
KIT/PNP Installation
- Install the motor and ESC.
- Install the servo and push rods, then install the rudder.
- The user can choose to use a carbon plate to install the camera or just use foam to fill it.
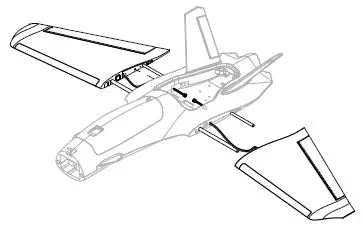
- Install the wing to the fuselage.
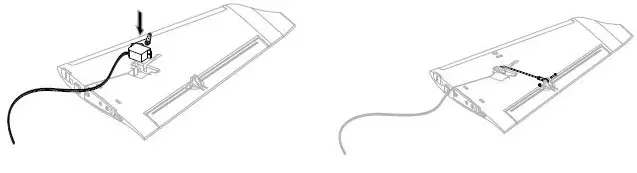
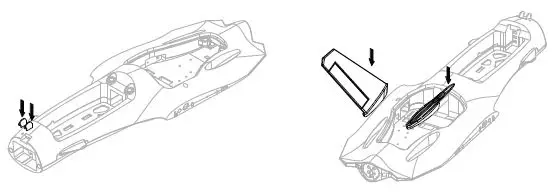
- When Gopro is installed, adjust the battery slider to adjust the balance.
- To install Gopro, use a rubber band to lock the GoPro then install the hatch.
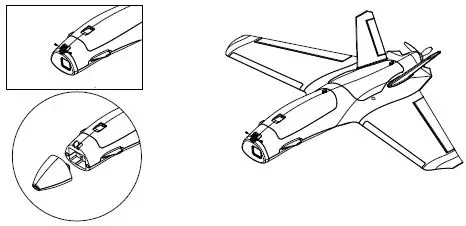
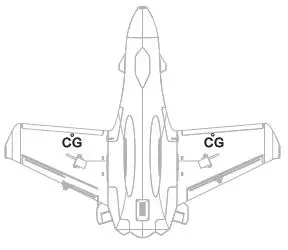
- Install the nose and cam. The CG is marked under the wing, and you can move the CG 3-4mm to get better control.
RTH/RTHFPV Installation
- Install the camera mount plate and the V-tail.
- Install the wing to the fuselage. Plug the left servo into S4 and the right servo into S4. S3S4
- Install the INAV configurator, then plug it into PC INAV.
- Check INAV Configurator for receiver type, then assign the channel and mode.
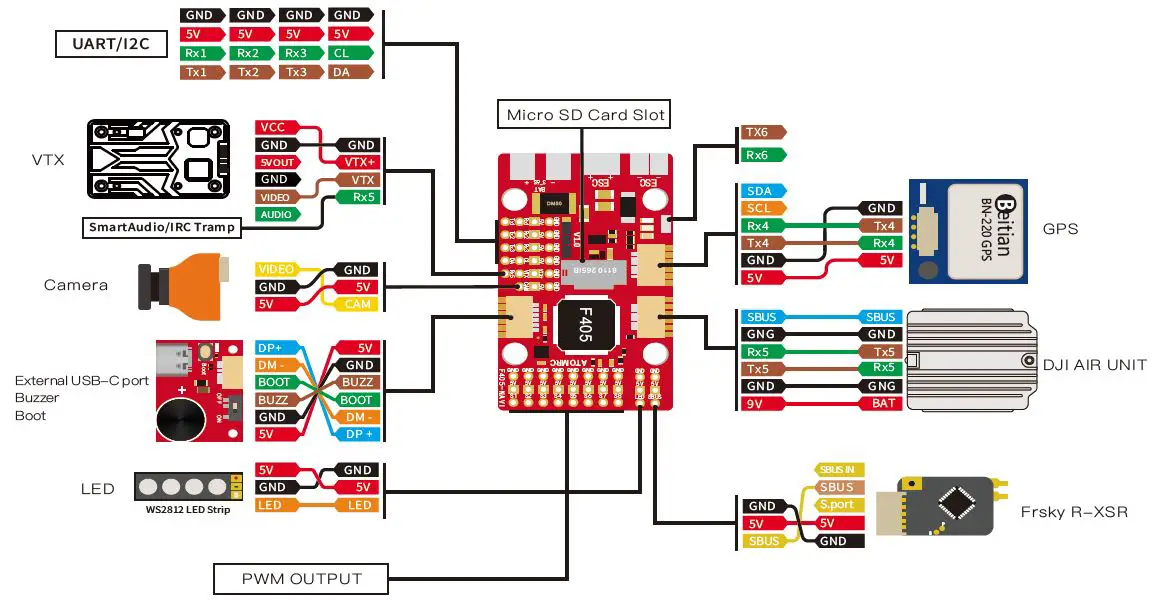
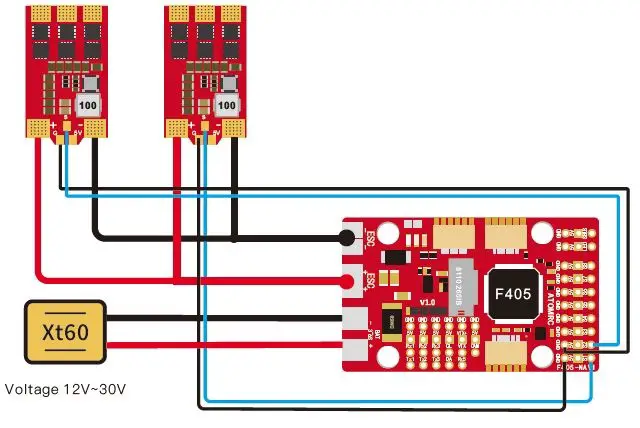
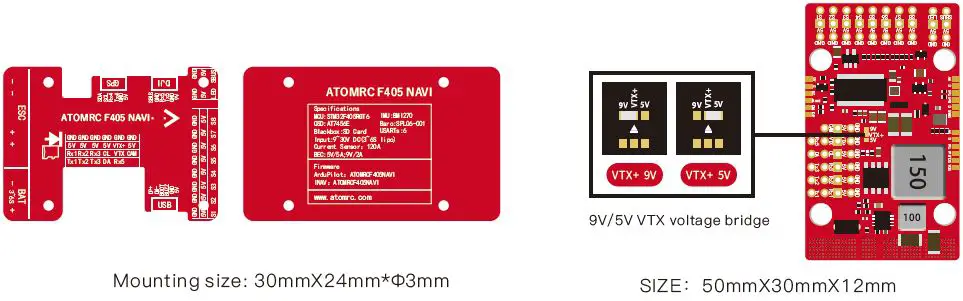
ATOMRCF405NAVI Information
The ATOMRCF405NAVI features UART/I2C, GND, 5V, Rx1, Tx1, Rx2, Tx2, Rx3, Tx3, CL, DA, VTX, SmartAudio/IRCTramp, VCC, GND, 5VOUT, VIDEO AUDIO, Camera, External USB-C port Buzzer Boot, DP+ DMBOOT BUZZ GND 5V LED S WS2812LEDStrip, 5V GND LED, VTX+ VTX Rx5, CAM 5V GND BUZZ BOOT DMDP+, GND 5V, LED PWM OUTPUT 100s-, G 5V+, and a Micro SD Card Slot-ESC-+ESC+BAT – 3~6S +.
Introduction
The Dolphin is swept forward fly wing, with an elegant design, the dolphin can fly stable both at high speed and low speed, the large fuselage can give use lots of space to install the electronics, and the detachable wing made the wing easy to transport, V tail made the wing more stable for cruising.
Specifications
Specifications | |
| Wingspan | 845mm |
| Length | 710mm |
| WingArea | 15.24d㎡ |
| Material | EPP |
| Recommend Motor | 2207/2306 |
| Recommend ESC | 30A 2~4S |
| Recommend Propeller | 6~7inch |
| Servo | 9g Servo*2PCS |
| Recommended Battery | 21700 4S1P(300g) |
Version Description
| ATOMRC Dolphin V1.1 Fixed Wing | |||||
| Version | KIT | PNP | RTH | RTH FPV | |
| Description | Pre-glued Fixed WING | KIT+Motor +ESC+Servo | PNP+Pre-turned FC+GPS, all electronics are installed | RTH+VTX+Camera, all electronics are installed | |
| Basic Pack | Pre-Build KIT | √ | √ | √ | √ |
| Wood plate | √ | √ | √ | √ | |
| Screws and Nuts | √ | √ | √ | √ | |
| Sticker and Carbon tube | √ | √ | √ | √ | |
| Motor | ATOMRC 2306 1700kv | √ | √ | √ | |
| ESC | ATOMRC BLS 30A 2~4S | √ | √ | √ | |
| Servo | ATOMRC 9g Digital Servo 300mm | 2pcs | 2pcs | 2pcs | |
| Prop | 7042-2 | √ | √ | √ | |
| Cam | Foxeer Toothless NANO | √ | |||
| VTX | ATOMRC Exceed TX15 VTX | √ | |||
| Antenna | ATOMRC | √ | |||
| FC | ATOMRC F405 NAVI | √ | √ | ||
| GPS | BN220 | √ | √ | ||
| The specs will be slightly adjusted according to different, actual specs are subject to the latest manual and real objects. | |||||
KIT Foam Contents
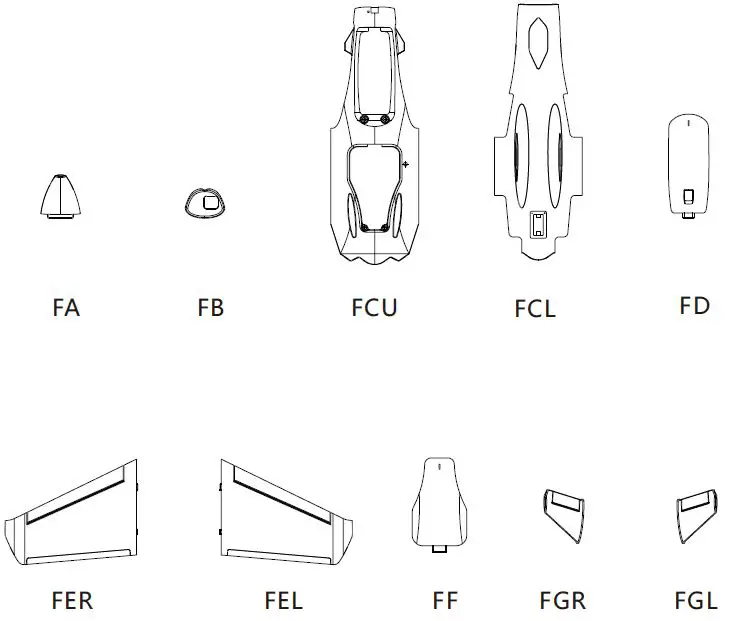
- FA: Front Hatch Cover
- FCL: Lower Fuselage
- FEL: Left Wing
- FGL: V Tail
- FB: Gopro Cover
- FD: Front Hatch
- FF: Rear Hatch
- FCU: Upper Fuselage
- FER: Right Wing
- FGR: V Tail
KIT/PNP Installation
- Install the motor and ESC.

- Install the servo and push rods, then install the rudder.

- Users can choose a carbon plate to install the camera or just use foam to fill it.

- Install the wing to the fuselage.

- When Gopro is installed, adjust the battery slider to adjust the balance.

- To install Gopro, use a rubber band to lock the Gopro then install the hatch.

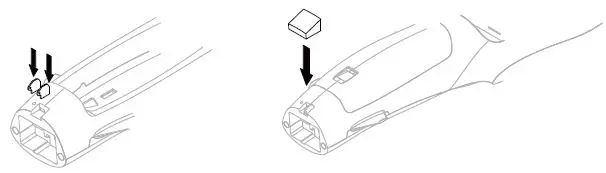
- Install the Nose and Cam.

- The CG is marked under the wing, you can move the CG 3-4mm to get better control.

RTH/RTH FPV Installation
- Install the Camera mount plate and the V tail.

- Install the wing to the fuselage, Plug the Left Servo into S4, Right Servo into S4.

- Install the INAV configurator then plug to PC

- Check INAV Configurator the receiver type, then assign the channel and mode

Rx2 and SBUS cant use at the same time, SBUS is on inverted Rx2 If using how power device, suggest soldering the capacitor.
ESC Information
Throttle calibration
- The ESC included with the model has a safe start. If the motor battery is connected to the ESC and the throttle stick is not in the low throttle or off position, the motor will not start until the throttle stick is moved to the low throttle or off position.
- Power on the ESC(The ESC must connect to the motor and Receiver).
The motor will emit a series of beeps, after the beeps, set the throttle stick to the minimum, the motor will emit a series of beeps again. now the ESC calibration is done.
Exceed BLS 4s30A ESC Wiring Diagram
- Voltage input: 2~4S Lipo
- Continuous current: 30A
- Max Current: 35A
- Output: Built-in 5V 3A BEC
VTX Tx15 User manual
Tx15 Wiring Diagram
Please make sure the antenna is installed before powering on, otherwise, the VTX will be fried!
Tx15 Specs
- Voltage input: 2~6S Lipo
- Power: 200/800/1500mw Switchable
- Power consumption: 9V 1.1A
- Frequency: 5.3~5.9Ghz
Band | Channel | |||||||
| 1 | 2 | 3 | 4 | 5 | 6 | 7 | 8 | |
| Band A | 5865 | 5845 | 5825 | 5805 | 5785 | 5765 | 5745 | 5725 |
| Band B | 5733 | 5752 | 5771 | 5790 | 5809 | 5828 | 5847 | 5866 |
| Band E | 5705 | 5685 | 5665 | 5645 | 5885 | 5905 | 5925 | 5945 |
| Airwave/FS | 5740 | 5760 | 5780 | 5800 | 5820 | 5840 | 5860 | 5880 |
| Race Band | 5658 | 5695 | 5732 | 5769 | 5806 | 5843 | 5880 | 5917 |
| L Band | 5362 | 5399 | 5436 | 5473 | 5510 | 5547 | 5584 | 5621 |
VTX Setting
- Hold the button 3 seconds into setting mode.
- In setting mode. short press the button to change the band.
- Then hold the button for 3 seconds into CH setting mode, and short press the button to change CH.
- Hold the button for 3 seconds to get into Power setting mode, there is a short bar on LED, a short press to switch power, 1 bar means 200mW, 2 bars means 800mW, and 3 bars mean 1500mW.
Please download the latest user manual at www.atomrc.com/pages/download.