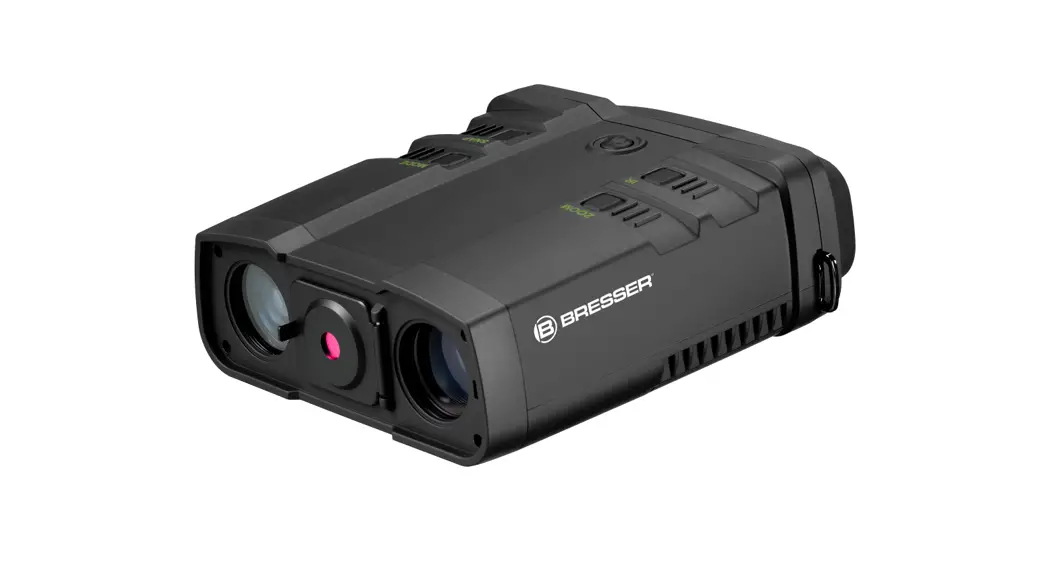
![]() 1877493 Digital Nightvision NightSpyDIGI Pro HD
1877493 Digital Nightvision NightSpyDIGI Pro HD
Instruction Manual
About this Instruction Manual
![]() Please read the safety instructions and the operating instructions carefully before use.
Please read the safety instructions and the operating instructions carefully before use.
Keep these instructions for renewed use at a later date. When the device is sold or given to someone else, the instruction manual must be provided to the new owner/ user of the product.
General Warning
![]() DANGER!
DANGER!
Children should only use the device under adult supervision. Keep packaging material, like plastic bags and rubber bands, out of the reach of children, as these materials pose a choking hazard.
Do not expose the device to high temperatures. Use only the recommended batteries. Do not short-circuit the device or batteries, or throw them into a fire. Excessive heat or improper handling could trigger a short-circuit, a fire or an explosion.
![]() FIRE RISK!
FIRE RISK!
Do not place the device, particularly the lenses, in direct sunlight. The concentration of light could cause a fire.![]() RISK OF ELECTRIC SHOCK!
RISK OF ELECTRIC SHOCK!
This device contains electronic components that operate via a power source (batteries). Children should only use the device under adult supervision. Only use the device as described in the manual; otherwise, you run the risk of an electric shock.![]() RISK OF CHEMICAL BURN!
RISK OF CHEMICAL BURN!
Leaking battery acid can lead to chemical burns. Avoid contact of battery acid with skin, eyes, and mucous membranes. In the event of contact, rinse the affected region immediately with plenty of water and seek medical attention.
![]() NOTE!
NOTE!
Do not disassemble the device. In the event of a defect, please contact your dealer. The dealer will contact the Service Centre and can send the device in to be repaired, if necessary.
Use only the recommended batteries. Always replace weak or empty batteries with a new, complete set of batteries at full capacity. Do not use batteries from different brands or with different capacities. Remove the batteries from the unit if it has not been used for a long time.
![]() PRIVACY PROTECTION!
PRIVACY PROTECTION!
The binoculars are intended only for private use. Please heed the privacy of other people. Do not use them to look into apartments, for example.
Scope of delivery
- Night vision device
- MINI USB cable
- A/V cable
- Storage pouch
- Operating instructions
8 × AA / LR 6 batteries required (not included with delivery).
Device Overview
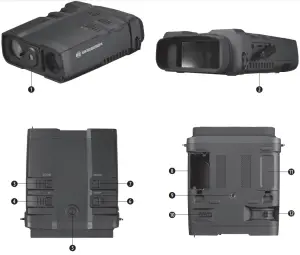
| 1. Infrared filter cap 2. USB/AV/TF card slot 3. ZOOM button 4. IR Button 5. Power Button 6. SNAP button 7. MODE button | 8.+ 11. Battery compartment (4 × AA batteries required) 9. Tripod adapter 10. Objective focus 11. Ocular adjustment |
Battery Installation
Open the battery compartment and install the 8 × AA batteries being sure to follow the polarity markings inside the battery compartment.
Close the battery cover.
Inserting / Removing the TF card
Insert the TF card into the TF card port and push until it locks in place.
To remove the installed TF card, please push the TF card inward to release it.
Storage capacity: 4GB or above is recommended
Note: The device will prompt “Please insert SD card” if the TF card is not been installed
Instructions for Use
Power On: Press the power button still for about 2 seconds to start the Night Vision.
Taking Video: Press the [MODE] button and select the video mode. The icon will appear in the lower right corner of the screen. Press the [SNAP] button to start recording the video and press the [Shutter] button again to stop recording.
Taking a Photo: Press the [MODE] button and select the capture photo mode. The icon
will appear in the lower right corner of the screen. Press the [SNAP] button to take photos.
Note: When in bright conditions, please cover the objective lens with the attached IR-Cut cover. When using the device in dark conditions, please remove the IR-Cut cover.
Watching Stored Videos and Photos: Press the [MODE] button and select playback mode.
Deleting Stored Videos and Photos: In playback mode, press the [ZOOM] button. You will be given the option to delete the one image you are viewing.
Turning off the Night Vision device
Press the power button to the right side for 2 seconds to turn off the Night Vision device.
Adjusting the eyepiece
Turn the Night Vision device on.. While looking through the eyepiece, please rotate the eyepiece adjustment until the image on the screen is sharp and in focus.
Focusing the image
Target the object you would like to view and turn the focusing ring located just below the objective lens until the image on the screen is sharp and clear.
Key functions
| [MODE] | Toggles between Video / Photo / Playback / Menu |
| [SNAP] | In video mode: Press to take video. To stop recording, press this button again. In photo capture mode: Press to take a photo. In playback mode: Press to Play the video. In Menu mode: Press to select. |
| [ZOOM] | In video mode: Press to zoom out. In photo capture mode: Press to zoom out. In playback mode: Press to delete the photo or video. In menu mode: Press to select the previous menu listing. |
| [IR] | In Video/Photo mode: Press to turn on the infrared light. With each additional click, the IR brightness will increase In playback mode: Press to select the next photo or video. In menu mode: Press to select the next menu listing. |
LCD display information
Your screen display in video mode
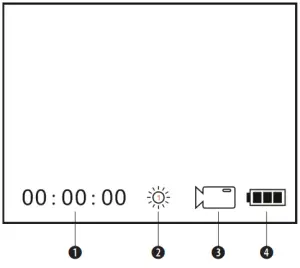
- Remaining time of recording
- The brightness of IR from 1 to 3
- Icon displaying that you are in Video Mode
- Battery power
Your screen display in photo mode

- Remain capacity quantity of photos
- The brightness of IR from 1 to 3
- Icon displaying that you are in Photo Mode
- Battery power
Your screen display during menu mode
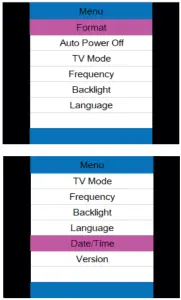
| Format | Select to format the TF card |
| Auto Power Off | Auto Power off mode: The NV can be set to automatically shut down when not operating after the selected period of time. (Default: 10 Minutes)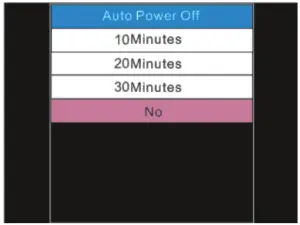 |
| TV Mode | The video output mode can be set to NTSC (North America) or PAL (Europe)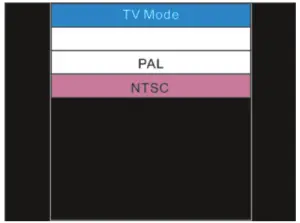 |
| Frequency | Anti-flicker settings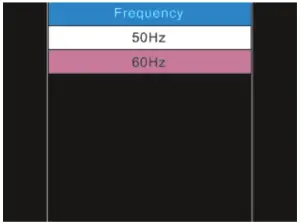 |
| Backlight | 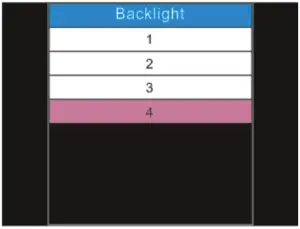 The NV-150 is programmed for day and night multi-purpose, Depending on the different environments the users can select different brightness of the backlight. Selecting small digit caused dimmer brightness of backlight during dark environment, conversely selecting large digit in the bright environment. The NV-150 is programmed for day and night multi-purpose, Depending on the different environments the users can select different brightness of the backlight. Selecting small digit caused dimmer brightness of backlight during dark environment, conversely selecting large digit in the bright environment. |
| Language | 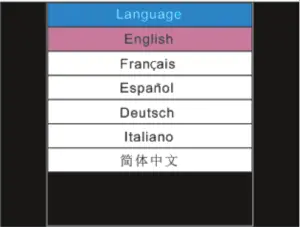 |
| Date/Time | 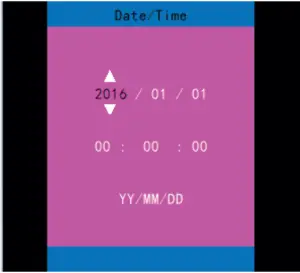 [ZOOM] [IR]: adjust the date/time – [SNAP]: OK [ZOOM] [IR]: adjust the date/time – [SNAP]: OK |
| Version | The software version of the device |
Using the zoom function
This device features a zoom function that can be used while taking a video or photo.
Press the [ZOOM] button to toggle between 1x and 2x digital zoom.
Using IR light in complete darkness
This device can be used in complete darkness when using the built-in IR (infrared) light.
Press the [IR] button to activate the infrared light.
Remove the IR Lens cover and press the [IR] button to select between the 7 levels of brightness.
Viewing videos and photos on TV
Connect the AV output port of the night vision device with an A/V cable.
Connect the other end of the A/V cable to the TV video input.
In playback mode, press the [ZOOM]/[IR] buttons to select the file you will display on your TV.
Note: When the night vision device is connected to a TV, the screen inside the device will not work.
Transmitting stored videos and photos to a computer
Using a USB cable, you can connect the night vision device to a computer.
You can find the stored photo/video files on the computer by looking under “My computer \ removable disk”.
Once the removable disk is selected, you can view, delete, move, or copy any video or photo.
Troubleshooting
- Device Power Off:
- If the night vision device fails to activate, check for defective, missing, or improperly installed batteries. Replace or install batteries correctly. Please make sure to use only Alkaline batteries.
Poor Image:
- If you wear glasses, please keep them on while using the binocular.
- Adjust the focus by slowly turning the Focus wheel at the front bottom of the binocular. Make sure it is focused.
EC DECLARATION OF CONFORMITY
Bresser GmbH has issued a „Declaration of Conformity“ in accordance with applicable guidelines and corresponding standards. This can be viewed any time upon request.
DISPOSAL
![]() Dispose of the packaging materials properly, according to their types, such as paper or cardboard. Contact your local waste disposal service or environmental authority for information on the proper disposal.
Dispose of the packaging materials properly, according to their types, such as paper or cardboard. Contact your local waste disposal service or environmental authority for information on the proper disposal.![]() Do not dispose of electronic devices in the household garbage!
Do not dispose of electronic devices in the household garbage!
As per Directive 2002/96/EC of the European Parliament on waste electrical and electronic equipment and its adaptation into German law, used electronic devices must be collected separately and recycled in an environmentally friendly manner.![]() In accordance with the regulations concerning batteries and rechargeable batteries, disposing of them in normal household waste is explicitly forbidden. Please make sure to dispose of your used batteries as required by law — at a local collection point or in the retail market. Disposal in domestic waste violates the Battery Directive. Batteries that contain toxins are marked with a sign and a chemical symbol. „Cd“ = cadmium, „Hg“ = mercury, „Pb“ = lead.
In accordance with the regulations concerning batteries and rechargeable batteries, disposing of them in normal household waste is explicitly forbidden. Please make sure to dispose of your used batteries as required by law — at a local collection point or in the retail market. Disposal in domestic waste violates the Battery Directive. Batteries that contain toxins are marked with a sign and a chemical symbol. „Cd“ = cadmium, „Hg“ = mercury, „Pb“ = lead.
WARRANTY & SERVICE
The regular guarantee period is 2 years and begins on the day of purchase. To benefit from an extended voluntary guarantee period as stated on the gift box, registration on our website is required. You can consult the full guarantee terms as well as information on extending the guarantee pe riod and details of our services at www.bresser.de/warranty_terms.
Would you like detailed instructions for this product in a particular language? Then visit our website via the link below (QR code) for available versions.
Alternatively, you can also send an email to [email protected] or leave a message on +49 (0) 28 72 – 80 74-220*. Please always state your name, precise address, a valid phone number, and email address, as well as the article number and product name.
*Number charged at local rates in Germany (the amount you will be charged per phone call will depend on the tariff of your phone provider); calls from abroad will involve higher costs.
MANUAL DOWNLOAD

http://www.bresser.de/P1877493
Please be prepared for service requests:
Art. No.: 1877493
Product name:
BRESSER Digital Nightvision NightSpyDIGI Pro HD
Instruction manual:
Manual_1877493_Digital-NV-NightSpyDIGI-Pro-HD_deen_BRESSER_v012021a.pdf
Notes
________________________________
________________________________
Please contact the service center first for any questions regarding the product or claims, preferably by e-mail.
E-Mail: [email protected]
Telephone*: +44 1342 837 098
BRESSER UK Ltd.
Suite 3G, Eden House
Enterprise Way
Edenbridge, Kent TN8 6HF
United Kingdom
*Number charged at local rates in the UK (the amount you will be charged per phone call will depend on the tariff of your phone provider); calls from abroad will involve higher costs.
Contact
Bresser GmbH
Gutenbergstraße 2
46414 Rhede · Germany
www.bresser.de![]() @BresserEurope
@BresserEurope
![]()


