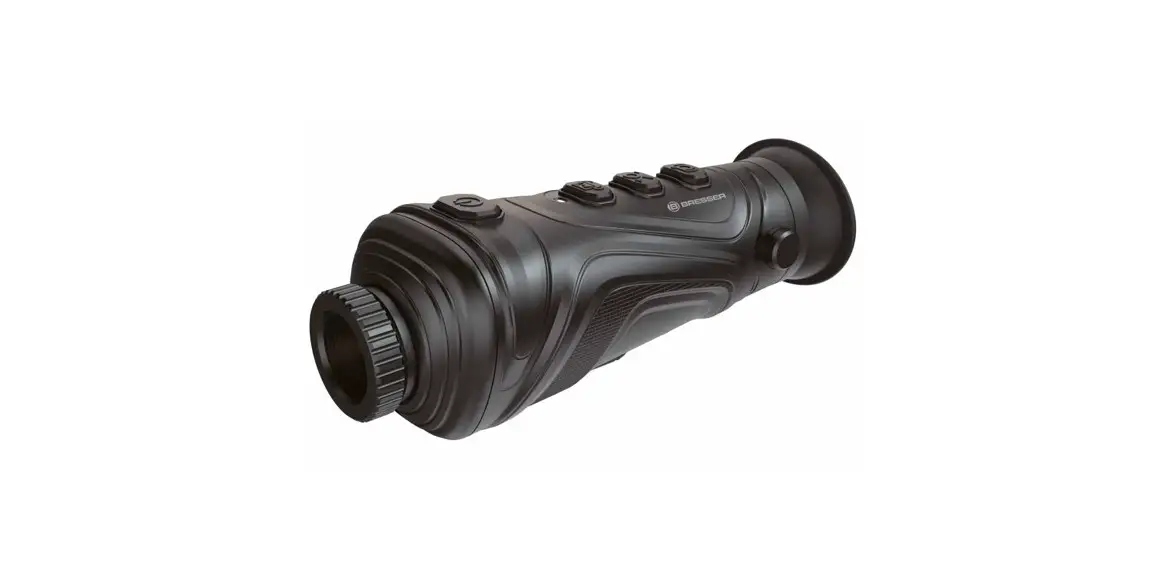
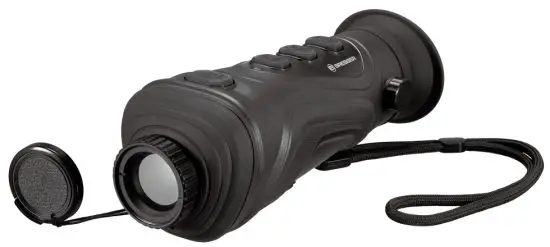
![]() TNS1 Thermal Night Vision
TNS1 Thermal Night Vision
Instruction Manual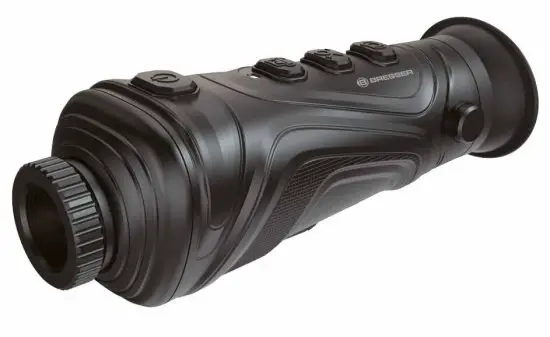
APP DOWNLOAD:

 MANUAL & APP DOWNLOAD:
 MANUAL & APP DOWNLOAD:
 www.bresser.de/download/9630900
Google Play and the Google Play logo are trademarks of Google Inc.
Apple and the Apple logo are trademarks of Apple Inc., registered in the U.S. and other countries. App Store is a service mark of Apple Inc., registered in the U.S. and other countries.
ABOUT THIS INSTRUCTION MANUAL
![]() These operating instructions are to be considered a component of the device.
These operating instructions are to be considered a component of the device.
Please read the safety instructions and the operating instructions carefully before use.
Keep these instructions for renewed use at a later date. When the device is sold or given to someone else, the instruction manual must be provided to the new owner/user of the product.
GENERAL WARNINGS
 RISK OF CHOKING!
Keep packaging material, like plastic bags and rubber bands, out of the reach of children, as these materials pose a choking hazard.RISK OF ELECTRIC SHOCK!
This device contains electronic components that operate via a power source (power supply). Children should only use the device under adult supervision.
Only use the device as described in the manual; otherwise, you run the risk of an electric shock.
Disconnect the device from the power supply by pulling the power plug when it is not used. In case of longer interruption of operation and before starting any work on maintenance and cleaning.
Always pull on the plug to separate the device from the power supply. Never pull on the cable.
RISK OF FIRE/EXPLOSION!
Do not expose the device to high temperatures. Use only the supplied power supply. Do not short-circuit the device. Excessive heat or improper handling could trigger a short circuit, a fire, or an explosion.![]() NOTE!
NOTE!
Do not disassemble the device. In the event of a defect, please contact the Service Centre in your country.
Do not immerse the unit in water.
Do not subject the unit to excessive force, shock, dust, extreme temperature or high humidity, which may result in malfunction, shorter electronic life span, damaged batteries, and distorted parts.
When the product works, a slight click will be given out every several seconds. This is the normal phenomenon that the lens captures the image.
INTRODUCTION
This Thermal Night Vision device adopts an advanced non-cooled focal plane infrared detector and quality optical lenses as the core. With the characteristics of
the convenient and quick operating system, small appearance design, expansion parts with perfect function, long duration of use, it is sturdy and durable and applicable to all types of environments and provides an ideal temperature measurement tool featuring “clear imaging, precise measurement, simple operation and easy to carry”. This is the best selection for onsite detection, preventive maintenance, and other application sites.
The product may be used for outdoor animal observation, search and rescue, law enforcement detection for policemen, night patrol, outdoor activities, and personal security, etc. The product is provided with the photographing function. The photos may be browsed by connecting with a computer through USB to make it convenient for observation of many persons at the same time, which creates the possibility for application in more occasions.
SCOPE OF DELIVERY
- Thermal Night Vision device
- USB cable
- Power supply adapter (for use with USB cable)
- Instruction Manual
BATTERY CHARGING INSTRUCTIONS
Use USB data line to charge:
This product has a built-in rechargeable battery.
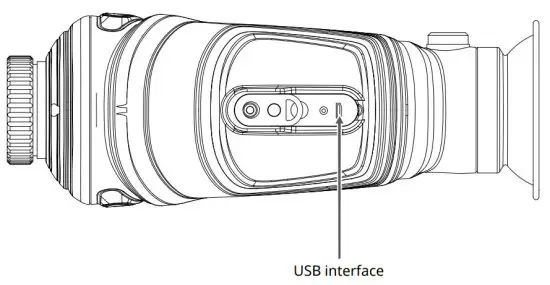
When the battery is low, please charge it in time via the Micro USB port.
After fully charged, unplug the USB cable.
Note: When the battery is completely empty, there will be an abnormality. It is recommended to use the battery when it is sufficient.
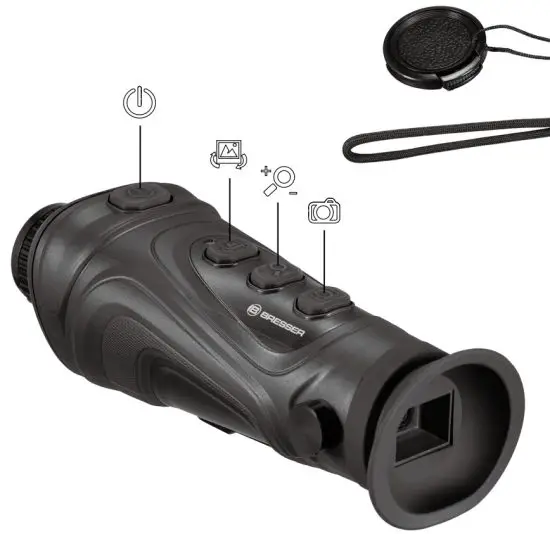
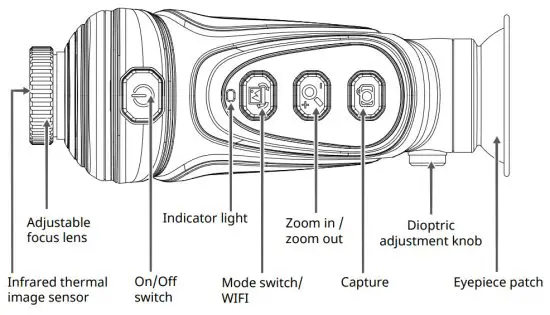
PARTS OVERVIEW
OPERATING
CHARGING
The product is provided with a built-in battery. When the battery power is not sufficient, please charge it through the Micro USB interface in time.
POWER ON/OFF
Hold down [![]() ] key to power on /off.
] key to power on /off.
IMAGE CAPTURE
Press [ ![]() ] key to capturing the image. The screen will show [√ ] prompt, indicating that image cap- ture is successful.
] key to capturing the image. The screen will show [√ ] prompt, indicating that image cap- ture is successful.
VIDEO CAPTURE
Video recording is only possible via the WIFI app.
IMAGE REVIEW
After powering on, short press the [![]() ] key to enter the image viewing mode (the image shows the last image taken), press the [
] key to enter the image viewing mode (the image shows the last image taken), press the [![]() ] key to view the previous image, press the [
] key to view the previous image, press the [ ![]() ] key to view the next image, and press the [
] key to view the next image, and press the [![]() ] key to exit Image viewing mode.
] key to exit Image viewing mode.
DELETE IMAGE
After entering the image viewing mode, press and hold the [![]() ] key to delete the currently viewed image.
] key to delete the currently viewed image.
IMAGE EXPORT
Capture and save images can be viewed and exported via a Micro USB connection to a computer.
MODE SWITCHING
Press the [![]() ] button to switch between the four imaging modes of the rainbow, iron oxide red, white heat, and black heat.
] button to switch between the four imaging modes of the rainbow, iron oxide red, white heat, and black heat.
ZOOM IN/OUT
Under the power-on state, press the [ ![]() ] key, and each time you press it, the target of “2X, 4X” will be gradually enlarged and displayed. Press again to return to the normal state.
] key, and each time you press it, the target of “2X, 4X” will be gradually enlarged and displayed. Press again to return to the normal state.
BRIGHTNESS ADJUSTMENT OF THE DISPLAY SCREEN
Under the power-on state, press and hold the [ ![]() ] key to adjust the brightness. Each long press adjusts the brightness by 1 level.
] key to adjust the brightness. Each long press adjusts the brightness by 1 level.
DIOPTER ADJUSTMENT
Rotate the diopter adjustment button left and right to adjust the diopter for yourself.
FOCUSABLE LENS
Rotate the focus lens button left and right to focus. Rotate clockwise for near focus and counterclockwise for far focus.
INDICATOR LIGHT
| Status | Not being charged | In charging | Fully charged |
| Power on | Blue | Red blue (purple) | Blue |
| Power off | None | Red | None |
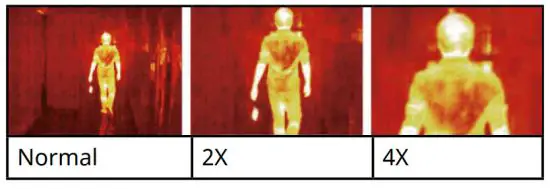
APPLICATION OF AMPLIFICATION
The magnification function may be utilized when a remote objective is photographed so as to observe the objective clearly. The effect picture is as follows:
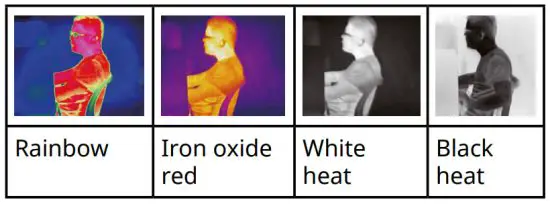
APPLICATION OF COLOR PALETTE
The color palette menu may change the pseudo color of infrared thermal image and provide three types of color palettes: rainbow, iron oxide red, white heat, black heat.
The selection of a proper color palette can show the details of the target object in a better manner. The color palette of rainbow and iron oxide red focuses on the display of color and is very suitable for the condition of high heat contrast and is used to improve color contrast between high temperature and low emperature. On the other hand, the color palettes white heat, and black heat provide a greyscale image. White heat is particularly suitable for detection at greater distances.
The image effect was photographed with four types of color palettes.
UNDER-FLOOR HEATING, TERRESTRIAL HEAT, AND LEAKAGE POINT – DETECTION SKILL
- Heat the floor for 3 minutes.
- Adjust the ambient light to the darkest. Stabilize the instrument and not shake it. Stand to detect large areas.
- Pieces of pipes appear in nonleakage images.
The locality of the leakage point is red. - A large area of red appears if the floor temperature is high. The effect is better if reducing temperature first and rising it up again.
Note:
- Suggest that the under-floor temperature is above 40° C. The preheating time is more than 3 minutes. (Make adjustment according to a depth of under-floor heating pipe concretely).
- Don’t be too close to the floor. Suggest making observations for a large area.
- The locality of the leakage point will appear a imaging area.
- If the temperature is too high, it needs to turn off the under-floor heating. Rise temperature of the under-floor heating for detection after the floor reduces to normal temperature.
WIFI FUNCTION & APP DOWNLOAD
First, install the app on your smartphone.
Download (AppStore or Google Play):
http://www.bresser.de/download/9630900
Now press and hold the [![]() ] button for 3 seconds to start the WIFI function. Search for “FPV_WIFI_****” under open Wifi networks on your smartphone and connect to it. Enter the password: “wifi12345678”.
] button for 3 seconds to start the WIFI function. Search for “FPV_WIFI_****” under open Wifi networks on your smartphone and connect to it. Enter the password: “wifi12345678”.
Now open the app. After pressing Start, the connection to the camera is established.
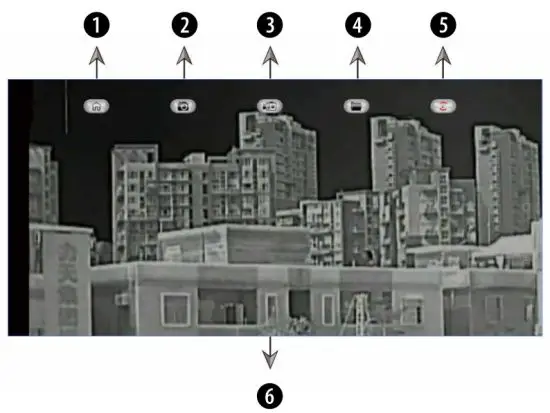
| 1. Start screen | 4. Playback |
| 2. Take photos | 5. Picture rotation |
| 3. Record videos | 6. Screen view |
Press and hold the [ ![]() ] button for 3 seconds to stop the Wifi function and to disconnect the camera.
] button for 3 seconds to stop the Wifi function and to disconnect the camera.
TECHNICAL DATA
| Probe type | Uncooled focal plane |
| Resolution ratio | 384×288 infrared focal plane |
| LCD resolution | 720X540 |
| Focus length | 19mm; 25mm; 35mm |
| Eyepiece | Single eyepiece display (the dioptric compensation is adjustable) |
| Field angle | 19.5°x14.7°; 14.9°x11.2°; 10.7°x 8° |
| Digital zoom | 2X; 4X |
| Detection range | up to 900 m |
| Wavelength coverage | 8pm-14pm |
| Frame rate of thermal images | 50Hz |
| Color palette | Rainbow/iron oxide red/white heat/black heat |
| Focusing mode | Adjustable |
| Image storage | BMP |
| Battery | Built-in rechargeable batteries |
| USB | Micro USB |
| Working time | *15 hours |
| Work temperature | 0 °C to 45 °C |
| Storage temperature | -20 °C to 60 °C |
| Product size | 186x69x68 mm |
| Product weight | 440g |
DISPOSAL![]() Dispose of the packaging materials properly, according to their types, such as paper or cardboard. Contact your local waste disposal service or environmental authority for information on the proper disposal.
Dispose of the packaging materials properly, according to their types, such as paper or cardboard. Contact your local waste disposal service or environmental authority for information on the proper disposal.![]() Do not dispose of electronic devices in the household garbage! As per Directive 2002/96/ EC of the European Parliament on waste electrical and electronic equipment and its adaptation into German law, used electronic devices must be collected separately and recycled in an environmentally friendly manner.
Do not dispose of electronic devices in the household garbage! As per Directive 2002/96/ EC of the European Parliament on waste electrical and electronic equipment and its adaptation into German law, used electronic devices must be collected separately and recycled in an environmentally friendly manner.
EC DECLARATION OF CONFORMITY![]() Hereby, Bresser GmbH declares that the equipment type with part number: 9630900 is in compliance with Directive: 2014/53/ EU. The full text of the EU declaration of conformity is available at the following internet address: www.bresser.de/download/9630900/CE/9630900_CE.pdf
Hereby, Bresser GmbH declares that the equipment type with part number: 9630900 is in compliance with Directive: 2014/53/ EU. The full text of the EU declaration of conformity is available at the following internet address: www.bresser.de/download/9630900/CE/9630900_CE.pdf
WARRANTY & SERVICE
The regular guarantee period is 5 years and begins on the day of purchase. You can consult the full guarantee terms and details of our services at www.bresser.de/warranty_terms.
Service
Please contact the service center first for any questions regarding the product or claims, preferably by e-mail.
E-Mail: [email protected]
Telephone*: +44 1342 837 098
BRESSER UK Ltd.
Suite 3G, Eden House
Enterprise Way
Edenbridge, Kent TN8 6HF
United Kingdom
*Number charged at local rates in the UK (the amount you will be charged per phone call will depend on the tariff of your phone provider); calls from abroad will involve higher costs.
Contact
Bresser GmbH
46414 Rhede · Germany
www.bresser.de![]() @BresserEurope
@BresserEurope
![]()


