
![]() MP7 7 Litre Countertop Mixer
MP7 7 Litre Countertop Mixer
Instruction Manual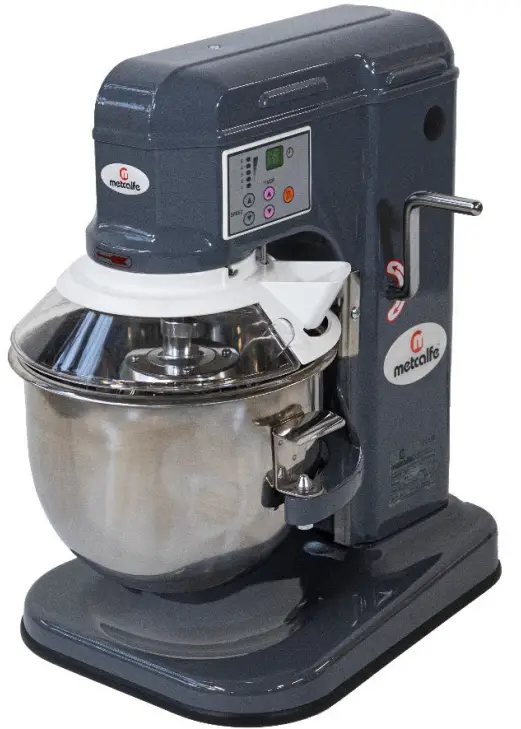
MP7 7 Litre Countertop Mixer
Metcalfe MP7 7 Litre Countertop Mixer Installation & Operating Instructions
T. 01766 830 456
E. [email protected]
W. www.metcalfecatering.com
Your Mixer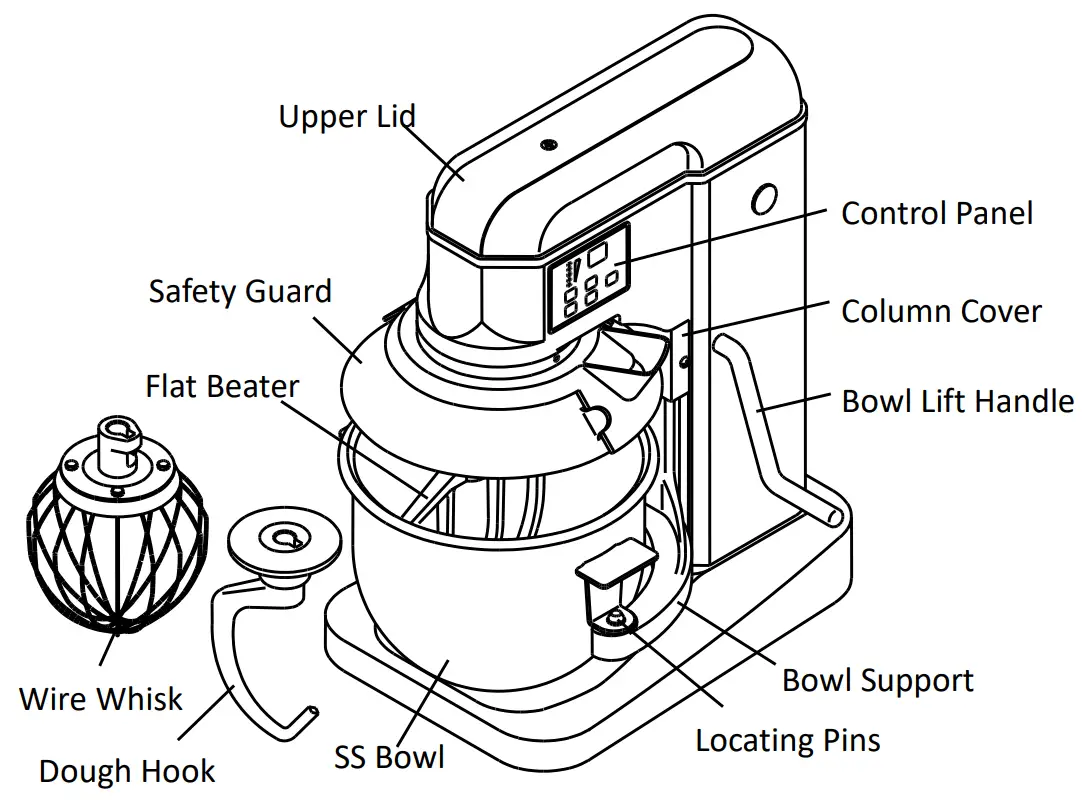
Metcalfe MP7 (7 Litre Heavy Duty Mixer)
The Metcalfe MP7 planetary mixer has a powerful, variable speed motor. It comes complete with a 7 litre stainless steel removable bowl, beater, whisk and dough hook. It is also fully interlocked for safety whilst in use.
Features
- Heavy duty 7ltr, gear driven, countertop, planetary mixer
- Particularly suitable for bakeries, hotels, restaurants, canteens etc
- Easy to operate
- Planetary mixing action ensures perfect results
- High torque 600w motor allows mixing of stiffer doughs and larger batches
- Automatic electronic 5-speed control and digital timer
- All in one digital Control Panel
- 5 Variable speeds from 193 rpm to 495 rpm
- Non-stop shifting speed
- 30 minute timer
- Interlocking bowl guard and bowl lift
- Perspex safety guard with ingredient chute and automatic shut-off when guard is opened at any speed
- Overload protection (NVR device)
- Long lasting lubricant providing abrasion resistant transmission
- Transmission gears are made of heat treated, hardened steel
- All metal and die-cast aluminium body
- Quiet operation
- CE approved
Specifications
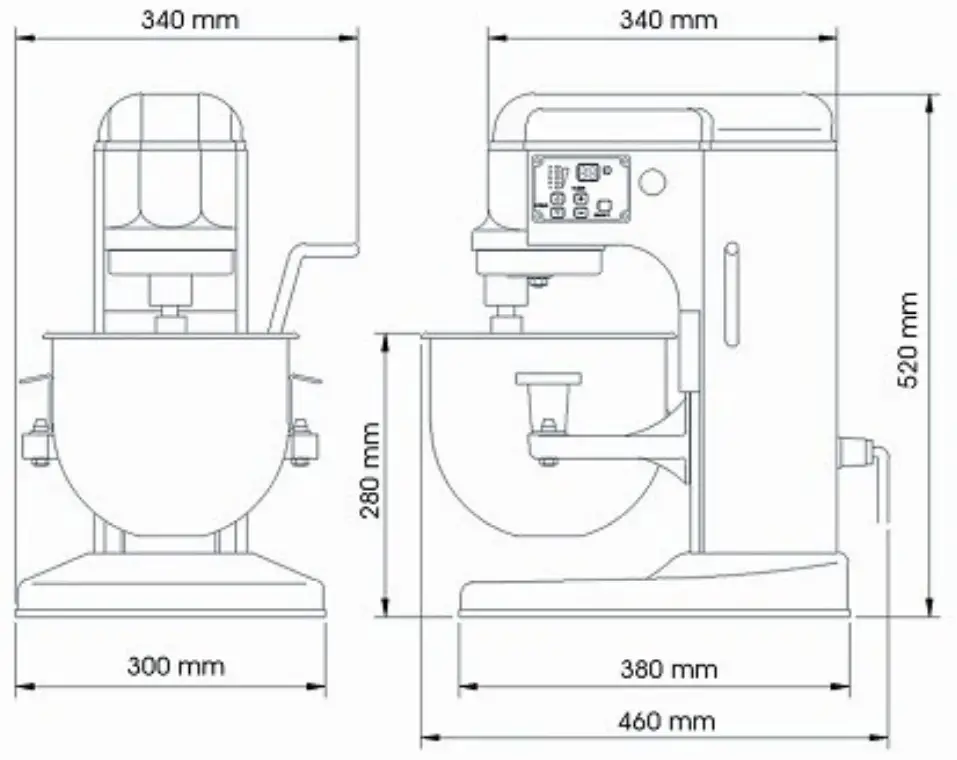
| Model | Capacity (Litres) | Phase (Ø) | Motor (Volt) | Frequency (Hz) | Power (kW) | Dimensions D x W x H (mm) | Net Weight (Kg) |
| MP7 | 7 | 1 | 230 | 50 | 0.60 | 460 x 340 x 520 | 18 |
Installation
Unpacking
Unpack the mixer immediately after receipt. Please inspect the mixer to ensure no damage and all parts i.e. Bowl, Beater, Whisk & Dough Hook have been provided. If the machine is found to be damaged, keep all the packaging material and contact us immediately or contact your source of the equipment. Never attempt to operate the machine with damaged parts. Report any deficiencies to the dealer that supplied the machine.
You should receive with your mixer:
1 x Stainless Steel Bowl
1 x Beater
1 x Whisk
1 x Dough Hook
If any of the above items were not received with your mixer, please refer to page 13 for contact details and inform us immediately for replacements.
Before using the mixer please read this manual thoroughly. Do not proceed with any installation nor operation if you have any questions or do not understand anything within this manual. Please see contact details on page 13 for assistance.
Location
Select a location for the machine keeping these points in mind:
- Counter must be level – It is recommended that the machine is level from front to back and from side to side. This will ensure the greatest stability.
- Easy access for cleaning, maintenance and servicing
- Clearance for operating controls, installing and removing attachments and bowl
- Sufficient space for adding ingredients during mixing
- The surface must be able to support a load of 30kgs
- The rear ventilation outlet of the mixer must not be blocked.
Ambient Conditions
- The minimum requirement for all electrical equipment’s correct operation is an air temperature of between +5 and +40.
- Electrical equipment operates correctly when the relative humidity does not exceed 95% at a maximum temperature of +40.
- Electrical equipment operates correctly at altitude up to 1000m.
- Electrical equipment is designed to withstand and be protected against the effects of transportation, and storage temperature within a range of -25 to +55 and for short periods not exceeding 24h at up to +70.
Electrical Connection
- Before connecting the mixer to an electrical supply, please read the specifications on the rating plate to ensure that they comply with those of the electrical supply.
- The machine works off 220/240V 50Hz 1 phase supply and comes fitted with a 3-pin 13amp fused plug.
- An electrical supply should be available within the reach of the included power cord. DO NOT use extension cords to connect the machine’s power cord to the electrical supply. The low AMP supply could damage the mixer or cause a fire.
- All wiring connections must be checked and tight.
Once the electrical connection has been made, the machine is ready for use.
Fitting the Bowl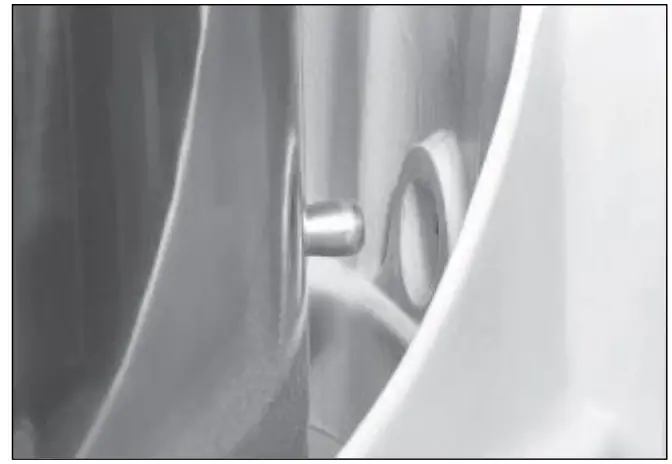
Operation
NOTE: Install the bowl BEFORE attaching the agitator.
- Lower the bowl lift handle anti-clockwise and down to its resting position.
- Lift the bowl by the handles and slowly position the locking pin located at the rear of the bowl into the hole in the middle rear of the cradle.
- Lower the bowl onto the pins located on either side of the bowl cradle.
Bowl Lift & Guard
Move the bowl lift handle anti-clockwise to lower the bowl. It is necessary to lower the bowl to change the tools, and to provide better access for filling and emptying the bowl. To raise the bowl, move the bowl lift handle clockwise until it hits the upper stops.
The bowl cradle and guard are electrically interlocked so that the mixer will only operate when the bowl is in the raised position. In addition to this the bowl safety guard must be locked by rotating into position (left to right) and the guard is locked in place. This ensures total user safety at all times.
Once the guard has been opened and the bowl lowered the mixer can only be restarted by pressing the start button.
During operation additional ingredients can be added via the ingredients chute located on the righthand side of the bowl guard.
Tool Selection
The beater, whisk and dough hook are meant for the work implied by their names. Do not use the beater for dough making or the whisk for anything other than whisking, aerating or mixing light mixtures. These are the typical uses for each of the tools supplied:
 | Whisk Light mixes such as whipped cream, mayonnaise, egg whites, pancakes and soufflés |
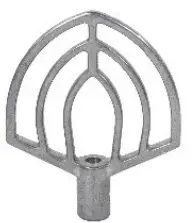 | Beater Firm mixes such as light pastry, cakes, biscuits, icing, fillings and mashed vegetables |
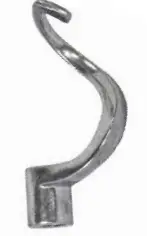 | Dough Hook Heavy mixes such as dough and pastry |
Fitting Attachments
NOTE: Install the bowl BEFORE attaching the mixing tool.
NOTE: It is easier to install the attachment prior to adding ingredients into the bowl.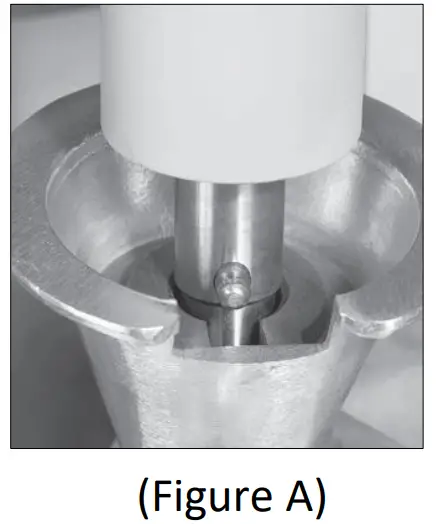 Open the bowl guard and lower the bowl.
Slide the attachment slowly upwards onto the planetary shaft, fitting the shaft pin through the slot in the attachment. (Figure A)
Rotate the attachment clockwise to secure it onto the planetary shaft.
NOTE: Attachments should always rotate in a clockwise direction around the bowl. If an attachment is moving counter-clockwise please contact a licensed electrician immediately to remedy incorrect wiring.
New mixers, bowls and agitators (beaters, whisks and dough hooks) should be thoroughly washed with hot water and mild soap solution and thoroughly rinsed with clean water before being used for the first time.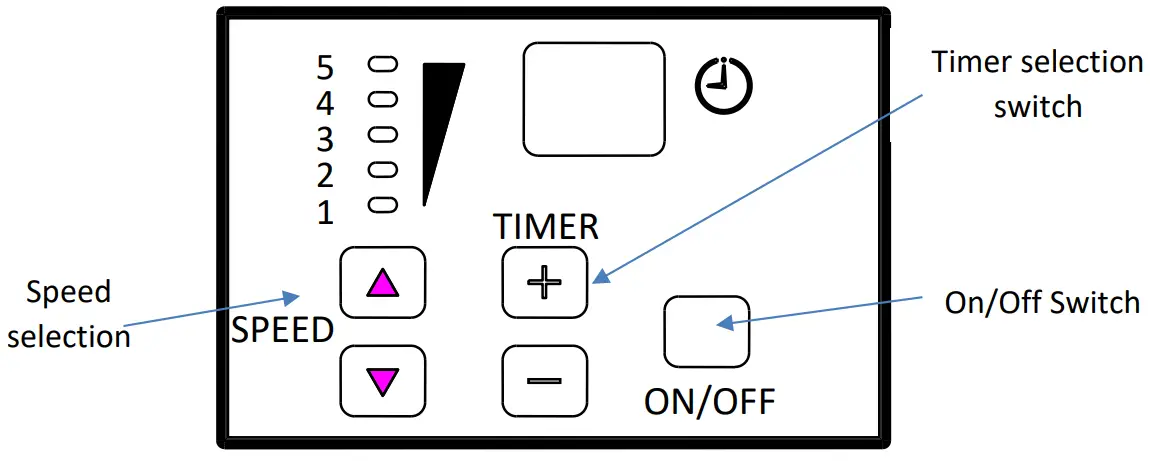
- Before you can start the machine, you will have to lift the bowl and close the perspex safety guard.
- Select time required if using the timer.
- Press on button to start the machine.
- The speed can be adjusted by pressing the up and down arrows on the panel.
– Number 1 is the slowest speed and number 5 is the highest speed.
– The speed selected depends largely on the quantity and consistency of the product. Slow Speed
is for heavy mixtures such as dough, biscuits, etc. and High Speed is for fast, light work, such as whipping cream, beating eggs, and mixing thin substances.
– It is recommended that mixing is always started at the lowest speed and progressively increased to the desired setting.
Speed 1 For slow beating, mashing and kneading yeast dough.
Speed 2 For mixing cookie and cake batters.
Speed 3 For beating, creaming and medium fast whipping.
Speed 4 For whipping heavy cream, egg whites and boiled frostings.
Speed 5 For whipping small amounts of heavy cream and egg whites. - Never place your hand or any kitchen utensil in the bowl whilst the mixer is in operation.
- Never operate this machine with safety covers removed or with safety switches inoperative.
- When mixing is complete, turn off the machine and lower the bowl by lift handle/lever then take off the attachment.
- Then take out the bowl together with attachment.
- Finally take out the mixed ingredients.
- Please follow the capacity chart on the following page. Overloading or not following the chart will damage the mixer and void the warranty.
Recommended Mixing Capacities
| PRODUCT | MP7 | | | |
| Bowl size | 7 litre | |||
| Egg Whites | 0.3 ltr | |||
| Mashed Potatoes | 1.5 kg | |||
| Mayonnaise (Qts. Oil) | 2 ltr | |||
| Waffle/Pancake Batter | 2.8 ltr | |||
| Whipped Cream | 1.7 ltr | |||
| Fondant Icing | 1 kg | |||
| Cup / Layer Cake | 2 kg | |||
| Pound Cake | 2 kg | |||
| Sponge Cake | 1.3 kg | |||
| Pie Dough | 1.8 kg | |||
| Bread or Roll Dough (Light/Med, 60% AR) | 1.8 kg | |||
| Bread or Roll Dough (Heavy, 55% AR) | 1.1 kg | |||
| Thin Pizza Dough, Pasta, Basic Egg Noodle (40% AR) 5 min max mix time | 0.8 kg | |||
| Medium Pizza Dough (50% AR) | 1.4 kg | |||
| Thick Pizza Dough (60% AR) | 0.9 kg | |||
| Raised Donut Dough (65% AR) | 0.8 kg | |||
| Whole Wheat Dough (70% AR) | 1 kg |
Mixing Heavy Dough
The moisture content of heavy dough is a critical factor when selecting the correct mixing speed. You should never use 2nd speed when mixing heavy dough with an Absorption Ratio (AR) of 50% or less.
To determine the Absorption Ratio (AR) of a product, divide the water weight by the flour weight.
Example: Calculate the Absorption Ratio of a mixture containing 50g of water and 100g of flour. 5 ÷ 10 = 0.50 = 50 % = AR
- If high gluten flour is used, reduce above dough batch size by 10 %
- Capacities listed are based on flour at room temperature and water at 20°C. If using chilled flour, water below 20°C, or ice, reduce batch size by 10%
Cleaning Instructions
ALWAYS disconnect from the power source when cleaning or servicing this machine.
ALWAYS remove the attachment/s after each batch. If not, the attachment/s can become stuck on the shaft and difficult to remove.
NEVER attempt to clean this machine while it is in motion, serious injury could result.
NEVER use a scrubber pad, steel wool, or abrasive material to clean the mixer.
NEVER use bleach or bleach based cleaner.
Recommended Cleaning
| Part | Required Action | Frequency |
| Attachments | Hand wash using soap and water, rinse, dry and sanitise. | Clean after each use |
| Guard | Hand wash using soap and water, rinse, dry and sanitise. | When required |
| Bowl | Using a sponge or cloth, soap and water, apply pressure to ensure the bowl is clean, rinse, dry and sanitise. The bowl can also be placed in a dishwasher | Clean after each use |
| Bowl Guard | Hand wash using soap and water, rinse, dry and sanitise. | Clean after each use |
| Bowl Cradle | Hand wash using soap and water, rinse, dry and sanitise. | Daily |
| Planetary Shaft | Wipe with a clean damp cloth, dry & sanitise. | Clean after each use |
| Exterior | Hand wash using soap and water, rinse, dry and sanitise. | Daily |
| Hub Interior | Wipe with clean damp cloth, dry & sanitise. | Daily |
Maintenance
Regular maintenance is necessary on all mixers if they are to run smoothly and problem free.
| Part | Required Action | Frequency |
| Bowl Slide Rods | Apply food quality grease on the bowl slide rods. Raise and lower the bowl to distribute the grease onto the rods. | If the bowl becomes difficult to raise or lower. |
Troubleshooting
| Problem | Possible Causes | Action Required |
| Mixer will not turn | Bowl guard not in closed position | Rotate guard to the right until fully closed. |
| Bowl not raised | Raise bowl to highest position. | |
| Power not connected correctly | Check all power connections. Plug into a live socket (do not use extension cord!). Test socket with another item. | |
| Building circuit breaker is off | Check breaker box | |
| Internal overload tripped | Wait two minutes. Press stop button then press start button. (If overload continues to trip, reduce batch size and/or adjust recipe!) | |
| Mixing stops during mixing | Internal overload tripped | Wait two minutes. Press stop button then press start button. (If overload continues to trip, reduce batch size and/or adjust recipe!) |
| Damaged or broken transmission belt | Replace belt | |
| Mixer is noisy | Mixer is not installed on level surface | Adjust surface or relocate mixer |
| Bowl not seated correctly | Ensure bowl is seated into bowl cradle correctly | |
| Attachment not fitted properly | Remove and re attach attachment into position correctly | |
| Overloading bowl | Reduce batch size (see capacity chart) | |
| Damaged or worn belt | Replace belt | |
| Planetary ring gear needs more grease | Technician to inspect for source of noise | |
| Safety guard seized (will not move freely) | Clean & lubricate slide sheath | Technician must drop down planetary assembly to access mat & sheath |
| Attachments won’t go onto the planetary shaft easily | Lack of lubrication and /or cleaning of the planetary shaft | Wipe planetary shaft with a clean damp cloth and lubricate the shaft with mineral oil or food quality grease |
| Mixing time is too long | Three-phase mixer is wired incorrectly | Attachments should rotate clockwise around bowl. If not, electrician must rewire |
| Batch size too small | Increase batch size | |
| Bowl lift sticking or not operational | Lack of lubrication on bowl slides | Lubricate bowl slides with food quality grease. If still sticking, technician must clean bowl lift mechanism |
| Mixer will not mix medium or heavy loads | Incorrect or low voltage | Contact electrician |
| Attachments touching bottom or sides of bowl | Defective or dented bowl | Remove dents or replace bowl |
| Defective attachment | Replace attachment | |
|
Broken whisk wires | Batch size too large for mixer Items too firm Speed too high | Reduce batch size (see Capacity Chart) Adjust recipe Reduce speed |
| Hand utensil dropped into bowl while mixing | Stop mixer before working on mixture | |
| Broken beater | Ingredients too cold or too large (e.g. frozen butter/ cream cheese cut in chunks) | Wait for ingredient to reach room temperature before mixing Reduce chunk size |
| Broken dough hook | Batch size too large for mixer | Reduce batch size (see Capacity Chart) Adjust recipe |
| Ingredients too cold or too large | Wait for ingredients to reach room temperature before mixing Reduce chunk size | |
| Discoloration of mixed product | Bowl has not been cleaned thoroughly | Clean bowl again (refer to page 10) |
Spare Parts and Service
For more information on Metcalfe spare parts, accessories and service support, including breakdown drawings and parts lists please contact us on the details below.
Please always quote the Serial Number of the machine. This can be found on the serial number plate which is located on the rear of the machine. 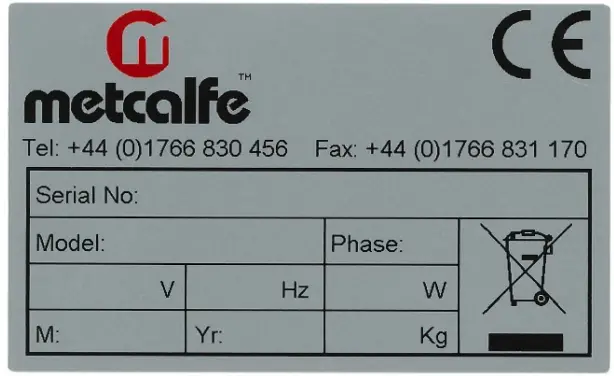
| Metcalfe Sales & Spares Department | [email protected] |
| Metcalfe Service Department | [email protected] |
| Metcalfe Website | www.metcalfecatering.com |
| Metcalfe Telephone Number | 01766 830 456 |
Additional copies of this instruction manual can be obtained by either visiting our website or contacting the sales department. https://flowto.it/cc6Ot9c8
Metcalfe Warranty
All Metcalfe products are guaranteed against defects in material and workmanship for a period of one year from date of Invoice, except where specially noted.
The Company’s obligation under this warranty is limited to repairing or replacing, without charge, any part or parts found to be defective under normal use, in accordance with the specified operations manual and capacity ratings.
On all return to factory warranty items, it is the responsibility of the purchaser to return the entire unit to the factory, in a clean condition, properly packed and labelled.
All repairs, alterations or replacement of materials or parts not authorised by Metcalfe will automatically void all warranties in their entirety. year parts only) and full after sales service.
All Metcalfe slicers (except Simple Line) are covered by a 2-year warranty (1st year parts and labour, 2nd
All Metcalfe MP mixers are covered by a 3-year warranty (1st year parts and labour, 2nd & 3rd year parts only) and full after sales service.
There is a limited 6-month warranty on the following:
- Mixer attachments (beater, whisk and dough hook)
- Parts purchased or supplied for the repair of Metcalfe equipment
This warranty does not cover the following:
- Failure due to neglect, abuse, careless handling or misuse of machine
- Failure caused due to improper maintenance
- Blender clutches
- Knives and gears on can openers
- Sharpening of slicer blades
- General wear and tear
Metcalfe and its suppliers reserve the right to make changes in design and specification to any product without prior notification.
![]() Food Preparation Machines
Food Preparation Machines
Made in Sweden
hallde.com
Metcalfe Catering Equipment Ltd
Haygarth Park
Blaenau Ffestiniog
Gwynedd, LL41 3PF
T 01766 830 456
E [email protected]
W www.metcalfecatering.com https://flowto.it/cc6Ot9c8
![]()


