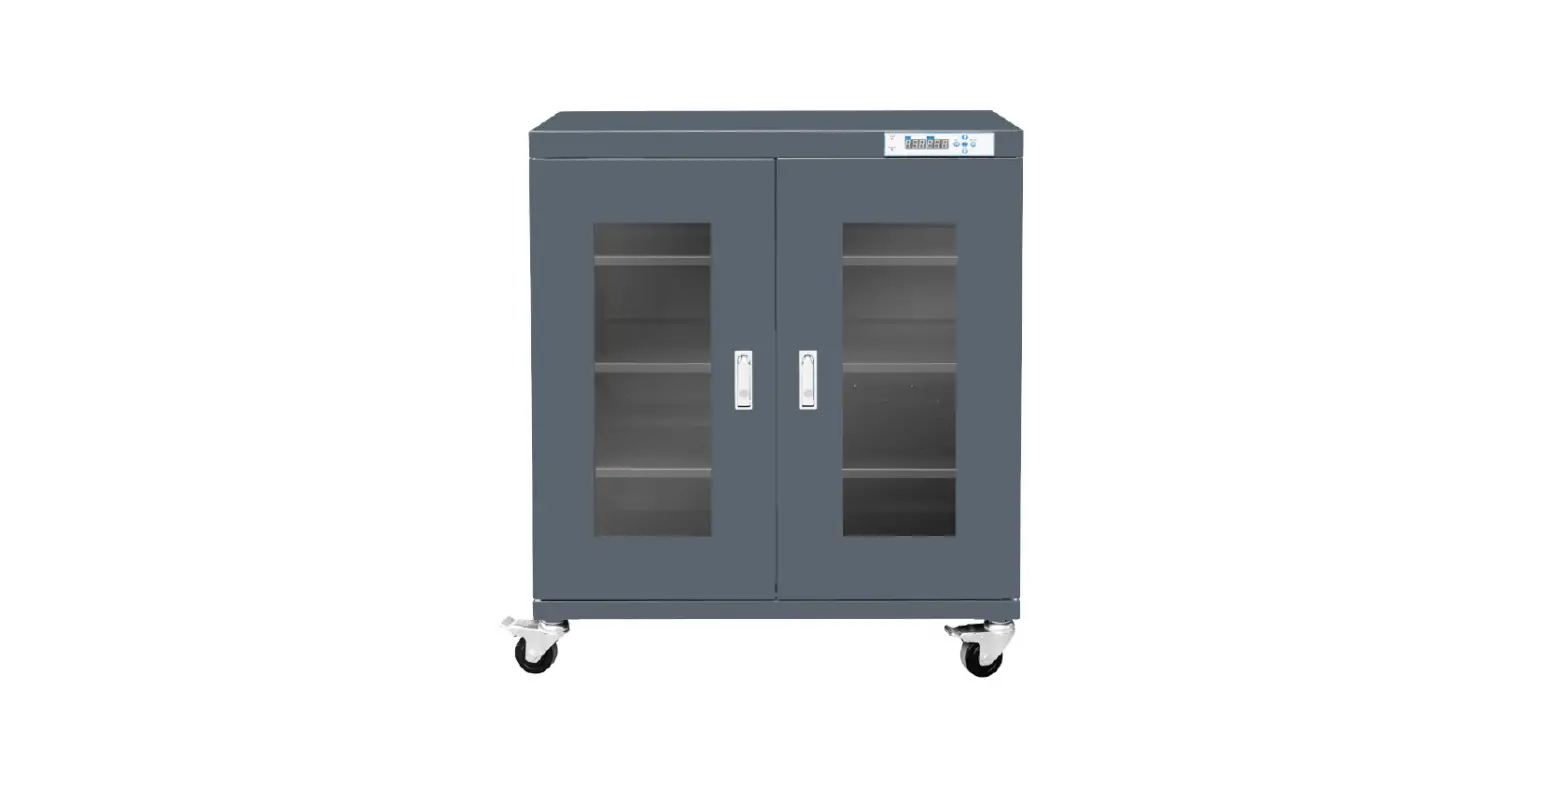
CATEC DRY***A Dry Cabinet
General Statement
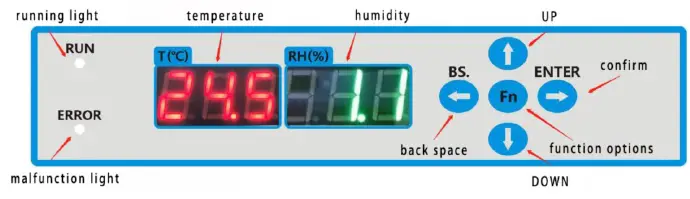
- On the display panel, the figure in RED means temperature, and the Green refers to humidity. The inside temperature will be 1-3 degrees higher than the ambient temperature.
- The equipment is clarified as per different humidity demand, with model spec as DRY+size+function:
- DRY***A, 20-60%RH;
- DRY***B, 10-20%RH;
- DRY***C, 1-10%RH;
- DRY***U, 1-5%RH;
- DRY***D, 1-60%RH (working with N2 or compressed air).
- Additional “E” before ‘A’B’C’U’ D’ means anti-ESD painted.
- Other special functions:
- H, with heating system for up to 40℃ or 60℃;
- L, with light tower for temperature / humidity limitation alarm;
- S, cabinet in stainless steel.
Installation Instruction
- Place the dry cabinet on a level and strong surface. Turn the adjuster to be balanced.
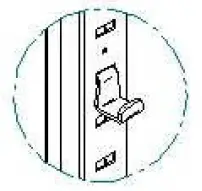 Adjust the height of the shelf as per your storage goods, and the shelf clasp should be put as the following figure.
- The clasp holes are at regular distance on the slat, to support the shelf on the level surface and to be adjusted up or down by 2.5cm.
- Leave a space of at least 5cm behind the dry cabinet from the wall for ventilation.
- Don’t put cabinet in areas where there is direct air flow, such as in front of air conditioner or hot area.
- Don’t place the cabinet in direct sunlight.
- Don’t place cabinet in area where there is smoke or stream.
- Connect the signal cable in series as the number on the plug, then switch on the power supply.
- The humidity can be set by pressing the ‘up’ and ‘down’ button as per your need.
- For first application or usage after long-time non-working, you need to run the empty dry cabinet for over 12 hours until the inside humidity moves down to a reasonable lower level as per the model type.
- The dry cabinet has the memory function to keep the last setting, so don’t need to reset the humidity target again even after power off.
- Don’t store the materials like fibre board, paper or wood etc., that contains high moisture, in the dry cabinet. This will delay the humidity elimination process.
- Don’t open the windows too frequently. The opening times shall be well controlled and each opening better to be finished in 15 seconds.
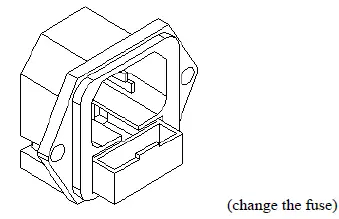
- If you have a short circuit, you can replace the fuse to restart the dry cabinet. The fuse case is on back of the drying module, as below figure. There are two fuses inside the little case, of which the inside fuse is the working fuse and the out fuse is for spare.
Operation on Control Panel
- Options of the Control Panel
- 2 LED lights for temperature T(℃) in RED and humidity RH(%) in GREEN, 5 buttons for operations;
- Button of RUN indicates normal working, ERROR for malfunction. Besides, the ERROR will light up once when connecting USB successfully.
- UP/DOWN arrows are for figure reducing or increasing. BS. is for back space, ENTER for confirmation, and Fn is for administration. When press Fn to enter admin mode, you’ll have 11 functions for resetting, press UP or DOWN arrow to set the required value and press ENTER for confirm, then press BS. back to working status.
- Starting up
- The LED lights will light up for 3 times for self-checking.
- After the self-checking, there’ll be X-Y V*.*, of which X stands for dry cabinet (A-std dry cabinet, B-N2 cabinet, C- multi-function cabinet, D- oxygen detection cabinet), Y stands for the system mode(1-std mode, 2-USB mode, 3-blue tooth mode, 4-networking mode), V*.* means the controller version.
- You may reset the target humidity after the self-checking, the figure in RED is the bottom and the Green is the roof value.
- Administration mode
Target humidity setting (for standard models without additional functions like heating, alarming, or oxygen detection etc.)- Press Fn to enter admin mode, and press UP or DOWN arrow to select the function (01 for target humidity setting) for resetting and again press UP or DOWN arrow to set the target value, then press ENTER for confirm, you can see SUC in the Blue column, then press BS. back to working status. Target rate setting for air injection cutting off (for the dry cabinet with nitrogen purging or oxygen detection).
- Press Fn to enter admin mode, and press UP or DOWN arrow to select the function (02 for oxygen rate setting) for resetting and again press UP or DOWN arrow to set the target value, then press ENTER for confirm, you can see SUC in the Blue column, then press BS. back to working status. Resetting for the drying cabinet with humidity alarm (for the models with alarming system)
- Press Fn to enter admin mode, and press UP or DOWN arrow to select the function (03 for humidity limit setting) for resetting and again press UP or DOWN arrow to set the limitation value. The flickering value in RED will be the bottom limit value while the BLUE figure is the roof limit value. After finish the resetting, press ENTER for confirm, you can see SUC in the Blue column, then press BS. back to working status. It’s defaulted in the system that the difference between the bottom limit and roof limit is 5%RH (5 points in the setting figure). When set the bottom limit value as 0 while the roof limit is 100, the alarming system will be cancelled. Alarming delay time resetting (for the drying cabinet with humidity alarming)
- Press Fn to enter admin mode, and press UP or DOWN arrow to select the function (04 for alarming delay time setting) for resetting and again press UP or DOWN arrow to set the target value. The flickering value in BLUE will be the bottom limit value while the BLUE figure is the roof limit value. The time resetting range is 0~99min. After finish the resetting, press ENTER for confirm, you can see SUC in the Blue column, then press BS. back to working status.
- Resetting for calibration reminder
- All CATEC models will be well inspected for outcoming. Normally in the first 3years after installation, no need calibration. We suggest once calibration in each year after the first 3-year working, as per ISO regulations on the humidity and temperature sensors. You can reset on the system for calibration notice as below operation:
- Press Fn to enter admin mode, and press UP or DOWN arrow to select the function (05 for calibration due date setting) for resetting and again press UP or DOWN arrow to set the target value. The value in RED will be the due date while the BLUE figure will be the options of ON/OFF/Clr. After finish the resetting, press ENTER for confirm, you can see SUC in the Blue column, then press BS. back to working status.
- For calibration, press Fn for about 5s until the figures sparkle, then press ENTER to select the figure to be calibrated, press ENTER again on the figure to be revised and press the UP or DOWN arrow to calibrate, and then press ENTER to finalize the operation. You can see SUC on the display and return to normal state.
- Target temperature resetting for the drying cabinet with heating (for the models with heating)
Press Fn to enter admin mode, and press UP or DOWN arrow to select the function (06 for target temperature setting) for resetting and again press UP or DOWN arrow to set the target value. The flickering value in RED will be the bottom limit value while the BLUE figure is the roof limit value. After finish the resetting, press ENTER for confirm, you can see SUC in the Blue column, then press BS. back to working status. It’s defaulted in the system that the difference between the bottom limit and roof limit is 5℃. The temperature resetting range is RT~40℃,from room temperature to 40℃. - Resetting for temperature alarm limitation (for the dry cabinet with temperature alarming system)
Press Fn to enter admin mode, and press UP or DOWN arrow to select the function (07 for temperature alarm limitation setting) for resetting and again press UP or DOWN arrow to set the target value. The flickering value in RED will be the bottom limit value while the Green figure is the roof limit value. After finish the resetting, press ENTER for confirm, you can see SUC in the Blue column, then press BS. back to working status. The limitation is defaulted as 0~40℃ and you should keep the difference between the bottom limit and roof limit to be 5℃ in the resetting. The temperature resetting range is -20~70℃. - Delay time resetting for the drying cabinet with temperature alarm (for the dry cabinet with alarming system)
Press Fn to enter admin mode, and press UP or DOWN arrow to select the function (07 for setting the delay time of temperature alarm) for resetting. The flickering value in GREEN will be the current delay time of temperature alarm. You could again press UP or DOWN arrow to set the target value. After finish the resetting, press ENTER for confirm, you can see SUC in the GREEN column, then press BS. back to working status. The resettable range is 0~99min. - Sleep mode of the control panel
Press Fn to enter admin mode, and press UP or DOWN arrow to select the function (09 for sleep mode setting) for resetting and press ENTER for sleep mode, you can see all lights off. If you want the system to be back to normal display, operate again as above. - System restart
Press Fn to enter admin mode, and press UP or DOWN arrow to select the function (10 for restart mode setting) for resetting and press ENTER for system restart. - Resetting interval time for data logging (for the dry cabinet with data logging system)
You can reset the interval time in the system to record to record the working data of the cabinet that can be read or recorded via USB or Bluetooth or networking, connected with your computer or smart phone. Press Fn to enter admin mode, and press UP or DOWN arrow to select the function (11 for interval time setting of data logging) for resetting and press ENTER for the interval time setting mode. The flickering GREEN figure will be the current interval time of the data logging. You could again press UP or DOWN arrow to set the target value. After finish the resetting, press ENTER for confirm, you can see SUC in the GREEN column. Or you can press BS. back to working status to keep the old value. The resettable interval time range is 1~60min, with default of one point recording per 3min. - Bluetooth connecting (for the dry cabinet with Bluetooth)
Press Fn to enter admin mode, and press UP or DOWN arrow to select the function (12 for setting of Bluetooth connection) for resetting and press ENTER for the connection setting. The RED figure will display bLE and the GREEN will show 30s count down within which you should finish the Bluetooth connecting. After connecting, you can press ENTER to stop it and return back to working status. - Networking resetting(for networked drying cabinets)
Press Fn to enter admin mode, and press UP or DOWN arrow to select the function (13 for setting of networking) for resetting and press ENTER for the network setting mode.
Below are the network parameters which is subject to change via CATEC software:- Local ip: 192.168.0.120
- Subnet mask: 255.255.255.000
- Default gateway: 192.168.000.001
- Local port: 050000
If you have the models with other options excluded, please contact our service for instruction.
Application Notice
- Each time of door opening is suggested be as fast as possible, better controlled in 15 seconds, to minimize the humidity rising.
- Keep power on if possible, to keep the cabinet in good working status.
- When goods stored inside the cabinet, the cabinet humidity will rise due to the moisture contained in the goods. It may take 1 to 2 days for dehumidifying. For the goods like package paper or cloth that contains heavy humidity, it might take more than 2 days to dehumidify to normal humidity status.
- The dry cabinet has the memory function, so don’t need to set the humidity again after the last setting, even after power off.
- The error of humidity value is ±3%RH and the temperature error is about ±2℃.
- Don’t cover the exhaust vent on the back of the dry cabinet.
- If been power off over 24 hours, we suggest to move your goods out of the dry cabinet.
- Please keep the electric lines well connected for static grounding.
- It’s normal that the surface temperature of the dry cabinet will rise a little when the dry units under moisture exhausting process.
- If the humidity does not drop down, please switch off the power and restart it again for over 12 hours until the dry cabinet works normal.
Cable Layout of Cabinet Backside (DRY1436EC/EU as example)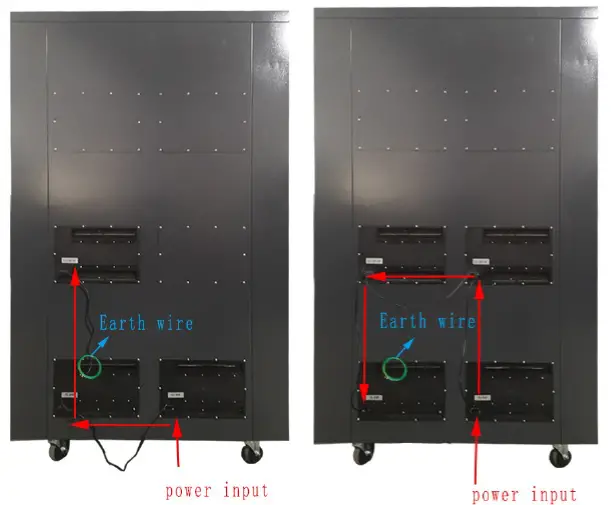
SPECIAL INSTRUCTION FOR N2 CABINET (D type)
- Please make sure of the adaptability of power supply before your usage. Normally the power supply is 110V/50Hz, but some areas are different.
- Plugging into the N2 pipe at the inlet of flow-meter and the inlet pressure should be controlled within 0.2~0.7Mpa. The rate of flux can be adjusted within 0~25L/M or 0~60L/M or 0~300L/M, depended on the flow-meter type. The suitable flow rate is about 10-25L/M, if not customized.
- Setting the target humidity during the running period, and better shut off the flow-meter before open the door, then open up the flow-meter again after close the door and adjust the flux for saving N2。
- When the humidity is 0.5%RH higher than the setting humidity (when set within 1~3%RH), the electromagnetic vale will open automatically to restart the air injection. And the valve will open automatically when humidity is 1.5%RH higher than the set target (within 3~10%RH), and 2%RH higher to open if the set value is over 10%RH. You can see the float ball rising up and the cabinet to be filled with N2. If you find the float ball not moving, please check whether any gas leakage happens at the connectors.
- The automatic active time of electromagnetic valve is about half minute.
- The N2 should be clean and does not contain too much impurity such as oil or granulated solid that will damage the electromagnetic valve.
- If you find the cabinet running wrong, please switch the power off firstly. Then restart again after half minute and adjust the setting humidity once again.
Notice points for maintenance
- Is it plugged in properly? Is the power switched off? Is the fuse broken?
- Is the humidity setting correct?
- When operating the dry cabinet for first time or having kept it non-used for long time, did you switch it on and leave it working for at least 12 hours with the empty cabinet?
- If you want to store materials with high moisture, like paper piles, it may take several days for the dehumidifying process.
- In the case the dry cabinet fails to work after above checking, please contact us without hesitation.
Application Scope
Reference humidity and storing goods
| Relative Humidity | Suitable items for storage |
| A/60~50%RH | Paintings, antiques, paper money, old books, Fax paper, copy paper, etc. |
| A/50~30%RH | Cameras, CD, LD, technical drawing, video cameras, lenses, microscopes, endoscopes, binoculars, magnetic tapes, disks, records, films, negatives, positive films, musical instruments, stamps, furs, medicinal materials, tea, coffee, cigarette, leather goods, etc. |
| A/30~20%RH | Precision dies, measurement instruments, all electronic parts to be stored within 45days, normal PCB, phosphor, metallic powders, semiconductors, medical supplies, etc. |
| B/20~10%RH | Precision electronic parts to be stored within 90days, IC, BGA, special chemicals, lead free PCB, photo couples, XTL, SCR, special samples, measuring tools, seeds, pollen, seedlings, etc. |
| C/10~1%RH | Materials which are typically sensitive to humidity, e.g., high precision IC, BGA, silver articles, copper articles, etc. |
| U/5~1%RH | Extremely humidity sensitive device with materials that are likely to go oxidized like silver, brass, bronze, tungsten, etc., and nitrogen condition is recommended most often. |
AFTER SERVICE GUARANTEE
Thank you for buying our dry cabinet. Our warranty terms is two (2) years from your purchase date. Please ask your distributor to fill in below form to show us for any maintenance. Any problems caused by as below reasons will not be included in the warranty:
- Incorrect operation;
- Normal consumables of the equipment.
Special notice:
- A, necessary charging though within warranty period:
- problems caused by incorrect operation, or natural disaster like bad weather, flooding, lightning strike, Pats&Rat disaster, etc.;
- incorrect repairing, opening, changing, moving, shipping or dropping;
- problems caused outside the cabinet, like wrong power connecting, etc.
- B, we will have reasonable charges for parts changing after the warranty period.
- C, if you want to send the product to our service for any maintenance, please show the AFTER SERVICE GUARANTEE form. You have to pay for all shipping cost.
- D, the AFTER SERVICE GUARANTEE form shall be well kept. We prepare only one Form for each of the device.
| Spec: | Model spec.: | ||
| user | Company name: | ||
| Tel.: | |||
| Address: | |||
| Purchase date:(date/month/year) | Stamp of the distributor/seller | ||
| Distributor/seller: tel.: address: | |||


