
Single zone Bluetooth keyboard software development requirements
- The PCBA size
The tolerance of PCB dimension is + -0.2mm
PCB thickness 1.0mm tolerance + -0.1mm
1.1 Forward and reverse trend diagram of PCB:
The drawings will be packaged later - Compatible system
Windows OS, Mac, Android - Layout Requirements (KR, US universal Software)
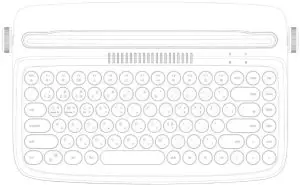
3.1 KR layout:
Retro Classic Mini BT KBD – KR 3.2,US layout
Retro Classic Mini BT KBD – US
- LED lights description
From left to right are LED A, LEDB
LED A with multi-function as below, RGB light or three-color light
A1 BT pairing indicator, The blue light blinks when the keyboard is pairing with Bluetooth and goes off when the Bluetooth is connected
A2 power indicator, the single battery is correctly loaded into the battery compartment, the keyboard is green for 3 seconds after power-on and then off
A3 When the keyboard is low voltage, the red light blinks
Lamp B functions as follows: monochrome white light
B1 is white when CAPS LOCK on - Sleep time: when no key is pressed down, 20minslater the keyboard will enter the sleep state.Press any key to wake up and automatically connect back to the connected
device - Low voltage alarm: when voltage is lower than 2.3V, the green light alarm; when the voltage is lower than 2.1V, the keyboard enters into shutdown
- working distance: according to the requirements of CLASS2, no obstacles test effective distance is > 10meters
- Current (Motherboard keypress current (LED does not light up 0.8~ 1.2mA): no key standby current: 0.5~ 1.0mA (this current as far as possible in the state of maintaining the connection to do the lowest);20 minutes without pressing the button into the sleep state, sleep current: 0.01~0.04mA):
- Press the FN+C, the three green lights will turn on to clear the pairing devices
- Press FN + Q to switch to android, FN + W to windows, FN+E to IOS
- Multimedia specification
FN+ to lock multimedia
FN+ to reduce the brightness of the screen
FN+ to increase the brightness of the screen
FN+ Multitasking window (win+tab)
FN+ web home
FN+ to show desk(win+D)
FN+ search
FN+ previous
FN+ pause
pause
FN+ next
next
FN+ mute
mute
FN+ volume-
FN+ volume+
Press F key alone for the corresponding multimedia function, FN + F key to display the function of the F key
FN+ The BT pairing
 - Name of device:Act to keyboard
- Pairing with password
 3.2,US layout
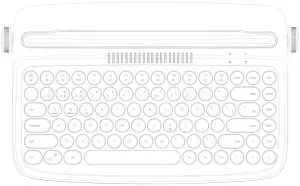
 to lock multimedia
 to increase the brightness of the screen
NOTE: This equipment has been tested and found to comply with the limits for a Class B digital device, pursuant to part 15 of the FCC Rules. These limits are designed to provide reasonable protection against harmful interference in a residential installation. This equipment generates uses and can radiate radio frequency energy and, if not installed and used in accordance with the instructions, may cause harmful interference to radio communications. However, there is no guarantee that interference will not occur in a particular installation. If this equipment does cause harmful interference to radio or television reception, which can be determined by turning the equipment off and on, the user is encouraged to try to correct the interference by one or more of the following measures:
– Reorient or relocate the receiving antenna.
– Increase the separation between the equipment and receiver.
-Connect the equipment into an outlet on a circuit different from that to which the receiver is connected.
-Consult the dealer or an experienced radio/TV technician for help
Changes or modifications not expressly approved by the party responsible for compliance could void the user’s authority to operate the equipment.
This device complies with Part 15 of the FCC Rules. Operation is subject to the following two conditions:
(1) this device may not cause harmful interference, and
(2) this device must accept any interference received, including interference that may cause undesired operation.


