PTZ 2.4G Wireless
Transmission Camera
User Manual
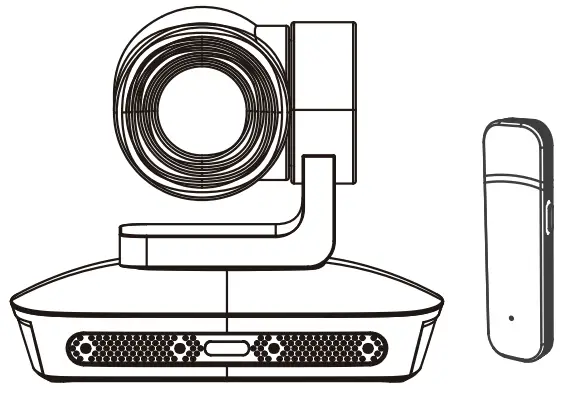
Product Display
- Wireless Camera

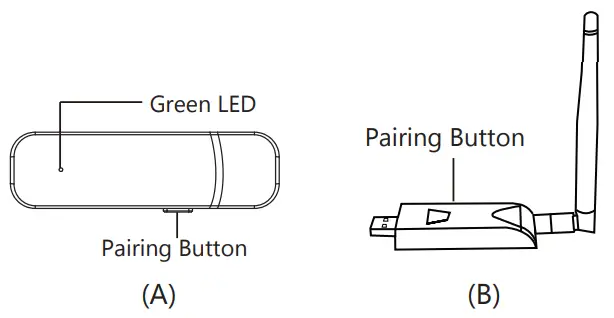
- USB Receiver A & B Optional

Packing Box


Product Features
- 2.4G wireless connection, 300ms latency time, Cable free
- Transmission distance : 20meters indoor and 50m in open air
- 4 Digital Microphones Array and 10 meters voice pickup
- 2.0 million pixels,1/2.8” HD color CMOS
- 1080P/30fps, 720@30fps
- Adopt AEC & ANS & AGC technology
- Camera automatically rotates and tracks the voice
- 10x Optical zoom
- With IR Remote Controller
Install the camera
(1).Place your camera
Designed for the way you like to make a video call, Live, conference, etc. Place the Camera where you want it like on desktop, Tripod, wall, ceiling.
(a). Put on top of desk
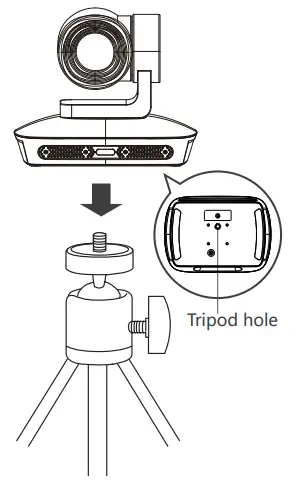
(b). Put on a tripod
(Tripod is not including in the package )

(c). Ceiling Installation
Product bracket, and install the corresponding screws (optional )
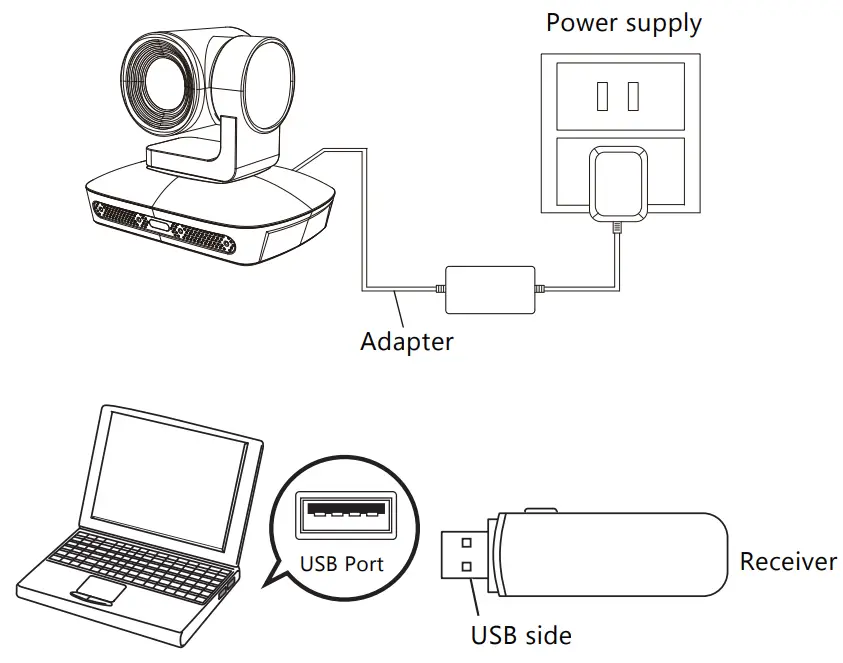
Connect the camera
- Plug your camera into the power supply with the adapter
- Connect the USB connector of the receiver to the USB port of your computer.
The driver will be installed aut omatically.
The installation status is displayed in the task tray during installation.
Note:
- Wireless transmission distance 20m indoor and 50m in open straight line
- Since this product is a wireless connection, a wired connection is not possible. Cannot be connected using the included USB cable

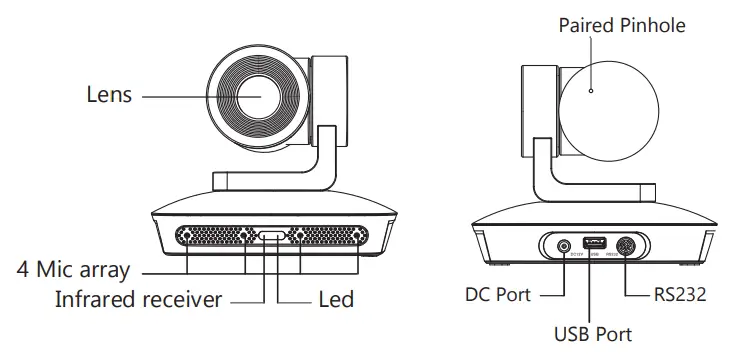
How to re-connect
The pairing was completed at the factory, but if the camera is out of pairing, you can re-connect it.
- Power on the camera and let the camera can self-check for moment,
- Connect the receiver to your computer
- Press the pairing button on the camera body which on the back side of the camera by a needle.
Press the pairing button on the receiver , when the green LED of USB receiver is keep lighting then pairing completed
How to check webcam is connected
In the process of running the application, if you change the connector or settings, it may not be recognized immediately, please end the application once and start again.
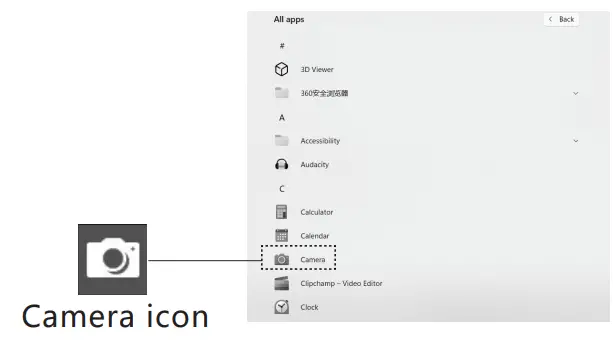
For Windows 11
- From Windows start select all apps
- Click Camera
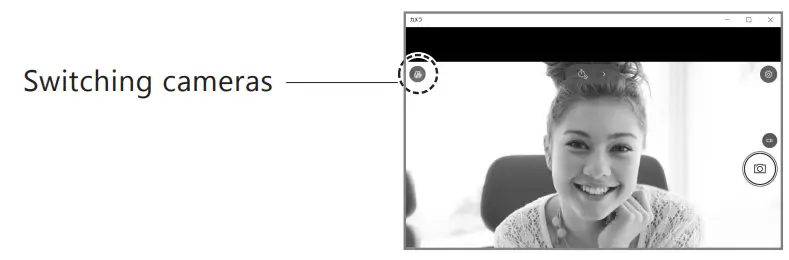
For Windows 10
- Click windows start and click”camera” is projected.

- When multiple webcames are connected and the image of this product is not displayed Click ”Switch Camera” to change the camera.

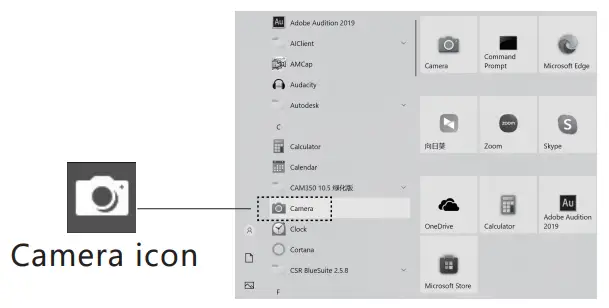
Switching webcam for Windows 8.1-8
- Click Windows Start to display the Start screen.
- -1.The screen on the right is displayed Click the camera icon.
If the icon is not displayed, click the arrow icon to display the list of apps. 2-2. Click the camera icon from the app list
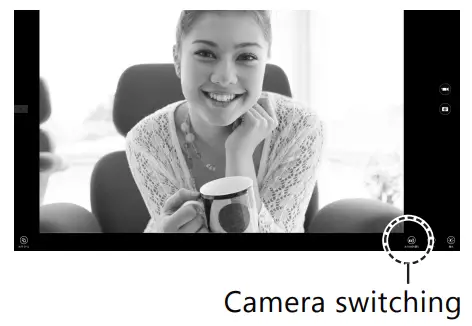
- The image of the webcam is projected.
If multiple cameras are connected and the image of this product is not displayed, Right-click the screen to display the setting screen. Click “Switch Camera” to change the camera.

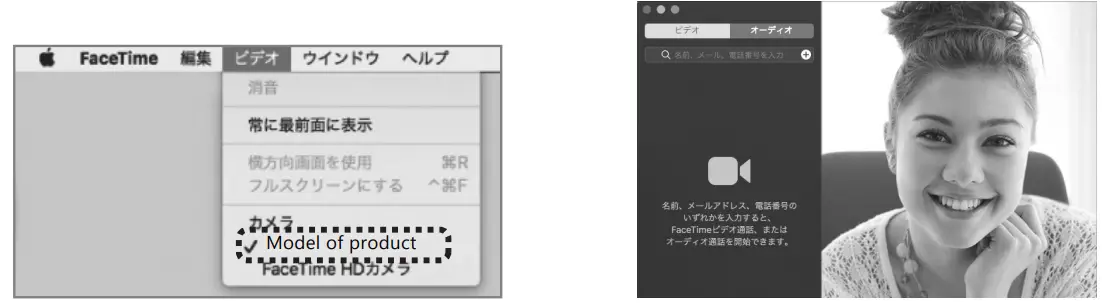
For Mac
- Start 1.0S and in the application folder Launch Face Time!
- From “Video”, choose the webcam model of this product
- The image taken with this product is displayed on the preview screen.
Product Specification
| Camera, Lens | |
| Image Sensor | 1/2.8 inch CMOS Sensor |
| Min Lux | 0.1Lux(F1.2) |
| Effective Piexl | 2.0 MP |
| Focus Mode | 10x Optical zoom |
| Shutter Speed | 1 to 1/10000s |
| Horizontal Field of View | 54.8°(W)~5.8°(T) |
| Frame Rate | 1920×1080,1280×720, 640×480 |
| Aperture Mode | manual |
| Backlight Compensation | Support |
| Wide Dynamic | Support |
| Picture Adjustment | Brightness 、Chroma 、Saturation 、Contrast 、Acut |
| Microphone | |
| MIC Array Quantity | 4 |
| MIC Array Form | Linear |
| Microphone Spacing | 45.8mm |
| Sampling Rate | 16KHz/48KHz |
| Sensitivity | -29dBFs |
| Far-field Pick up Voice Distance | 0-10meters |
| Horizontal Voice Pick up Angle | Horizontal 180° |
| SNR | 65.5dB |
| Communication Mode | Full duplexuplex |
| Interface | |
| Video Compressed Format | MJPEG |
| Control Interface | RS-232, UVC |
| Control Agreement | VISCA/PELCO-D/PELCO-P |
| Communicate Baud Rate | 2400/4800/9600/115200 |
| Power Interface | DC-038 power socket (DC12V ) |
| PTZ | |
| Pan Rotation | -170°~ +173° |
| Tilt Rotation | -30°~ +90° |
| Horizontal Rotate Speed | 0.1~100°/second |
| Vertical Rotate Speed | 0.1~80°/ second |
| Other | |
| Power Adapter | Input AC100V~AC240V Output DC12V/2A |
| Decoder | Built in |
| Input voltage | DV12V |
| Power Consumption | 12W(MAX ) |
| Storage Temperature and Humidity | -10°C ~ +60°C / 20% ~ 95% |
| Working temperature and Humidity | -10°C ~ +50°C / 20% ~ 80% |
| Operating Environment | Indoor |
| Baud Rate | 2400/4800/9600/115200 |
| Protocol | VISCA / PELCO-D / PELCO-P |
| Address Setting | Max 1~255, 10 via remote |
| Size | 160.7*115.1*131.4mm |
| Weight | 600g |
Remote Controller Specification
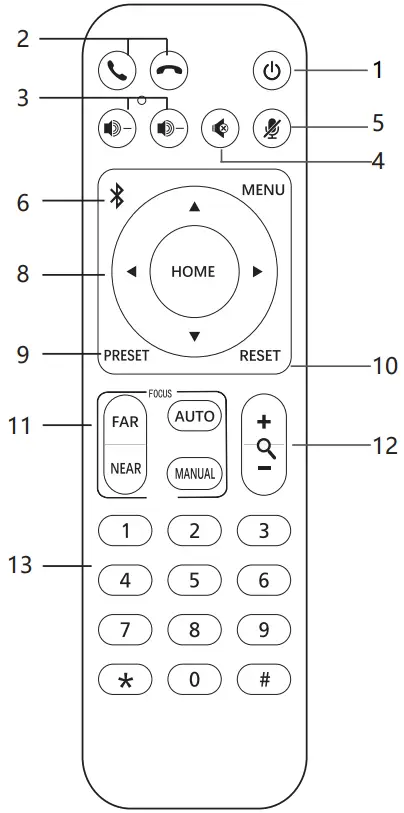
- Power button: Press the power button, the camera enters standby mode
- Answer/end button: Answer/end call
- Volume button: Speaker volume down/up
- Speaker mute button: Turn on/off the speaker mute
- Microphone mute button: Turn on/off microphone mute
- Bluetooth button: Turn on/off the microphone Bluetooth. (Only for Bluetooth version, not for MC200S).
Bluetooth key + “*” key. Turn on the soundtracking function;
Bluetooth key + “#” key. Turn off the soundtracking function;
“*” key + number keys to adjust the camera soundtracking sensitivity/time.
If you press “*” + the number 5 key first, the duration of the person’s speech needs to be greater than five seconds before the camera can turn. The duration of speaking is less than five seconds, the camera will not turn.
After successfully connecting to the product, the sound tracking function will be turned on by default. - Menu button: Single press menu button no use, Press the [Menu]+ [0] button Combination to ceiling installation
- Camera PTZ control button: Use the control button to adjust the camera to the position you want. Press the HOME button to return the camera to the middle position.
- Preset position setting button: Press the PRESET button + number button (1-9) to save the corresponding preset position of the camera.
- Preset position clear button: Press the RESET button + number button (1-9) to clear the corresponding preset position of the camera.
- Focus button
AUTO: Turn on Auto Focus mode
MANUAL: Turn on Manual Focus mode
FAR: Manual focus button to make distant objects clearer
NEAR: manual focus button to make nearby objects clearer - Camera zoom button: “+” camera lens zooms in, “-” camera lens zooms out.
- Number button: cooperate with setting/calling preset position.
Precaution
- Electrical Safety
Confirm country and local electrical safety standards when using or installing the product. The product itself has no power switch. Please stop power supply or plug out power socket when it is not in good working. Video wire and control wire should be insulated and individual connected, can’t mix-up with other wires. - Transportation with Care
Product should be protected against extremes of stress, vibration and moisture in transport, storage and installation. It is transported by integrated packing style. - Power Supply
Product supplies 12V DC power. - Installation with Care
Don’t turn the camera head manually. Doing so may result in mechanical damage.
The product should be put on a stable horizontal table and does not be installed at a tilt, or else, which may cause a tilted image.
Don’t focus the camera directly on the sun or other bright objects no matter when in use or not. Otherwise, it may affect image quality.
Don’t apply corrosive liquid, gas or solid, to avoid damaging the cover which is made up of plastic material.
Make sure there is no obstacle with the camera’s rotational range when installing.
Never power on before installation has been completed. - Prohibited Unauthorized Disassemble
There is no part for users to disassemble voluntarily. The Company is not responsible for any unauthorized modification or dismantling.
Before the installation of the company’s products, please read the product manual carefully.
FAQ Processed.
– A1: Compatible.
– A2: Many companies use firewalls when connecting to the Internet, so they may not be available for video conferences. Please contact the server administrator for details.
– A3: It depends on the performance of your computer and the speed of your internet connection.
– A4: Please refer to “5. How to check if this product is recognized correctly”.
Warranty and Service Information
This product is guaranteed for a period of one year from the date of purchase. Only product defects caused by its quality can be returned for repair or replacement.The returned product package shall be in its original package or package with an equal degree of protection.
Following information must be presented to obtain Warranty Service:
(a) the product;
(b) proof of purchase clearly indicates date of purchase & product model;
(c) reason for return.
This Warranty does not cover defects or damages that result from:
(a) improper storage, misuse or abuse, accident or neglect, such as physical damage (cracks, scratches, etc.) to the surface of the product resulting from misuse;
(b) contact with liquid, water, rain, extreme humidity or heavy perspiration, sand, dirt or the like, extreme heat, or food;
(c) use of the product or accessories for commercial purposes or subjecting ; the product or accessories to abnormal usage or conditions;
(d) other acts which are not the fault of seller;
(e) damage due to improper operation;
(f) product’s battery which have not been charged over six months.


