qtx HIPAR-126 Outdoor LED PAR Can
- Please read through this manual thoroughly before use, any damage Caused by misuse of product will not be covered by warranty.
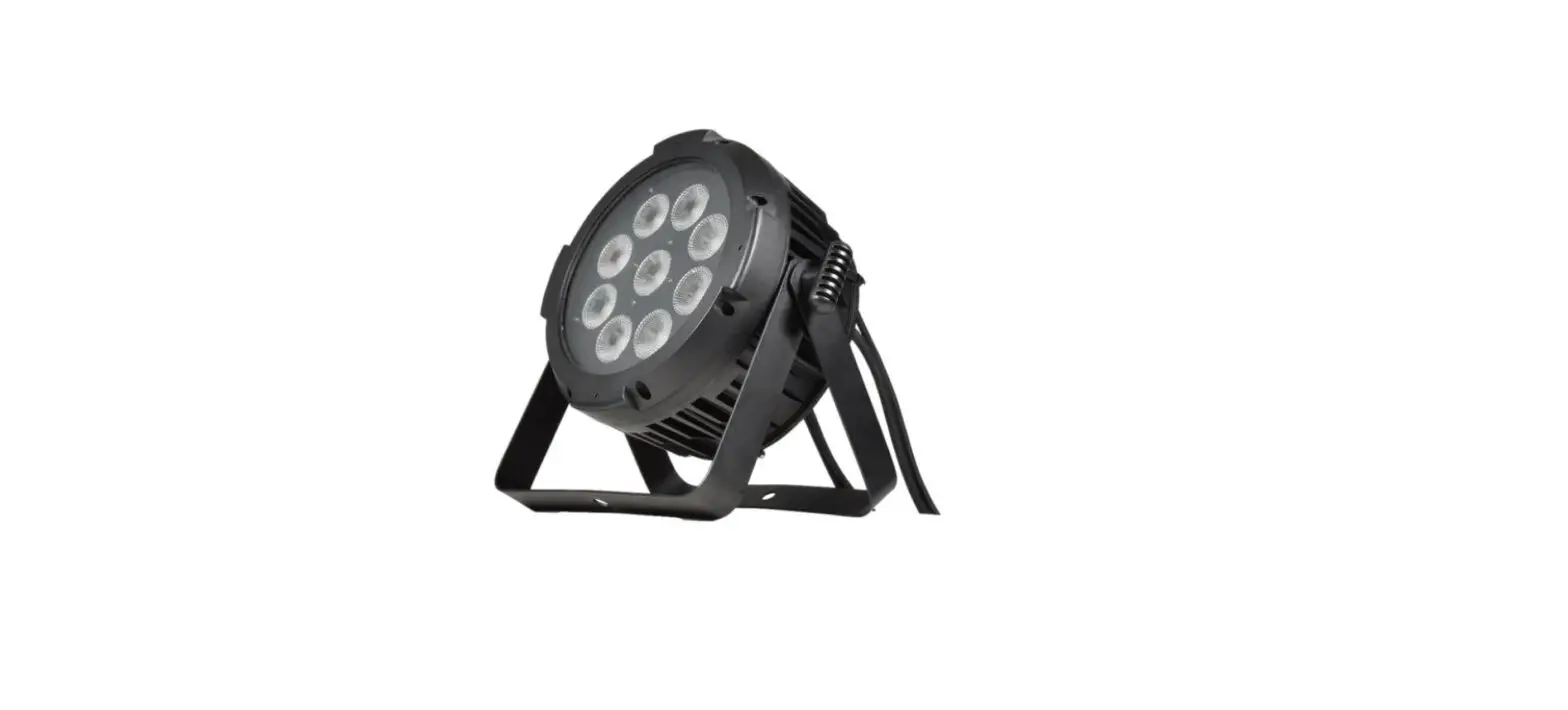
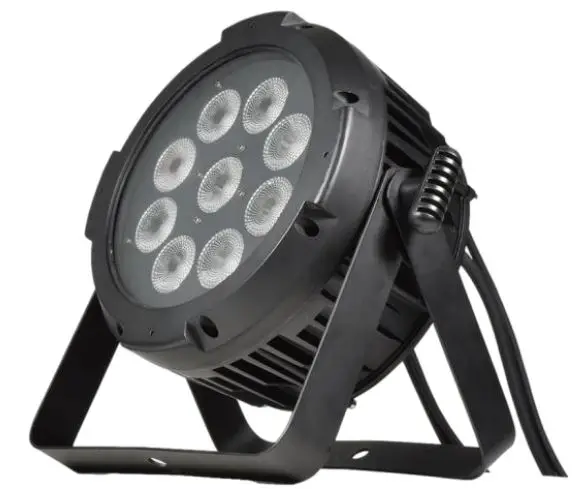
- Thank you for choosing the HIPAR-126, a high-power LED PAR can fitted with 9pcs of 10W super bright 6-in-1 COB LEDs, built into an IP65 weatherproof housing for outdoor or indoor applications. Can be operated standalone from the internal auto programs or via DMX512 controller is more precise control is required. Pre-wired with waterproof power and DMX signal leads for easy connection and daisy-chaining. Supplied with split bracket which can also be used as a floor stand. Ideal solution for parties and events where background colour wash or U/V illumination is required.
In the box
- Your HIPAR-126 should arrive with you in a single carton in good condition. The carton should contain
- 1 x main unit with bracket and screws, 1x remote control, 1 x UK IEC mains lead and 1 x user guide.
Warning:
- To prevent risk of fire or electric shock, do not expose the unit to rain or damp environments. In the event of a spillage, disconnect the mains and allow the unit to dry out naturally. Qualified personnel should then check the unit before continuing use.
- Please do not open cover, contains high voltage. This product is not serviceable or repairable by the end user. Please refer to qualified personnel for service and repair.
Installation
- The HIPAR-126 is supplied with a dual hanging bracket, which can also be used as a free-standing support.
- When installing the fixture, ensure all fixings are secure, controls and connections are accessible and allow enough space for air to circulate around the housing. Do not aim directly in line of sight or very close to people where the extremely bright output of the fixture may be harmful to eyesight.
- The HIPAR-126 is IP65 weatherproof, and all electrical connections are hard-wired with waterproof connectors. An XLR to the waterproof connector is provided for adapting the DMX input lead to a standard DMX signal input. A mains plug to the waterproof connector is provided to adapt the power input lead to a standard mains supply.
- Connect the waterproof connectors securely, ensuring that the notches are aligned for correct polarity.
- The waterproof plugs have a threaded collar which must be fully tightened onto the waterproof socket.
- The HIPAR-126 also has DMX through and power through leads for connecting onto further HIPAR cans in a daisy-chain manner. Ensure that the mains power supply is capable of the total load of all cans connected.
Cleaning
- Use a soft cloth with a neutral detergent to clean the casing and lens as required
- Do not use strong solvents for cleaning the unit
Rear panel controls: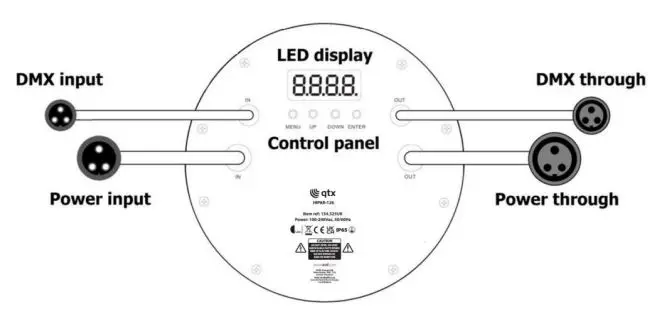
Manual control menu:
- Press the “MENU” button to enter the settings menu.
- Press the “UP” and “DOWN” buttons to navigate through various setting functions. Press the “ENTER” button to save the desired setting.
| Menu | Number range | Function and description |
| A001 | A001-A512 | 10CH DMX512 address setting |
| d001 | d001-d512 | 6CH DMX512 address setting |
| CJ01 | CJ01-CJ16 | Colour jump (speed slow to fast) |
| CF01 | CF01-CF16 | Colour fade (speed slow to fast) |
| CC00 | CC00-CC16 | Colour pulse (speed slow to fast) |
| SoUD | Sound to light colour change | |
| CL01 | CL01-CL32 | Manual colour mix selection |
| r000 | r000-r255 | Red dimming (0-100%) |
| G000 | G000-G255 | Green dimming (0-100%) |
| b000 | b000-b255 | Blue dimming (0-100%) |
| u000 | u000-u255 | White dimming (0-100%) |
| P000 | P000-P255 | Amber dimming (0-100%) |
| o000 | o000-o255 | UV dimming (0-100%) |
DMX mode:
- The HIPAR-126 can be controlled by DMX signal, simply connect the DMX signal source to the DMX input on the unit via a balanced XLR lead. Extra fixtures can be controlled by the same DMX signal by looping through the DMX out on the unit. To enter DMX mode, select A001 from the menu and confirm the correct start address by using the “UP” and “DOWN” buttons and “ENTER” to confirm.
- This unit has 6 or 10 DMX channels as indicated in the tables below:
10 Channel mode (A001-A512)
| Channel | Value | Function |
| CH1 | 0-255 | Master dimming (0-100%) |
| CH2 | 0-255 | Red dimming (0-100%) |
| CH3 | 0-255 | Green dimming (0-100%) |
| CH4 | 0-255 | Blue dimming (0-100%) |
| CH5 | 0-255 | White dimming (0-100%) |
| CH6 | 0-255 | Amber dimming (0-100%) |
| CH7 | 0-255 | UV dimming (0-100%) |
| CH8 | 0-255 | Strobe effect (slow to fast) |
| CH9 | 0-49 | No effect |
| 50-99 | Colour jump | |
| 100-149 | Colour fade | |
| 150-199 | Colour pulse | |
| 200-255 | Sound to light colour change | |
| CH10 | 0-255 | Macro speed (slow to fast) |
6 Channel mode (d001-d512)
| Channel | Value | Function |
| CH1 | 0-255 | Red dimming (0-100%) |
| CH2 | 0-255 | Green dimming (0-100%) |
| CH3 | 0-255 | Blue dimming (0-100%) |
| CH4 | 0-255 | White dimming (0-100%) |
| CH5 | 0-255 | Amber dimming (0-100%) |
| CH6 | 0-255 | UV dimming (0-100%) |
Specifications
| Power supply | 100-240Vac, 50/60Hz (IEC) |
| Power consumption | 120W |
| LED quantity | 9x 10W RGBWA-UV |
| DMX channels | 6/10CH |
| Beam angle | 25° |
| IP rating | IP65 |
| Modes | Manual, Auto, sound-activated, master/slave, DMX512 |
| Connections | Power in, power out, DMX in, DMX out |
| Dimensions | 240 x 240 x 150mm |
| Weight | 4.8kg |
Troubleshooting
| No power (mains) | Check mains voltage is correct, and outlet is switched on |
| Check IEC leads are properly connected | |
| No light output | Check control panel mode settings |
| Check DMX settings from the controller (dimmer levels, blackout, etc.) | |
| Unresponsive to DMX | Check that unit is in DMX mode and ensure the DMX address remains lit to confirm receiving the DMX signal |
| Check DMX controller is not set to black out | |
| Check DMX controller is on correct fixture/page | |
| Check master dimmer value | |
| Check correct DMX address is set | |
| Check DMX connection and leads | |
| Overheating/ cutting out | Ensure adequate ventilation and unit is not too close to a heat source |
- This product is classed as Electrical or Electronic equipment and should not be disposed of with other household or commercial waste at the end of its useful life.
- The goods must be disposed of according to your local council guidelines.
- Errors and omissions excepted.
- Copyright© 2022 AVSL Group Ltd, Unit 2 Bridgewater Park,
- Taylor Road, Trafford Park, Manchester. M41 7JQ.
- AVSL (Europe) Ltd, Unit 3D North Point House,
- North Point Bus. Park, New Mallow Road, Cork, Ireland.
- www.avsl.com
- 154.325UK User Manual


