DDX6.9CP 6.9-Inch Double Din Multimedia Receiver
![]() TECHNOLOGIES
TECHNOLOGIES
DDX6.9CP
6.9″ DOUBLE DIN MULTIMEDIA RECEIVER
OWNER’S MANUAL
#WELIKEITLOUD![]()
IMPORTANT NOTICE & PRECAUTIONS
Thank you for using our DS18 multi-media player! To operate the unit correctly, please read the operation manual carefully before using it. Keep this operation manual for further reference.
The unit is designed only for DC 12V negative ground operation system. Make sure your vehicle is connected to DC 12V negative ground electrical system. Be sure to connect the speaker(-) leads to the speaker (-) terminal. Never connect the left and right channel speaker wires together or to the vehicle body.
The normal temperature for operation is between -20 and 60 degrees Celsius. Do not work in extremely high or low temperatures and block vents or radiator panels of the unit, blocking them will cause heat to build up inside the unit and may cause damage or fire.
This unit can play the multi-media files: RMVB / MPEG 4 I DivX / AVI / 1080p / MP3 /WMA/ JPEG.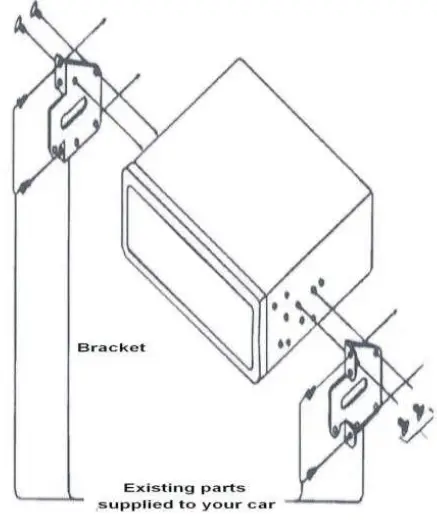 INSTALLATION
- Installation varies on the type of cars and supplied pads
- Store small articles in places not accessible to children
- Install only with the supplied screws
- Installation of the unit by a professional technician is strongly recommended
REMARKS
Mounting brackets and screws are the parts that are supplied in your car and not provided in this unit.
WIRING CONNECTIONS
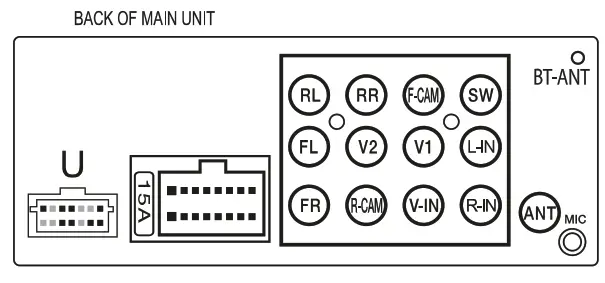
REMARKS
Due to the law of some countries, video playback is not allowed, during driving. To allow video playback during driving, the brown wire (brake) should be connecthe ted to ground (b-) of the car battery.
| Portion | color | Connection | |
| Connecting Socket | Power / Poder | Red | Ignition switch(B+) |
| Black(Thick) | Ground (B) | ||
| Yellow | Memory backup (B+) | ||
| White | Front left speaker(-F) | ||
| White/Black | Front left speaker(-) | ||
| Grey | Front right speaker(+) | ||
| Grey /Black | Front right speaker(-) | ||
| Green | Rear left speaker(+) | ||
| Green/Black | Rear left speaker(-) | ||
| Purple | Rear right speaker(+) | ||
| Purple/Black | Rear right speaker(-) | ||
| Blue | Auto antenna(B+) | ||
| Pink | Reverse Lamp(B+) | ||
| Pink/Black | Front Camera Output (B+) | ||
| Black (3.5mm Connector) | Steering wheel control | ||
| Orange | Illumination Detection input (B+) | ||
| Brown | Hand Brake Detection (B-) | ||
| Blue/white | Amplifier control : control del Amplificador | ||
| USB | USB wire Extension | ||
| MIC | External MIC input | ||
| ANT | Radio antenna | ||
| Audio Output RCA | SW | Green | Sub-woofer |
| RL | White | Rear left Pre-Output | |
| RR | Red | Rear right Pre-Output | |
| FL | White | Front left Pre-Output | |
| FR | Red | Front right Pre-Output | |
| Audio Input RCA | L-IN | White | Auxiliary left Audio input |
| R-IN | Red | Auxiliary Right Audio input | |
| Audio Output RCA | V1 &V2 | Yellow Amarillo | Video output |
| Audio input RCA | R-CAM | Yellow Amarillo | Reverse Camera input |
| V-IN | Yellow Amarillo | Video input | |
| F-CAM | Yellow Amarillo | Front camera input |
MAIN UNIT OPERATIONS
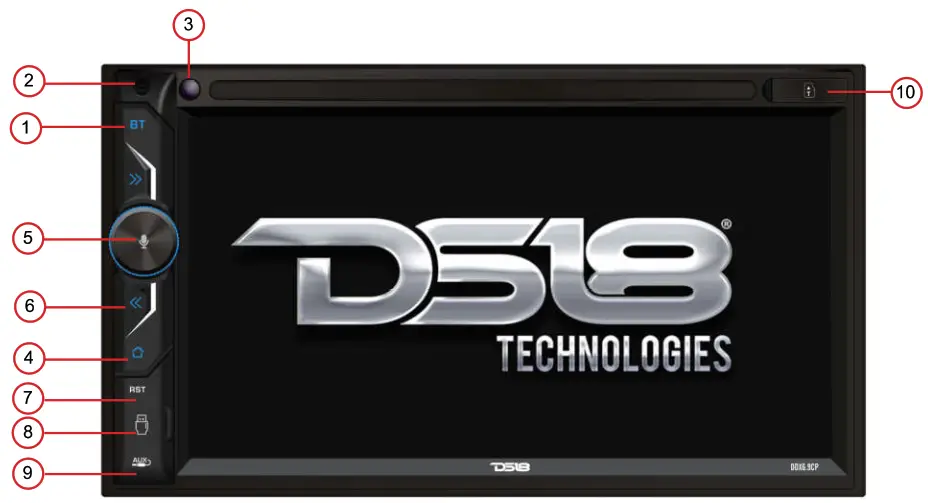
| NO | FUNCTION | OPERATIONS & CONTROLS |
| 1 | BT | Press to activate BT operation. |
| 2 | M IC | For voice reception under BT operation. |
| 3 | IR | Remote control sensor for signal reception from remote handset. |
| 4 | Press to shift between MAIN MENU & current operation mode. | |
| 5 |  | For the rotary control version, rotate to adjust the sound output level. When the unit is turned off, press to turn on the unit. When the unit is turned on, press & hold shortly to turn off the unit. Siri button: When Apple car play is available, hold Siri button to start the voice control function. |
| 6 | Radio Mode Press repeatedly to fine-tune the radio frequency upward or downward. Press & hold shortly to tune the radio frequency to the upward or downward station for broadcasting. Disc / USB / SD Input Mode / Bluetooth Mode | |
| 7 | RST | Press with a pointed object (such as a ballpoint) to reset the unit to its initial selling by the factory (default stage). |
| 8 | USB | Insert a USB device into this slot for digital files playback |
| NO | FUNCTION | OPERATIONS & CONTROLS |
| 9 | AUX | Insert an external device to this jack in order to have a sound output of that external device through the unit. |
| 10 | Insert micro SD card to this port for digital files playback | |
| 11 | TFT SCREEN | It shows the status of operation on the unit. This screen is also a touch-screen display – tap the screen softly for different operations of the unit (refer to other parts of this manual for operation details). |
NOTE Printing and symbols on the above may be varied from the exact main unit. Referred to the main unit for exact functions and featurewere s that applied. User is highly recommended to use the touch screen control to operate.
REMOTE HANDSET GENERAL OPERATIONS
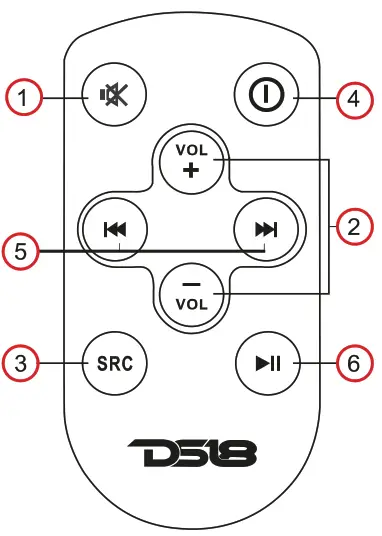
| N0. | FUNCTION | OPERATIONS & CONTROLS |
| 1 | Sound mute control. | |
| 2 | VOL+/VOL- | Adjust sound output level. |
| 3 | SRC | Press repeatedly to select the desired mode for operation. |
| 4 | Press to turn on the unit or turn off the unit. | |
| 5 | Radio Mode Press to tune the radio frequency upward or downward and stop for broadcasting when a station received. Media Playback Mode Press to shift track upward or downward for playback. | |
| 6 | Press to pause, resume or start playback. |
BATTERY REPLACEMENT
Refer to the back of the remote handset for details on how to replace the battery. Replace only with the same or equivalent type of battery.
BATTERY DISPOSAL
Attention should be drawn to the environmental aspects of used battery disposal. The battery shall not be exposed to excessive heat such as sunshine, fire or the like. The danger of explosion if is incorrectly placed.
REMARKS
Depending on the input devices & playback media files, the operation may be varied or not available for operation.
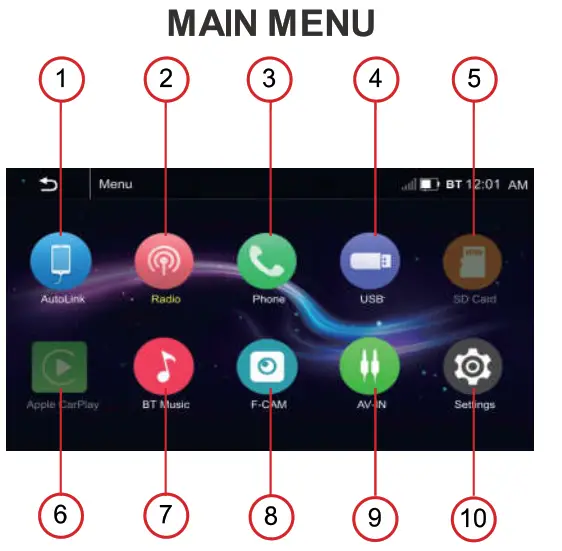
| NO. | OPERATIONS & CONTROLS |
| 1 | Touch to start mobile phone mirror linking operation (when the mobile phone is connected to the front USB port). |
| 2 | Touch to start radio operation (when the radio antenna is connected). |
| 3 | Touch to start BT operation (when mobile phone connected). |
| 4 | Touch to start USB input operation (when a USB device is inserted). |
| 5 | Touch to start SD card input operation (when a micro SD card is inserted). |
| 6 | Apple CarPlay: Touch to start Apple CarPlay operation(when the iPhone is connected to the front USB port). |
| 7 | BT Music: Touch to start BT audio playback operation. |
| 8 | Touch to start viewing front camera (when connected to the front camera and pink/black wire). |
| 9 | Touch to start auxiliary input operation (when an auxiliary device is inserted). |
| 10 | Touch to activate SYSTEM SETUP MENU on screen to have various setup of the unit. |
ON-SCREEN – RADIO OPERATIONS
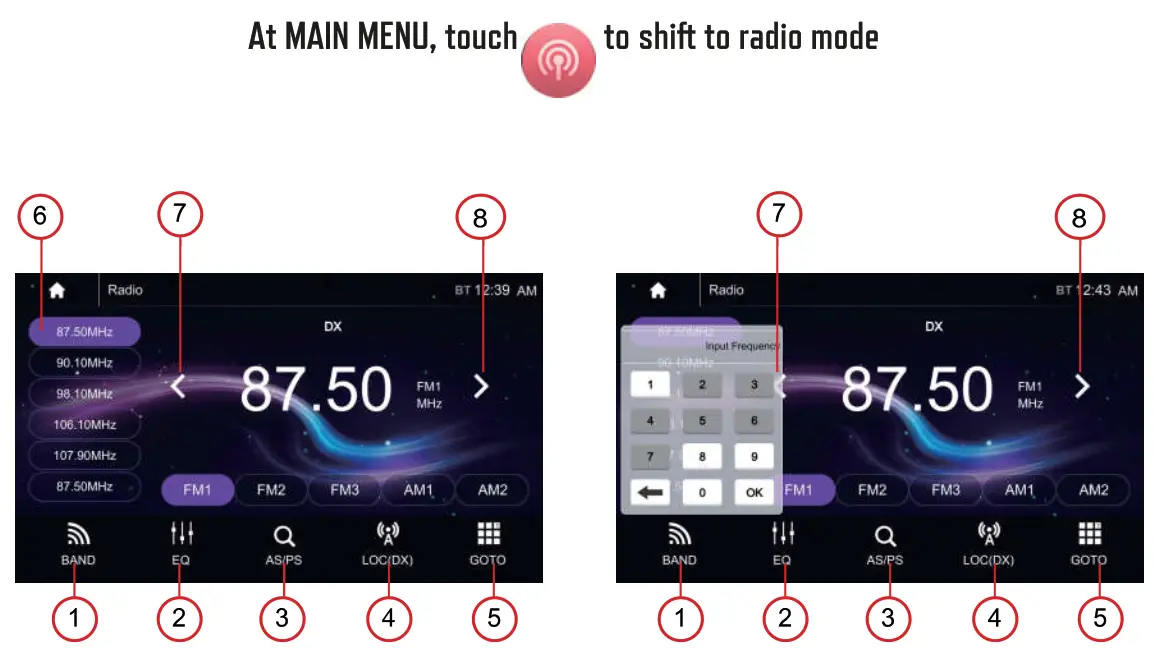
| NO. | OPERATIONS & CONTROLS |
| 1 | Touch to select Band,FM1,FM2,FM3,AM1,AM2 |
| 2 | Touch to enter EQ settings. |
| 3 | Short touch to prescan searching, each scanned station will be played 10s. Long touch for auto searching. |
| 4 | Touch to switch LOCAL or DX. |
| 5 | Touch to input the exact frequency directly that users want. |
| 6 | Preset station,6 preset stores and recall stations for each band. |
| 7 | Short touch to Seek-, long touch for Step-. |
| 8 | Short touch to Seek+, long touch for Step+. |
ON-SCREEN – BT OPERATIONS

LINK UP WITH MOBILE PHONE
To link up a BT connection with the mobile phone, Turn on the BT of the device and phone, take your phone, and follow the steps:
- Set the mobile phone on BT state – Start to search new device
- After searching, a new device (DDX6.9CP) was searched out, confirm the search
The Phone will pop up the pairing code and click”pairing” to complete the connection
- At the same time, the BT icon & BT DEVICES MENU appeared on the screen
- Connection succeeded and you can start using the BT function.
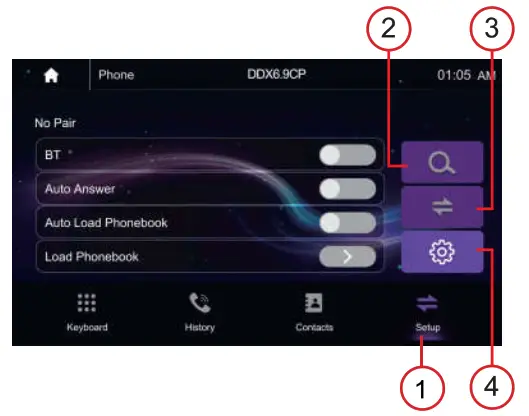
| NO. | OPERATIONS & CONTROLS |
| 1 | Show the usable devices. |
| 2 | Search the available devices. |
| 3 | Manage the connected device. |
| 4 | BT Setup, tap to set auto answer, and load phonebook. |
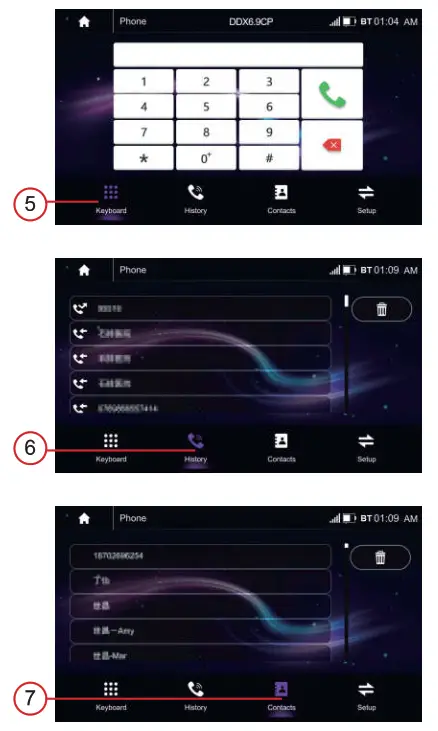
| 5 | Dial Pad. tap it to enter call mode. |
| 6 | Call logs, to show the call record, missed, received, and dialed calls |
| 6 | Tap to show the phonebook connected phone. |
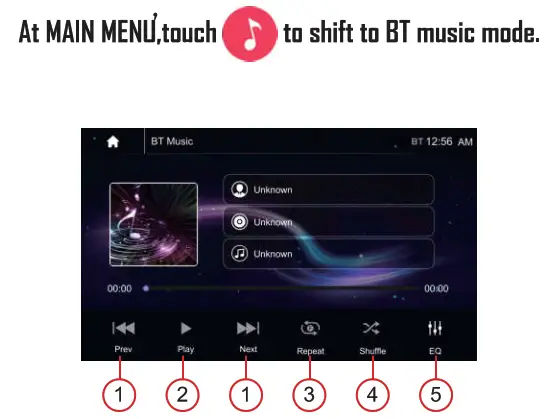
| NO. | OPERATIONS & CONTROLS |
| 1 | Press to skip the previous/ next track |
| 2 | Play or pause the button. |
| 3 | Press to select Repeat All > Repeat 1> Repeat Directory. |
| 4 | Press to switch Random is On or Off. |
| 5 | Press to select an Audio setting or set the preferred EQ of each band in custom mode. |
ON-SCREEN – AUTOLINK OPERATIONS
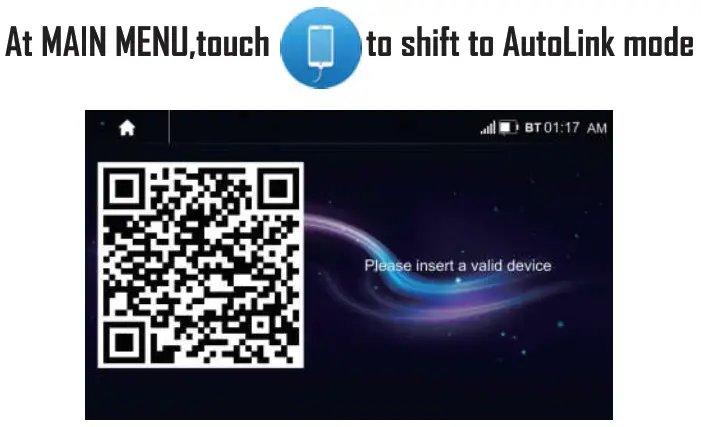
- The AutoLink function is used for android phones.
- The cable should be used to connect the android phone to the front USB slot of the head unit.
- When the android phone is connected for the first time, scan the OR code, follow the instruction of the connected phone and download the “Autolink” application from the Google play store.
- Open the “Autolink” application after download, and mirror linking appeared on the screen and android phone, the operation can be started and controlled by touching the screen of the unit.
ON-SCREEN – APPLE CARPLAY OPERATIONS
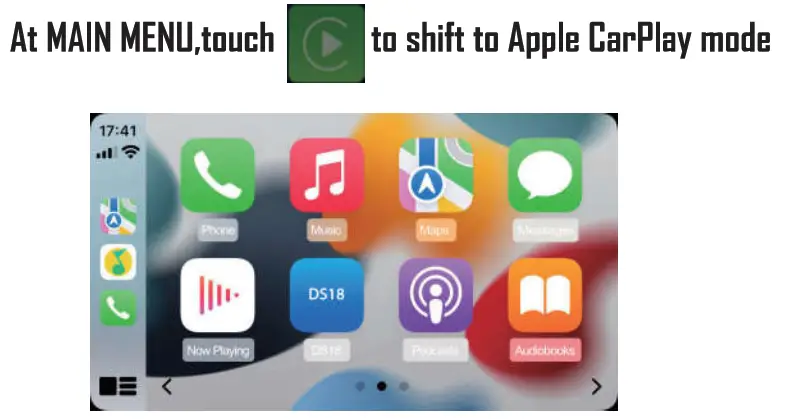
- The CarPlay function is used for iPhones. – The cable should be used to connect the iPhone to the front USB slot of the head unit.
- When the iPhone is connected with the head unit, then will show the below picture. You can make calls, play music, view maps, listen to podcasts,ets.
- In the Apple Carplay mode, you can talk to sin to control the CarPlay functions.
- Press
 on the head unit or your iPhone sin button to start the Siri function, Now you can talk to Sin for playing music, I am going…
Note: For the Sin function in the source unit, the Microphone has to be connected.
ON-SCREEN – USB/SD CARD INPUT OPERATIONS

Playback will start automatically. Depending on the input device and playback media, touch on screen (at music playback, touch repeatedly on screen) to show various playback menus for operation.
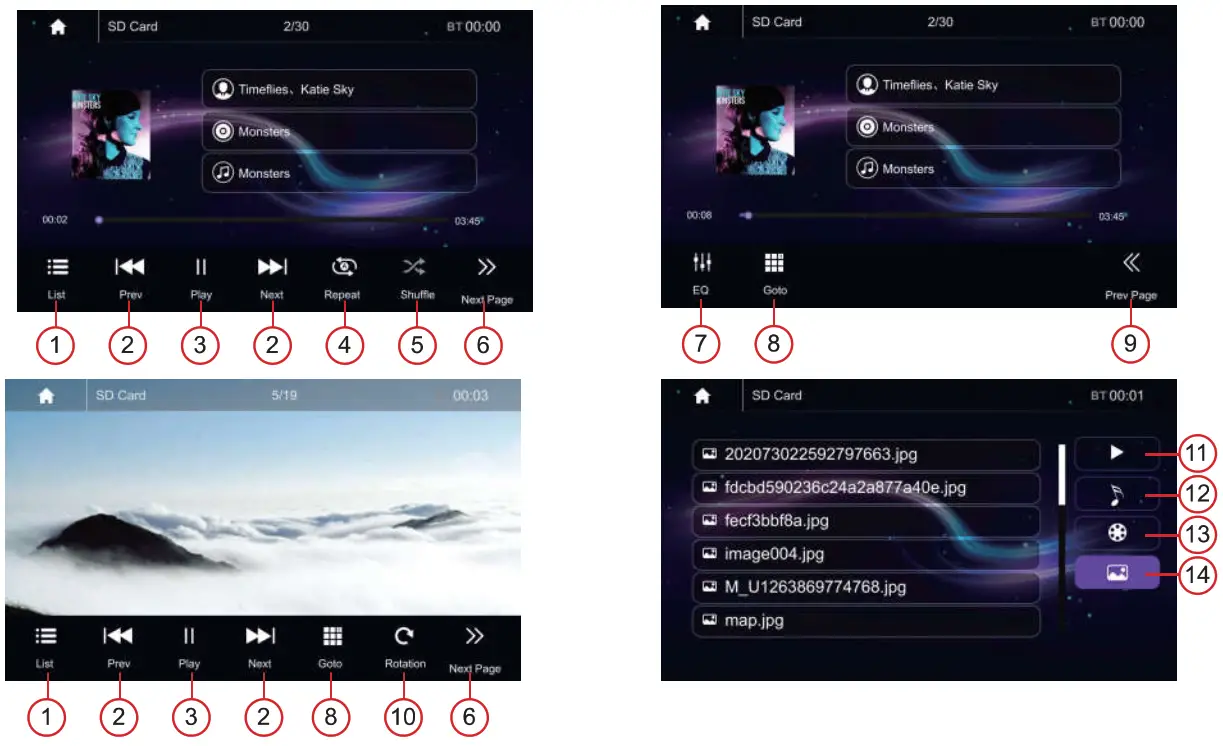
- Press to first Audio, Video, and Picture files on USB.
- Short press to skip previous/next track, Long press to fast reverse/forward.
- Play or pause the button.
- Press to select Repeat All >Repeat 1> Repeat Directory.
- Press to switch Random is ON or OFF.
- Touch to select the second page of the keypad.
- Press to select an Audio setting or set the preferred EQ of each band in custom mode.
- Touch to handle goto page for input the tracking number directly.
- Touch to select the first page of the keypad.
- Press to rotate the picture
- Return to playing the previous file.
- Select Audio or Music files.
- Select Movie or Video files.
- Select Picture files.
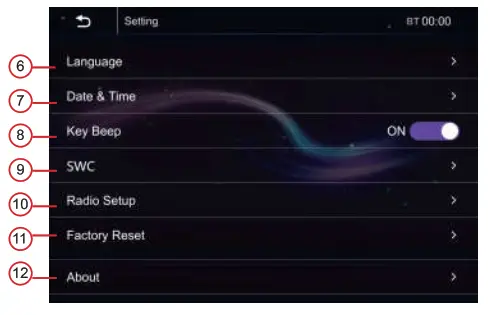
ON SCREEN-SETTING OPERATION

- Touch to shift to System SETUP MENU for various system settings.
- Touch to shift to Display SETUP MENU for various system settings.
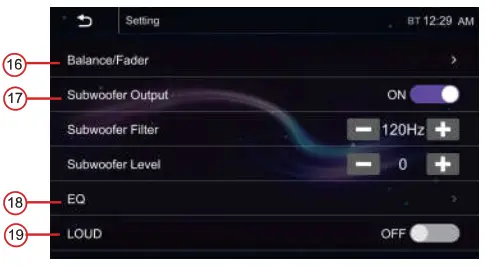
- Touch to shift to Audio and EQ SETUP MENU for various system settings.
- Touch to shift to BT SETUP MENU for various system settings.
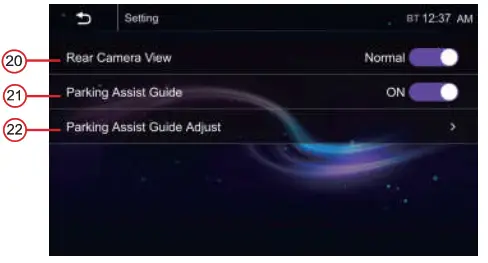
- Touch to shift to Rear Camera SETUP MENU for various system settings.
- touch to shift to the language setup menu for various language settings.
- touch to shift to Time setup menu for calendar & clock setting.
- Touch to Key Beep tum / off.
- Touch to SWC study setting.
- Touch to select radio area, and turn on/off RDS.
- Touch to reset to factory settings.
- Touch to review the version information and to do the upgrade.
- Touch to tum on/off fighting detect.
- Touch to select the LED light color.
- Touch to select the wallpaper.
- Touch to adjust the balance/fader settings.
- Subwoofer output ON/OFF.
- Touch to adjust the EQ settings.
- Loud ON/OFF
- Touch to select normal or reverse.
- Turn on/off.
- When you tum on the parking assist guide, then can adjust from here.
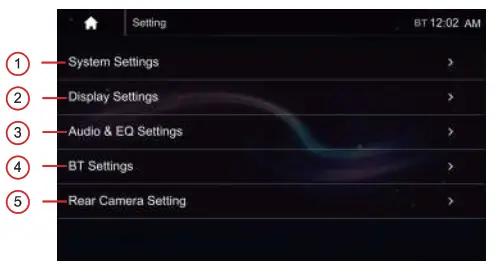 |  |  |
| System Setting | Display Setting | Audio & EQ Setting |
 |  |
| Rear Camera Setting |
ON SCREEN – AUXILIARY INPUT OPERATION
At MAIN MENU, touch
To shift to auxiliary input operation (provided an auxiliary video device had been connected). At auxiliary input operation, touch any portion of the screen to activate AV INPUT MENU for operation.
Warning: Do not watch video while driving! 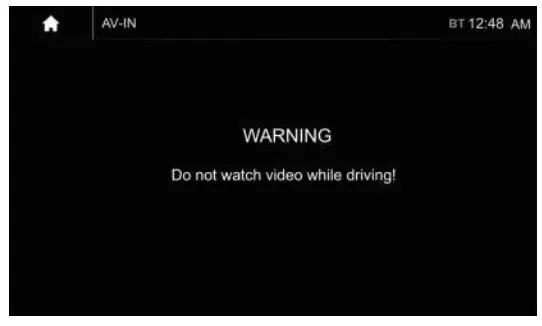
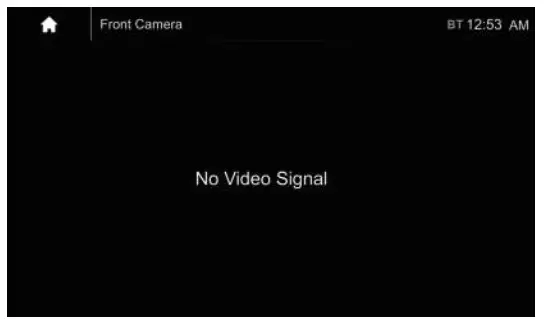
ON-SCREEN – FRON CAMERA INPUT OPERATION
At MAIN MENU, touch![]()
To shift to front camera viewing (provided the front camera and the pink/black wires are connected). In front camera viewing mode, touch any portion of the screen to activate FRONT CAMERA INPUT MENU for operation.
 This device complies with Part 15 of the FCC Rules. Operation is subject to the following two conditions: (1) this device may not cause harmful interference, and (2) this device must accept any interference received, including interference that may cause undesired operation.
Changes or modifications to this unit not expressly approved by the party responsible for compliance could void the user’s authority to operate the equipment.
NOTE: This equipment has been tested and found to comply with the limits for a Class B digital device, pursuant to Part 15 of the FCC Rules. These limits are designed to provide reasonable protection against harmful interference in a residential installation. This equipment generates uses and can radiate radio frequency energy and, if not installed and used in accordance with the instructions, may cause harmful interference to radio communications. However, there is no guarantee that interference will not occur in a particular installation. If this equipment does cause harmful interference to radio or television reception, which can be determined by turning the equipment off and on, the user Is encouraged to try to correct the interference by one or more of the following measures:
- Reorient or relocate the receiving antenna.
- Increase the separation between the equipment and receiver.
- Connect the equipment into an outlet on a circuit different from that to which the receiver is connected.
- Consult the dealer or an experienced radio/TV technician for help.
This device and its antenna(s) must not be co-located or operated in conjunction with any other antenna or transmitter.
Radiation Exposure Statement
This equipment complies with FCC radiation exposure limits set forth for an uncontrolled environment. This equipment should be installed and operated with a minimum distance of 10mm between the radiator and your body.


