
Hornady 050069 Lock-N-Load Powder
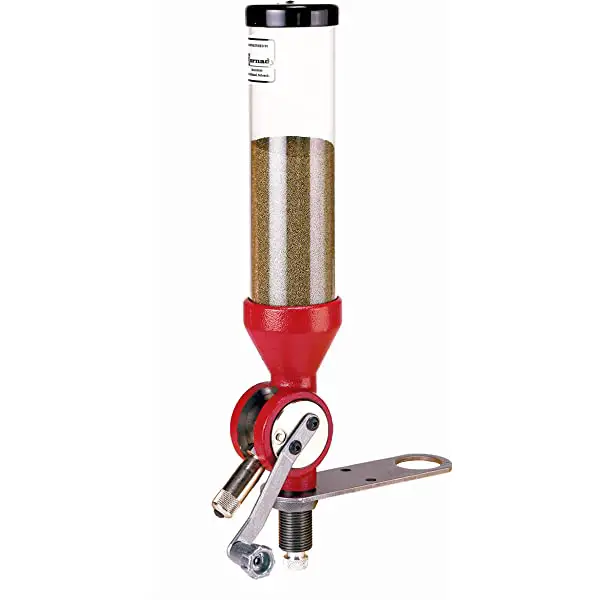
LOCK-N-LOAD® POWDER MEASURE
The Lock-N-Load® Powder Measure comes with the Standard Rotor and Standard Metering Insert installed, with the Pistol Rotor and Pistol Metering Insert sold separately.
Your Lock-N-Load® Powder Measure has been treated with a rust preventative that must be removed prior to use. We recommend that you clean and degrease all metal parts with Hornady® One Shot® Gun Cleaner and Lube.
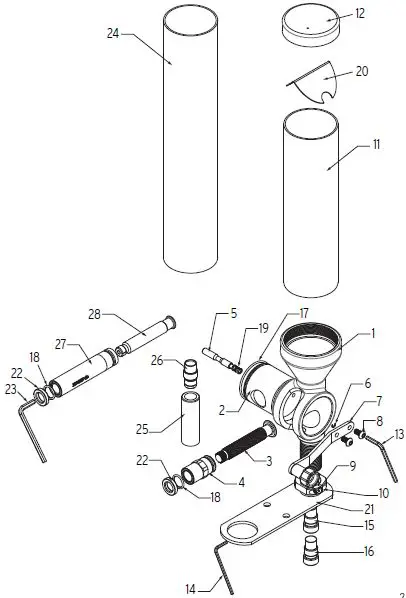
POWDER MEASURE BILL OF MATERIALS
| Item No. | Production Part Number | Qty. | Description |
| 1 | 392740 | 1 | POWDER MEASURE BODY |
| 2 | 392741 | 1 | ROTOR |
| 3 | 392743 | 1 | PLUNGER |
| 4 | 392742 | 1 | SLEEVE, ADJUSTING |
| 5 | 392744 | 1 | BUTTON |
| 6 | 392748 | 1 | C-CLIP, FOR 5/32″ O.D. |
| 7 | 392752 | 1 | HANDLE |
| 8 | 392719 | 1 | BHCS, 10-32 x 3/8 |
| 9 | 390200 | 1 | SOCKET HEAD CAP SCREW, 5-40 X 3/8″ |
| 10 | 044000 | 1 | LOCK RING |
| 11 | 398520 | 1 | HOPPER TUBE |
| 12 | 170405 | 1 | POWDER HOPPER CAP |
| 13 | 390653 | 1 | 1/8″ ALLEN WRENCH, SHORT ARM |
| 14 | 390656 | 1 | 3/32 ALLEN WRENCH, SHORT ARM |
| 15 | 390701 | 1 | DROP TUBE, LARGE |
| 16 | 390702 | 1 | DROP TUBE, SMALL |
| 17 | 392766 | 1 | O-RING, #029, BUNA |
| 18* | 480083 | 2 | O-RING, #112 |
| 19 | 392768 | 1 | .24 OD X .38 L COMPRESSION SPRING |
| 20 | 480027 | 1 | POWDER BAFFLE |
| 21 | 392760 | 1 | MOUNTING BRACKET |
| 22* | 392764 | 2 | LOCK NUT |
| 23* | 390036 | 1 | 5/32″ ALLEN WRENCH, SHORT ARM |
| 24* | 398521 | 1 | POWDER MEASURE HOPPER TUBE, HIGH CAPACITY |
| 25* | 392775 | 1 | TUBE |
| 26* | 392777 | 1 | ADAPTER |
| 27* | 392779 | 1 | BODY, 165-265 |
| 28* | 392780 | 1 | PLUNGER, HIGH CAPACITY |
POWDER MEASURE EXPLODED VIEW 
TO DISASSEMBLE FOR CLEANING:
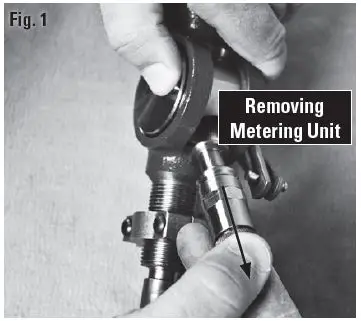
- Set the Rotor with the Metering Unit perpendicular to the axis of the Body, press the Push Button and hold it down while removing the Metering Unit (Fig. 1).
 NOTE: Do NOT remove push button. It is permanently installed and does not need cleaning.
 - Remove the Handle, or Rotating Arm from the Powder Measure, by removing the two attaching screws with a 1/8″ hex wrench. Unscrew the drop tube (Fig. 2).

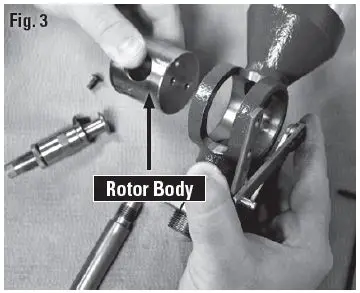
- Slide the Rotor out of the Body by pressing gently on the handle side of the Rotor (Fig. 3).
 Be careful not to drop or otherwise damage the Rotor while it is out of the Body.
 - Remove the Lock Nut, O-Ring and Sleeve from the Metering Plunger. Spray all metal parts liberally with Hornady One Shot Gun Cleaner and Lube. Be sure all rust preventatives are removed (Fig. 4).

- Allow it to dry thoroughly before reassembling.
 NOTE: Do NOT remove push button. It is permanently installed and does not need cleaning.
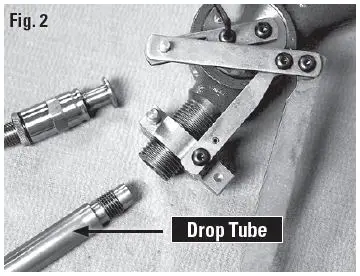
 Be careful not to drop or otherwise damage the Rotor while it is out of the Body.
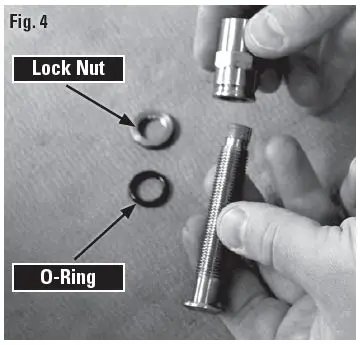
TO RE-ASSEMBLE AFTER CLEANING
- Reverse the procedure described in “To Disassemble For Cleaning.”
- The Rotor and Body are very closely fit and must be properly aligned to reassemble.
NOTE: Make sure the rotor is inserted with the push button on the left (assuming powder dispenser body is facing you).
DO NOT FORCE IT OR IRREPARABLE DAMAGE WILL OCCUR.
TO OPERATE AND ADJUST
- Attach the Mounting Bracket to your bench or shelf using two #14 Binding Head Sheet Metal Screws or other suitable hardware. The screws should be approximately 3/4″ back from the edge of the bench, and the smaller of the two large holes should be suspended off the bench.
- Place the Powder Measure in the hole of the Mounting Plate, thread the Lock Ring onto the Powder Measure, tighten the Lock Ring to the Mounting Plate and lock it in place with the 3/32″ hex wrench, if desired.
- Select the appropriate Drop Tube (the smaller for 20 and 25 caliber, the larger for 6.5 mm and up) and thread it into the bottom of the Powder Measure until it is secure against the internal shoulder. Finger tight is all that is required.
- The Lock Nut and O-ring on the Metering Unit may be adjusted to provide tension on the thread of the Plunger, so as to allow setting it while not allowing unintentional movement in operation. It may be locked in place by tightening when adjustment is achieved. One revolution of the plunger is .05″ travel. With the plunger all the way in, or the capacity set to near zero, the end of the thread and the outer surface of the Lock Nut should be approximately flush. With the plunger all the way out (roughly 20 turns, 1″), the maximum capacity is approximately 100 grains or 5 grains per turn.
- Once your Metering Unit is set, lock it, label it and store it with the die set to achieve a quick return to the present setting for future loading sessions.
LOCK-N-LOAD® POWDER MEASURE PRECAUTIONS
- Always change the metering units with the handle and the metering unit in the horizontal position, and after you have dropped the charge. If you allow the Handle to fall while changing units, you will drain the Hopper.
- Be sure you have the proper Lock-N-Load® device locked in place, before operating.
- Always verify your charges with a scale before loading.
- Any moisture in the unit will cause powder to stick, and charge weights will vary dramatically.
WARRANTY
All Hornady® reloading tools and accessories are warranted against material defects and workmanship This warranty is void if the product
- has been damaged by accident or unreasonable use, neglect, improper service or other causes not arising out of defects in material or workmanship; or
- has been altered or repairs have been made or attempted by other than authorized factory personnel;
- is used commercially; or
- has been altered or defaced in any way.
This warranty supersedes all other warranties for Hornady products either written or oral. No other warranty is expressed or implied.
PRODUCT REGISTRATION AND SERVICE
You must register your product to obtain Warranty Service. Complete the registration form at hornady.com/warranties.
TO RECEIVE WARRANTY SERVICE
To report a warranty claim, call Hornady® at 800-338-3220 to request a return authorization number. Returns will not be accepted without prior return authorization by Hornady.®
POST-WARRANTY SERVICE INFORMATION
For issues concerning service after the Limited Warranty expires, contact Hornady® at 800-338-3220.
PRODUCT SERIAL NUMBER AND REFERENCE INFORMATION
You must register your product in order to obtain warranty service. In the event you should need service for your product, please note the following information:
Serial Number ___________________________________________________________
Date Purchased __________________________________________________________
Retailer ________________________________________________________________
Hornady Manufacturing Company
P.O. Box 1848, Grand Island, NE 68802-1848 hornady.com/contact


