LumensCMS Auto Tracking Camera Image Management Software
Copyright Information
Copyrights © Lumens Digital Optics Inc. All rights reserved.
Lumens is a trademark that is currently being registered by Lumens Digital Optics Inc.
Copying, reproducing or transmitting this file is not allowed if a license is not provided by Lumens Digital Optics Inc. unless copying this file is for the purpose of backup after purchasing this product.
In order to keep improving the product, the information in this file is subject to change without prior notice.
To fully explain or describe how this product should be used, this manual may refer to names of other products or companies without any intention of infringement.
Disclaimer of warranties: Lumens Digital Optics Inc. is neither responsible for any possible technological, editorial errors or omissions, nor responsible for any incidental or related damages arising from providing this file, using, or operating this product.
Instructions on Software Installation and Tracking Settings
System Requirements
- Operating System: Windows 7 32 bits/64 bits or higher
● Windows XP is not supported
●MAC OS is not supported - CPU: Intel i3 or higher level processor
- Memory: 4G RAM or above
- Min Hard Drive Space: 1GB or above
Connecting Camera to Network
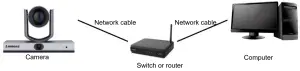
Two common connection methods are shown below:
- Connecting via switch or router

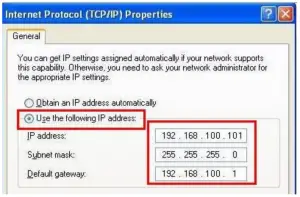
- To connect directly through network cable, the IP address of the computer should be changed so that it is on the same network segment as the camera E.g.: The factory-preset default IP address of VC-TR1 is 192.168.100.100. The computer IP address must be set with the same network segment, such as 192.168.100.101, so that the computer can be connected correctly with the camera
● Change network settings
Connect LumensCMS Software with VC-TR1
- Please download the software from [Support] > [Download] page on Lumens official website

- Open the LumensCMS software, and add in the camera
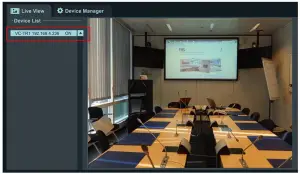
◾ Automatically add it in– First, turn on the camera. After opening the LumensCMS software, VC-TR1 will be automatically added to the list for about 5 – 7 seconds. Double-click the camera to display the screen
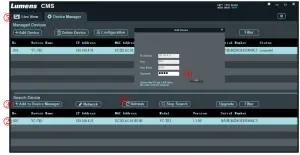
◾ Manually add it in- Open the Device Manager page
➢ Search Device:
❶[Refresh]>❷Click the camera> ❸[Add to Device Manager] ,❹ Enter the camera password (Default is 9999)
➢ Go back to ❺ [Live View] page. Double-click the camera added to the list to display the screen
- Set Tracking Parameters

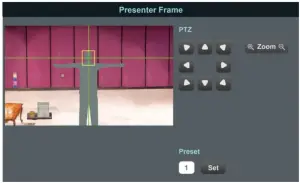
1. Presenter Frame
Operate the PTZ to set the tracking screen. This setting determines the magnification and the vertical angle of the PTZ during tracking
※ Recommendation: The face shall be in the yellow auxiliary frame. After straightening the arms, the best distance between the left and right sides and the frame is to accommodate at most 2 people
<Remark> Presenter Frame is same with the setting of Preset 1. You can also set up from the remote control
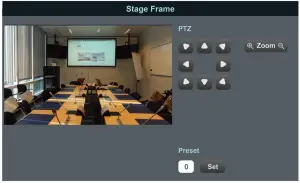
2. Stage Frame
Operate the PTZ to set the stage screen. This setting switches to the Stage Frame screen automatically when the camera loses the tracking target
<Remark> Stage Frame is same with the setting of Preset 0. You can also set up from the remote control
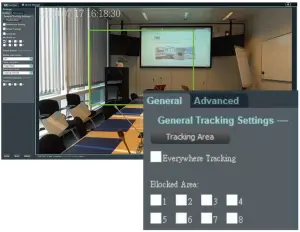
3. [Settings]> [Tracking Area]
Click , drag the mouse to customize the tracking area (green frame) When the target appears in the tracking area, the VC-TR1 will start the tracking.
※ Recommendation: When setting the tracking area, you have to make sure there is only one tracking target moving in this area. Excluding the probability of non-tracking targets appearing in this area is required
◾ Everywhere Tracking:
After being checked, the target will still be tracked automatically if it is outside the green tracking area frame
◾ Blocked Area(1-8):
Draw the Blocked Area, the Blocked Area can block the motion detection (but not the face detection).
4.Click to start tracking
Software Function Descriptions
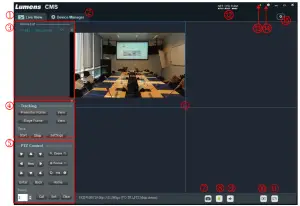
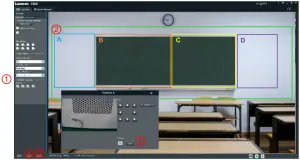
Launch Screen (Live View)
 | ||
| No | Item | Function Descriptions |
| 1 | Live View | Preview the camera screen, control tracking and PTZ function |
| 2 | Device Manger | Search and manage the available cameras |
| 3 | Device List | List of controllable cameras |
| 4 | Tracking | Control the auto tracking function of the camera |
| 5 | PTZ control | Control the PTZ of the camera, menu, Preset, image parameters |
| 6 | Preview Screen | Support up to the four-pane preview screen |
| 7 | Snapshot | Take snapshots and save in the designated path |
| 8 | Recording | Recording and save in the designated path |
| 9 | Audio In | Turn on/off the sound of LumensCMS software |
| 10 | Close all screens | Click to close all preview screens |
| 11 | Screen Switch | Switch the selected screen to a single window or go back to the four-pane preview screen |
| 12 | Computer’s performance status | Display computer’s performance status |
| 13 | Stand By/Wake Up | Stand By/Wake Up the selected cameras in Device list |
| 14 | About | In formation of software version and release date |
| 15 | Lumens CMS Settings |
|
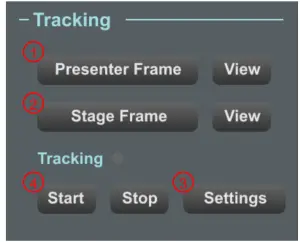
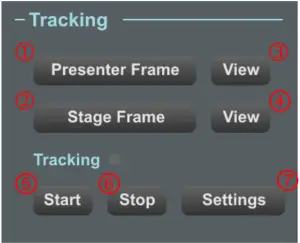
Live View – Tracking
 | ||
| No | Item | Function Descriptions |
| 1 | Presenter Frame | 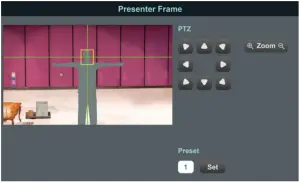 Operate the PTZ to set the tracking screen. This setting determines the magnification and the vertical angle of the PTZ during tracking ※ Recommendation: The face shall be in the yellow auxiliary frame. After straightening the arms, the best distance between the left and right sides and the frame is to accommodate at most 2 people <Remark> Presenter Frame is same with the setting of Preset 1. You can also set up from the remote control |
| 2 | Stage Frame | 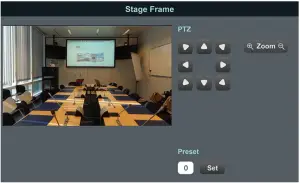 Operate the PTZ to set the stage screen. This setting calls the Stage Frame screen automatically when the camera loses the tracking target |
| 3 | View | Load Presenter Frame (Preset 1) |
| 4 | View | Load Stage Frame (Preset 0) |
| 5 | Start | Start tracking |
| 6 | Stop | Stop tracking |
| 7 | Settings | For parameter setting, please refer to the following sections about detailed parameters. 2.3 Live View – Tracking – Settings – General 2.4 Live View – Tracking – Settings – Advanced |
Live View – Tracking – Settings – General
 | No | Item | Function Descriptions |
| 1 | Tracking Area | Drag the mouse to customize the tracking area (green frame). When the target appears in the tracking area, the VC-TR1 will start the tracking. | |
| 2 | Everywhere Tracking | After being checked, the target will still be tracked automatically if it is outside the green tracking area | |
| 3 | Blocked Area | Draw the Blocked Area. The Blocked Area can block the motion detection (but not the face detection). | |
| 4 | Enable smart switch |
| |
| 5 | Target lost action |
| |
| 6 | Smart switch mode |
| |
|
7 |
Partition | Select to draw the tracking area of the preset. When the target enters this tracking frame, the preset screen will be loaded automatically until the target leaves the tracking frame. A (Blue): Preset 101 / B (Orange): Preset 102 | |
| 8 | Multi-People Detection | After selecting, the camera will call when two or more targets appear in the Tracking Area (green frame)
| |
| 9 | Multi-People Frame | Click to set multi-people detection (Preset 2) screen | |
| 10 | Reset | Reset to the initial setting | |
| 11 | Save | Save parameters | |
| 12 | Return | Return to Live view |
- Tracking Area
When the target appears in the tracking area, the VC-TR1 will start the tracking.
※Recommendation: When setting the tracking area, you have to make sure there is only one tracking target moving in this area. Excluding the probability of non-tracking targets appearing in this area is required
- Click , drag the mouse to customize the tracking area (green frame)
- Click Save to save the settings
- Click Return to return to the Live View screen


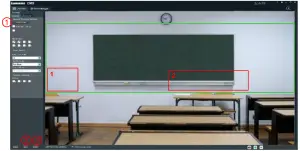
- Blocked Area
Draw the blocked area (red frame). You can set 8 blocked areas in total. The blocked area can block the motion detection (but not the face detection).
- After being checked, drag the mouse to draw the blocked area (red frame)
- Click Save to save the settings
- Click Return to return to the Live View screen
- Partition
Draw the Partition area. You can set 4 Partition areas in total.
- Check Partition
- Drag the mouse to draw the Partition tracking area
• A: Blue frame
• B: Orange frame
• C: Yellow frame
• D: Purple frame - Set the preset position for Preset
• A: Preset 101
• B: Preset 102
• C: Preset 103
• D: Preset 104 - Click Save to save the settings
- Click Return to return to the Live View screen.

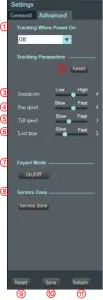
Live View – Tracking – Settings – Advanced
| No | Item | Function Descriptions |
| 1 | Tracking When Power On | Turn on/off Auto Tracking after the camera boots up | |
| 2 | Reset | Reset to the initial setting | |
| 3 | Sensitivity | The bigger the value, the higher the tracking sensitivity and the more small movement can be detected | |
| 4 | Pan speed | The PTZ horizontal moving speed during tracking | |
| 5 | Tilt speed | The PTZ vertical moving speed during tracking | |
| 6 | Lost time | The time before returning to target lost action setting when the camera loses the target | |
| 7 | Expert Mode | Turn on/off identifier When the green light next to the button is on, the tracking identifier will be turned on | |
| 8 | Service Zone | For engineers use only | |
| 9 | Reset | Reset to the initial setting | |
| 10 | Save | Save parameters | |
| 11 | Return | Return to Live view |
Live View – PTZ Control
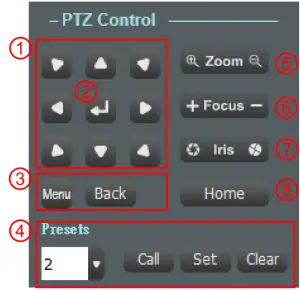 | ||
No | Item | Function Descriptions |
| 1 | Control the PTZ direction | |
| 2 | Enter | Enter the next layer of the menu |
| 3 | Menu / Back | Enter: Turn on or off the menu Back: Return to the previous layer of the menu |
| 4 | Preset | Number: Enter the preset number from 3 to 255 (Special preset cannot be used as general preset. Please refer 2.5.1 Special Preset Function Descriptions) for more details about the related function descriptions Call: Load the preset of the set Set: Set the preset of the set Clear: Clean the preset of the set |
| 5 | Zoom | Zoom setting |
| 6 | Focus | Focus Setting |
| 7 | Iris | Iris setting |
| 8 | Home | Restore the PTZ to the initial position |
Special Preset Function Descriptions: Special preset cannot be used as general preset
| Special preset | Function | Remark |
| 80 | Start tracking | |
| 81 | Stop tracking | |
| 95 | Enter or exit the setting menu | |
| 96 | Clear 0 – 64 preset | |
| 99 | Reboot the machine | |
| 121 | Output the PTZ screen | HDMI/ SDI |
| 122 | Output the panoramic screen | HDMI/ SDI |
| 123 | PTZ and panoramic PIP screen | HDMI/ SDI |
Device Manager
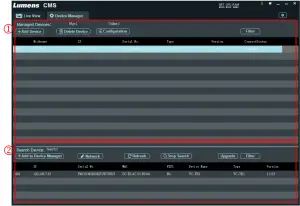 | ||
| No | Item | Function Descriptions |
| 1 | Managed Device | Display the list of added devices which can be managed by LumensCMS |
| 2 | Search Device | Display the list of available cameras found |
Device Manager – Managed Device
 | ||
| No | Item | Function Descriptions |
| 1 | Add Device | After entering data, you can add devices manually. The user name cannot be changed |
| 2 | Delete Device | Delete the selected devices |
| 3 | Configuration | Set the selected devices |
| 4 | Filter | There will be an input box after clicking. After entering the text, only the devices with keywords will appear on the list |
Device Manager – Search Device
 | ||
| No | Item | Function Descriptions |
| 1 | Add to Device Manager | Add devices to Managed Devices list |
| 2 | Network | Change network settings (DHCP/static IP) |
| 3 | Refresh | Refresh the device list |
| 4 | Start / Stop Search | Start or stop searching cameras |
| 5 | Upgrade | Update camera firmware |
| 6 | Filter | There will be an input box after clicking. After entering the text, only the devices with keywords will appear on the list |
Device Manager – Configuration – Streams
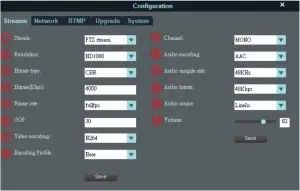 | ||
| No | Item | Function Descriptions |
| 1 | Stream | Set IP streaming. There are 3 IP streaming options: PTZ, Panoramic, Preview stream |
| 2 | Resolution | There are 4 resolution settings: QVGA, D1, HD720P, and HD1080P The different streaming sources provide different resolution settings
Caution: The resolution of IP streaming is set independently, which is not subject to the resolution setting of DIP SWITCH and MENU |
| 3 | Bitrate type | Select CBR (Constant Bit Rate) / VBR (Variable Bit Rate) |
| 4 | Bitrate (Kbps) | Users enter bitrate |
| 5 | Frame rate | Select frame rate 50 / 60 option is subject to the maximum FPS limit of DIP SWITCH |
| 6 | GOP | 50 / 60 option is subject to the maximum FPS limit of DIP SWITCH |
| 7 | Video encoding | The encoding type. H.265 and H.264 encoding are available |
| 8 | Encoding Profile | The encoding level. Base, Main and High Profile setting are available for selection |
| 9 | Channel | The audio channel setting. Currently only Mono setting is supported |
| 10 | Audio Encoding | The audio encoding type supported by the current device. Currently only AAC is supported |
| 11 | Audio sample rate | The audio sample rate. Currently only 48 KHz is supported |
| 12 | Audio bitrate | The audio encoding setting. Currently only 48 Kbps is supported |
| 13 | Audio source | The audio input method. Currently only LineIn is supported |
| 14 | Volume | Drag the volume bar to set the volume. The adjustable range is 0 – 100 |
Device Manager – Configuration – Network
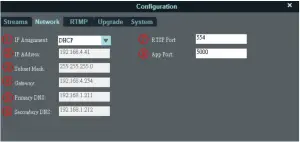 | ||
| No | Item | Function Descriptions |
| 1 | IP Assignment | Select Static IP or set DHCP auto configured IP |
| 2 | IP Address | IP address setting |
| 3 | Subnet Mask | Subnet mask setting |
| 4 | Gateway | Gateway setting |
| 5 | Primary DNS | Primary DNS setting |
| 6 | Secondary DNS | Secondary DNS setting |
| 7 | RTSP port | RTSP port setting. Default is 554 |
| 8 | APP port | APP port setting. Default is 5000 |
Device Manager – Configuration – RTMP
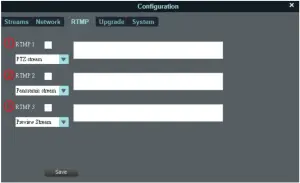 | ||
| No | Item | Function Descriptions |
| 1 | RTMP 1 | Set the streaming which is live streamed to RTMP1 server. Select the signal source, check the box to save it and start live streaming |
| 2 | RTMP 2 | Set the streaming which is live streamed to RTMP2 server. Select the signal source, check the box to save it and start live streaming |
| 3 | RTMP 3 | Set the streaming which is live streamed to RTMP3 server. Select the signal source, check the box to save it and start live streaming |
Device Manager – Configuration – Upgrade
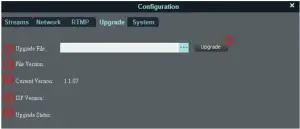 | ||
| No | Item | Function Descriptions |
| 1 | Upgrade File | Select the firmware file to upgrade |
| 2 | Upgrade | Click to start firmware upgrade |
| 3 | File Version | Displaying the version of the selected upgrade firmware file |
| 4 | Current Version | Displaying the current firmware version of the machine |
| 5 | ISP Version | The ISP version for judgment of engineers only |
| 6 | Upgrade Status | Displaying the status of upgrade firmware |
Device Manager – Configuration – System
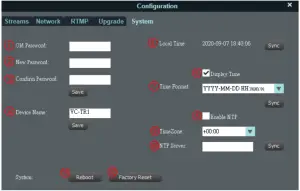 | ||
| No | Item | Function Descriptions |
| 1 | Old Password | Enter the old password |
| 2 | New Password | Enter the new password |
| 3 | Confirm Password | Confirm the new password |
| 4 | Device Name | Set the camera name |
| 5 | Local Time | Displaying the current local time |
| 6 | Display Time | Turn on/off time display |
| 7 | Time Format | Time display format setting |
| 8 | Enable NTP | Enable NTP auto time zone setting |
| 9 | TimeZone | Select the time zone of your location |
| 10 | NTP Server | You can set the NTP Server by yourself. Confirm and click Sync to synchronize |
| 11 | Reboot | Reboot the camera |
| 12 | Factory Reset | Restore the camera to the factory reset |
Troubleshooting
This chapter describes problems you may encounter while using VC-TR1 and LumensCMS software. If you have questions, please refer to related chapters and follow all the suggested solutions. If the problem still occurred, please contact your distributor or the service center.
No. | Problems | Solutions |
| 1. | After enabling tracking, the target size does not meet expectations | You can adjust the setting by Presenter Frame. Set the scale size by the designated position, and zoom to the desired scale |
| 2. | When stopping tracking, can the screen stay at the designated position? | By Stage Frame function, you can set the desired position to stay as the position for stopping tracking |
| 3. | How to activate and stop the tracking function? | It can be activated and stopped via [Start]/[Stop] in the CMS software. In addition, F1/F2 on the remote control can be used to activate and stop the function |
|
4. | How to make the camera direct to a designated position instead of tracking the presenter (target) during tracking? | You can set by Partition Tracking This function is to set the customized area. When the tracking target appears in the specific position, the camera will automatically direct to the preconfigured Preset position |
|
5. | After using the mask frame function, why does the camera still tracking the target when it appears in the mask frame? | The mask frame will only turn off moving object detection, not face detection. When TR1 already detects the target tracking face, even the target enters the mask area, TR1 will keep tracking the target until the target leaves the tracking area |
| 6. | Turn on/off Expert Mode | Expert Mode is to show the identifier fame after enabling tracking. It helps users to know the current detection precision and if there is any on-site tracking issue caused by environment interference (Blue/red one is the face detection fame, and green one is the object detection frame) |
| 7. | How to change the default path of recording and snapshots? | Access the LumensCMS main screen and click the tool icon (LumensCMS Configuration) to change the recording path  |
| 8. | LumensCMS cannot connect to VC-TR1 |
|


