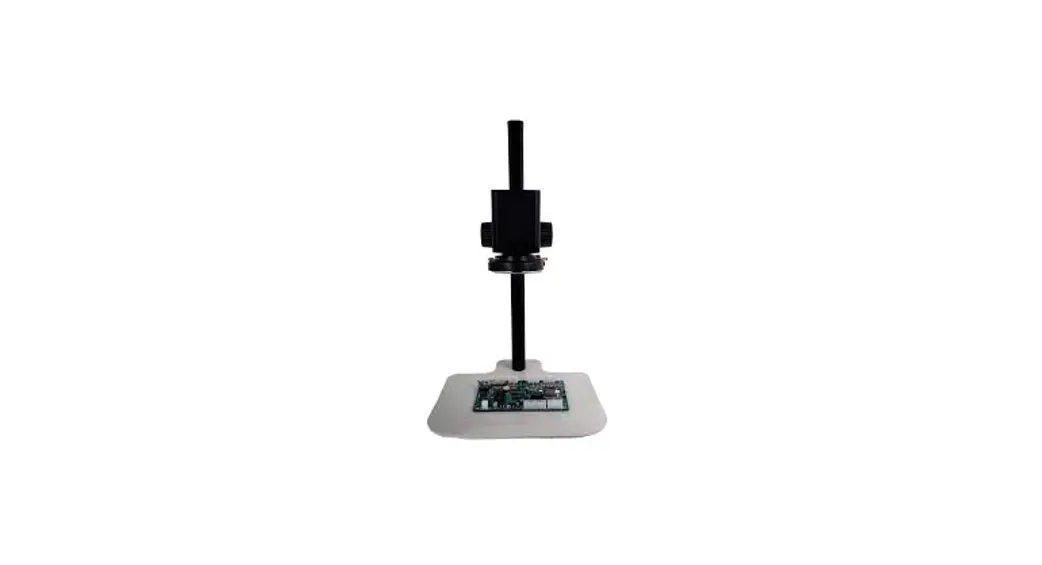
![]() H4KAZFSD08DPX 20X motorized Zoom and Autofocus Digital Microscope
H4KAZFSD08DPX 20X motorized Zoom and Autofocus Digital Microscope
User manual 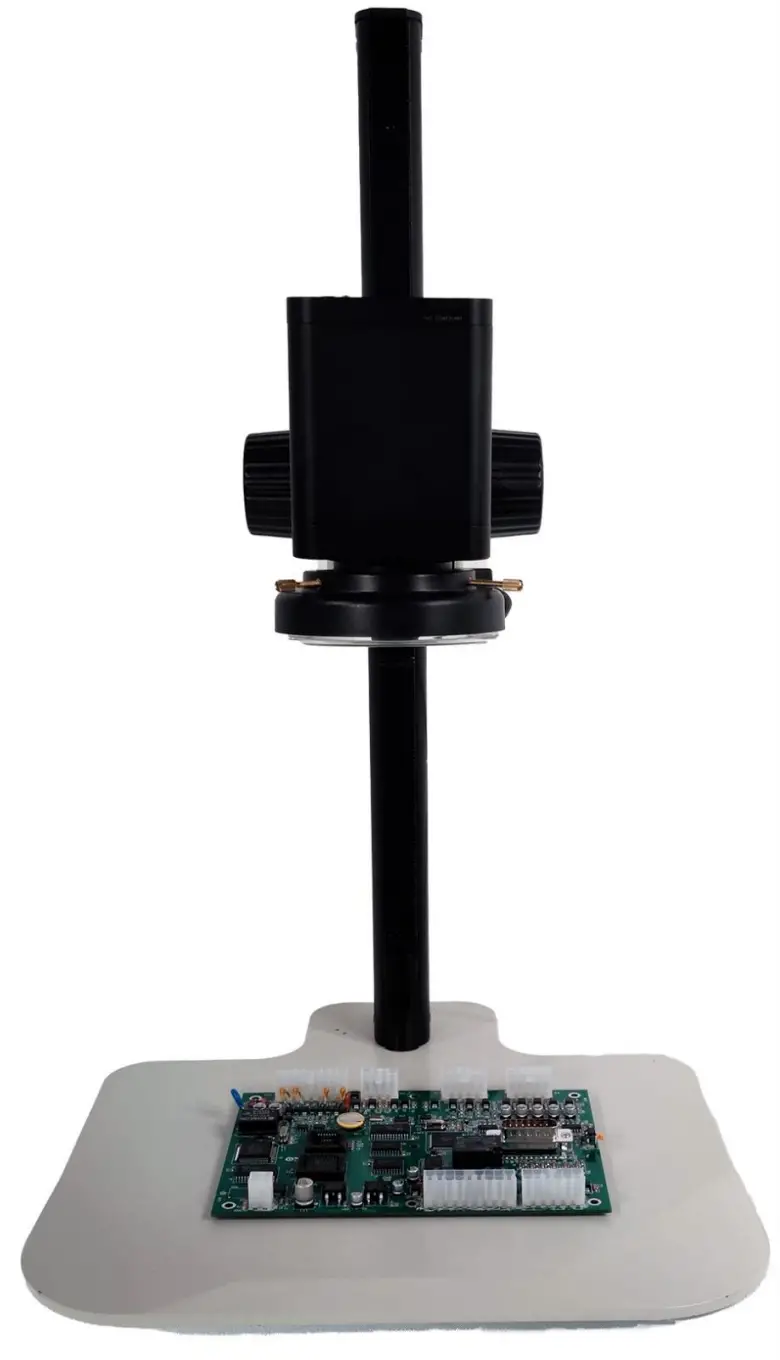
H4KAZFSD08DPX 20X motorized Zoom and Autofocus Digital Microscope
1.1.1 The Basic Characteristic of H4KAZFSD08DPX
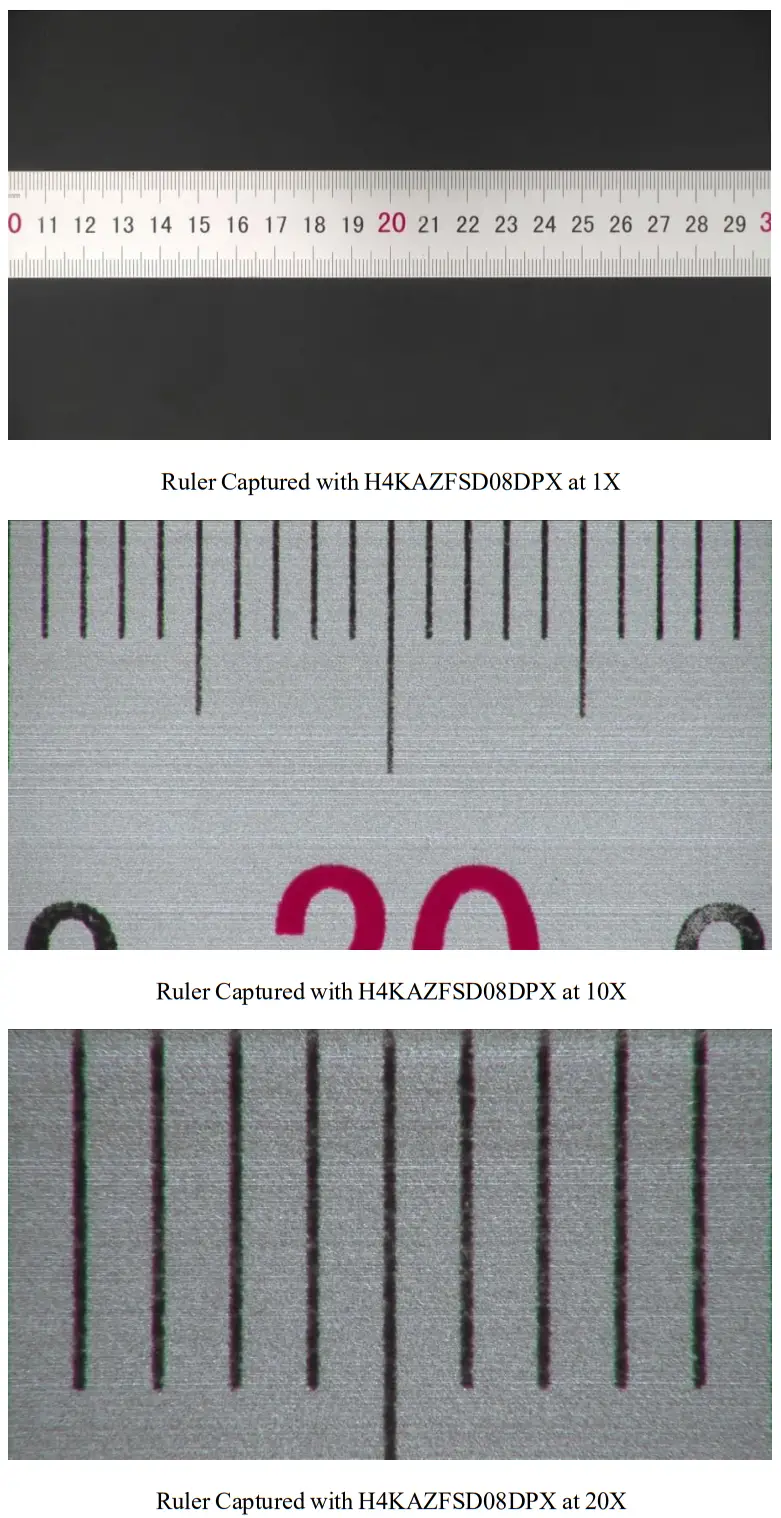
- 5 groups 16 elements with 0.028~0.56X, 20 zoom ratio, supports auto and manual focus
- 192mm standard working distance with 150~195mm depth of field
- At standard working distance, the large field of view 200mm*112.5mm at low magnification, helping users to quickly locate the target object, the small field of view 10mm*5.6mm at higher magnification, helping users to observe microscopically
- Sony 1/2.8” 4K Starvis CMOS with high signal-to-noise ratio
- 4K HDMI/USB
- 4K/1080P auto switching according to monitor resolution
- SD card/USB flash drive for captured image and video storage, support local preview and playback
- Built-in mouse control software DeltaPix 4KView Software, all functions can be controlled with USB mouse
- Embedded mouse Camera Control Panel, Measurement Toolbar, Synthesis Control Toolbar, focus and zoom Control Panel.
- Multi-language support
1.1.2 Specification of H4KAZFSD08DPX
| Interface& Button Functions | ||
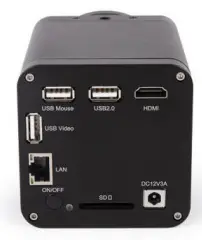 | USB Mouse | USB mouse for DeltaPix 4KView control |
| USB2.0 | Connect USB flash drive to save pictures and videos | |
| HDMI | Comply with HDMI1.4 standard. 41C/1080P format video output and supporting automatic switch between 4K and 1080P format according to the connected monitors | |
| USB Video | Connect PC or other host device to realize video image transmission with DeltaPix InSight | |
| ON/OFF | Power on/off switch | |
| LED | Power LED indicator | |
| SD | Comply with SDI03.0 standard and SD card could be inserted for video and images saving | |
| DC12V3A | DC12V3A power input | |
| DeltaPix 4KView Software Functions | ||
| UI Operation | With USB mouse to operate on the embedded DeltaPix 4KView | |
| Image Capture | 8M (3840*2160) JPEG/TIFF image in SD card or USB flash drive | |
| Video Record | Video fonnat: 8M(3840*2160) 1-1264/1-1265 encoded M P4 file Video saving frame rate:30fps | |
| Camera Control Panel | Including Exposure, Gain, White Balance, Sharpness, Denoise, Denoise, Saturation, Gamma, Contrast, Brightness, Power Frequency control | |
| Measurement Toolbar | Including Calibration, Measurement, and measurement parameter Export functions | |
| Synthesis Control Toolbar | Including software Zoom, Flip, Freeze, Crosshair, LED Control, Auto-focus, Comparison, Browser , Setting, Version Check function | |
| Auto Focus Control Panel | Including Zoom, Auto Focus, One Push, Manual Focus, Reset, and other functions | |
| Operating Environment | ||
| Operating Temperature(in Centidegree) | -10-50 | |
| Storage Temperature(in Centidegree) | -20— 60 | |
| Operating Humidity | 30—80%RH | |
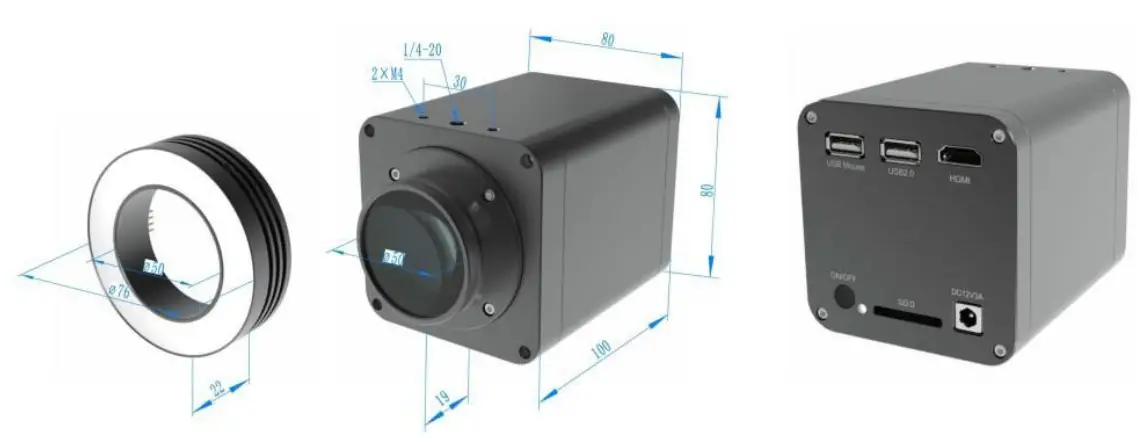
1.1.3 Dimension of H4KAZFSD08DPX
Installation and Operation of H4KAZFSD08DPX/ DPX IM200-4K
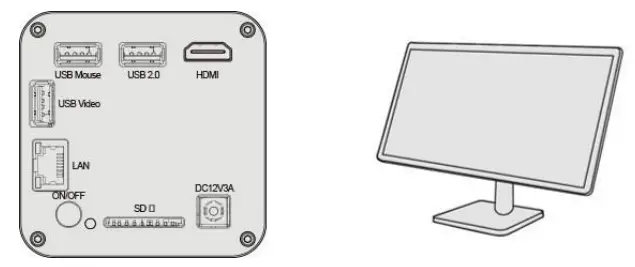
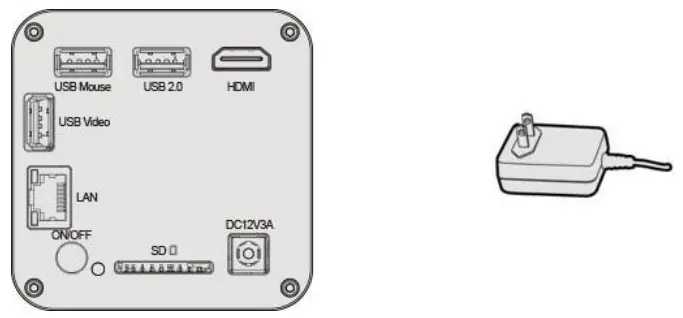
- Plug HDMI cable into the HDMI port on the H4KAZFSD08DPX and to HDMI monitor.
- Plug a USB mouse into USB Mouse port, to get control of the H4KAZFSD08DPX by using built-in software DeltaPix 4Kview;
- Plug DC12V3A power adapter into DC12V3A port, to supply power for the H4KAZFSD08DPX, the LED Indicator will turn into red.
- Insert SD card into SD card Slot for saving captured images and recorded videos.
- Press ON/OFF button to start the H4KAZFSD08DPX, LED Indicator will turn into blue.
- Move the mouse to the left side of the video window, the Camera Control Panel will appear. It includes Manual/Automatic Exposure, White Balance, Sharpness, Denoise, and other functions, please refer to section 3.2 for details.
- Move mouse to the upper side of the video window, the Measurement Toolbar will appear. It includes calibration, measurement of lines, angles, rectangles, circles, etc, and supports data export (*.CSV format), please refer to section 3.3 for detail.
- Move mouse to the bottom side of the video window, the Synthesis Camera Control Toolbar will appear. Operations like Zoom In, Zoom Out, Flip, Freeze, Crossline, LED brightness control, Autofocus, SD card contents browsing, Settings, and Camera Version can be executed. See section 3.4 for details.
- Move mouse to the bottom side of the video window, the Synthesis Camera Control Toolbar will pop up automatically. Click AF button, and Auto Focus Control Panel will show up for autofocus operation, it supports 20X optical zoom, Autofocus, Manual Focus, Reset, and One Push operation. See section 3.5 for details.
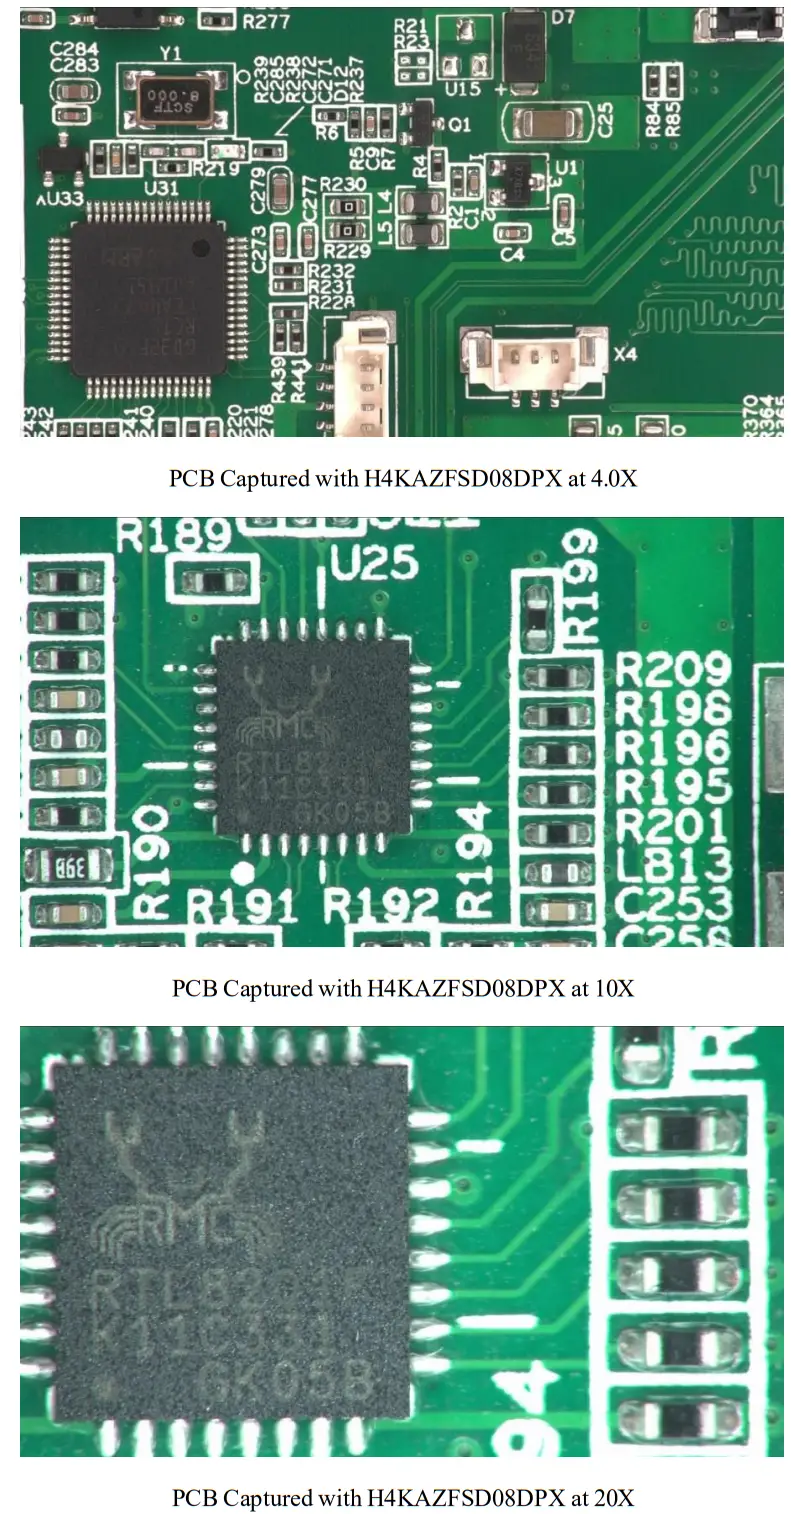
Images Captured with H4KAZFSD08DPX
Software
DeltaPix InSight Pc software is an optional addon, if available /purchased there will be an USB memory key with installation files and calibration files. In addition to the USB memory key there will also be a Software Protection USB Dongle.
H4KAZFSD08DPX Camera Configurations
You can use the H4KAZFSD08DPX series camera in 5 different ways. Each connection requires different hardware configuration.
5.1 Camera Working Standalone with Built-in Deltapix 4KViewSoftware
For this application, apart from the H4KAZFSD08DPX, you only need an HDMI monitor, the supplied USB mouse, and the camera embedded with Deltapix 4KViewsoftware. The steps to start the camera are listed as below:
- Connect the camera to a HDMI monitor using the HDMI cable;

- Insert the supplied USB mouse to the camera’s USB port.

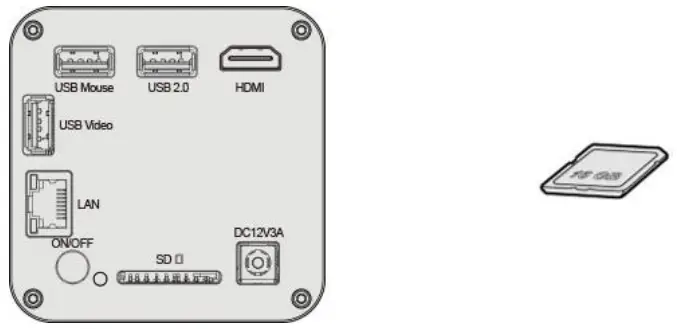
- Insert the supplied SD card/USB flash drive (USB2.0 slot) into the H4KAZFSD08DPX series camera SD card slot/USB2.0 slot;

- Connect the camera to the power adapter and witch it on by pressing once on the on/off button.

- Turn on the monitor and view the video in the DeltaPix 4KViewsoftware. Move the mouse to the left, top or bottom of the DeltaPix 4KView UI, different control panel or toolbar will pop up and users could operate with the mouse at ease.


5.2 Connecting Camera to Computers with USB2.0 Port
For Windows user (Windows 8/10/11 (64 bit), please use DeltaPix InSight 64bits.
- Install DeltaPix InSight on your PC. Run the software
- Insert the USB memory key to the PC USB port and find the installation file and start the installation wizard. Follow the installation instructions until installed successfully.
- Leve the USB memory key in the USB port, as all calibration files are on it.
- Insert the Software Protection USB dongle into a USB port on the PC.
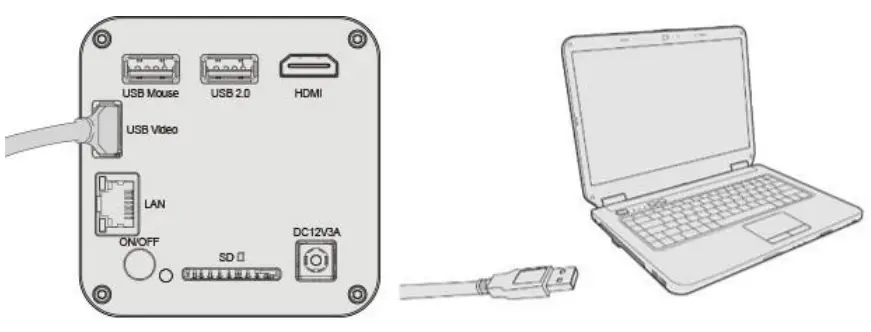
- Connect the H4KAZSD08DPX to the PC via USB, using the included USB cable Please use “USB Video” slot, not “USB Mouse” slot as shown below.
- Plug the H4KAZSD008DPX to the included 12V power supply and plus the power supply to the power outlet.
- Switch the H4KAZSD08DPX on and wait until the camera starts and the drivers are automatically found on the PC, then start DeltaPix InSight.
- For instruction on how to use DeltaPix InSight please see the manual for the DeltaPix InSight found in the software or on www.deltapix.dk

Introduction of DeltaPix 4KViewUI and Functions
6.1 Control UI 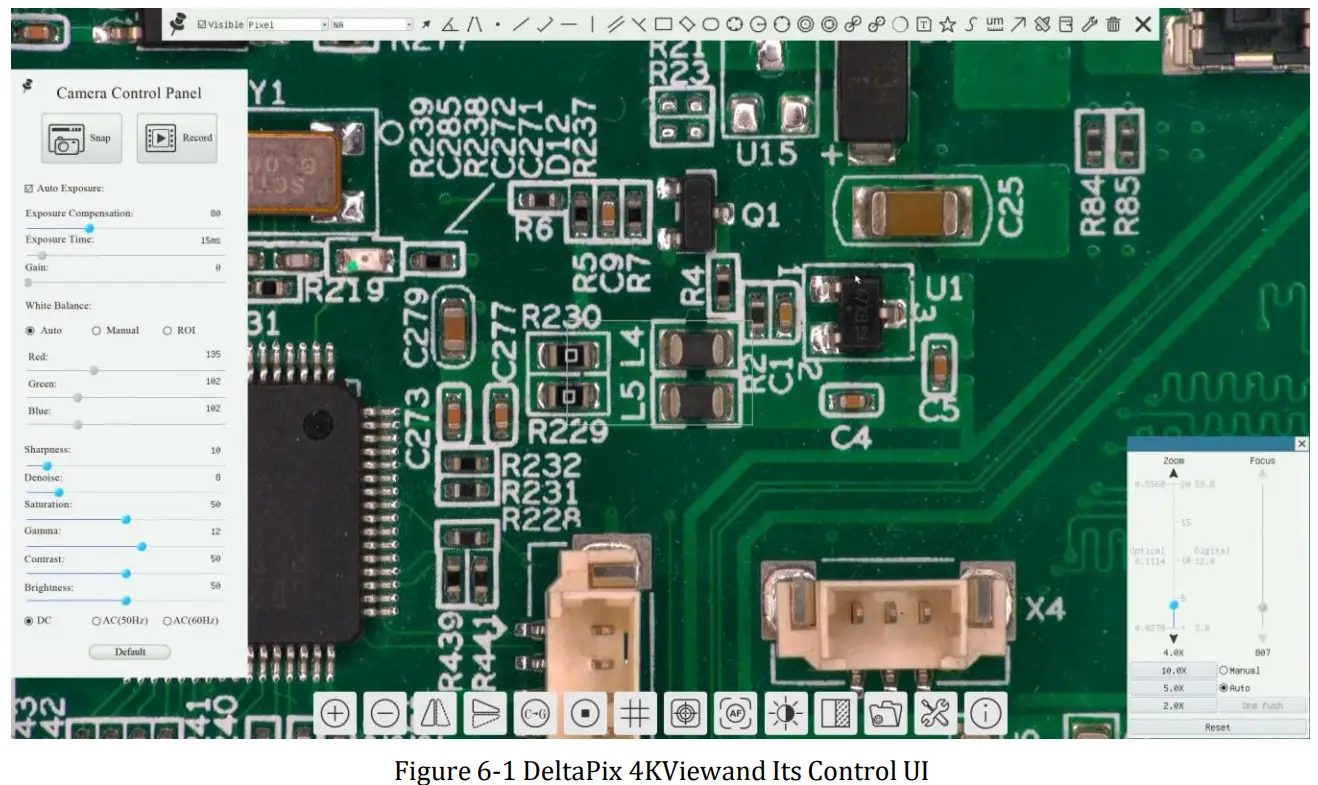
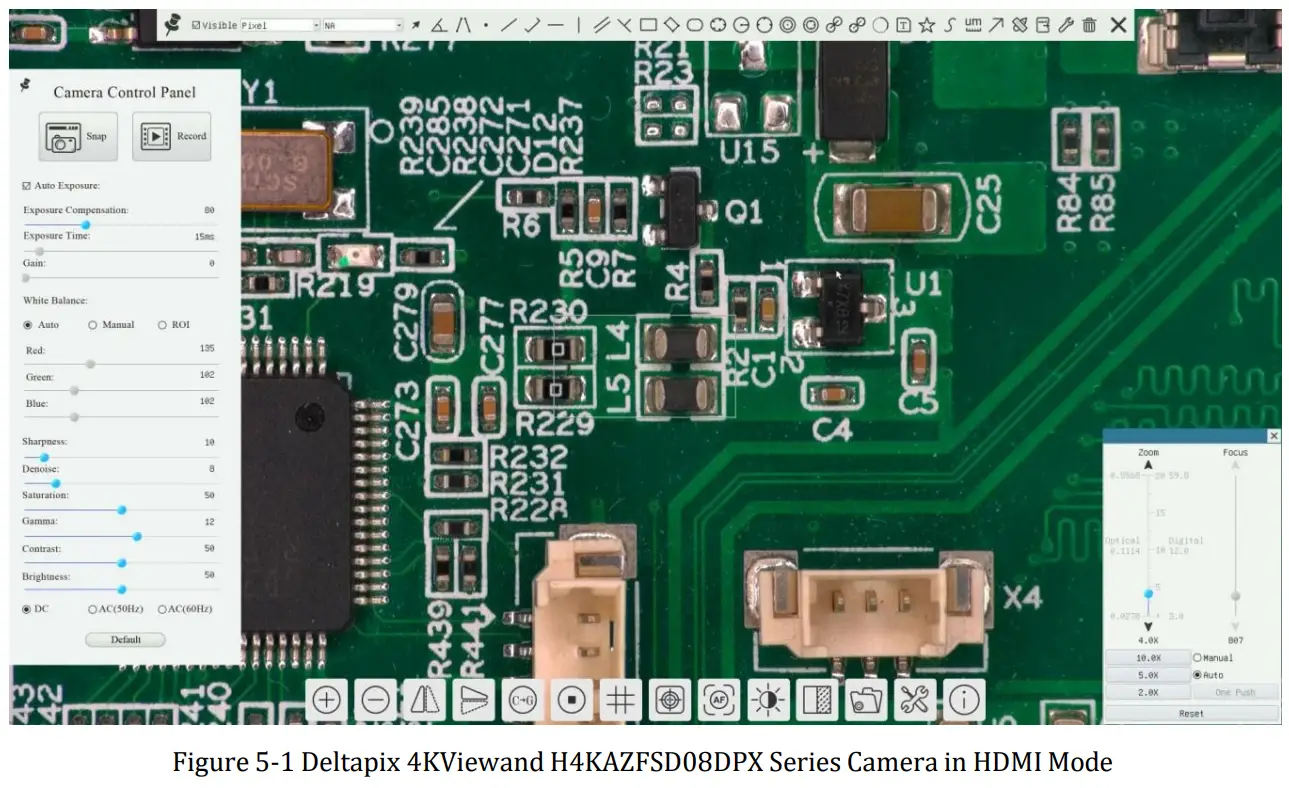
H4KAZFSD08DPX ’s DeltaPix 4KView software operation UI is shown in Figure 6-1. It includes Camera Control Panel on the left side of the video window, Measurement Toolbar on the top of the video window, Synthesis Camera Control Toolbar, and Autofocus Control Panel on the right side of the video window.
Software Toolbar / Control Bar / Control Panel
- Move the mouse to the left side of the video window, the Camera Control Panel will pop up automatically;
- Move the mouse to the bottom of the video window, the Synthesis Camera Control Toolbar will pop up automatically;
- Move the mouse to the bottom of the video window, the Synthesis Camera Control Toolbar will pop up automatically. Click the 3 button and the Auto Focus Control Panel will appear for autofocus operation;
- Move the mouse to the upper side of the video window, the Measurement Toolbar will pop up for the calibration and measurement operations. When the user left-clicks the Float/Fixed button
 on the Measurement Toolbar, the Measurement Toolbar will be fixed. In this case, the Camera Control Panel will not pop up automatically even if user moves mouse to the left side of the video windows. Only when the user left- clicks the button
 on the Measurement Toolbar to exit from the measuring procedure will he be able to do other operations on Camera Control Panel, Autofocus Control Panel, or Synthesis Camera Control Toolbar. During the measuring process, when a specific measuring object is selected, an Object Location & Attributes Control Bar
 will appear for changing location and properties of the selected objects.
6.2 The Camera Control Panel on the Left Side of the Video Window
| Camera (Mao] Panel | Function | Function Description | |
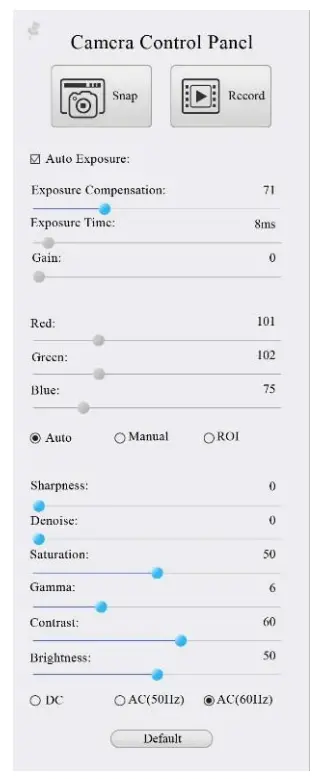 | Snap | Capture or Snap image from the current video window | |
| Record | Record video from the current video window | ||
| Auto Exposure | Checking Automatic Exposure box will automatically adjust exposure time according to the Exposure Compensation value | ||
| Exposure Compensation | Available when Auto Exposure is checked. Slide to left or right to adjust Exposure Compensation according to current video brightness to achieve proper video brightness | ||
| Exposure Time | Available when Auto Exposure is unchecked. Slide to left or right to decrease or increase the exposure time to adjust the video brightness | ||
| Gain | Adjust the gain value to decrease or increase the video brightness. The noise will be reduced or increased accordingly | ||
| Red | Slide to left or right to decrease or increase the proportion of Red in the video window | ||
| Green | Green is a base for reference and cannot be adjusted | ||
| Blue | Slide to left or right to decrease or increase the proportion of Blue for the video | ||
| White Balance | Auto White Balance adjustment according to the video window | ||
| Sharpness | Adjust Sharpness level of the video window | ||
| Denise | Adjust Denoise level of the video window | ||
| Saturation | Adjust Saturation level of the video window | ||
| Gamma | Adjust Gamma level of the video. Slide to the right to increase the gamma value and to the left to decrease the gamma x a lue. | ||
| Contrast | Adjust Contrast level of the video. Slide to the right side to increase and to the left to decrease video contrast | ||
| DC | For DC illumination, there will be no fluctuation under the light source so no need for compensating light flickering | ||
| AC(50HZ) | Check AC(50HZ) to eliminate flickering “strap” caused by 50Hz illumination | ||
| AC(60HZ) | Check AC(60HZ) to eliminate flickering “strap” caused by 60Hz illumination | ||
| Default | Set all the settings in the Camera Control Panel to the default values. | ||
The Camera Control Panel controls the camera to achieve the best image quality according to the specific applications; It will pop up automatically when the mouse is moved to the left side of the video window (in measurement status, the Camera Control Panel will not pop up. Only when the measurement process is terminated will the Camera Control Panel pop up by moving mouse to the left side of the video window). Left-clicking button to achieve Display/ Auto Hide switch of the Camera Control Panel;
6.3 The Measurement Toolbar On The Upper Side Of The Video Window
6.3.1 Introduction to Measurement Toolbar
The Measurement Toolbar will pop up when moving the mouse to any place near the upper side of the video window. Here is the introduction of the various functions on the Measurement Toolbar:

| Icon | Function | Icon | Function |
| Float/ Fix switch of the Measurement Toolbar | Define measuring object in Show up/ Hide mode | ||
| Select the desired Measurement Unit | |||
| Choose the same Magnification as the digital microscope current Zoom Ratio to ensure accuracy of measurement result when measurement unit is not in Pixel unit | |||
| Object Select | Point | ||
| Angle | Four-point method to measure the angle | ||
| Arbitrary Line | Three-Point method to measure the spacing | ||
| Three-Point method to measure vertical line | Parallel Line | ||
| Horizontal Line | Vertical Line | ||
| Rectangle | Center + Radius Circle | ||
| Three-points Circle | Ellipse | ||
| Annulus | Two Circles | ||
| Three-points Two Circles | Arc | ||
| Polygon | Curve | ||
| Arrow | Scale Bar |
| Make Calibration to determine the corresponding relation between magnification and resolution, this will establish the corresponding relationship between the measurement unit and the sensor pixel size. The monitor’s size can be input to achieve the accurate value of the digital magnification. The Calibration needs to be done with the aid of a ruler with an accuracy of more than 1mm. The detailed Calibration process is described in Sec. 6.3.2 | |
| Export the measurement information to CSV file(*.csv) | |
| Delete all the Measurement Objects | |
| Setting | |
| Exit from Current Measurement Mode |
![]() When the measurement ends, left click on a single measuring object and the Object Location & Properties Control Bar will show up. The icons on the control bar mean Move Left, Move Right, Move Up, Move Down, Color Adjustment, and Delete.
When the measurement ends, left click on a single measuring object and the Object Location & Properties Control Bar will show up. The icons on the control bar mean Move Left, Move Right, Move Up, Move Down, Color Adjustment, and Delete.
Note:
- When the user left-clicks Display/Hide button on the Measurement Toolbar, the Measurement
Toolbar will be fixed. In this case, the Camera Control Panel will not pop up automatically even if moving the mouse cursor to the left side of the video window. Only when users left-clickthe button on the Measurement Toolbar to exit from the measurement mode will they be able to perform other operations in the Camera Control Panel, the Autofocus Control Panel, or the Synthesis Camera Control Toolbar. - When a specific measuring object is selected during the measuring process, the Object Location & Attributes Control Bar will appear for changing the object location and properties of the selected objects.
- To ensure accuracy of the measurement, after the calibration is turned on, the camera will automatically reset, and then sets the normalization magnification to 20X, and adjusts the focus to the required standard object distance.
If the “Calibration Object” on the stage is not clear on the monitor, you need to manually adjust the height of the bracket to the clearest position, which is the standard object distance. After the Calibration is completed, use the Measurement Toolbar to measure the 1mm physical distance on the ruler, which should display 1mm on the monitor. - Even if the Calibration has been completed, once the user needs to measure, but is not sure whether the camera is at the standard object distance position, it is always better to reset it first, adjust the stand height in the reset state to see object clear, and ensure that the camera is at the standard object distance position before measurement.
6.3.2 Calibration Method
User needs to prepare a Calibration Object such as ruler before Calibration;
Move the mouse to the upper side of the video window, the Measurement Toolbar will appear. Clicking
Calibration on the Measurement Toolbar to start the calibration.
- The DeltaPix 4KView will pop up a message box: “1. Camera resetting for calibration…”
- After the reset is finished, a message box: “2. Please put the calibration object on the stage (if not), adjust the height of the stand until the calibration object is in focus, then click OK button; ” will pop up.
- After clicking the OK Button, DeltaPix 4KView will pop up a Calibration dialog shown below:
 Figure 6-2 A Dialog for Calibration
| Magnification: | the Magnification edit box, can be set from 1 to 20 as user want, Click Apply button to confirm; |
| Actual Length: | the Actual Length of the Calibration object on the stage, the unit can be selected with the right drop-down list box. Read the hint on the Calibration dialog to get the correct Calibration result; |
| Monitor Size: | the Monitor Size in Inch for the magnification calculation of the object displayed on the monitor; |
| Pixel: | the length in Pixel of the Calibration Line on the monitor; |
| Resolution: | the resolution in Pixel/Meter unit which is arrived by Pixel/Actual Length; |
| OK: | Click OK button to end the Calibration; |
| Users can refer to he message: “3. Please adjust the length and position of the calibration line until it is aligned with the calibration object. Then write down the actual dimension of the calibration object in the actual length edit box, and click OK.” to get the correct calibration result. | |
The default monitor size is 27.0 inches. Users can enter the practical Monitor Size.
6.4 Synthesis Camera Control Toolbar At The Bottom Of The Video Window
| Icon | Function | Icon | Function |
| Zoom In the Video Window | Zoom Out the Video Window | ||
| Horizontal Flip | Vertical Flip | ||
| Color/gray | Video Freeze | ||
| Display Cross Line | Image Overlay | ||
| Auto Focus Control Panel | LED Brightness Control | ||
| Compare Image with the Current Video | Browse Images Videos | ||
| Settings | Check the Version of the built/in software |
The Setting function is relatively more complicated than the other functions. Here is more info about it:
6.4.1 Setting>Measurement
This page is used for the define of the Measurement Object properties.
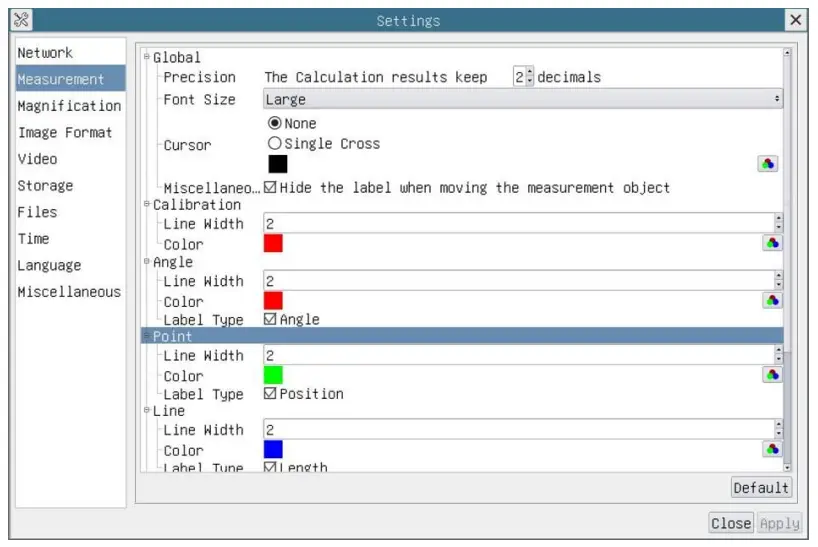 Figure 6-7 The Measurement Setup
| Global | Used for setting digits behind the decimal point for measurement results; | |
| Calibration | Line Width | Used for defining width of the lines for calibration; |
| Color | Used for defining color of the lines for calibration; | |
| EndPoint | Type: Used for defining shape of the endpoints of lines for calibration: Null means no EndPoint, rectangle means rectangle type of endpoints. It makes alignment more easily; | |
| Point, Angle, Line, Horizontal Line, Vertical Line, Rectangle, Circle, Ellipse, Annulus, Two Circles, Polygon, Curve | ||
| Left-click the+ along with the Measurement command mentioned above will unfold the corresponding attribute settings to set the individual property of the Measurement Objects. | ||
6.4.2 Setting>Magnification
This page’s items are formed by the Measurement Toolbar’s Calibration command. 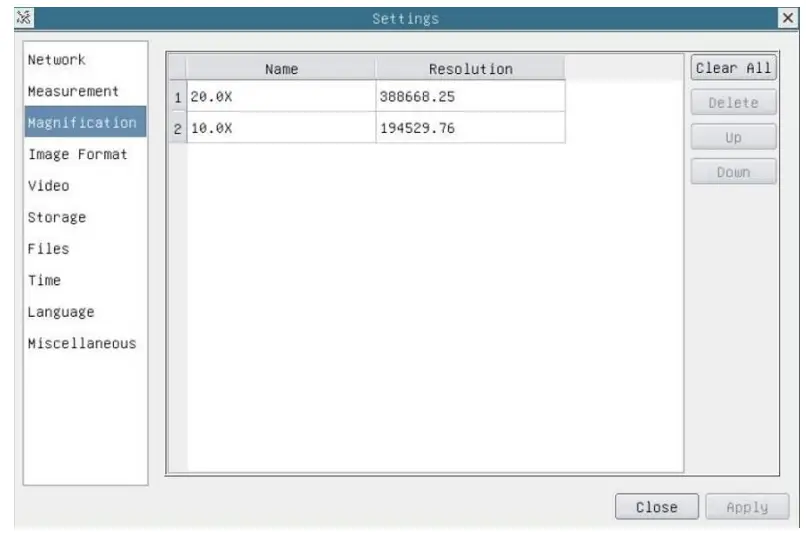
| Name | Names such as 4X,I0X, 20X, are based on magnification of the Digital microscopes. |
| Resolution | Pixels per meter. Image device like microscopes have high Resolution value; |
| Clear All | Click the Clear All button will clear the calibrated magnifications; |
| Delete | Click Delete to delete the selected magnification; |
| Up | Select a row in the magnification ratio and click Up to move up the currently selected magnification ratio; |
| Down | Select a row in the magnification ratio and click Down to move down the currently selected magnification ratio; |
1.1.4 Settings>Image Format
| Image Format | JPEG: The extension of JPEG file can get very high compression rate and display very rich and vivid images by removing redundant images and color data. In other words, it can get better image quality with the least disk space. If measurement objects are available, the measurement objects will be burned into the image and the measurement cannot be edited. TIFF: TIFF is a flexible bitmap format mainly used to store images including photos and artistic images. |
| Measurement Object Saving Method | Burn in Mode: The measurement objects are merged into the current image. User could not edit the measurement objects any more. This mode is not reversable. Layered Mode: The measurement objects are saved in different layer with current image data in the target file. User could edit the measurement objects in the target file with some software on the PC. This mode is reversable. |
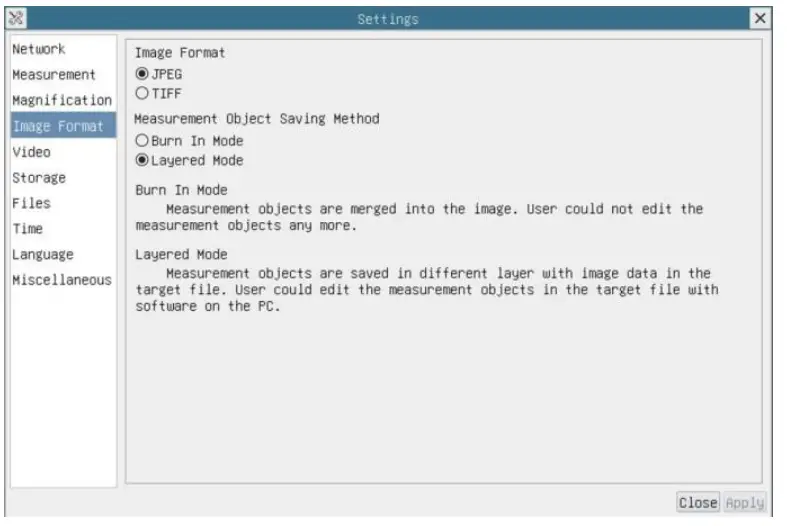 Figure 6-9 Comprehensive Image Format Settings Page
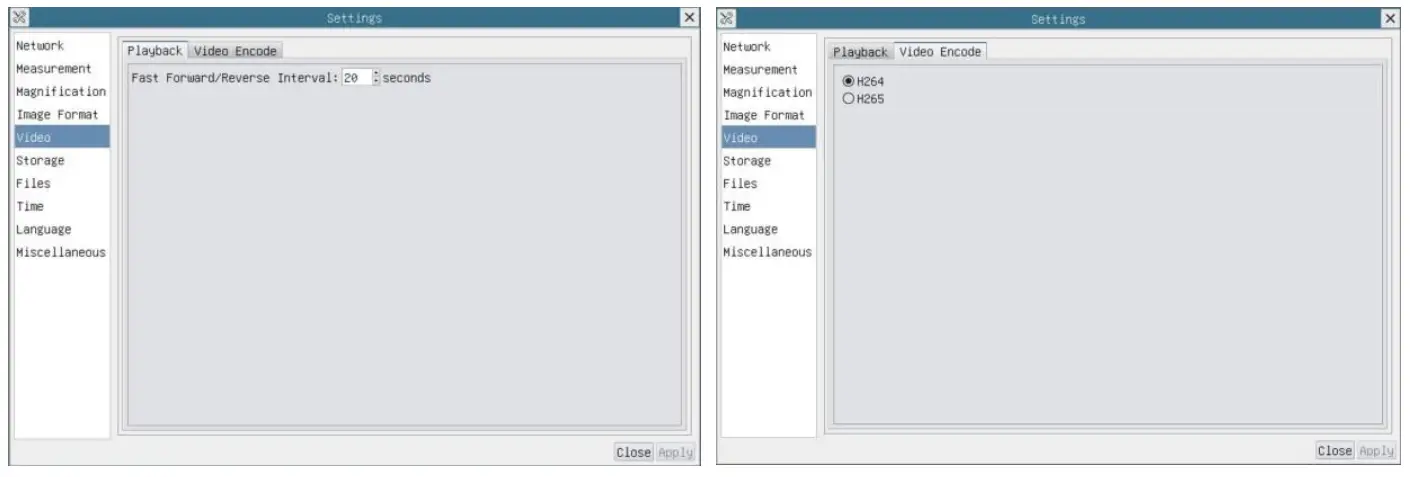
6.4.3 Setting>Video
| Video Playback | Fast Forward/Reverse internal in second unite for Video Playback |
| Video Encode | Select the Video Encode format. Can be H264 or H265. Compared with H264, H265 has a higher H265 compression ratio which is primarily used to further reduce the design flow rate, in order to lower the cost of storage and transmission |
6.4.4 Setting>Storage
File System Format of the Storage Device
List the file system format of the current storage device
FAT32: The file system of SD Card is FAT32. The maximum video file size of single file in FAT32 file system is 4G Bytes;
exFAT: The file system of SD Card is exFAT. The maximum video file size of single file in FAT32 file system is 16E Bytes;
NTFS: The file system of SD Card is NTFS. The maximum video file size of single file is 2T Bytes.
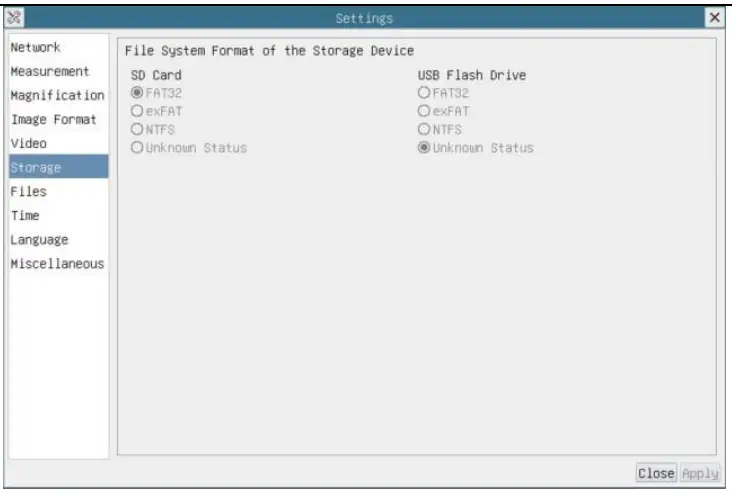 Figure 6-11 Comprehensive Setting of Storage Page
6.4.5 Setting>Files 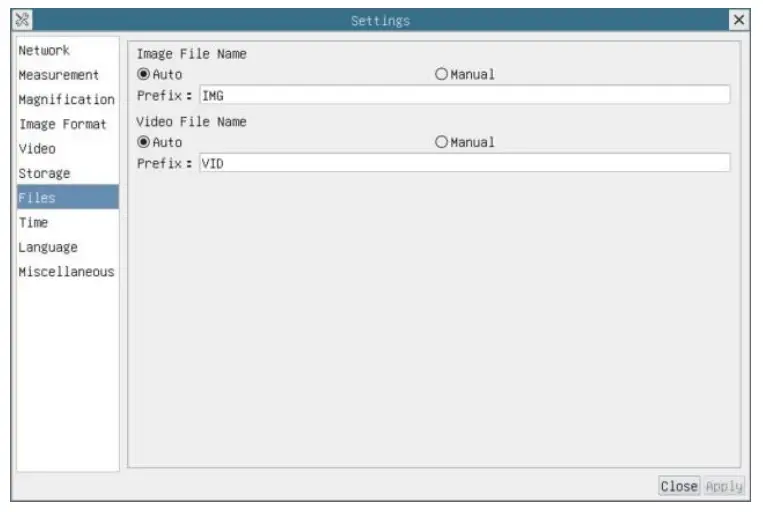
| Image/Video File Name | Provide Auto or Manual naming paradigm for Image or Video file; |
| Auto | With specified name as the Prefix and DeltaPix 4KView will add number after the Prefix for the Image or Video file: |
| Manual | A file dialog will pop up to enter the Image or Video file name for the captured Image or Video. |
6.4.6 Setting>Time
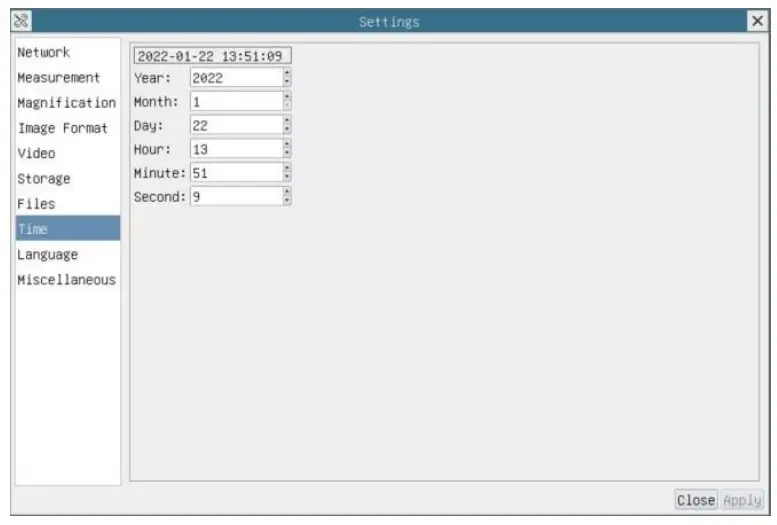 Figure 6-13 Time Setting
Time
User can set Year, Month, Day, Hour, Minute and Second ital.in this page.
6.4.7 Setting>Language
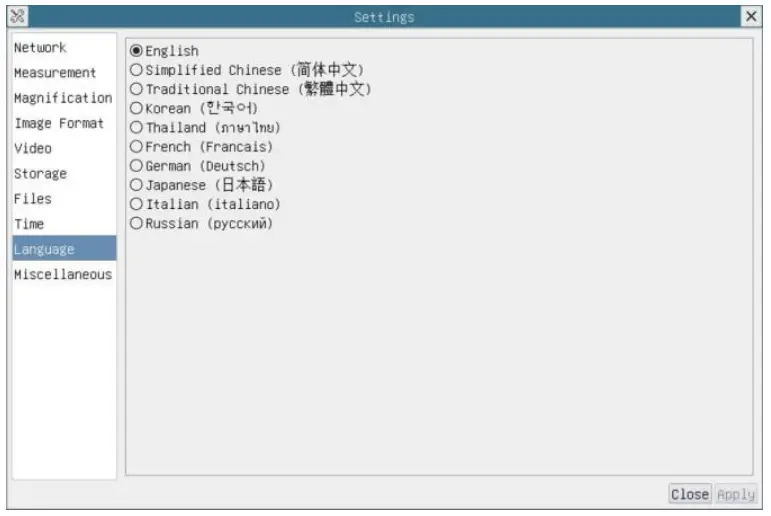 Figure 6-14 Comprehensive Setting of Language Selection Setting Page
| English | Set language of the whole software into English; |
| Simplified Chinese | Set language of the whole software into Simplified Chinese; |
| Traditional Chinese | Set language of the whole software into Traditional Chinese; |
| Korean: | Set language of the whole software into Korean; |
| Thailand | Set language of the whole software into Thailand; |
| French | Set language of the whole software into French; |
| German | Set language of the whole software into German; |
| Japanese | Set language of the whole software into Japanese; |
| Italian | Set language of the whole software into Italian; |
| Russian | Set language of the whole software into Russian; |
6.4.8 Setting>Miscellaneous
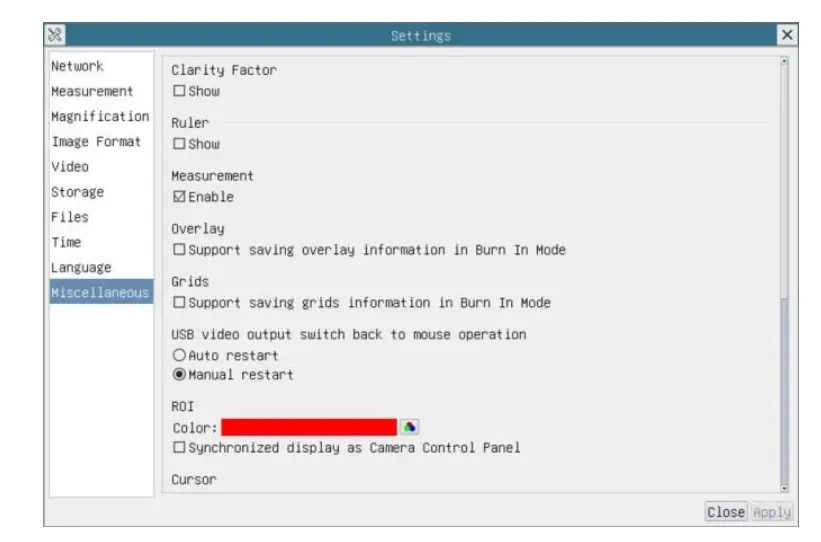 Figure 6-15 Comprehensive Miscellaneous Settings Page
| Clarity Factor | Check this will show the Clarity Factor on the video window screen to tell if the camera is focused correctly or not; | |
| Ruler | Select to display the ruler in the video window, otherwise not to display the ruler, | |
| Measurement | Select to display the measurement toolbar in the video window, otherwise not to display the measurement toolbar; | |
| Overlay | Select to support saving graphics overlay information in fusion mode, otherwise it will not support; | |
| Grids | Select to support saving mesh information in fusion mode, otherwise not to support; | |
| USB video output switch back to mouse operation | Select automatic restart or manual restart to switch from USB video output to mouse operation; | |
| ROI Color | Choosing the ROI rectangle line color | |
| Cursor | Choosing the Cursor size according to the screen resolution or personal preference | |
| Auto Exposure | Define the maximum automatic exposure time; | |
| Auto Exposure Region | Select the AE reference area; | |
| Camera Parameters Import | Import the Camera Parameters from the SD Card or USB flash drive to use the previously exported Camera Parameters | |
| Camera Parameters Export | Export the Camera Parameters to the SD Card or USB flash drive to use the previously exported Camera Parameters | |
| Reset to factory defaults | Restore camera parameters to its factory status; | |
6.4.9 Auto Focus Control Panel on the Right Side of Video Window
| Zoom Slider | Move the Zoom Slider to change the Zoom Ratio, the value will be displayed below the slider. It can be edited to set the desired Zoom Ratio |
| Zoom Button | There are 3 Zoom Buttons, users can set specific zoom ratio for the quick control |
| Optical Magnification | Optical Magnification is the designed lens magnification |
| Digital Magnification | Digital Magnification is the object length on the monitor divided by the actual object length |
| Focus Slider | Move the Focus Slider to change the focus lens position; The focus lens position value will be displayed below the slider. It can be edited to set the desired focus lens position; |
| Manual Focus | With Manual Focus radio button is checked, users can move the Focus Slider to change the focus lens position to get a clear image. The position value of the focus lens below the slider can be set by the user With Autofocus radio button is checked, the system will automatically focus the object on the stage, the focus lens position value under the Focus Slider will be refreshed in real-time; When the ROI or Object state is changed, the camera will perform the Auto Focus operation automatically |
| Autofocus | |
6.4.10 Focus Region on The Video Window
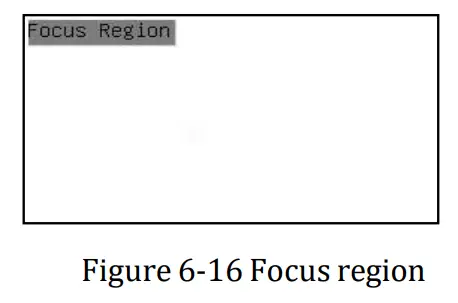
The Focus Region is used for selecting the region of interest for Auto Focus operation. When user clicks the button on the ![]() Synthesis Camera Control Toolbar, the Focus Region will pop up as well with the Autfoocus Contro Panel. Users can click any part of the video window to select the focus region for Auto Focus operation.
Synthesis Camera Control Toolbar, the Focus Region will pop up as well with the Autfoocus Contro Panel. Users can click any part of the video window to select the focus region for Auto Focus operation.
When users close the Autofocus Control Panel, the Focus Region will be closed automatically.


