![]()
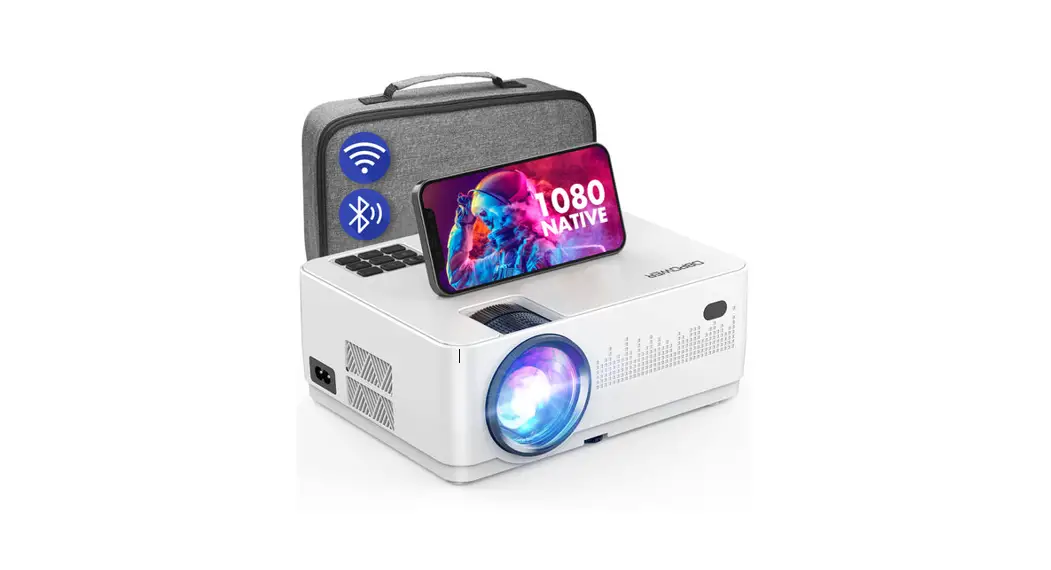
RD 821 MINI LCD Video Projector
User Manual
Power Your Life
RD 821 MINI LCD Video Projector
ACTIVATE YOUR 12-MONTH WARRANTY & GET EXCLUSIVE GIFT
Register within 7 days after receiving your new product.
PLEASE VISIT US NOW
~ warranty.dppowershop.com
CUSTOMER SERVICE![]() [email protected]
[email protected] ![]() www.dbpowershop.com
www.dbpowershop.com
![]() NOTE
NOTE
- Only suitable for home entertainment in a dark environment. NOT for presentation purposes.
- Dolby audio is NOT supported.
- DO NOT obstruct the air vents when using. UNPLUG & PREVENT DUST from entering when not in use.
A Big Thank You
We’re thrilled that you have chosen to purchase the Mini LCD Video Projector. At DBPOWER, we’re committed to providing you with products that enhance your daily life. We also aim to give our customers excellent support. Should you have any questions or feedback about your new product, simply get in touch with our customer support team at 1-855-888-5533, or by email at [email protected] Enjoy your new product!
FCC Warning
This device complies with part 15 of the FCC rules. Operation is subject to the following two conditions: (1) this device may not cause harmful interference, and (2) this device must accept any interference received, including interference that may cause undesired operation.)
The manufacturer is not responsible for any radio or tv interference caused by unauthorized modifications or change to this equipment. Such modifications or change could void the user’s authority to operate the equipment.
This equipment has been tested and found to comply with the limits for a Class B digital device, pursuant to part 15 of the FCC Rules. These limits are designed to provide reasonable protection against harmful interference in a residential installation. This equipment generates, uses and can radiate radio frequency energy and, if not installed and used in accordance with the instructions, may cause harmful interference to radio communications. However, there is no guarantee that interference will not occur in a particular installation. If this equipment does cause harmful interference to radio or television reception, which can be determined by turning the equipment off and on, the user is encouraged to try to correct the interference by one or more of the following measures:
- Reorient or relocate the receiving antenna.
- Increase the separation between the equipment and receiver.
- Connect the equipment into an outlet on a circuit different from that to which the receiver is connected.
- Consult the dealer or an experienced radio/TV technician for help.
RF warning statement:
The device has been evaluated to meet general RF exposure requirement. The device can be used in portable exposure condition without restriction.
NOTICE
- Not recommended for PPTs, Word, Excel, or business presentations.
- To connect the DBPOWER mini projector with a tablet or smartphone, please use Wi-Fi screen mirroring feature or use extemal HDMI adaptor. For HDMI adaptor connection, Android phones need to support MHL and an MHL to HDMI cable is required, iPhone & iPad need a Lightning to HDMI cable adaptor.
- To connect the mini projector to PCs or laptops, please adjust the PC/laptop display resolution to 1280*720 for best clarity.
- Please note that it is only suitable for use in dark rooms.
- Dolby is not supported. Please tum off Dolby digital in your device.
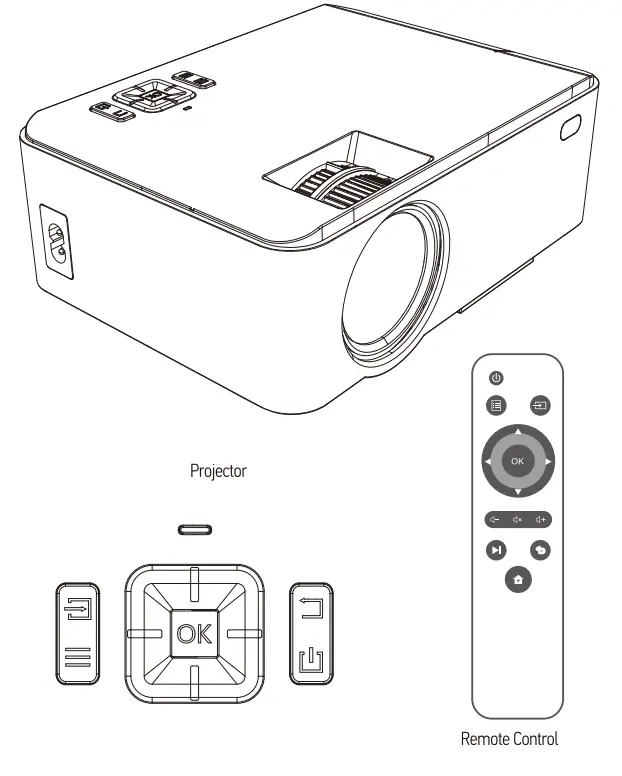
ACCESSORY LIST
1x AV signal cable
1x Remote control (battery not included)
1xHDMI cable
1x Power Cable
1x User manual
1x Warranty card
SAFETY NOTICE
Please read the user manual carefully before using the projector.
Please use a standard power cord with ground wire to ensure stable power supply.
Please use the same power voltage as marked on the projector.
Please do not disassemble the projector by yourself, otherwise the warranty will be void.
Please do not look into the lens when the projector is operating, otherwise it may hurt your eyes.
Please do not cover the projector ventilation holes with any material.
Please keep the projector away from water or any other liquid as it is not waterproof.
Please don’t put the projector in wet or moist conditions to prevent electric shock.
Please tum off and unplug from the power supply if not using the projector for a long time.
Please use the original packing foam or other anti-shock material when relocating the projector.
Please contact our customer support if the projector has any problems.
This mini projector comes with a full 12-month warranty.
Please contact us if you want to know more information about the warranty. (Warranty service does not include the frame, manual, packing and subjective ideas about the video, sound or image aspects)
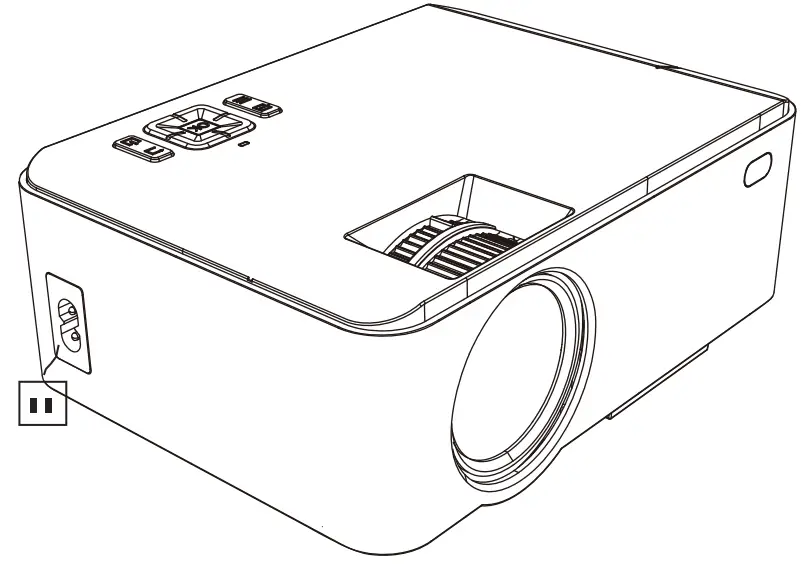
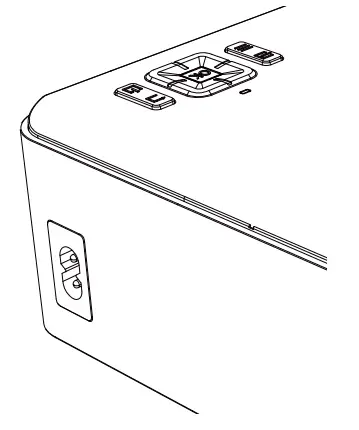
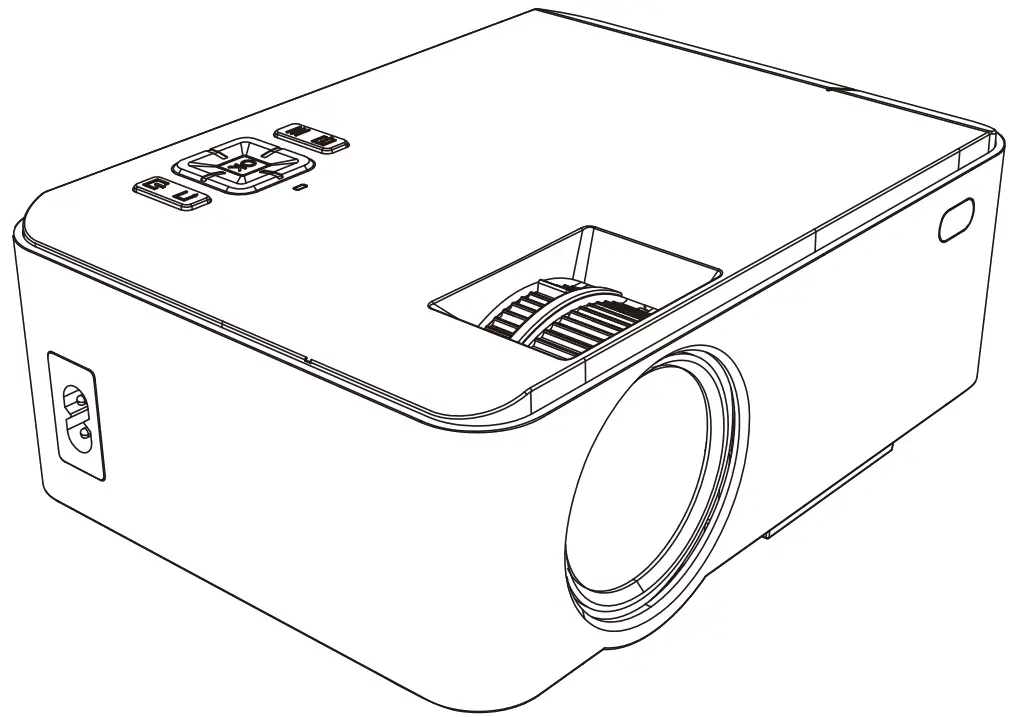
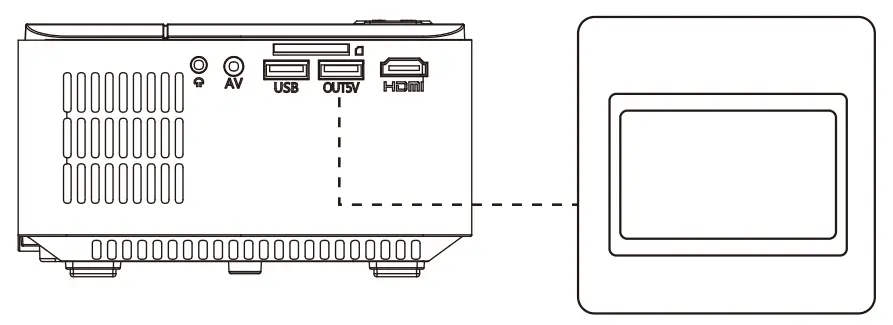
PROJECTOR OVERVIEW
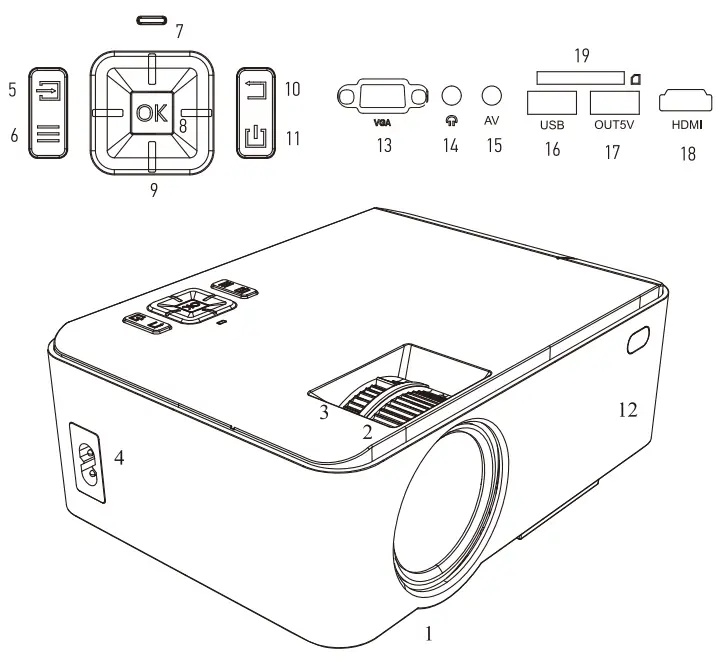
| 1. Lens 2. Manual focus 3. Keystone 4, Power input 5. Source 6. Menu | 7. Power indicator 8. OK 9. Direction buttons 10. ESC 11. Power button 12.1R 13. VGA | 14. Earphone slot 15. AV 16. USB input slot 17. USB output slot (5V power supply) 18. HDMI 19. SD |
REMOTE CONTROL
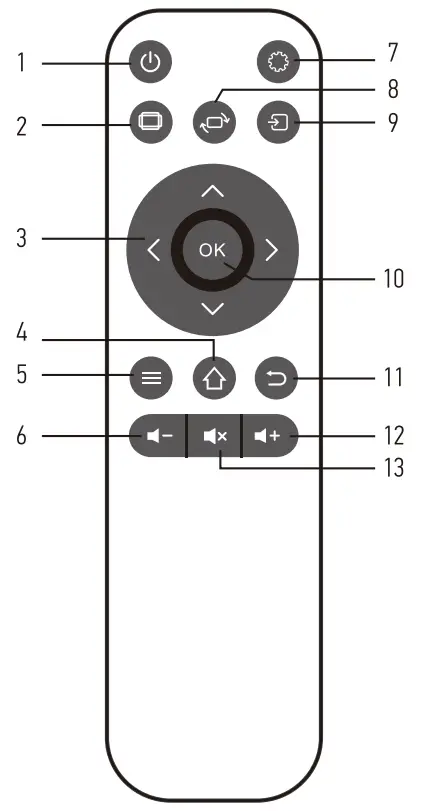
| 1. Power 2. Aspect ratio 3. Arrow keys 4, Home 5. Menu 6. Volume Down 7.Menu | 8. Screen flip 9. Source 10. Enter 11. Retum 12. Volume Up 13. Mute |
Caution
Do not submerge the remote control in water.
Do not put the remote control near fire or in wet/hot places.
Do not use old and new batteries together in the remote controL
Please take the batteries out if not using the remote control for a long time to avoid battery leakage.
Please point the remote control at the IR receiver.
USER MANUAL
4.1 Connecting the projector to power
4.1.1 Connect the power cable to the projector.
4.1.2 The projector will display an indicator light when connected to power.
4.2 Power ON/OFF
Press the “![]() ” button on the projector or on the remote control to power on.
” button on the projector or on the remote control to power on.
4.3 Multimedia boot screen
After 10-20 seconds, the multimedia screen will be displayed.
DISPLAY SOLUTION
4.4 Focus & keystone correction
4.4.1 Image focusing
Make sure the projector is horizontal to the projector screen and adjust the focus by pressing button 2.
You can display video or the menu to check adjustment.
4.4.2 Keystone correction
The projector uses an optical keystone correction function, so the image can be adjusted as below:

However, this projector does not have a horizontal keystone correction function. The projector must be placed horizontally to the projection screen. If you encounter this problem, itis probably because the projector has not been placed horizontally to the projection screen, or the projection screen is not vertically positioned.
Solution: Adjust the projector’s position so that it is horizontal to the screen.
CONNECTIONS
5.1 Connections
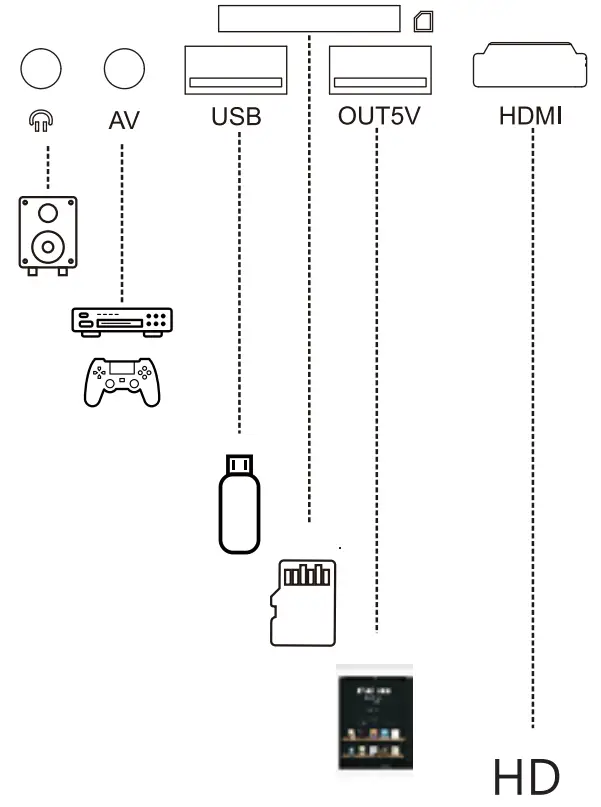
Connect multiple devices and applications.
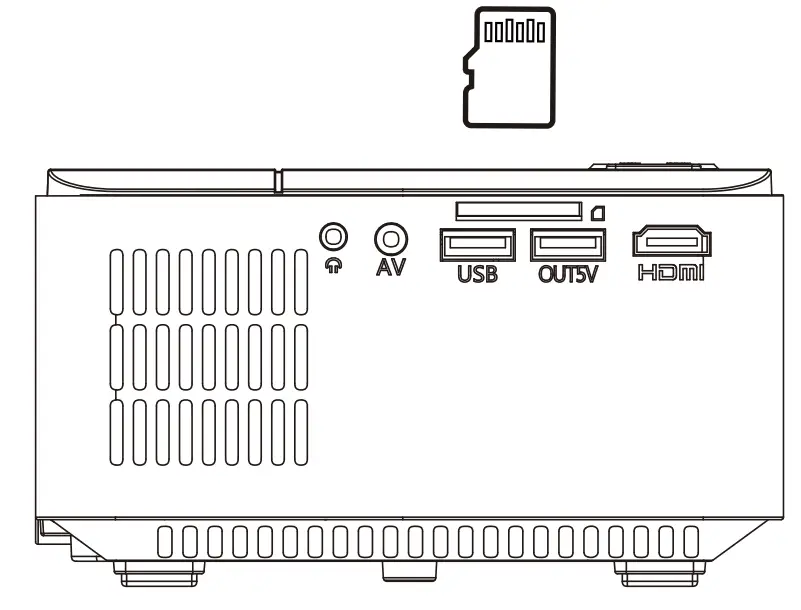
5.2 Playing media from a USB/SD card
5.2.1 Insert the USB/SD card into the slot (picture).
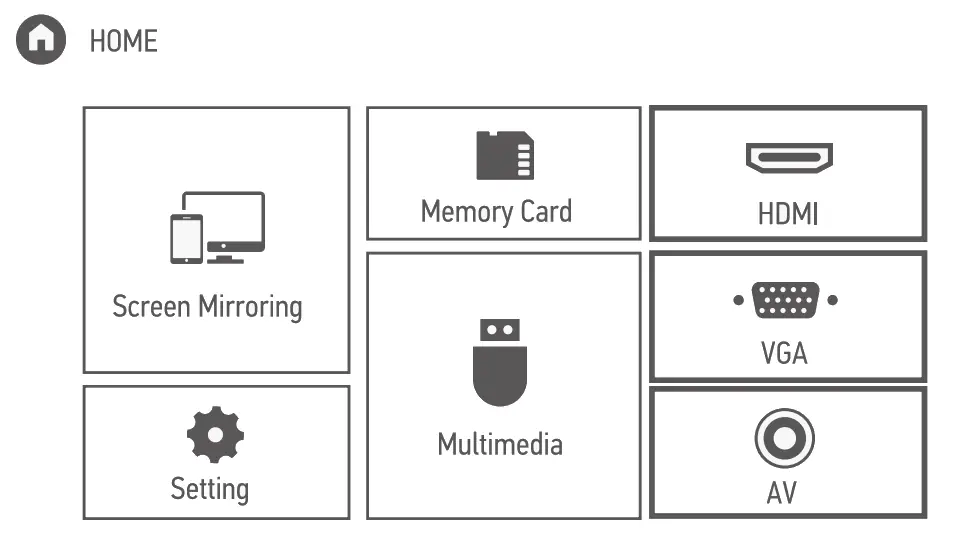
5.2.2 Choose Memory Card or Multimedia from the HOME screen

Supported multimedia formats
| Multimedia | Audio file | MP3 / MC I WAV / FLAC / WMA / M4A |
| Picture file | JPG / PNG / BMP / JPEG | |
| Video file | MPO MKV / MOV / WMV / RMVB / RM / AVI / FLV / TRP / VOB / 3GP / DIVX I T I TS I MPG / M2TS / F4V / DAT | |
| Text file | TXT |
5.2.3 Choose the content which you need to display: Video/music/photos/text.
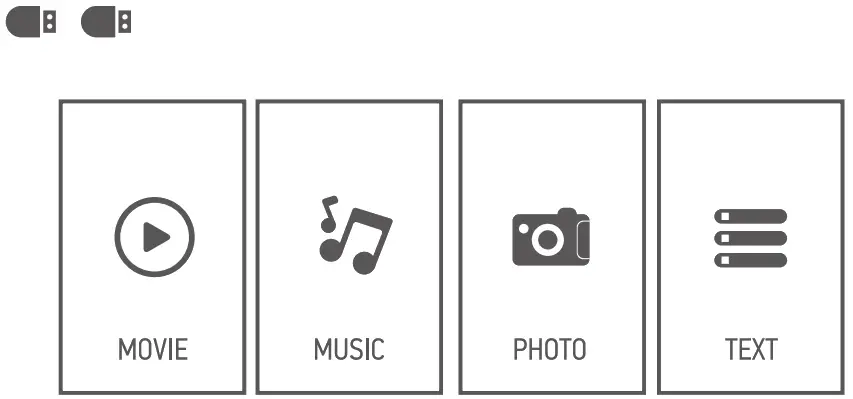
5.2.4 Choose the file you want to display. Press“ OK ” to display.
5.3 AV video connection
Use a 3-in-1 AV cable to connect to the projector as shown below. Once connected, select the AV signal source.
5.4 HDMI connection
5.4.1 Use the HDMI slot to connect computers and HDMI compatible devices. Once connected, select the HDMI signal source.
5.5 3.5mm audio connection
5.5.1 Use the 3.5mm audio jack to connect headphones and speaker equipment.
Note:
This prokeior does not support Dolby sound.
5.6 Other connection
USB output 5V for mobile table power supply.
6.1 Setting
Press the “Menu” key or select “Setting” on HOME screen to enter the main menu, then press “![]() ” to enter each sub-menu.
” to enter each sub-menu.
Press “![]() to select the sub-menu, then adjust the parameters per your needs, and press the “OK” key to confirm.
to select the sub-menu, then adjust the parameters per your needs, and press the “OK” key to confirm.
6.2 Sub-menu functions
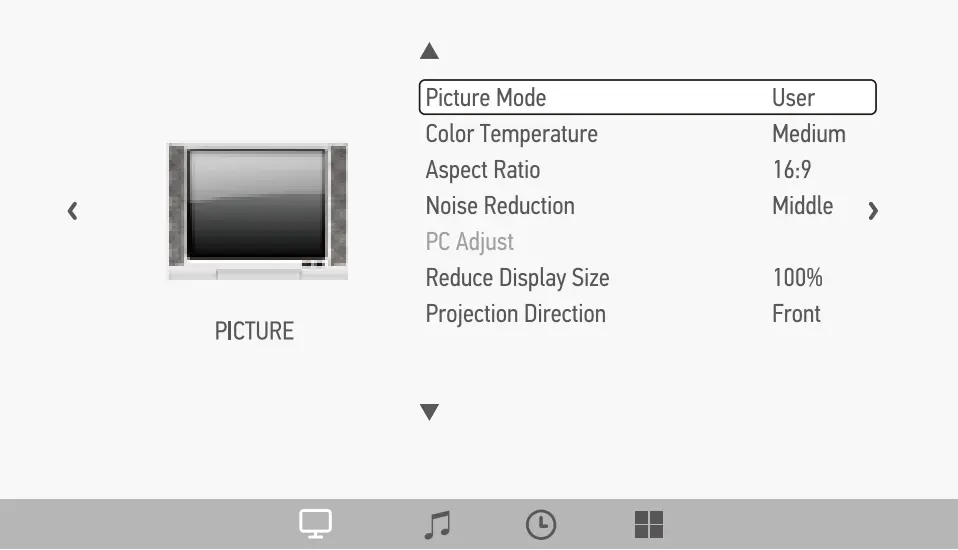
6.2.1 PICTURE: Picture Mode , Color Temperature , Aspect Ratio , Noise Reduction , PC Adjust, Reduce Display Size , Projection Direction.
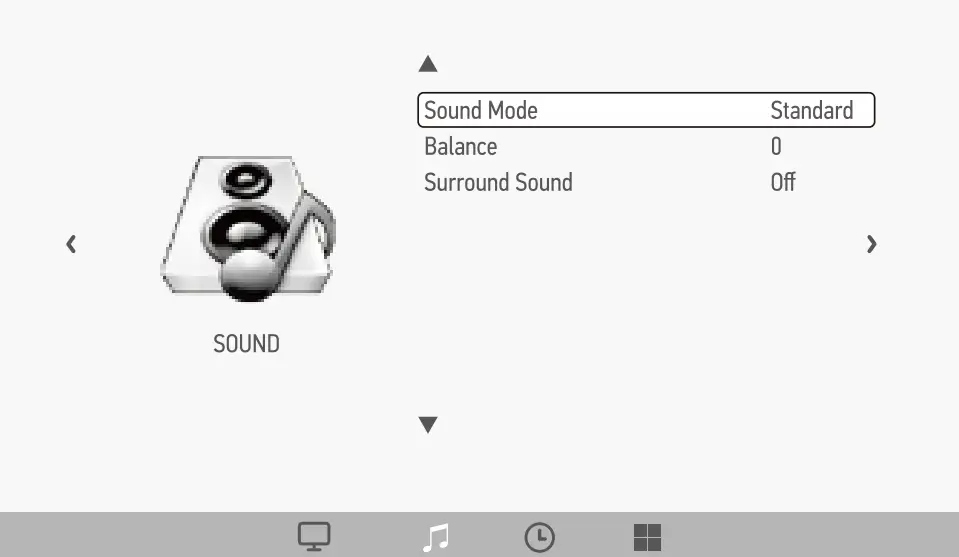
6.2.2 SOUND: Sound Mode , Balance , Surround Sound.
6.2.3 TIME: Clock , Sleep Timer.
6.2.4 OPTION: OSD Language , Restore Factory Default , Color Range , Sostware Upadate(USB).
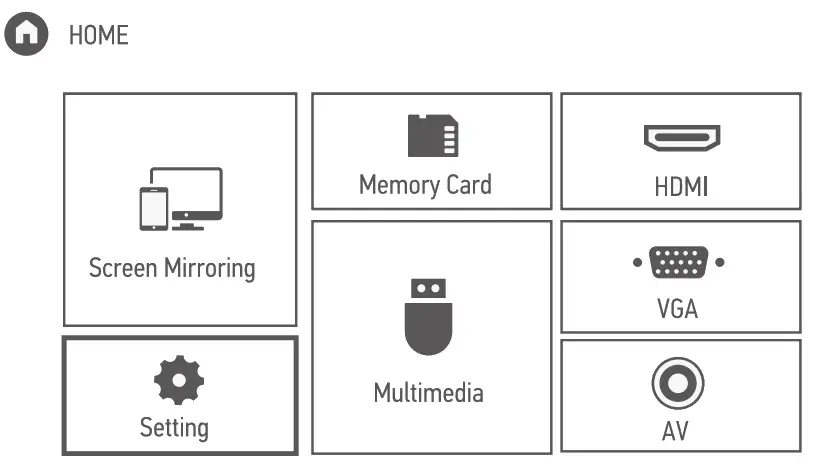
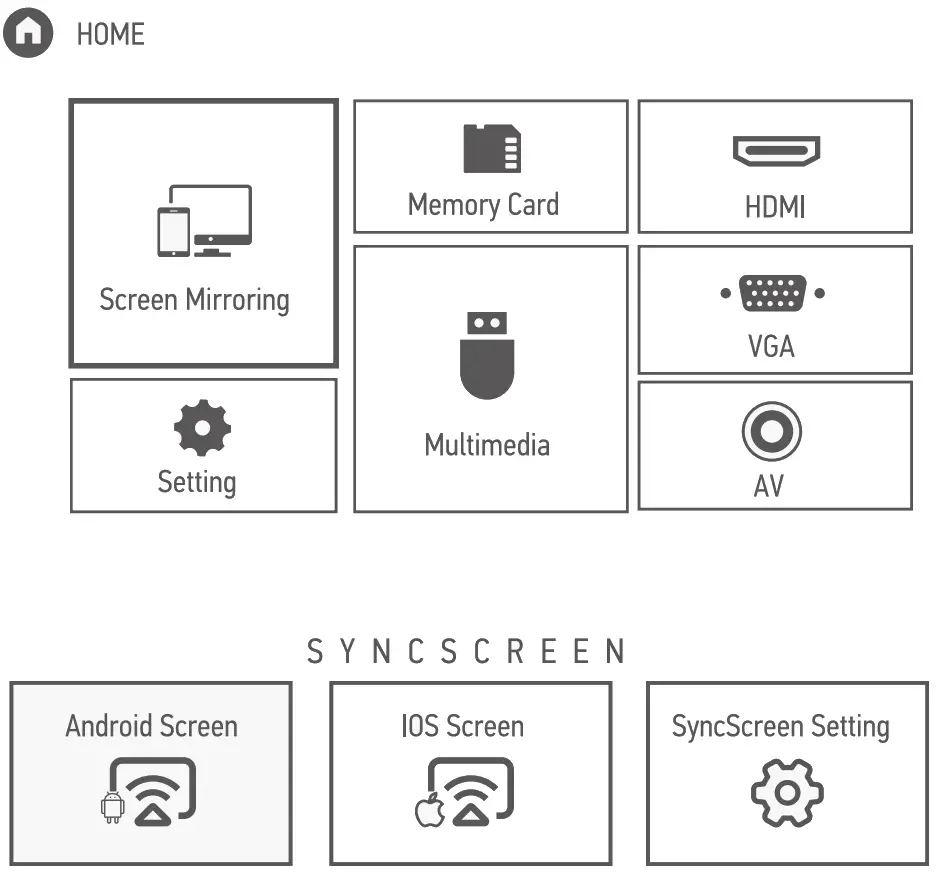
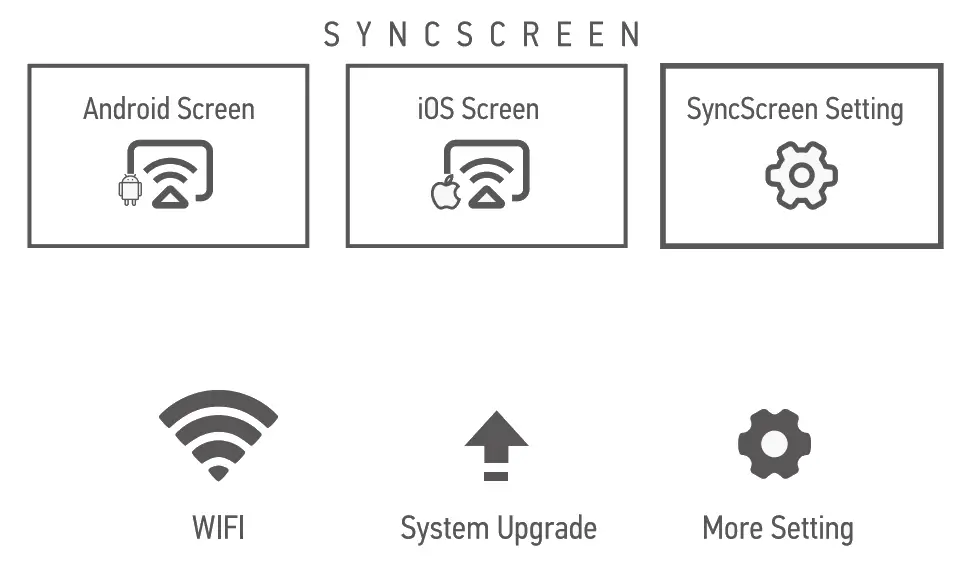
SCREEN MIRRORING
Step 1: Select Screen Mirroring in the HOME screen.
Step 2: Press the OK key to enter the interface.
Step 3: After entering into the interface, select the function you need.
Note: To return to HOME screen from Screen Mirroring interface, press the “Home” key on remote control.
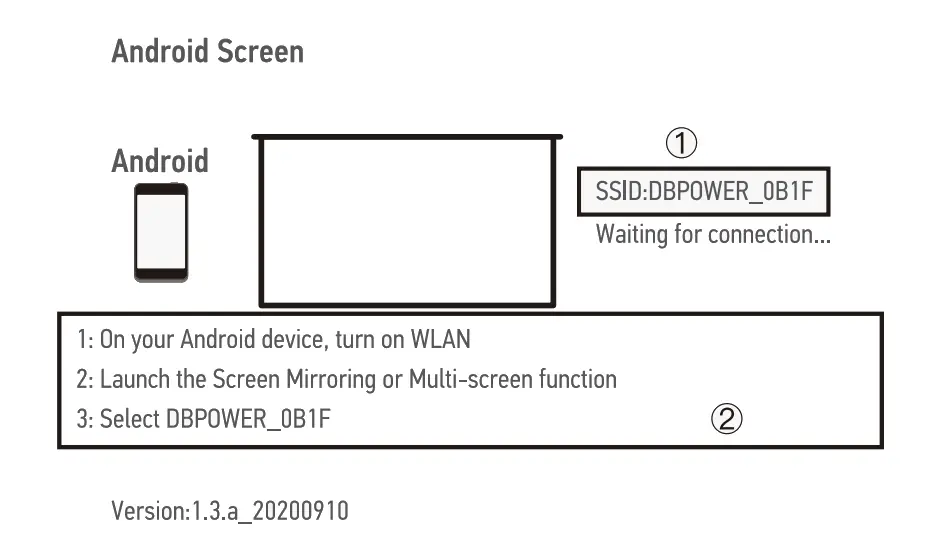
7.1 Android Screen
Android Screen has two connection methods:
7.1.1 Method 1: Wireless Connection (Recommeded)
Step 1: Select Android Screen in the Syncscreen interface
Step 2: Turn on the WLAN of Android device, choose the screen mirroring function on the Android device, search for the device name of the projector and click to connect, and wait a few seconds, then the mirroring will be successful.
Note: Diferent Android device have diferent positions and names for the screen mirroing function, please refer to the manual of the Android device.
- The SSID is the device name of the projector.
- The instructions of Android Screen.
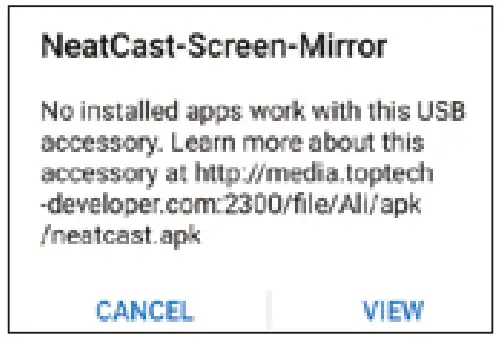
7.1.2 Method 2: Wired Connection
Step 1: Select Android Screen in the Syncscreen interface
Step 2: Connect your Android device to the projector OUTSV port with a USB cable
Step 3: For the first time, your Android device will pop up below “NeatCast-Screen-Mirror” window, select “VIEW” to download and install the “NeatCast” APP
Step 4: Your Android device will pop up below “NeatCast” window , slelect “OK”
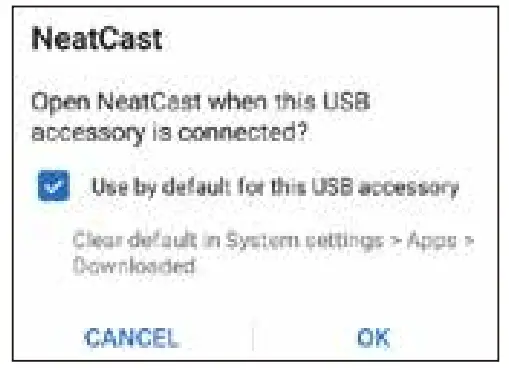
Step 5: When your Android device pop up the to start the”Privacy notice” window, select “START NOW” screen mirroring.

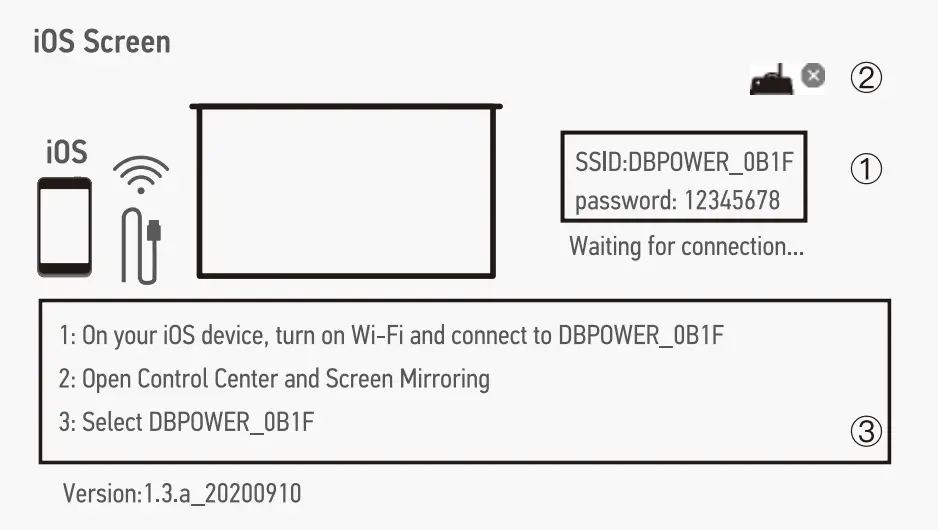
7.2 10S Screen
i0S Screen has three connection methods :
7.2.1 Method 1: Wireless connection without Wi-Fi router
Step 1: Projector doesn’t need to connect Wi-Fi router.
Step 2: Tum on Wi-Fi on your iOS device and search for the network name of the projector, for example: DBPOWER_ OBIF, select it and enter the password “12345678”, then your iOS device will connect to the projector.
Step 3: Tur on Screen Mirroring on your iOS device, select the device name of the projector.
- The device name and password of the projector.
- Projectot to Wi-Fi router connection indicator.
- The instruction of i0S Screen.
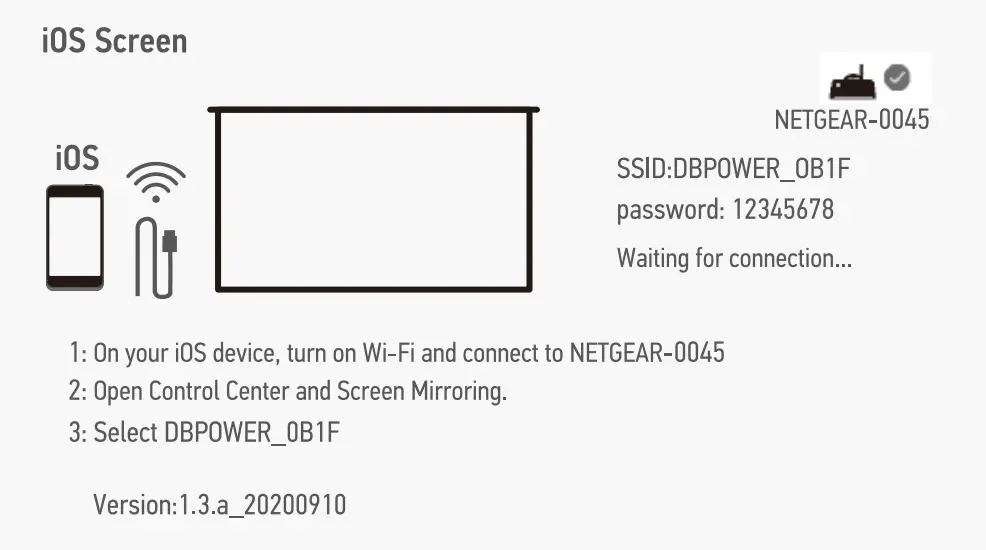
7.2.2 Method 2: Wireless connection with Wi-Fi router (Recommeded)
Step 1: Connect your projector to a Wi-Fi router (Refer to Wi-Fi connection method on page 24)
Step 2: Connect your iOS device to the same Wi-Fi router.
Step 3: Turn on Screen Mirroring on your iOS device, select the device name of the projector.
7.2.3 Method 3: Wired connection
Enter iOS Screen, connect your iOS device to the projector OUTSV port with a USB cable . Your iOS device will receive a trust prompt, confirm “trust”, then the screen mirroring will start .
Note: If your iOS device doesn’t receive a trust prompt after connect to the projector, please use the original iOS device cable to try again.
SYNCSCREEN SETTING
Step 1: Select SyncScreen Setting from syncscreen.
Step 2: Choose the setting you want.
The settings include three functions: WIFI / System Upgrade / More Setting.
WIFI: Search and Cormect WiFi.
System Upgrade: OTA upgrade / USB upgrade.
More Setting: System Reset / Mirror Made / Airplay Mode / Language.
WIFI CONNECTION
Step 1: Select WIFI and press the OK key to enter the next interface.
Step 2: Select the Wi-Fi that you want to connect from the Wi-Fi list.
Step 3: Enter the correct password through the virtual keyboard.
Select the Wi-Fi that has been connected, press the OK key, and three options will pop up:
Disconnect: Disconnect the Wi-Fi connection this time, but it will be automatically connected after restarting.
Forget: Forget the password. After restarting, it will not automatically connect. The password must be entered again for re-connection.
Cancel: Exit the menu.

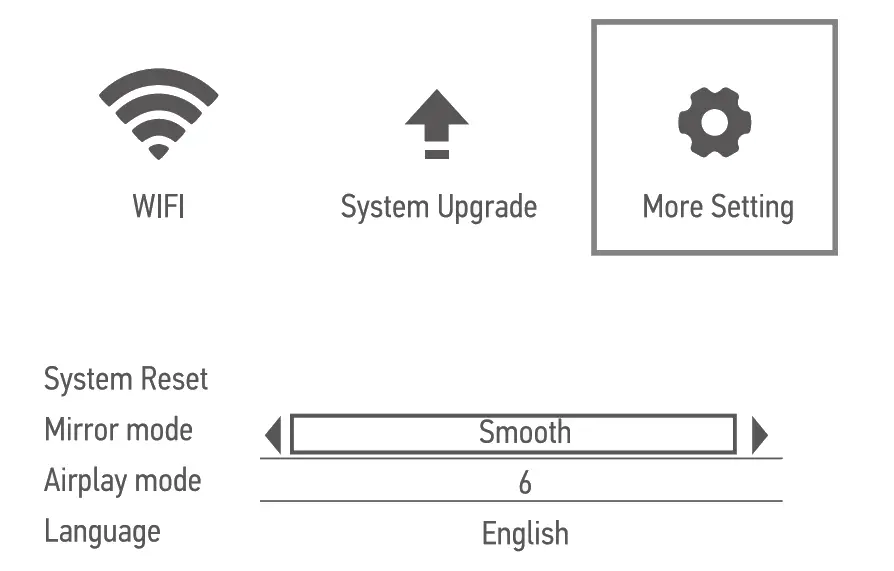
MORE SETTING
Step 1: Select More Setting, press OK key to enter the interface.
Step 2: Choose the setting you want
System Reset: Click Yes is to confirm the restoration, Ne is to exit the selection.
Mirror Mode: Smocth / Standard / Quick.
1)Smooth Mode: Requires higher network to optimize the effect of playing video, and caches the video to ensure smooth pictures during playback.
2)Standard Mode: Reduces the cache and delay of the mirroring.
3)Quick Mode: No video caching function. When the network environment is poor, the clarity of the mirroring will be lower to ensure smooth playback and reduce delay.
Airplay Mode: Can set the channels for 1, 6 and 11 routers. When the network is poor, you can set other channels to avoid the jam and delay.
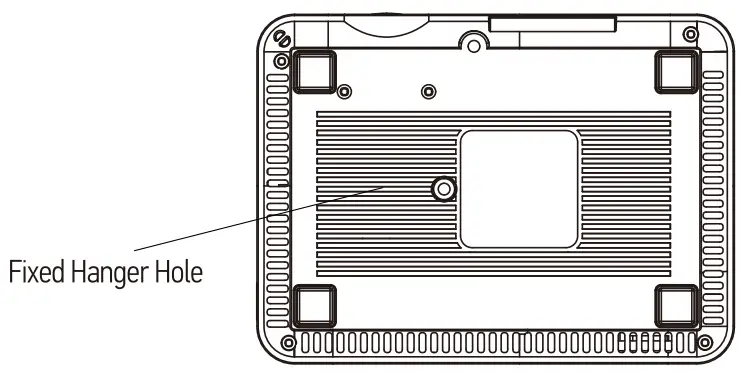
PROJECTOR INSTALLATION
7.1 Please refer to the following diagram for mounting the projector on a ceiling.
Do not place the projector near heat sources to prevent the projector from overheating.
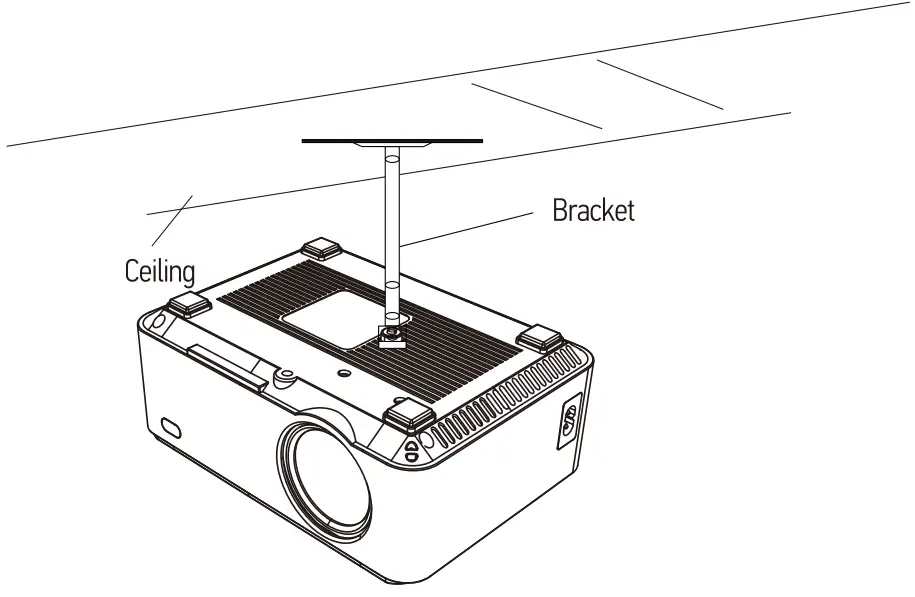
When ceiling mounting the projector, please ensure screws of a suitable quality are used, and that screw depth is deep enough to prevent the projector from falling.
TECHNOLOGY FEATURES
8.1 Basic parameters
| Imaging Technology | TFT LCD | Projection Color Number | 16.7M color by 8 bit R.G.B signal input |
| Resolution | 1280×720 RGB | Keystone | Manual Correction ±15° |
| Highest Resolution | 1920*1080 | Power Voltage | 100V-240V 50/60Hz |
| Light | LED | Integrated watt | 50W |
| Life Span | 50,000 his | Input | USB*1/SO/HDMINGA/AV |
| Lens | Multichip Coated | Output | Earphone*1/OUT 5V(5V-1.5A) |
| Operation Mode | Lens (F=125) Manual Operation | Speaker | 3W*1 |
| System support | Support multi-media | ||
| Language support | Support 23 Language | ||
| Throw Distance | 1-5M | Unit size | 204*149*83mm |
| Screen Size | 32-200 Inches | Projector Ratio | 1.4:1 |
| Aspect Ratio | 4:3/16:9 | New Weight | 1.05KG |
8.2 Projection distance and screen size
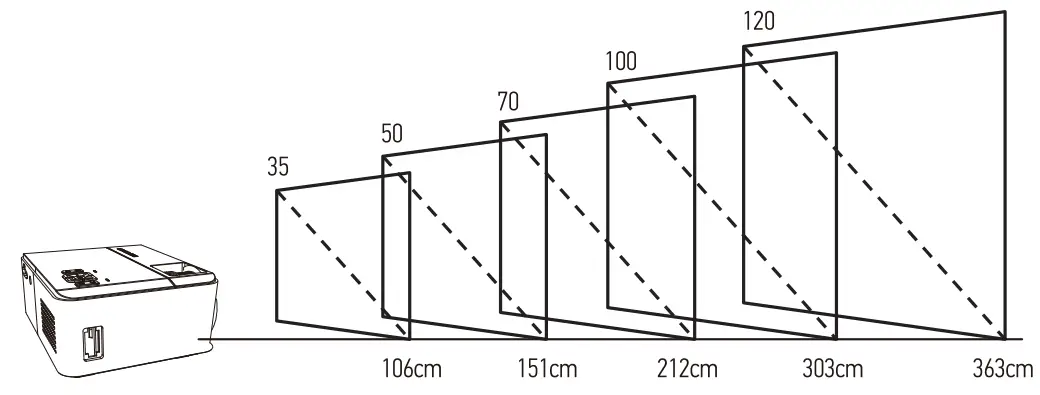 For reference only. The projection distance and screen size differ based on the configuration of the projector.


