
Jimi IoT VL501 LTE Vehicle Terminal

Read this manual carefully prior to use. No prior notice will be given for any changes made to the appearance color, or accessories of the product.
Introduction
Features
- Driving Behavior Analysis (Harsh Acceleration, Hard Braking,Sharp Cornering, and collision)
- Remote Listen-in (NA only)
- Multi-GNSS
- Exception Alerts (on Speed, Fatigue Driving, Entering or Leaving Geofences, and Device Plug-in and Unplug)
- Reupload of Location Data
- Panic Button for Emergencies
- Fast Charging
Operating Environment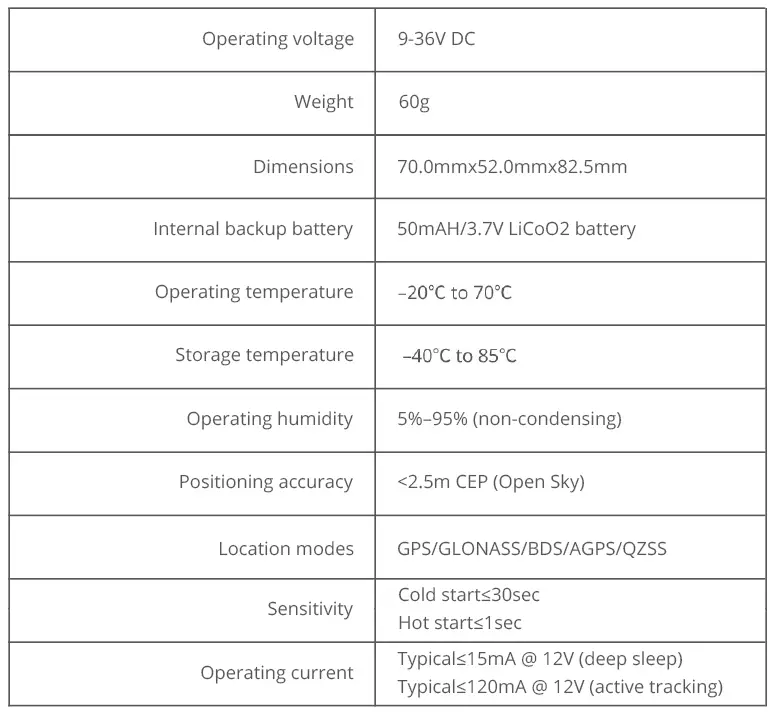
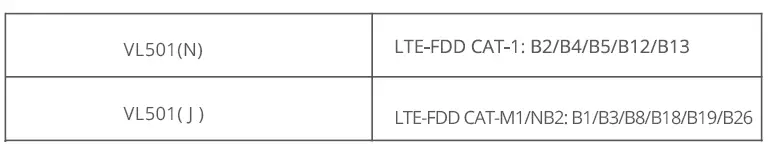
Frequency Bands
 Overview
 Overview
Appearance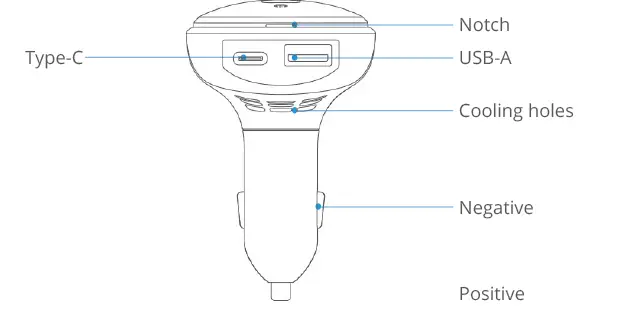
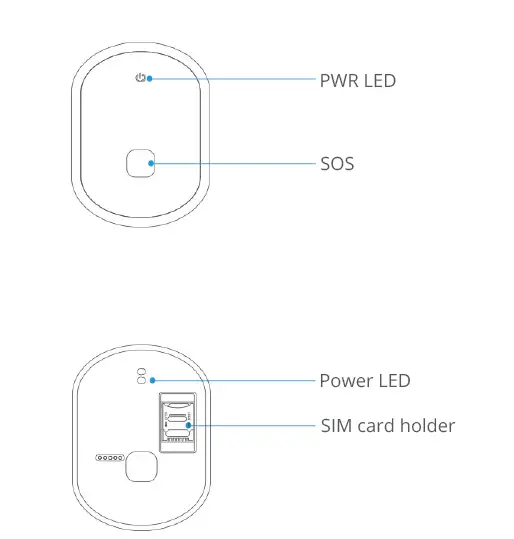
LED Indication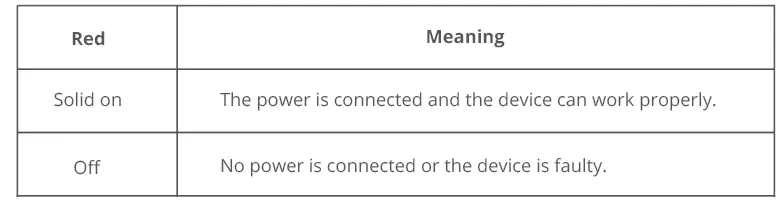
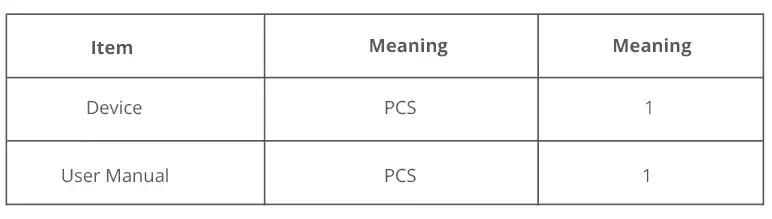
Packing List
Installation
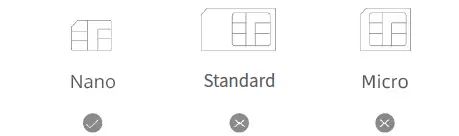
SIM Card Attachment
- Step 1 Prepare a Nano-SIM

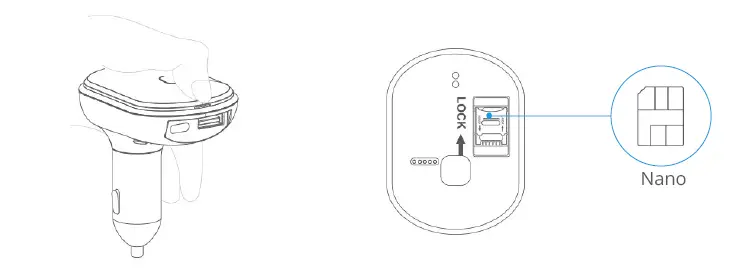
- Step 2 Attach the SIM.
- Remove the cover using the notch and insert the SIM by the figure
- Place the SIM in by the figure.Slide up the card holder to lock the SIM

Note:
- After the SIM is in place, the device will power on using its backup battery. If the backup battery is too low, the power-on will fail. In this case, it is recommended to plug the device into the cigar lighter of your vehicle.
- The SIM card must be inserted correctly, have GPRS services activated, and not be in arrears. If the SIM is identified and requires a PIN, please disable the PIN request
Device Installation
Find the cigar lighter socket of your vehicle and insert the VL501 into the port. The positions of cigar lighter sockets of different makes may different. It is recommended to visit the official website of your make and find out where the cigar lighter port of your vehicle is.
Note:
Do not shake or rotate the VL501 at will, as it may falsely trigger reckless driving behavior and other alerts.
Configuring APN and Server Parameters
To ensure the device gets online and operates correctly, you are advised to check the APN and server settings. You can set the APN and the server via SMS commands if necessarily.
APN set command
It is recommended to contact your network operator to confirm the APN information. Then you can use your phone to deliver the following SMS command to the VL501:
APN,ap nna me#
- For example: APN,internet#
- Or if your local APN contai'”‘s a user name and password, you can use the following command to set the APN:
- APN,a pn name, user, password#
- For example: APN,internet,CLENTE,AMENA#
Server set command
It is recommended to contact your platform service provide to confirm the domain name and IP address of their serve. Then you can use your phone to deliver the following command to the VL501:
SERVER, mode,do main name/IP, port, protocol#
For example:
- SERVER, 1,www.ydpat.com,8011,0#
- SERVER,0,211.154.135.113,8011,0#
- “Mode=1” means to set the server parameters via the domain name;
- “Mode=O” means to set the server parameters via the IP address.
- “Protocol=O” means to connect to the server using TCP protocol;
- “Protocol=1” means to connect to the server using UDP protocol.
Common SMS setting command
| Command | Description | Remark |
| VERSION# | Check firmware version | I |
| PARAM# | Check parameters | I |
| GPRSSET# | Query device network setting | I |
| STATUS# | Check device’s status | I |
| SOS,A,phone number 1, phone number 2,phone number 3# SOS,D,sequence number 1, sequence number 2, sequence number 3# SOS,D,phone number# SOS# |
SOS setting | Add SOS phone number Delete the phone number according to the sequence number Delete the matching SOS phone number Check the SOS phone number |
| WHERE# | Check position status | I |
| URL# | Check URL | I |
| POSITION# | Check position | I |
| MONITOR# | Voice Monitor(NA only) | I |
| FACTORY# | Restore to factory | Restore to factory setting |
| RESET# | Reboot | The device would reboot in 20S after receiving the command |
Platform Operations
- By logging in to the mobile app or locations services platform designated by your dealer and correctly your device, you can query and set related parameters.
- Logging In to Service Platform
- Log in to the location services platform designated by your dealer and configure accordingly. Downloading Mobile App
- Log in to the URL designated by your dealer to download the mobile app.


Troubleshooting
| Problem | Possible Solution |
| Unable to connect to tracking platform | Check the APN and IP settings |
| Check whether the data service of SIM card is enabled | |
| Check the balance of SIM card | |
| Tracker shows offline | Check whether extremal power is still connected |
| Check if the vehicle entered network blind area | |
| Check the balance of SIM card | |
| Unable to locate | Make sure the top side facing upward without metallic things shielded |
| Make sure it’s not in area with no satellite coverage | |
| Location drift | In area with poor GNSS signal(tall building around or basement), drifting may happen, |
| Check whether vibration happens around to trigger the accelerator | |
| No command reply | Make sure command format is correct |
| Vehicle may be in network blind area | |
| Make sure SIM card is well inserted and have SMS service |
Warranty Instructions
- The warranty is valid only when the warranty card is properly completed, and upon presentation of the proof of purchase consisting of original invoice indicating the date of purchase, model and serial NO. of the product. We reserve the right to refuse warranty if this information has been removed or changed after the original purchase of the product form the dealer.
- Our obligations are limited to repair of the defect or replacement the defective pa rt or at its discretion replacement of the product itself.
- Warranty repairs must be carried out by our Authorized Service Centre. Warranty cover will be void, even if a repair has been attempted by any unauthorized service center.
- Repair or replacement under the terms of this warranty does not provide rightto extension or renewal of the warranty period.
- The warranty is not applicable to cases other than defects in material, design and workmanship.
Maintenance Record
| Date | Serviced by |
| Product Model | |
| IMEI Number | |
| Failure Description | |
| Comments |
FCC
Any Changes or modifications not expressly approved by the party responsible for compliance could void the user’s authority to operate the equipment.
Note: This equipment has been tested and found to comply with the limits for a Class B digital device,pursuant to part of the FCC Rules. These limits are de-signed to provide reasonable protection against harmful interference in a resi-dential installation. This equipment generates uses and can radiate radio fre-quency energy and, if not installed and used in accordance with the instructions, may cause harmful interference to radio communications. However, there is no guarantee that interference will not occur in a particular installation. If this equip-ment does cause harmful interference to radio or television reception, which can be determined by turning the equipment off and on, the user is encouraged to try to correct theinterference by one or more of the following measures:
- Reorient or relocate the receiving antenna.
- Increase the separation between the equipment and receiver.
- Connect the equipment into an outlet on a circuit different from that to which the receiver is connected.
- Consult the dealer or an experienced radio/TV technician for help.
This device complies with part of the FCC Rules. Operation is subject to the fol-lowing two conditions:
This device may not cause harmful interference, and this device must accept any interference received, including interference that may cause unde-sired operation.
This equipment complies with RF radiation exposure limits set forth for an uncon-trolled environment.
This equipment should be installed and operated with a minimum distance of centimeters between the radiator and your body.


