![]() CTR 1.1
CTR 1.1
VFELCTR1.1
Elliptical Cross Trainer
User Manual
CTR 1.1 Elliptical Cross Trainer
 ASSEMBLY VIDEO
 https://virtufit.nl/service/montagevideos/?
![]() @virtufit_fitness
@virtufit_fitness![]() VirtuFit
VirtuFit![]() www.virtufit.com
www.virtufit.com
STEP 01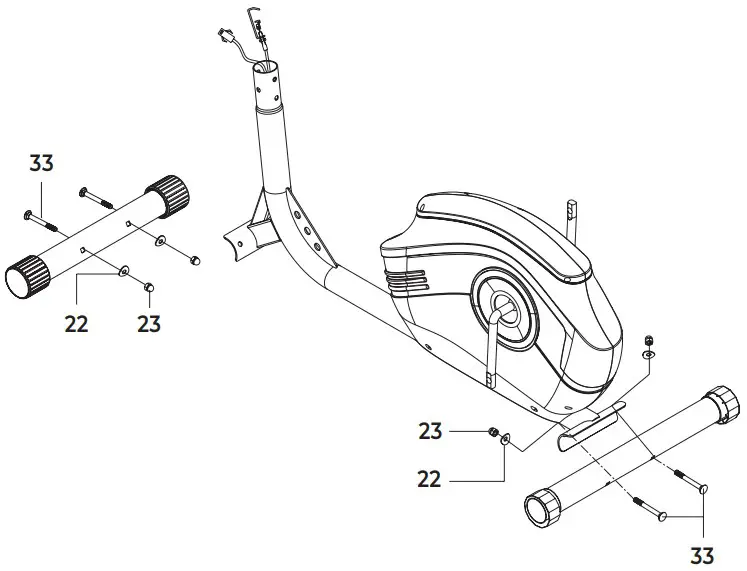 STEP 02
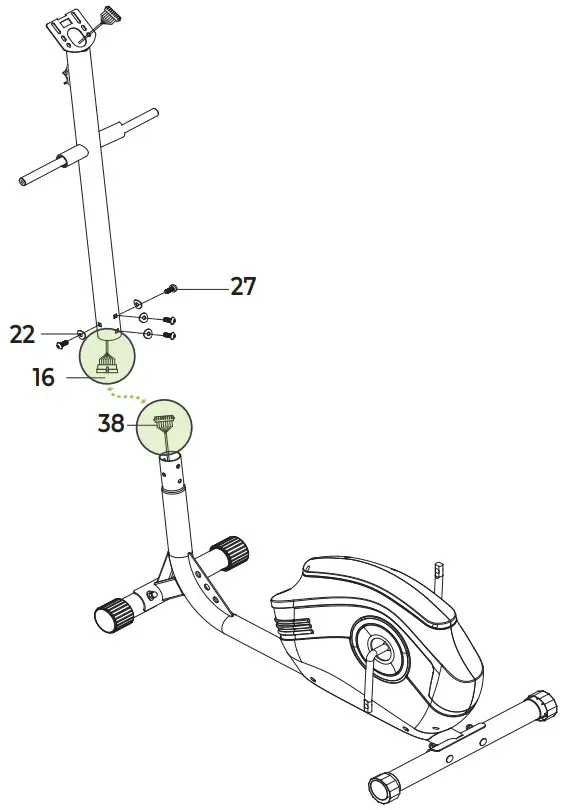 STEP 03
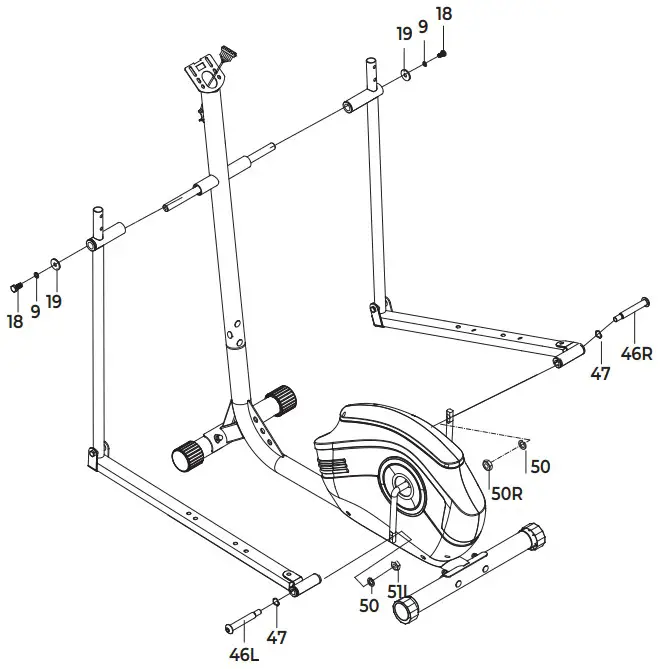 CAUTION! Only tighten Bolt 18 at the end of this step. Keep synchronous adjusting and screwing for Bolt 18 and Bolt 46R/L.
STEP 04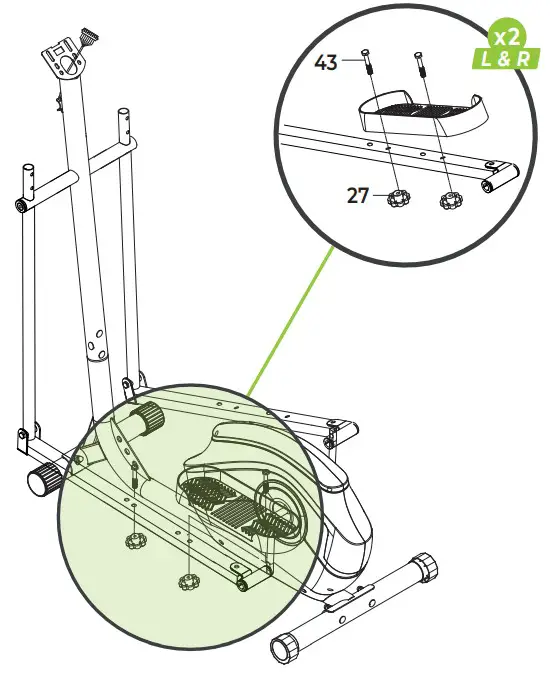 STEP 05
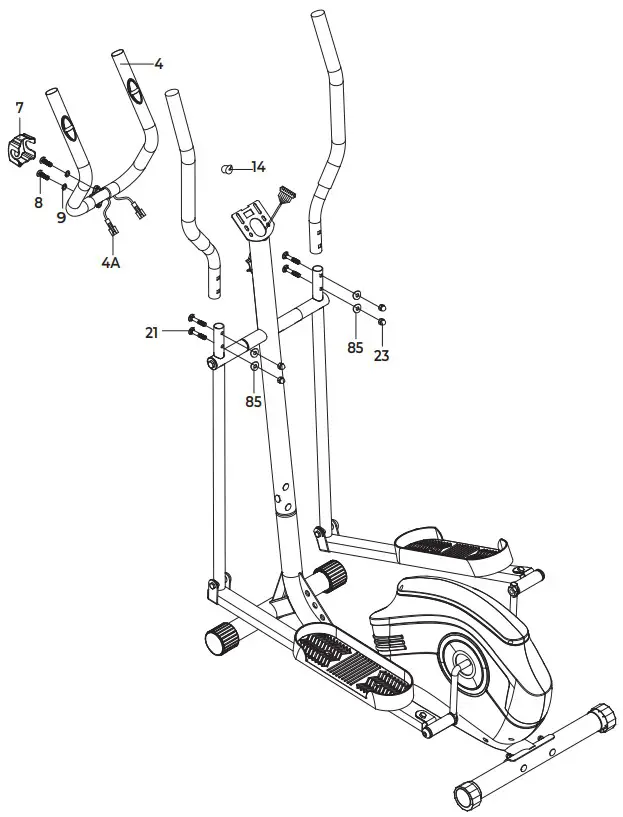 STEP 06
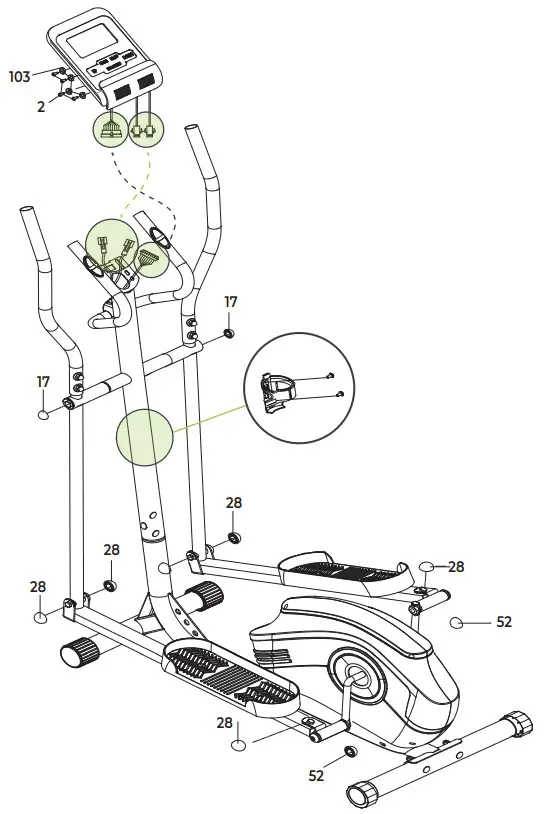 FIG. A
 FIG. B
SAFETY INSTRUCTIONS
WARNING!
Consult your doctor before you start exercising. This is particularly important for people with health problems. Please read all instructions before using the machine. VirtuFit assumes no responsibility for injury or property damage resulting from the use of this equipment. Please read this manual carefully before assembling and/or using the machine.
- Make sure that the machine is properly assembled and that all nuts and bolts are tight before using it.
- Lubricate all moving parts annually with petroleum jelly (acid- free) or silicone spray.
- Do not wear loose clothing to avoid getting caught in moving parts.
- Install and use the unit on a solid, level surface.
- Always wear clean sports shoes when using the appliance.
- Keep children and pets away from the appliance when in use.
- Maintain your balance when using the device.
- Do not place your fingers or other objects in the moving parts.
- Before exercising, consult your physician to determine the appropriate frequency, duration and intensity of exercise for your age and physical condition. Stop exercising immediately if you experience nausea, shortness of breath, fainting, headache, chest pain, tightness or any other discomfort.
- This machine should only be used by one person at a time.
- This machine is designed for domestic use and the maximum user weight is 115 kg.
- Leave 1-2 metres of space behind the machine to avoid accidents.
- Place the machine on a clean, flat surface. Do not place it on a thick carpet, as this may hinder the ventilation of the machine. Do not place the machine outdoors or near water.
- Keep the storage area dry, clean and level to prevent damage. Do not use the device for any purpose other than training.
- Use the device only in an environment where the ambient temperature is between 10°C and 35°C. Store the device only in an environment where the temperature is between 5°C and 45°C.
GUARANTEE
Warranty claims are excluded if the cause of the defect is the result of:
- Maintenance and repair work not carried out by an official dealer.
- Improper use, negligence and/or poor maintenance.
- Failure to maintain the appliance in accordance with the manufacturer’s instructions.
ASSEMBLY INSTRUCTIONS (STEP 01-06)
Missing parts: If any parts are missing from the packaging, carefully check the polystyrene foam and the appliance itself. Some parts (bolts, screws, etc.) are already attached to the unit.
Error message: Make sure that all cables are carefully attached. The aluminium feet of the console are very sensitive and must be kept straight. If the console gives an error message after the machine has been mounted, the aluminium feet of the console may be bent. Straightening the aluminium feet may make the error message disappear.
Hex head bolts: Make sure that the hex head spanner is pushed into the bolt before applying force. This will prevent the head of the socket bolt from turning.
TRAINING WITH HEART RATE
Hand sensors
This VirtuFit fitness machine is equipped with hand sensors to measure heart rate. The hand sensors are attached to the handle and only work if both sensors are held for a long time. For optimal performance, it is important that the hands are slightly damp and exert constant pressure on the sensors. Hands that are too dry or too wet may result in abnormal readings.
MAINTENANCE
Safe and efficient use can only be achieved if the appliance is properly installed and maintained. It is your responsibility to ensure that the appliance is maintained regularly. Parts that have been used and/or damaged must be replaced before the appliance is used again. The appliance should only be used and stored indoors. Long-term exposure to weather and temperature/humidity changes can have a serious impact on the electrical components and moving parts of the unit. Always unplug the power cord from the unit before cleaning or servicing it.
Daily maintenance
- Clean and remove sweat and moisture after each use.
- Check that the unit is free of dust and dirt.
- Do not use aggressive cleaning agents and keep the device away from moisture.
Semi-annual maintenance
- Inspect all bolts and nuts connected to the moving parts of the unit. Tighten bolts and nuts as necessary and appropriate.
- Check the mobility of moving parts and components of the unit. Use silicone spray if necessary and appropriate.
We recommend the following:
- Clean the unit after use.
- Use a dry cloth to clean the control panel and the areas around the on/off switch.
- Use a soft, clean cloth and detergent to remove stubborn marks and dirt from the unit.
- Store the unit in a safe, dry place away from heat and water.
CAUTION!
- Repairs must be carried out by a professional technician,
Cleaning
General cleaning of the unit will extend its life. Keep the appliance clean by dusting it regularly. Regular maintenance will prolong the life of your appliance and prevent injuries! For more information, please visit https://www.virtufit.nl/service/faq/
TROUBLESHOOTING
The display does not show any values: Check that the sensor and console cables are properly attached and undamaged. If this does not solve the problem, carefully bend the sensor.
Device squeaks: Check that all bolts and nuts are tight. If necessary.
The hand sensors are not working properly: Wash your hands, dry them well and test the hand sensors again. If this does not solve the problem, check the handlebar cables for damage and ensure that they are properly connected to the connector. If this still does not correct the problem, replace the handlebar.
Console does not work: If there is no signal, check that the cable is correctly connected.
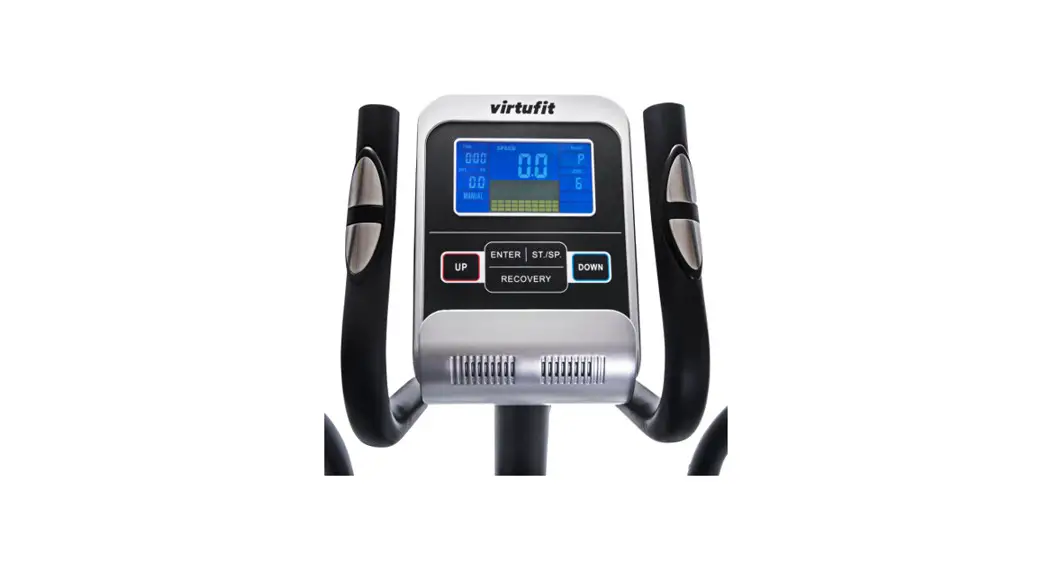
CONSOLE (FIG. A)

- (1) MODE Press “MODE” to select functions. Press and hold “MODE” to reset time, distance and calories.
- (2) SCAN Press “MODE” until “SCAN” is displayed, the monitor will cycle through all 6 functions: time, speed, distance, ODO, calories, pulse. Each function will hold for 5 seconds.
- (3) TIME Adds the total training time.
- (4) SPEED Displays current speed.
- (5) DIST Totals the total distance of the entire workout.
- (6) CALORIES Totals the calories burned during the entire workout.
- (7) ODO The total distance covered by this function refers to periods of battery power.
- (8) PULSE Press “MODE” until “PULSE” appears. Before the pulse can be measured, place the palms of your hands on both sensors and after 6/7 seconds the monitor will display the current heart rate in heart beats per minute (BPM).
ATTENTION! If the measurement gets stuck during the process of pulse measurement, the reading may be higher for the first 2-3 seconds, then it will return to normal level. The measurement value cannot be considered as a basis for medical treatment.
NOTE!
- If the display is blurred or does not show any digits, replace the batteries.
- The monitor switches off automatically when no signal is received within 4 minutes.
- The monitor turns on automatically when a push button is pressed.
- The monitor automatically starts calculating values when exercise starts and stops calculating when exercise is stopped for 4 seconds.
PROGRAM
Manual program and preset programs P1-P10
- Press “UP, DOWN” to select the desired programme.
- Press “ENTER” to confirm the selected programme and set the value. 3. The time will start to flash and then you can press “UP, DOWN” button to set the desired time. Press “ENTER” button to confirm the value.
- The distance will start to flash and you can adjust the distance by pressing the “UP, DOWN” button. Press “ENTER” button to confirm.
- The calorie value will start to flash and you can select the desired calorie burn by pressing the “UP, DOWN” button. Press “ENTER” button to confirm the value. 6. Press START/STOP to start the exercise.
TRAINING GUIDELINES (FIG. B, 1-5)
A successful training program includes a warm-up, the actual training and a cool-down. Perform the complete training program at least twice, but preferably three times a week and keep a rest day between training sessions. After a few months, the intensity of the training can be increased, for example to four or five times a week.
The warm-up
The purpose of a warm-up is to prepare the body for training and to reduce the risk of injury. Warm up your body for two to five minutes before starting a cardio or strength training session. Do exercises that increase the heart rate and warm up the working muscles. Examples of this type of activity are running, jogging, jumping jacks, skipping and running in place.
Stretching
Stretching while the muscles are warm is very important after a good warm-up and cool-down. It reduces the risk of injury. Stretching exercises should be held for 15-30 seconds. Here are some examples of stretching exercises:
- Toe touch (Fig. B-1)
- Inner thight stretch (Fig. B-2)
- Hamstring stretch (Fig. B-3)
- Achilles stretch (Fig. B-4)
- Side stretch (Fig. B-5)
Cooling down
The purpose of the cool-down is to return the body to its (near) normal resting position at the end of the workout. A good cool-down slowly reduces your heart rate and promotes recovery.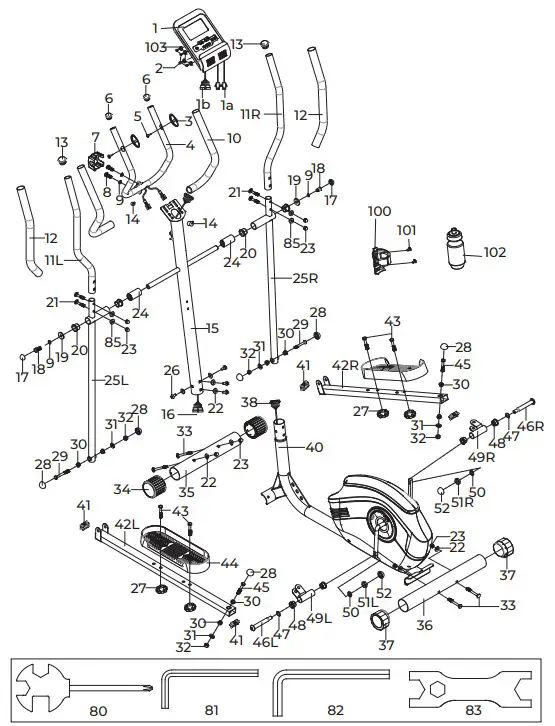
| # | DESCRIPTION | QTY. |
| 1 | Computer | 1 |
| 2 | Screw M5 | 4 |
| 3 | Pulse | 2 |
| 4 | Middle Handlebar | 1 |
| 5 | Screw ST4x19 | 2 |
| 6 | End cap φ25 | 2 |
| 7 | Small cover | 1 |
| 8 | Bolt M8x30 | 2 |
| 9 | Arc Washer D8 | 4 |
| 10 | Foam grip | 2 |
| 11 | Handlebar ( L / R ) | 2 |
| 12 | Foam grip | 2 |
| 13 | End cap φ28 | 2 |
| 14 | Stopple φ12.6Xφ6 | 2 |
| 15 | Upright post | 1 |
| 16 | Wire | 1 |
| 17 | End cap S13 | 2 |
| 18 | Bolt M8x16 | 2 |
| 19 | Washer D8Xφ32X2 | 2 |
| 20 | Bushing φ32Xφ19X28 | 4 |
| 21 | Bolt M8x40 | 4 |
| 22 | Arc washerD8Xφ20X1.5XR30 | 8 |
| 23 | Domed Nut M8 | 8 |
| 24 | Plastic insert | 2 |
| 25 | Lower handlebar ( L / R ) | 2 |
| 26 | Bolt M8x16 | 4 |
| 27 | Knob M10 | 4 |
| 28 | End cap S17 | 6 |
| 29 | Bolt M10x60 | 2 |
| 30 | Bushing φ14×12.5Xφ10.1 | 8 |
| 31 | Washer D10Xφ20×2 | 4 |
| 32 | Nylon nut M10 | 8 |
| 33 | Carriage Bolt M8X60 | 4 |
| 34 | End cap φ50 | 2 |
| 35 | Front stabilizer | 1 |
| 36 | Rear stabilizer | 1 |
| 37 | End cap φ50 | 1 |
| 38 | Sensor | 1 |
| 39 | Tension control cable | 1 |
| 40 | Main frame | 1 |
| 41 | End cap J40X25 | 4 |
| 42 | Pedal tube ( L / R ) | 2 |
| 43 | Bolt M10X50 | 4 |
| 44 | Pedal | 2 |
| 45 | Bolt M10X50 | 2 |
| 46 | Bolt ( L / R ) 1 / 2 | 2 |
| 47 | Arc Washer D17 | 2 |
| 48 | Bushing φ24X20Xφ16.1 | 4 |
| 49 | U bracket | 2 |
| 50 | Spring washer 1 / 2” | 2 |
| 51 | Nylon nut ( L / R ) 1 / 2” | 2 |
| 52 | End cap S19 | 2 |
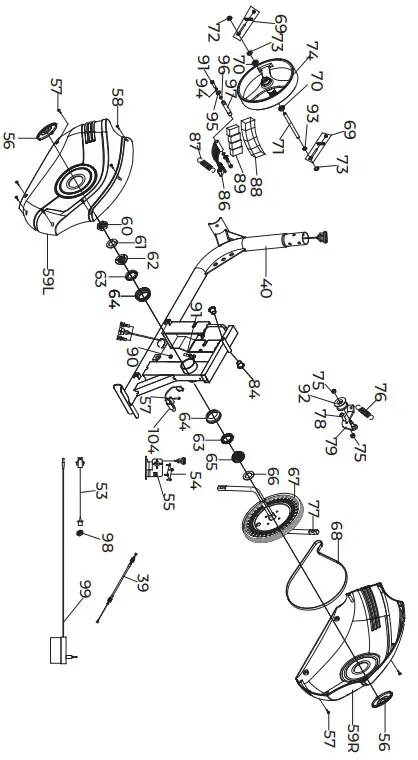
| 53 | Power line connection | 1 |
| 54 | Crosshead screw M5*15 | 1 |
| 55 | Motor | 1 |
| 56 | Crank cover | 2 |
| 57 | Crosshead screw ST4.2*16 | 5 |
| 58 | Crosshead screw ST4.2*19 | 12 |
| 59 | Chain cover ( L / R ) | 1 |
| 60 | Nut | 1 |
| 61 | Washer | 1 |
| 62 | Left collar housing | 1 |
| 63 | Collar ball | 1 |
| 64 | Collar housing | 2 |
| 65 | Right collar housing | 1 |
| 66 | Washer | 1 |
| 67 | Chain wheel | 1 |
| 68 | Belt | 1 |
| 69 | U bracket | 2 |
| 70 | Bearing | 2 |
| 71 | Axle | 1 |
| 72 | Nut M10 | 2 |
| 73 | Nut M10 | 2 |
| 74 | Flywheel | 1 |
| 75 | Nylon nut M8 | 2 |
| 76 | Tension spring 1 | 1 |
| 77 | Crank | 1 |
| 78 | Bolt | 1 |
| 79 | Bracket | 1 |
| 80 | Open-end wrench S13 14 15 | 1 |
| 81 | Hex wrench S6 | 1 |
| 82 | Hex wrench S8 | 1 |
| 83 | Open-end wrench S17 18 19 | 1 |
| 84 | End cap | 2 |
| 85 | Arc washer D8Xφ16X1.5XR30 | 4 |
| 86 | Magnetic board | 1 |
| 87 | Tension spring 2 | 2 |
| 88 | Plastic lattice | 1 |
| 89 | Magnet | 4 |
| 90 | Hexagon nut M6 | 2 |
| 91 | Hexagon bolt M6*20 | 3 |
| 92 | Idler | 1 |
| 93 | Hexagon thin nut M10*1.0*2 | 1 |
| 94 | Spring washer d6 | 2 |
| 95 | Washer d6 | 2 |
| 96 | Srap ring d12 | 2 |
| 97 | Axle of magnetic board | 1 |
| 98 | Hexagon nut | 1 |
| 99 | Adapter | 1 |
| 100 | Bottle holder | 1 |
| 101 | Crosshead screw M5*15 | 2 |
| 102 | Bottle | 1 |
| 103 | Washer d5 | 4 |
| 104 | Sensor | 1 |
COMPANY INFORMATION
For an ongoing service request or to purchase parts, please visit; [email protected]. Always state the service number (ITS number) with a question about the current application for a quick and efficient settlement. A service request must always be submitted via the service form. So the request not to request service via [email protected].
Do you have a problem with your VirtuFit fitness equipment and would you like to submit a service request? Then scan the QR code on the right and fill in our service form. https://www.virtufit.nl/service/service-formulier/
![]() Twekkelerweg 263
Twekkelerweg 263
7553 LZ Hengelo
The Netherlands
[email protected]


