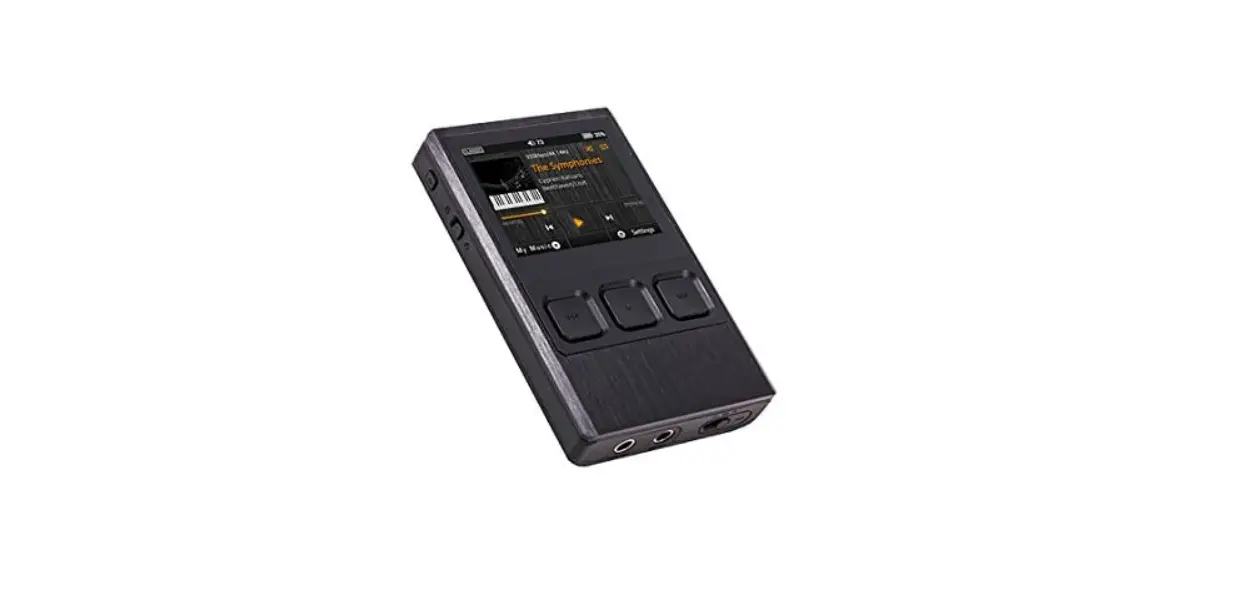
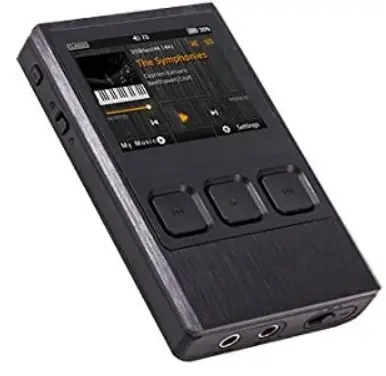
iBasso DX90 High-Resolution Dual Sabre USB Charger
Package Components
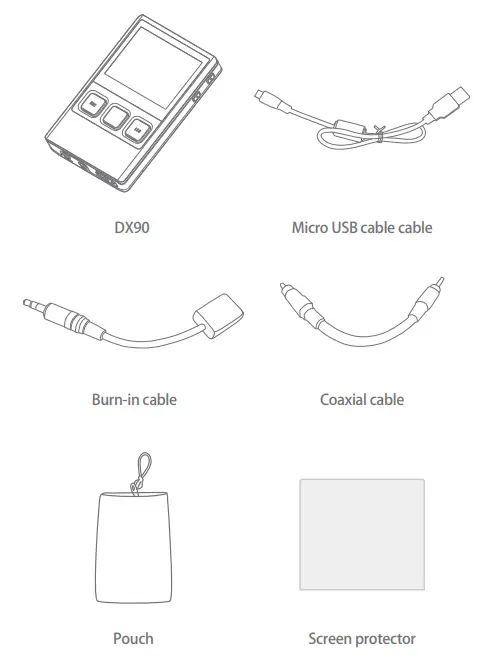
- Micro USB cable: Connect the Micro USB cable to a computer for charging and data transmission.
- Burn-in cable: Plug the burn-in cable into the PHONE out socket, and keep playing music to burn-in the DX90. The burn-in process helps the DX90’s sound reach its full potential by forming the capacitors and stabilizing the electronic components used.
- Coaxial cable: Connect the coaxial cable to an external DAC, to allow the DX90 working as a digital transport.
- Pouch: Use the pouch to protect the DX90 from scratches.
- Screen protector: Use the screen protector to protect the DX90`s screen from scratches.
Main Features
- Bit for bit playback, Support up to 24Bit/192kHz.
- Dual ES9018K2M DAC Chips.
- Built-in 10V Voltage Swing Headphone AMP.
- 2.4″ IPS Screen (320*240) with Capacitive Touch Panel, Which is Bonded by OCA.
- Up to 24Bit/192kHz Mini Coaxial Output.
- 3.5mm Headphone Output, and Line Out.
- Three Physical Buttons (Previous, Play/pauses, Next) on The Top Panel.
- 256-Steps Digital Volume Control.
- 8GB Onboard Flash Memory.
- Support for SDXC and SDHC MicroSD Card, up to 2TB. (as They Become Available).
- 3-Setting Gain Switch.
- Audio Formats Supported: APE, FLAC, WAV, WMA, AAC, ALAC, AIFF, OGG, MP3, DSD.
- Support for M3U Playlist.
- User Replaceable Battery (Compatible With S**sung S3),
- 8 hours Play Time.
Specifications
Line out:
- Frequency Response: 17Hz~20KHz +/-0.1dB
- S/N: -119dB +/-1dB
- THD+N: 0.0015%
- Crosstalk: 115dB (1KHz)
- Output Level: 1.7Vrms (1kHz 0dB)
Headphne out:
- Frequency Response: 17Hz~20KHz +/-0.1dB
- THD+N: 0.0015% (32ohm load)
- Output Level: 1.3Vrms(Low gain), 2.0Vrms(Mid gain), 2.8Vrms(High Gain)
- S/N: -118dB +/-1dB(Low gain), -116dB +/-1dB(Mid gain), -115dB +/-1dB
- (High Gain) (32ohm Load) Crosstalk: 75dB (1KHz,32ohm Load)
- Output Impedance: <0.1ohm
- Play Time: 8hours
- Battery Charge Time: 3hours with AC adapter, 5.5hours with PC USB port
- On Board Flash: 8GB
- Audio Formats Supported: APE, FLAC, WAV, WMA, AAC, ALAC, AIFF, OGG, MP3, DSF
- Case Dimension: 2.52W x 3.98L x 0.67H (inch)
- 64W x 100L x 17H (mm)
- Weight: 140g or 4.94oz
Names of Parts & Functions

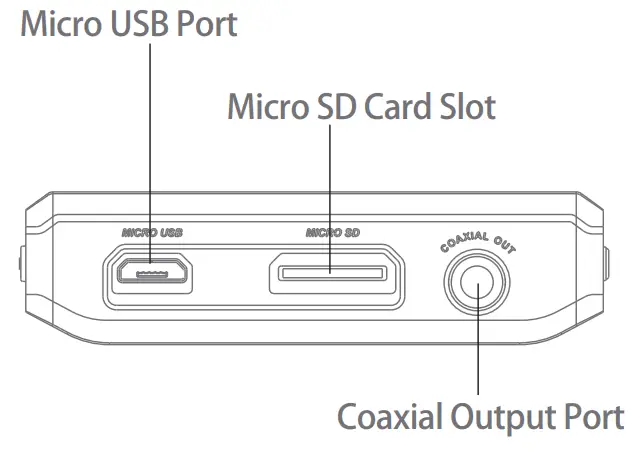
Coaxial Output Port
Use the furnished coaxial cable to play music stored in the DX90 on an external device with a coaxial input port.
Coaxial output has the highest output priority which would close the phone out or line out when coaxial cable plugged in.
Micro USB Port
Connect the DX90 to a computer or a USB charger to charge the DX90.
Connect the DX90 to a computer to transfer data into the DX90.
Connect the DX90 to an OTG storage device to play music files
Micro SD Card Slot
Insert a Micro SD card into the DX90 to access its stored files.
The following screen pops up after Micro SDcard inserted.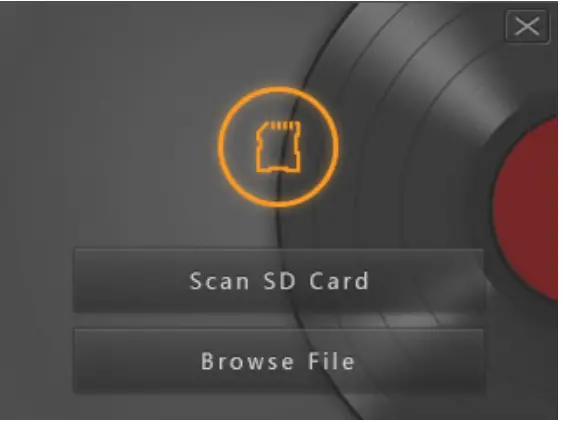
Scan SD Card: Press this button to fully scan the Micro SD card
The first media scanning will take more time as the DX90 is building the library for this card. The DX90 will create a folder called “.audio_data” in the Micro SD card after that. The speed of the media scanning the next time this card is inserted is much faster as the library is already built and stored on this card.
Browse files: Press to skip media scanning, and browse the Micro SD card in folder structure.
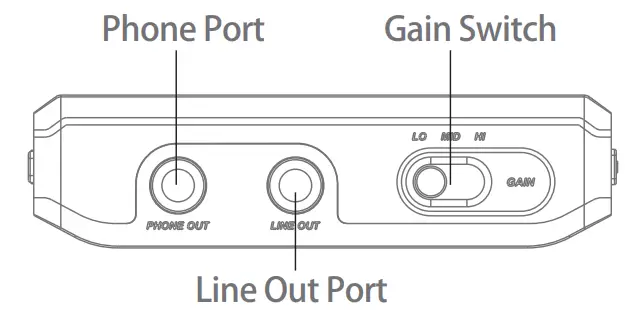
Phone Port
Plug in the earphone and output sound through the phone jack.
Line Out Port
Use a 3.5 to 3.5 interconnect cable to play music stored in the DX90 on an external amplifier with a line in port.
When using line out, one should always turn the volume up to the maximum “255” to ensure that your amplifier has as much dynamic range as possible to work with.
Gain Switch
Move the switch to set the Low, Mid, and High gain.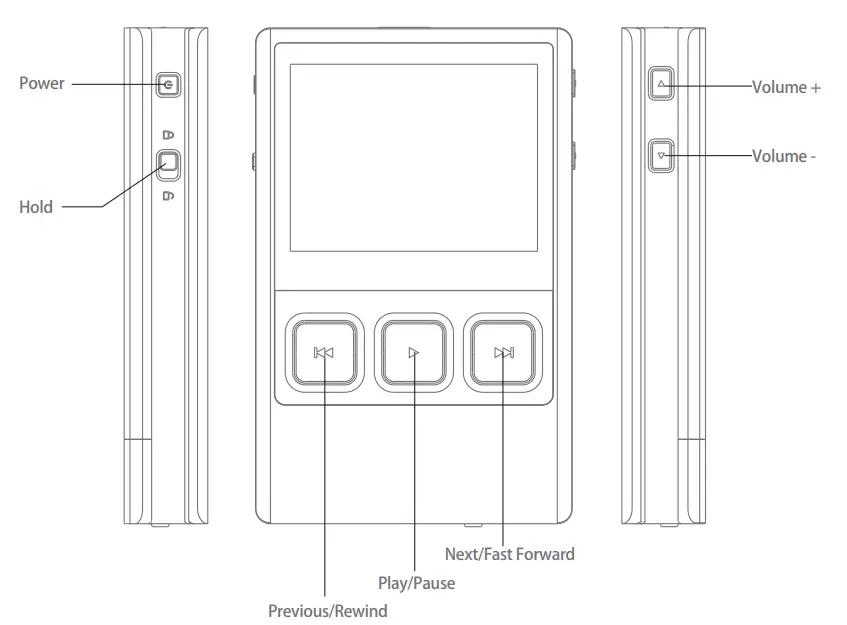
- Power
Short Press – Power the LCD screen on and off,
Long Press – Power the DX90 on and off. - Hold
Move the hold switch to activate or deactivate the button operation. - Volume +
Short-press to increase one step of the volume,
Long-press to continuously increase until its maximum. - Volume –
Short-press to decrease one step of the volume,
Long-press to continuously decrease until its minimum. - Previous/Rewind:
Short Press – Replay previous track,
Long Press – Rewind. - Play/Pause:
Short Press – Play/Pause. - Next/Fast Forward
Short Press – Play the next track,
Long Press – Fast forward.
Basic Operation
Power on/off
- Press and hold the power button to power on.
- After the DX90 is powered on, a long press of the Power button will display the shutdown menu. Press OK to power off.
Power on/off the screen
Single press the power button to power on/off the screen after the DX90 was powered on.
Reset
When the DX90 stop unexpectedly during operation and the keys are no longer responsive, press and hold the power button for 7 seconds to reset the DX90.
Reset also can be achieved by removing the battery.
Charging
The DX90 can be charged by computer through the USB port, or any USB charger with 5V output voltage and 1 A or above output current.
A full charge takes about 3 hours with USB charger and 5.5 hours with computer`s USB port.
Battery & removing the battery cover
The DX90s battery is user replaceable. It is 2100mAh, 3.8V, and compatible with S**sumg S3`s (i9300). It is a widely available battery.
To remove the aluminum back cover, press down on the center of the back cover, and slide it in direction of the arrow.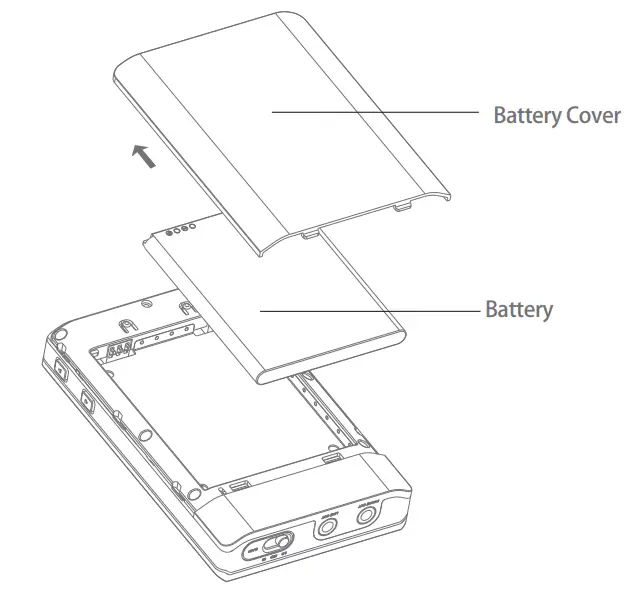
Connecting to a computer for data transmission
- Power on the DX90 first.
- Select Storage under Setting/USB Settings.
- Connect the DX90 to a computer via the furnished USB Cable.
- The “USB Connected” will be shown on the DX90 screen. The DX90 will appear on the computer as a drive labeled“DX90”.
- If a Micro SD card is in place, it will show up as a second drive on the computer.
- Music files can be easily transferred to the internal memory via drag and drop or copy and paste. Either complete albums or individual music files can be transferred. No special software is required for transferring files.
No special software is required for transferring files.
Disconnecting from a computer
When transfer is completed, make sure to safely remove the drive(s) from the computer before disconnecting the USB connection to the DX90. Click the icon displayed in the task bar or desktop of the computer to safely disconnect the DX90.
User Interface
The DX90 User interface is composed of three parts:
Music playback screen (homepage), my music, and settings.
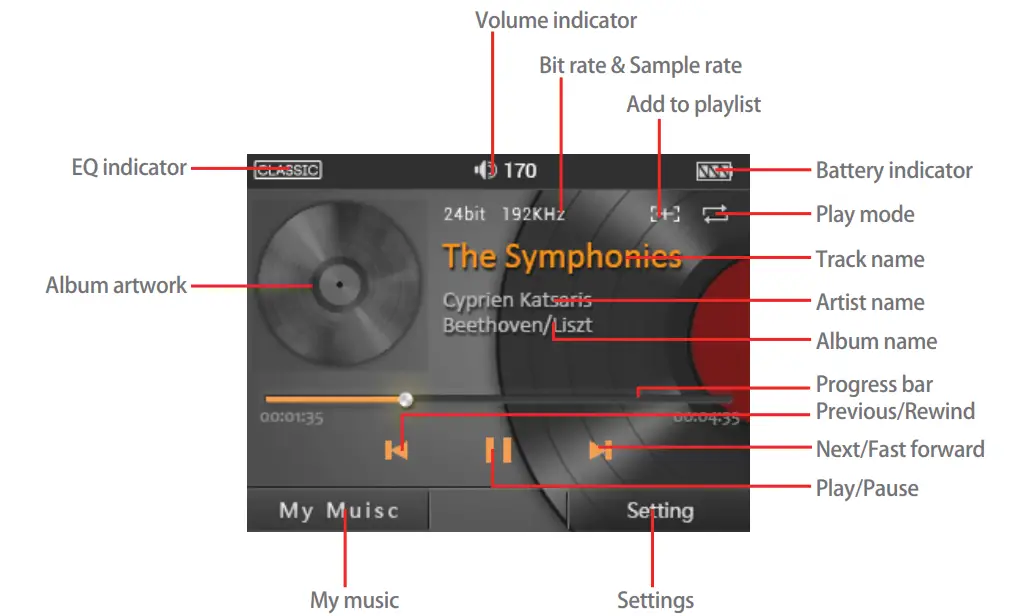
- Music Playback Screen

- My Music

- Return Button
Pressing the Return button on the top right of the My music or Settings screen will move back one page at a time until the home page is once again displayed. - Home Button
Regardless of which page or application is currently in view, pressing the Home button on the right top of the My music or Settings screen will instantly return one to the homepage. - Now Playing
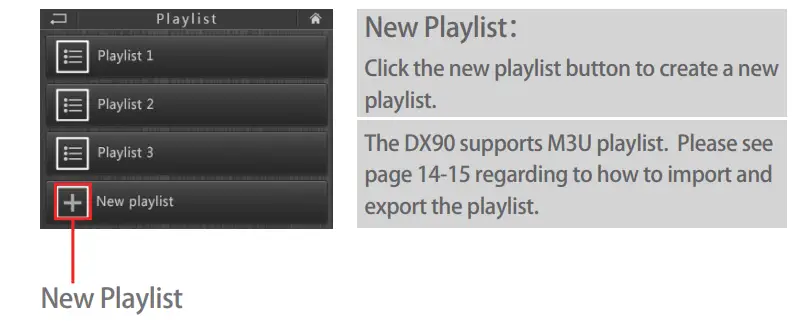
It is a list of the currently playing tracks. - Playlist

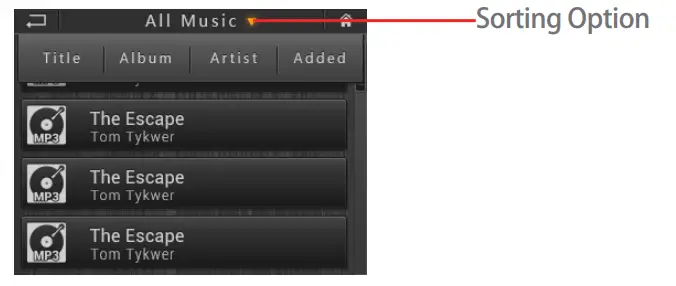
- All Music
 Sorting Option
Press the triangle to unfold the options. One can choose to sort the songs by track title, album name, artist name, and added time. - Album/Artist/Genre


 Sorting Option
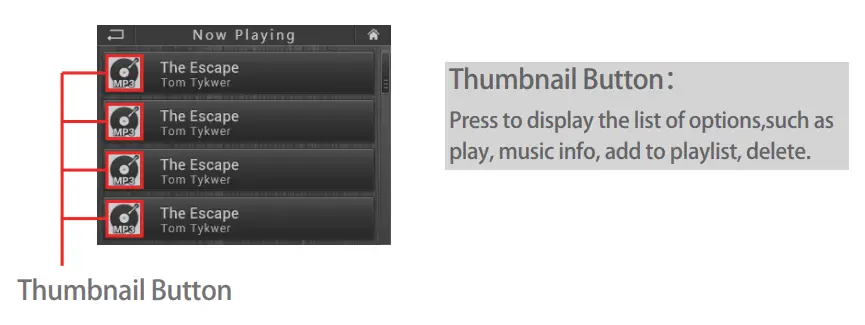
Settings
- EQ
One can setup the equalizer as desired. Press the “reset” to reset a pre-set EQ. - Play Mode:
There are four options: order, Loop, Shuffle, and Single Repeat. - Gapless
One can enable the gapless to eliminate the gap between two tracks. - Music Info:
It shows the detailed information of the currently playing song. - USB Settings:
There are three options: Storage, DAC, and Charge Only.- Storage.
Allows the DX90 to be used as an external drive. Please see page8 “Connecting to a computer for data transmission”, regarding to how to transfer data into the DX90. - DAC.
Allows the DX90 to be used as a USB-DAC. - Charge Only.
With this option, the computer would charge the DX90 when the DX90 is connected.
- Storage.
- L/R Balance
Slide to R to increase the volume in the right Channel.
Slide to L to increase the volume in the Left Channel. - Digital Filters:
There are two options: Sharp Roll-off, and Slow Roll-off.- Sharp Roll-off.
With the Sharp Roll-off, one can see the frequency curve drops significantly. The Sound is less aggressive. - Slow Roll-off.
With the Slow Roll-off, one can see the frequency curve drops smoothly. The sound is more open, the extension of low and high is better.
- Sharp Roll-off.
Advanced
To access to more system settings:
- Languages:
The DX90 supports multiple languages, such as simplified Chinese, traditional Chinese,
English, Japanese, Korean, Thai, French, German, Spanish, Dutch, Czech, and Italian. - Display:
Adjust the screen brightness. - Power Management
- Backlight Off: Set the amount of time to turn off the screen when there is not touch operation or button operation.
- Auto Power Off: Set the amount of time to power off the DX90 when it stays idle.
- Sleep Timer:Set the amount of time to power off the DX90, no matter if it is working or idle. The sleep timer wSould turn off after reboot.
- Rescan Library:
This function is used to fully rescan the internal Memory, and the Micro SD card. The whole
Library would be re-built after that. This function helps when a scan problem arises. - System Info:
It shows the firmware version, internal memory and available capacity, external memory and available capacity.
To import a M3U playlist, load the M3U playlist into the internal flash or a Micro SD card. Then find the M3U playlist under Directory. Press the M3U playlist to start importing the playlist.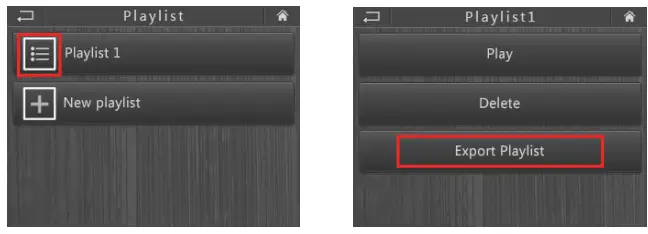
Firmware Update
- Download the newest firmware from iBasso.com.
- Extract the zip file, and copy the update.img into the DX90.
- Once copied, safely disconnect the DX90 from the computer.
- Select Settings→Advanced→System update (the system update option appears only after the update.img is inside the DX90).
- Click “OK” to start the firmware update.
- The DX90 will reboot after firmware update completed.
- Select Settings→Advanced→Factory Reset to reset the DX90.
This is to avoid conflicts with residual settings from the previous firmware - Delete the update.img.
FAQS
My computer does not recognize the DX90, what should I do?
The DX90 has to be turned on before connected to computer.
Where can I find the firmware version on my DX90?
Settings→Advanced→System Info.
All album artworks are not showing on my DX90, what should I do?
You should delete the “album_img” folder on the DX90`s internal flash, and “.audio_data” folder on the micro SD card. Then the DX90 will rebuild the library.
One also can use the Rescan Library function (Settings→Advanced→Rescan Library ) to rebuild the library.
Can my cell phone/mobile phone`s charger charge the DX90?
Yes, the DX90 can be charge with USB charger that has 5V output voltage and 1A or above current output.
How can I play all songs from a specific artist or genre?
Under the Artist category or Genre category, tap the thumbnail icon in front of the artist or genre, there will be a popup window with options, press“play”to play all songs from this artist or genre.
How can I change the wallpaper?
First of all, save your picture as a 320*240pixels wallpaper.png file. Then put it onto the DX90`s root folder.
How can I see the entire title of the currently playing song on the music playback screen?
You can scroll the title right to left to reveal the missing parts. The album name and the artist name are also scrollable when they are too long to be shown on the screen.
Does the DX90 support exFAT format SDXC?
Yes, the DX90 supports both of exFAT and FAT32 formats SDXC.
My DX90 cannot be powered on, what should I check?
Usually, it is low battery issue. Charge it for a while, then you should able to power on the DX90. Email us if it is not a low battery issue.
How to use the import/export playlist function?
After the playlist is built in the DX90, press the thumbnail icon in front of the playlist to unfold the options. Press “export playlist”, then one can find a M3U playlist under the M3U folder under the internal flash.


