FOS Lighting True Diversity UHF Receiver Owner’s Manual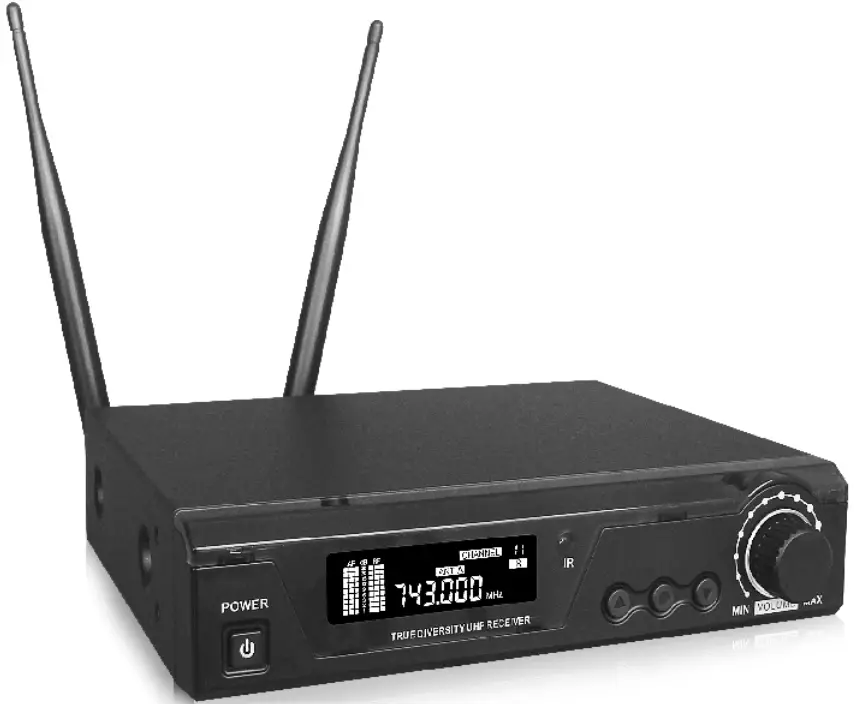
Introduction
Thank you for choosing our wireless system, In order to obtain the best efficiency from the system, you are recommended to read this instruction manual carefully.
System Components
All systems include
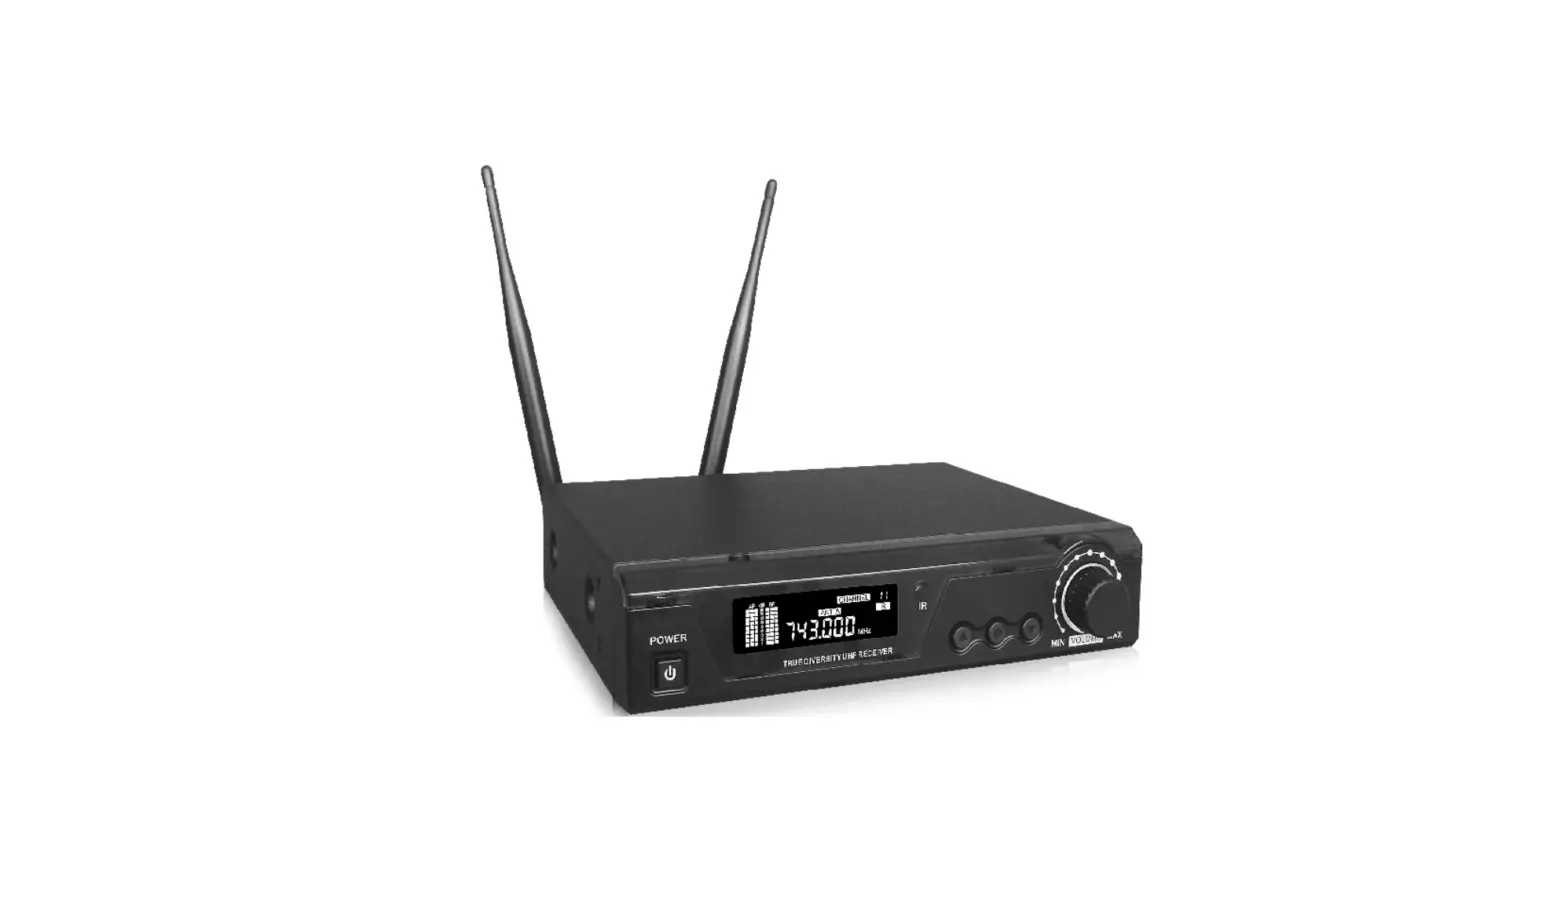
True diversity receiver
6.35mm audio cable
2* BNC antennas
Power adaptor
User guide
Warranty card
Transmitter (anyone below is selectable)
Wireless handheld transmitter
Wireless body-pack transmitter
Wireless plug-on transmitter
Wireless electric guitar transmitter
Saxophone, harmonica, flute, accordion, clarinet, acoustic guitar, violin, viola, double bass, erhu, etc.
System Features
UHF 600.937MHz frequency range (region dependant)
True diversity for maximum range and dropout protection
PLL Synthesized circuit
Pre-set 100 (10’10) selectable frequencies (bandwidth dependant)
IR sync downloading the frequency from receiver LCD display shows status of frequency, AF and RF signal etc
EIA standard 1/2U rack-mountable metal chassis
Up to 300 feet(100m) line-of-sight operating range
Designed for vocalist and musical instrument applications
Receiver Features
Front Panel
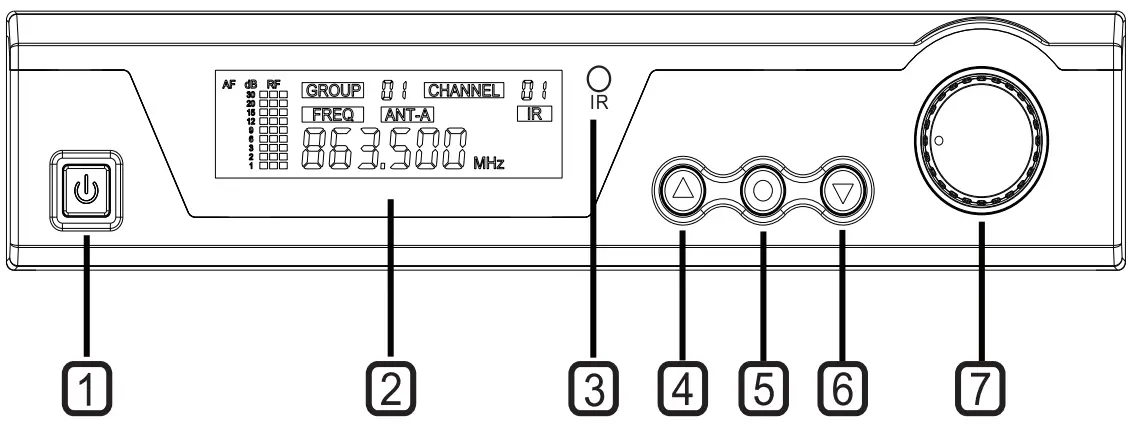
- Power switch
Tap to turn on, tap to turn off, blue light up when receiver turns on - LCD display
The 63mm’22mm high resolution LCD display shows the group, channel, frequency, antenna status, AF & RF level and IR set. - IR (Infrared) port
Send IR signal to transmitter for synchronization - UP button
Adjust the frequency, channel, group incrementally - SET button
Menu control to set group, channel, frequency, IR Synch. - DOWN button
Adjust the frequency, channel, group degressively. - Volume control
Adjust the volume level, volume knob encircled by blue light
Back Panel
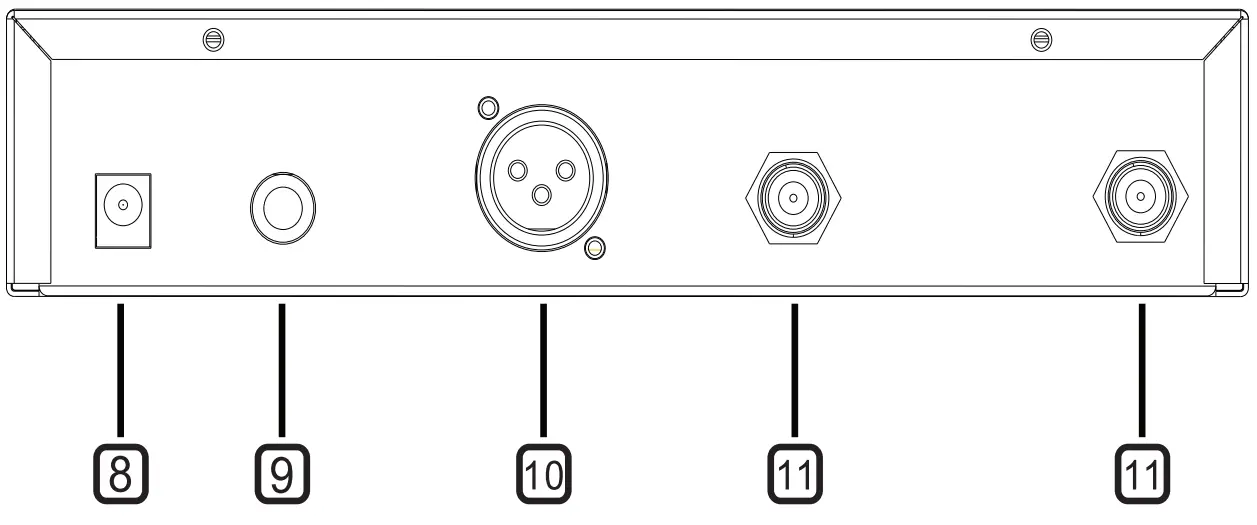
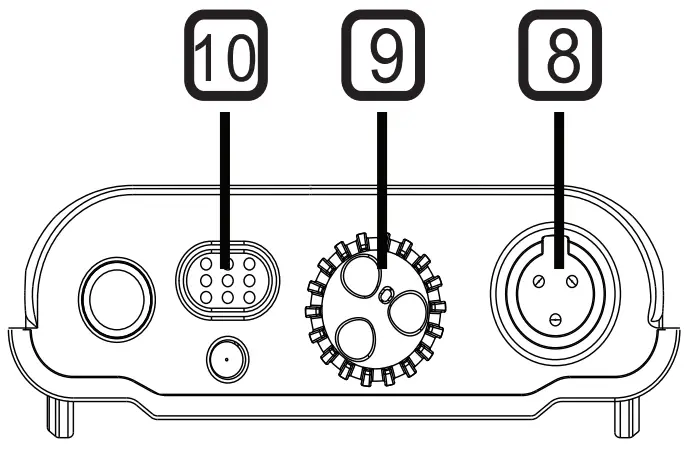
- 8. Power supply jack (DC12-18V / 500mA) Connecting the power supply unit
- 9. 6.35mm (1/4″) unbalanced output jack Connect the unbalanced input, e.g. of mixer or amplifier
- 10. Balanced XLR output jack Connect the unbalanced input, e.g. of mixer or amplifier
- 11. BNC antennas sockets Connect the high gain antennas
Transmitter Features
Handheld Transmitter Option 2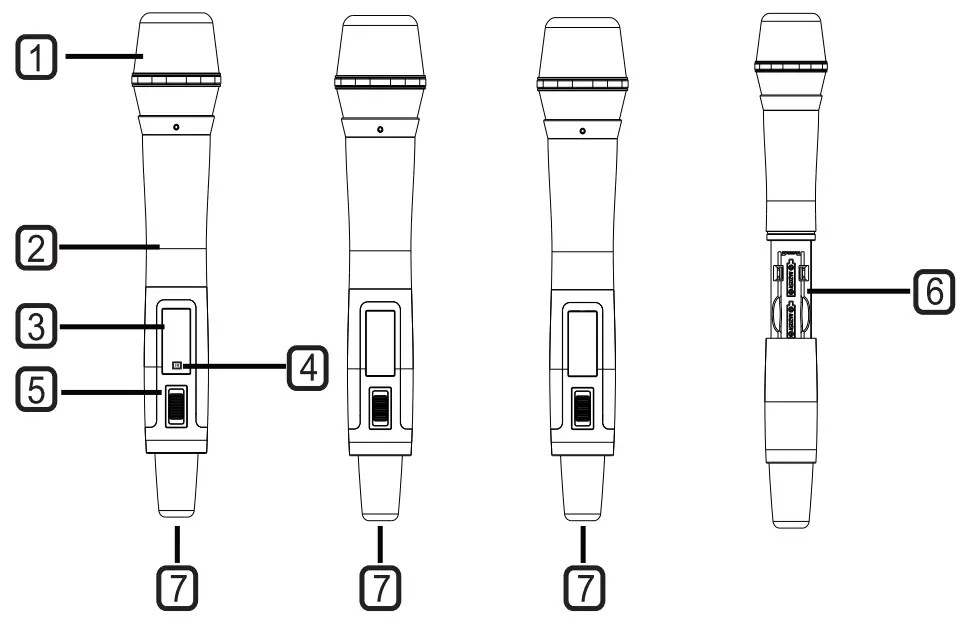
- Microphone head
Cartridge inside - Metal pipe (Aluminum alloy)
Anodize any different colors, never fade. - Backlit LCD
Display group, channel, frequency and battery life - IR infrared port
Receiver infrared beam to synchronize frequencies, hold the transmitter with its IR port facing direct to receiver’s IR port in a distance between 5-20cm Note: When using multiple systems, only one transmitter IR port should be expose at a time. - ON/OFF and Mute switch
Push up the switch to turn on, Mute at the mid position - Battery compartment
To replace batteries, unscrew the bottom pipe part counter-clockwise, make sure to put the battery in the right polar directions - Caps-on
Body-pack Transmitter
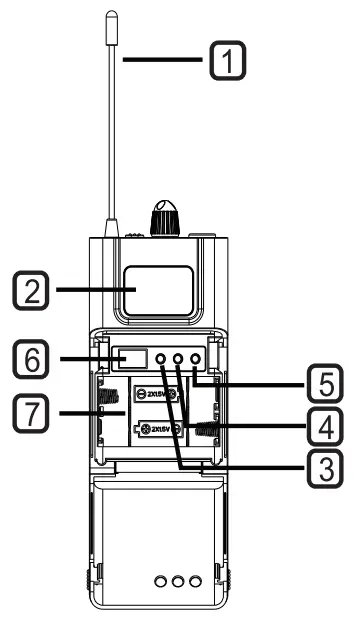
- Antenna
114 wave length wire type antenna, it should be fully extended during normal operations - Backlit LCD
Display frequency and battery life, if the battery symbol blinks, the battery need to be replaced immediately - UP button
Adjust the frequency, incrementally - SET button
Menu control to set frequency - DOWN button
Adjust the frequency degressively - IR infrared port
Receiver infrared beam to synchronize frequencies, hold the transmitter with its IR port facing direct to receiver’s IR port in a distance between 5-20cm. Note: When using multiple systems, only one transmitter IR port should be expose at a time. - Battery compartment
To replace batteries, slightly press the marked positions on left and right side of the cover and open forward, make sure to put the battery in the right polar directions. - Input
3-pin mini XLR input for supplier microphone, guitar cable or other musical instrument microphones (saxophone, violin, viola, cello, acoustic guitar etc) - Volume control
Clockwise to enlarge, counter-clockwise to reduce - Light touch power switch
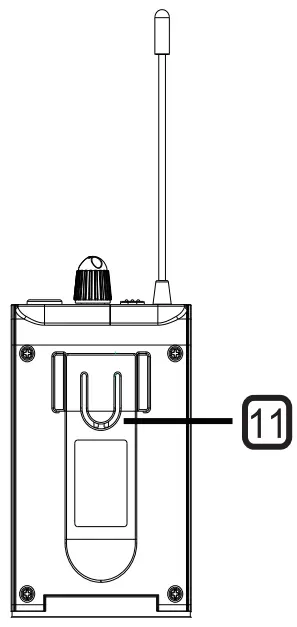
Tap to turn on, long press (2 seconds) to turn off. - Belt-clip
Clip to the belt or guitar strap
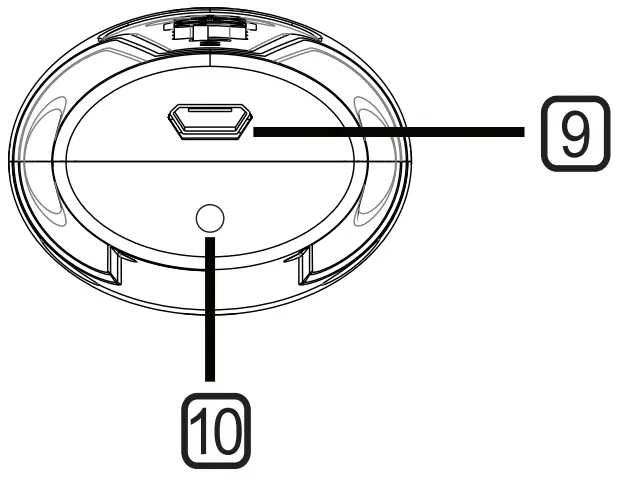
Plug-on Transmitter
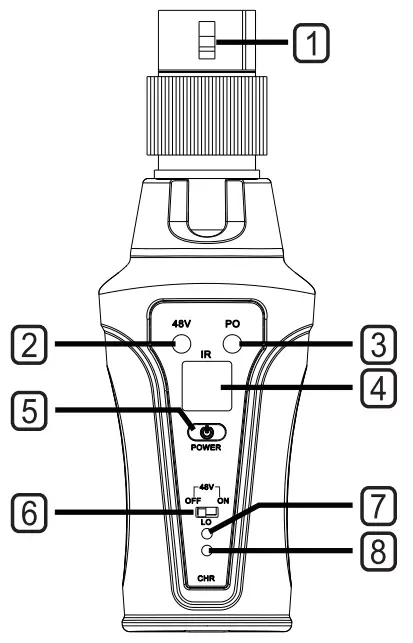
- Audio input:
Female XLR Plug(With Lock) - 48V phantom power indicator
When the phantom power switch is turned on, the 48V blue indicator fights up. - PO power indicator
When the power is turned on, the PO red indicator lights up. - IR sync window
Pair the receiver’s frequency by infrared SYNC - Power button
Long-press over 1 sec to turn on and off - 48V phantom power switch
When the switch is on the right side, 48V phantom power is ON. At the moment, the plug-on transmitter can connect and operate with condenser microphones. When the switch is on the left side, 48V phantom power is OFF, At the moment, the plug-on transmitter can connect and operate with dynamic microphones. - Low battery Button
When battery life is low, the LO red indicator starts flickering. It should be charged immediately. - Charge indicator
When it is charging, the indicator appears bright green, when it’s fully charged, the indicator appears off or very light color - MINI-USB charger jacket
Use 5V power adapter only - Antenna Jacket
The antenna is detachable. Be sure to rotate the antenna when using it.
Electric guitar electronic musical instrument
Guitar Straight pluglAngled plug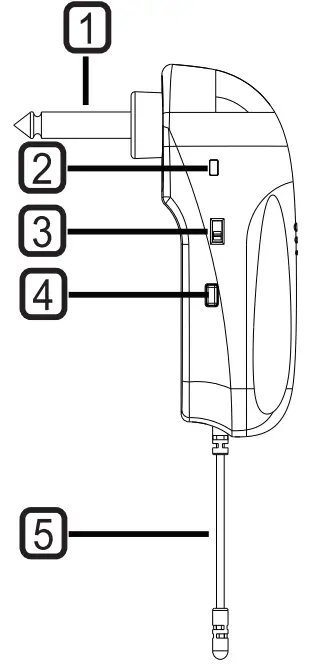
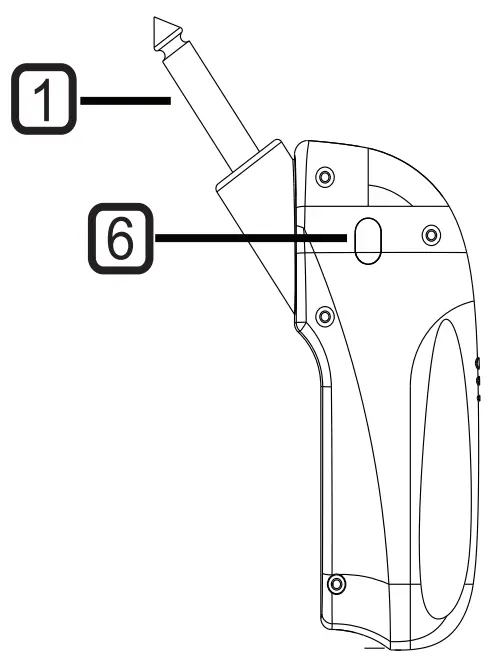
- 114″ inch plug
Insert this standard 114″ plug into your electric musical instrument. Note that the angling of the plug can be configured for Fender and Gibson electric guitar and bass. The angled plug can be configured for all 6.35mm end mount-jacks electric musical instrument e.g. electric violin, electric saxophone etc. - BATT/PO
Power and battery LED, this blue LED remains lighting as long as the transmitter has power; the blue LED flashing means the battery need to be replaced immediately. - Mute
Move the switch to left side to mute the microphone - Light touch power switch
Tap to turn on, long press (2 seconds) to turn off. - Antenna
1/4 wave length wire type antenna, it should be fully extended during normal operations - IR infrared port
Receiver infrared beam to synchronize frequencies, hold the transmitter with its IR port facing direct to receiver’s IR port in a distance between 5-20cm. - Battery compartment
Insert a standard AA alkaline battery here, make sure to put the battery in the right polar directions. - Battery cover
Pull back gently on this cover at the ribbing and pry upwards to remove
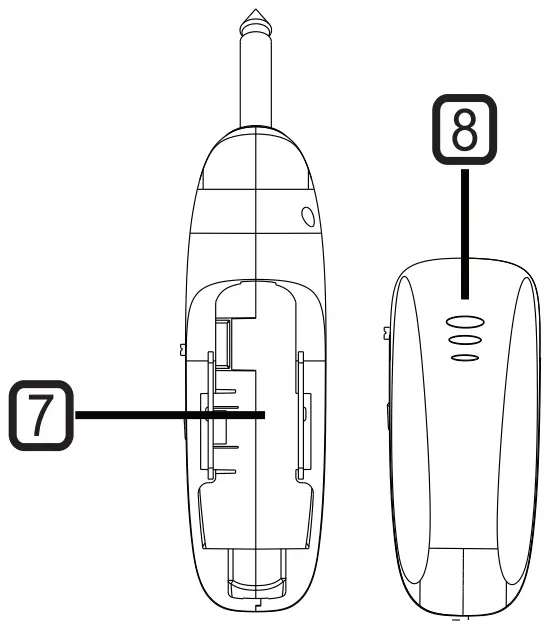
Saxophone/Horn Transmitter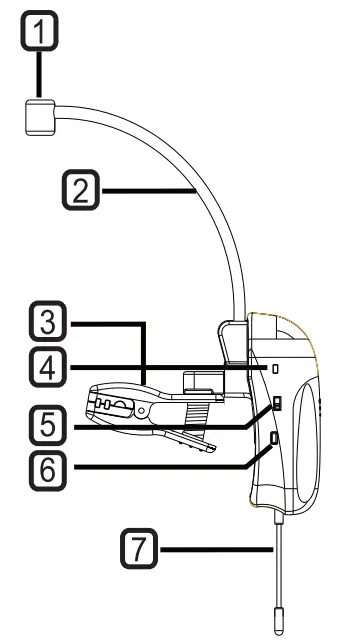
- Input mic Unidirectional Condenser microphone pick up of Saxophone / horn’s sound
- Gooseneck pipe
Adjustable at any Angle - Spring clip
Clamp the spring clip on the saxophone’s bell mouth to pick up the sound, and the spring clip is equipped with a rubber protective cover to avoid damage to the instrument. - BATT/PO
Power and battery LED, this blue LED remains lighting as long as the transmitter has power; the blue LED flashing means the battery need to be replaced immediately. - Mute
Move the switch to left side to mute the microphone - Light touch power switch
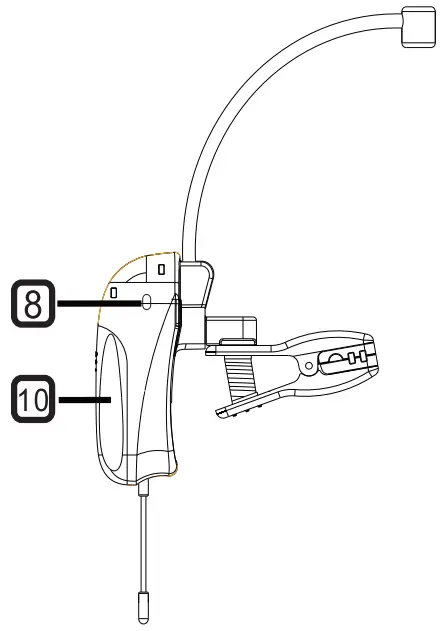
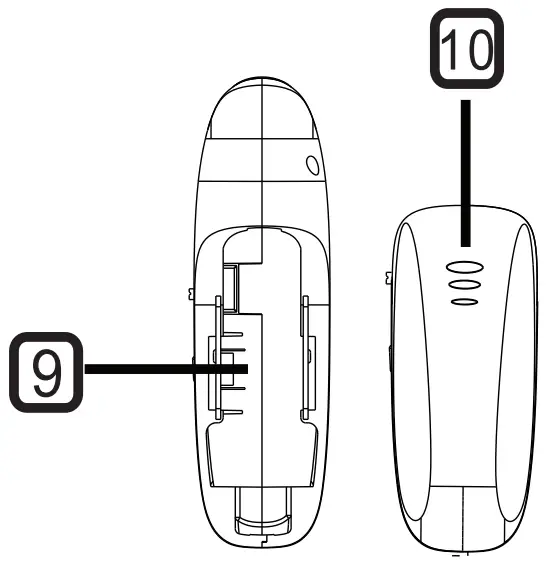
Tap to turn on, long press (2 seconds) to turn off. - Antenna
1/4 wave length wire type antenna, it should be fully extended during normal operations - IR infrared port
Receiver infrared beam to synchronize frequencies, hold the transmitter with its IR port facing direct to receiver’s IR port in a distance between 5-20cm. - Battery compartment
Insert a standard AA alkaline battery here, make sure to put the battery in the right polar directions. - Battery cover
Pull back gently on this cover at the ribbing and pry upwards to remove
System Setup
- Connect the included AC power supply to the rear of the receiver and turn on the receiver.
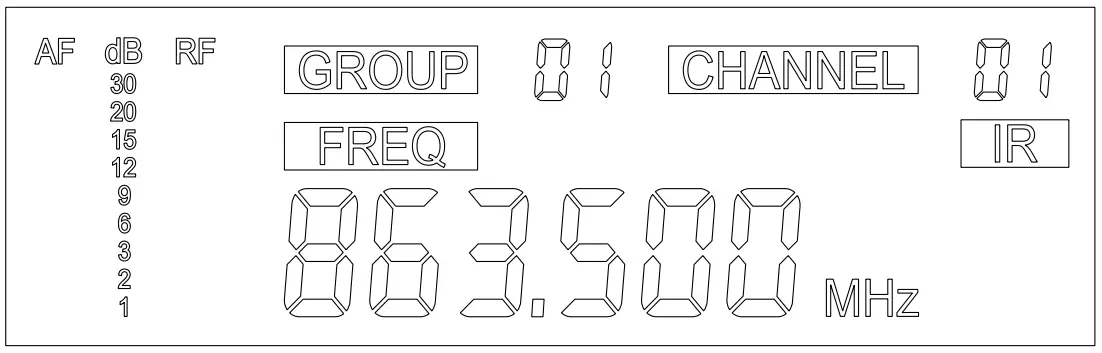
- Standard Display
The standard display shows the preselected group, channel
Group
Push the SET button and hold for 1 second, the GROUP blink, Push the up and down buttons to set the desired group (01-10), Press SET again to confirm. The display will return to standard after a short period of time of non-activity automatically.
NOTE: Each group 01-10 consists of 10 channels, each corresponding to a specific frequency.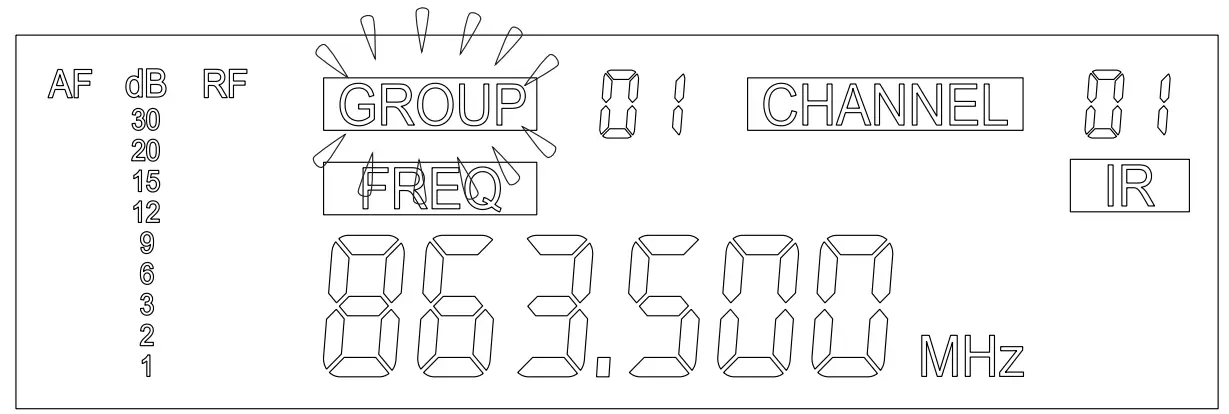
Channel
After the step of setting group, press the SET again, the CHANNEL blink. Push the up and down buttons to set the desired channel (01-10), Press SET again to confirm. The display will return to standard after a short period of time of non-activity automatically.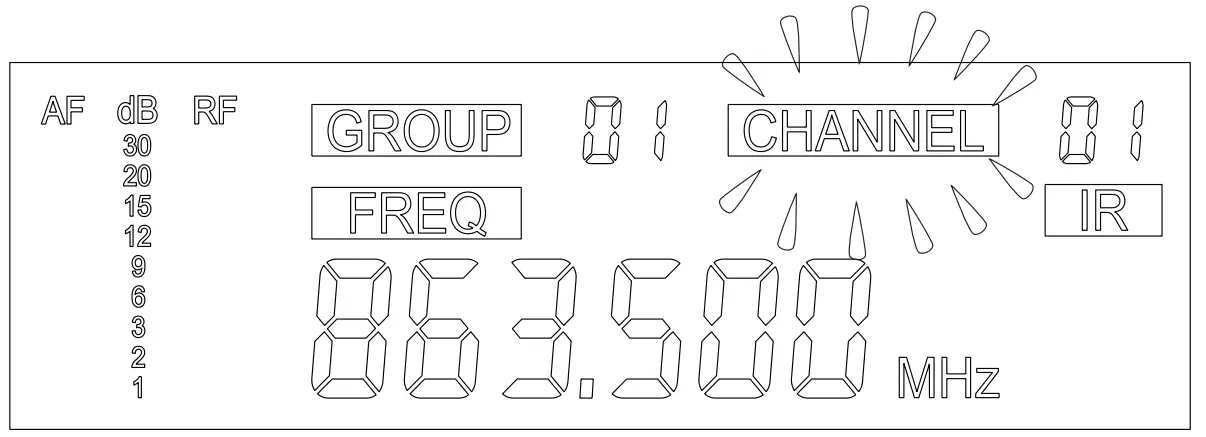
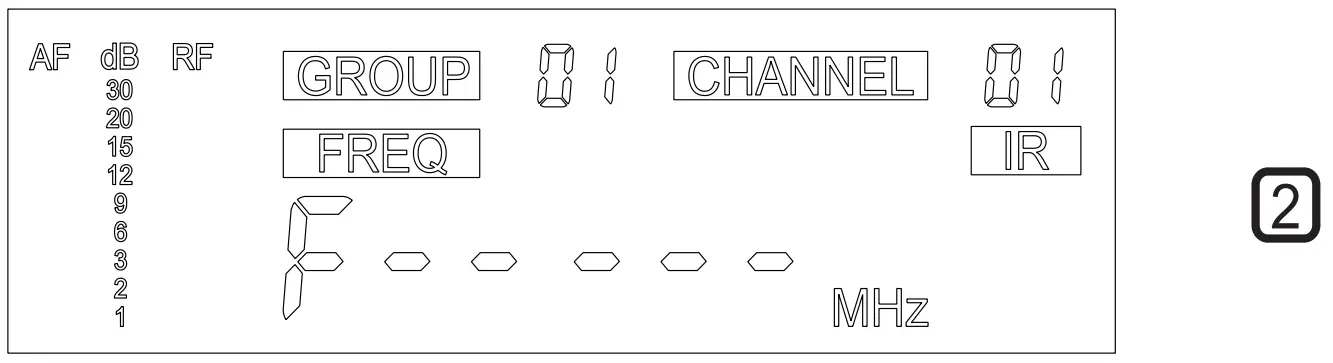
IR Synch
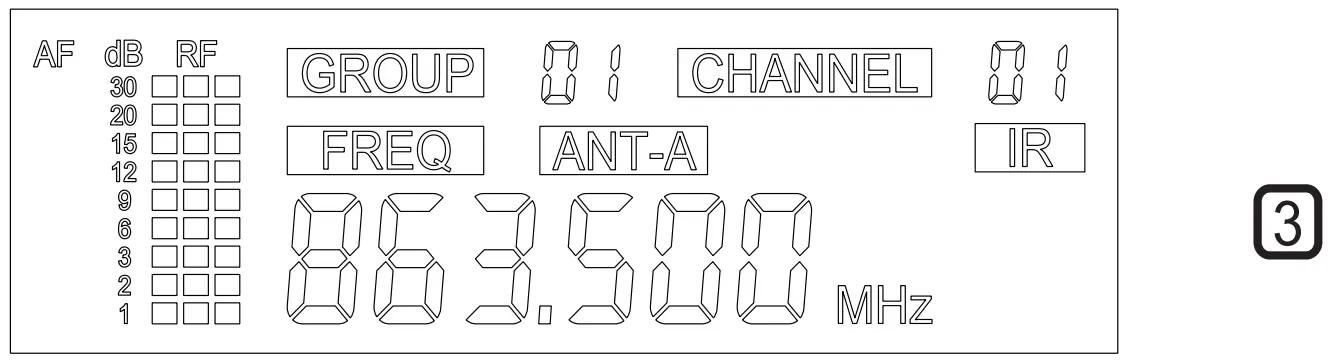
After the step of setting channel, press the SET again, the IR blink (picture 1). Push the SET button and hold for 1 second, the receiver start to send the infrared signals (picture 2), then put the transmitter (handheld, body-pack or musical instrument) IR port close to the receiver’s IR port , the transmitter has to be synchronized to the same frequency (group and channel) before using.
NOTE: Hold the transmitter with its IR port facing direct to receiver’s IR port in a distance between 5-20cm. After a successful sync, the display RF signal and ANT-A shows up (picture 3)
Specifications
Receiver
| Frequency Preparation | PLL Synthesized Control |
| Frequency Range | 600-937MHz (Region dependant) |
| Frequency Type | F3E |
| Modulation Type | FM |
| Channels: | 100(10×10) |
| Oscillation System | VCO |
| Type of reception | True Diversity |
| Receive Sensitivity | -110dBm |
| Frequency Response | 60Hz-17KHz+/-3dB |
| SIN Ratio | ≥105dB (-60dBm) |
| T.H.D | <0.5% at 1KHz |
| Dynamic Range | >100dB |
| Operating Temperature | -10-+50 |
| Display | Backlit LCD (63mm*22mm) |
| Audio Output | 1*Balanced XLR Socket 1*6.35mm Jack |
| Antenna: | 2*BNC |
| Power Supply | DC12V-18V/500mA |
| Dimensions( L*W*H): | 210*170*44mm |
Handheld Transmitter
| Frequency Preparation | PLL Synthesized Control 600- |
| Frequency Range | 937MHz (Region dependant) |
| Frequency Deviation | ±48KHz |
| Microphone Type | Dynamic |
| Polar Pattern | Cardioid |
| RF Output Power | 10mW |
| Controls | ON/MUTE/OFF |
| Indicators | Backlit LCD |
| Interface | Infrared |
| Power Supply | 2*AA battery |
| Operating Voltage | 3V |
| Operating time | 10h (depending on batteries) |
| Dimensions | 265mm |
Body-pack Transmitter
| Frequency Preparation | PLL Synthesized Control |
| Frequency Range | 600-937MHz (Region dependant) |
| Frequency Deviation | ±48KHz |
| Input | 3 pin mini-XLR |
| RF Output Power | 10mW |
| Controls | Power ONI/OFF, Volume, SET frequency |
| Indicators | LED (PO), LCD(BATT, frequency) |
| Interface | Infrared |
| Antenna: | 1/4 wave Length Wire Type |
| Power Supply | 2*AA battery |
| Operating Voltage | 3V |
| Operating time: | 10h (depending on batteries) |
| Dimensions( L’WH) | 110’63’21 mm |
Electronic Musical Instrument Transmitter
Guitar Straight plug/Angled plug
| Frequency Preparation | PLL Synthesized Control 600- |
| Frequency Range | 937MHz (Region dependant) |
| Frequency Deviation | t48KHz |
| RF Output Power | 10mW |
| Controls | ON/OFF, Mute |
| Indicators | LED(PO/BATT) |
| Interface | Infrared |
| Antenna: | 1/4 wave Length Wire Type |
| Power Supply | I ‘AA battery |
| Operating Voltage | 1.2-1.5V |
| Operating time: | 10h (depending on batteries) |
| Dimensions | 120’54’28mm(straight plug) 90’71’28mm(angled plug) |
Saxophone Transmitter
| Frequency Preparation | PLL Synthesized Control 600- |
| Frequency Range | 937MHz (Region dependant) |
| Frequency Deviation | ±48KHz |
| Microphone Type | Condenser |
| Polar pattern: | Ultra-cardioid |
| Cartridge size: | <1)14’5.0mm – |
| Sensitivity: | 47d13±2d8 |
| RF Output Power | 10mW |
| Controls | ON/OFF, Mute |
| Indicators | LEO(PO/BATT) |
| Interface | Infrared |
| Antenna: | 1/4 wave Length Wire Type |
| Power Supply | 1’AA battery |
| Operating Voltage | 1.2-1.5V |
| Operating time: | 10h (depending on batteries) |
| Dimensions | 165*66*28mm |
Plug-on Transmitter
| Frequency Preparation | PLL Synthesized Control |
| Frequency Range | 600-937MHz (Region dependant) |
| Frequency Deviation | ±48KHz |
| Input | Female XLR(with lock) |
| RF Output Power | 10mW |
| Controls | Power ON/OFF, 48VON/OFF |
| Indicators | LED (P0/48V/LO/CHR) |
| Interface | Infrared |
| Antenna: | 1/4 wave Length Wire Type |
| Power Supply | Lithium battery |
| Operating Voltage | 3.7V |
| Operating time: | 5h (depending on batteries) |
| Dimensions( L’W’11) | 180*20*10mm |


