![]() VW-55H2 LCD Display
VW-55H2 LCD Display
User Manual
www.agneovo.com
SAFETY INFORMATION
WEEE
Information for users applicable in European Union countries.![]() The symbol on the product or its packaging signifies that this product has to be disposed separately from ordinary household wastes at its end of life. Please kindly be aware that this is your responsibility to dispose electronic equipment at recycling centers so as to help conserve natural resources. Each country in the European Union should have its collection centers for electrical and electronic equipment recycling. For information about your recycling drop off area, please contact your local related electrical and electronic equipment waste management authority or the retailer where you bought the product.
The symbol on the product or its packaging signifies that this product has to be disposed separately from ordinary household wastes at its end of life. Please kindly be aware that this is your responsibility to dispose electronic equipment at recycling centers so as to help conserve natural resources. Each country in the European Union should have its collection centers for electrical and electronic equipment recycling. For information about your recycling drop off area, please contact your local related electrical and electronic equipment waste management authority or the retailer where you bought the product.
PRECAUTIONS
 | CAUTION | |
| RISK OF ELECTRIC SHOCK DO NOT OPEN |
Symbols used in this manual![]() This icon indicates the existence of a potential hazard that could result in personal injury or damage to the product.
This icon indicates the existence of a potential hazard that could result in personal injury or damage to the product.![]() This icon indicates important operating and servicing information.
This icon indicates important operating and servicing information.
Notice
- Read this User Manual carefully before using the LCD display and keep it for future reference.
- The product specifications and other information provided in this User Manual are for reference only. All information is subject to change without notice. Updated content can be downloaded from our web site at www.agneovo.com.
- To protect your rights as a consumer, do not remove any stickers from the LCD display. Doing so may affect the determination of the warranty period.
Cautions When Setting Up
| Do not place the LCD display near heat sources, such as a heater, exhaust vent, or in direct sunlight. | |
| Do not cover or block the ventilation holes in the housing. | |
| Place the LCD display on a stable area. Do not place the LCD display where it may subject to vibration or shock. | |
| Place the LCD display in a well-ventilated area. | |
| Do not place the LCD display outdoors. | |
| Do not place the LCD display in a dusty or humid environment. | |
| Do not spill liquid or insert sharp objects into the LCD display through the ventilation holes. Doing so may cause accidental fire, electric shock or damage the LCD display. |
PRECAUTIONS
Cautions When Using
| Use only the power cord supplied with the LCD display. | |
| The power outlet should be installed near the LCD display and be easily accessible. | |
| If an extension cord is used with the LCD display, ensure that the total current consumption plugged into the power outlet does not exceed the ampere rating. | |
| Do not allow anything to rest on the power cord. Do not place the LCD display where the power cord may be stepped on. | |
| If the LCD display will not be used for an indefinite period of time, unplug the power cord from the power outlet. | |
| To disconnect the power cord, grasp and pull by the plug head. Do not tug on the cord; doing so may cause fire or electric shock. | |
| Do not unplug or touch the power cord with wet hands. |
Cleaning and Maintenance
| The LCD display comes with NeoVTM Optical Glass. Use a soft cloth lightly moistened with a mild detergent solution to clean the glass surface and the housing. | |
| Do not rub or tap the surface of the glass with sharp or abrasive items such as a pen or screwdriver. This may result in scratching the surface of the glass. | |
| Do not attempt to service the LCD display yourself, refer to qualified service personnel. Opening or removing the covers may expose you to dangerous voltage or other risks. |
![]() Warning:
Warning:![]() Unplug the power cord from the power outlet and refer to qualified service personnel under the following conditions:
Unplug the power cord from the power outlet and refer to qualified service personnel under the following conditions:
- When the power cord is damaged.
- If the LCD display has been dropped or the housing has been damaged.
- If the LCD display emits smoke or a distinct odor.
![]() Warning:
Warning:![]() Ceiling mount or mount on any other horizontal surface overhead are not advisable.
Ceiling mount or mount on any other horizontal surface overhead are not advisable.
Installation in contravention of the instructions may result in undesirable consequences, particularly hurting people and damaging property. Users who have already mounted the display on the ceiling or any other horizontal surface overhead are strongly advised to contact AG Neovo for consultations and solutions to help ensure a most pleasurable and fulfilling display experience.
Notice for the LCD Display
In order to maintain the stable luminous performance, it is recommended to use low brightness setting.
Due to the lifespan of the lamp, it is normal that the brightness quality of the LCD display may decrease with time.
When static images are displayed for long periods of time, the image may cause an imprint on the LCD display. This is called image retention or burn-in.
To prevent image retention, do any of the following:
- Set the LCD display to turn off after a few minutes of being idle.
- Use a screen saver that has moving graphics or a blank white image.
- Switch desktop backgrounds regularly.
- Adjust the LCD display to low brightness settings.
- Turn off the LCD display when the system is not in use.
Things to do when the LCD display shows image retention: - Turn off the LCD display for extended periods of time. It can be several hours or several days.
- Use a screen saver and run it for extended periods of time.
- Use a black and white image and run it for extended periods of time.
When the LCD display is moved from one room to another or there is a sudden change from low to high ambient temperature, dew condensation may form on or inside the glass surface. When this happens, do not turn on the LCD display until the dew disappears.
Due to humid weather conditions, it is normal for mist to form inside the glass surface of the LCD display.
The mist will disappear after a few days or as soon as the weather stabilizes.
There are millions of micro transistors inside the LCD display. It is normal for a few transistors to be damaged and to produce spots. This is acceptable and is not considered a failure.
Connection
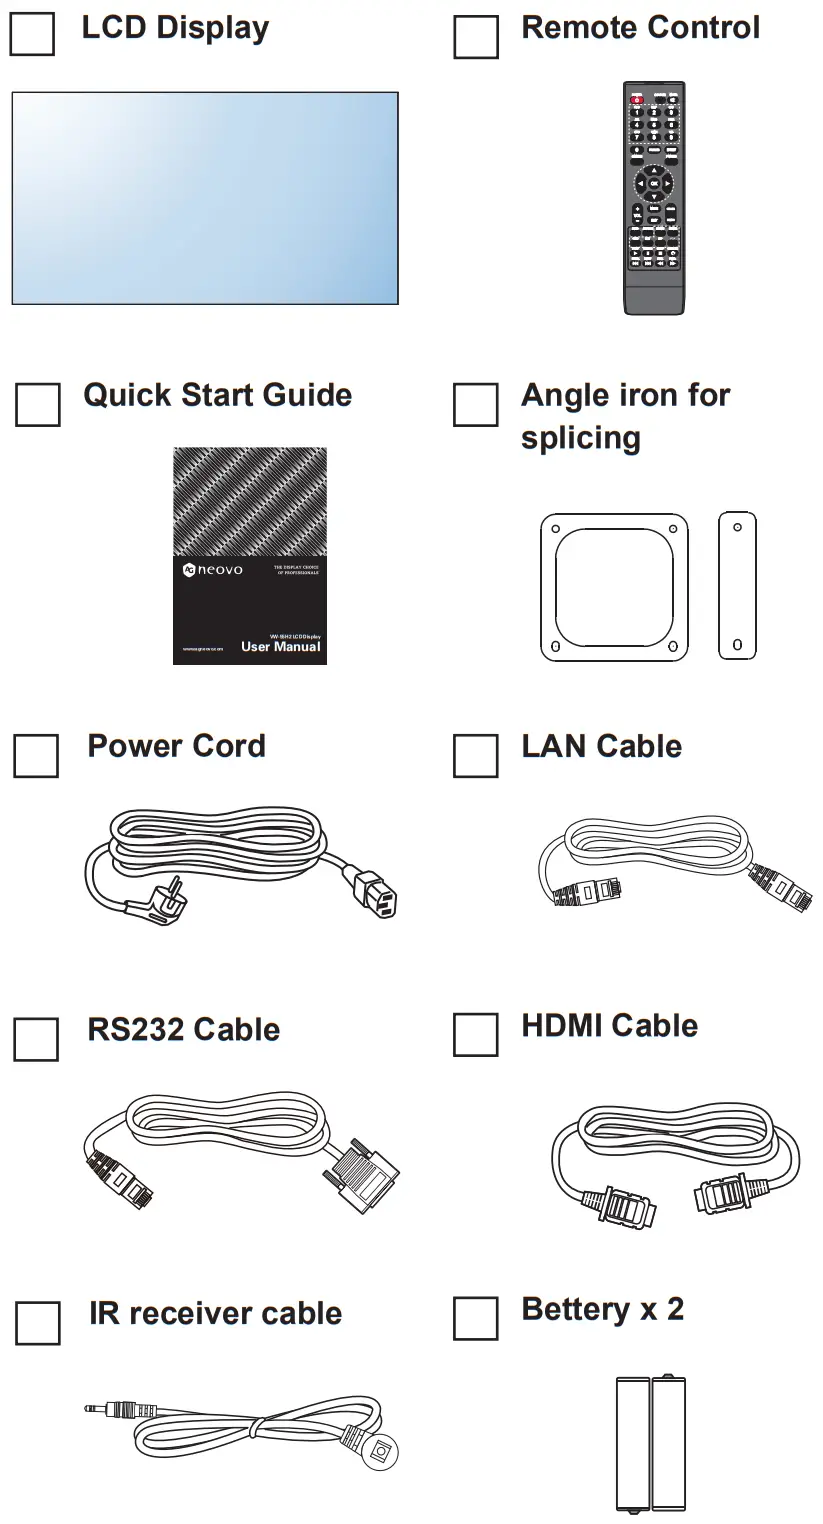
Packing List
When unpacking, check if the following items are included in the package. If any of them is missing or damaged, contact your dealer.
Note:
- Power Requirements: AC 100-240V 50/60 Hz is used.
- Disconnect the power supply when it is to be kept idle for a long time.
Note:
- The pictures are for reference only. Actual items may vary upon shipment.
Remote Control
Ports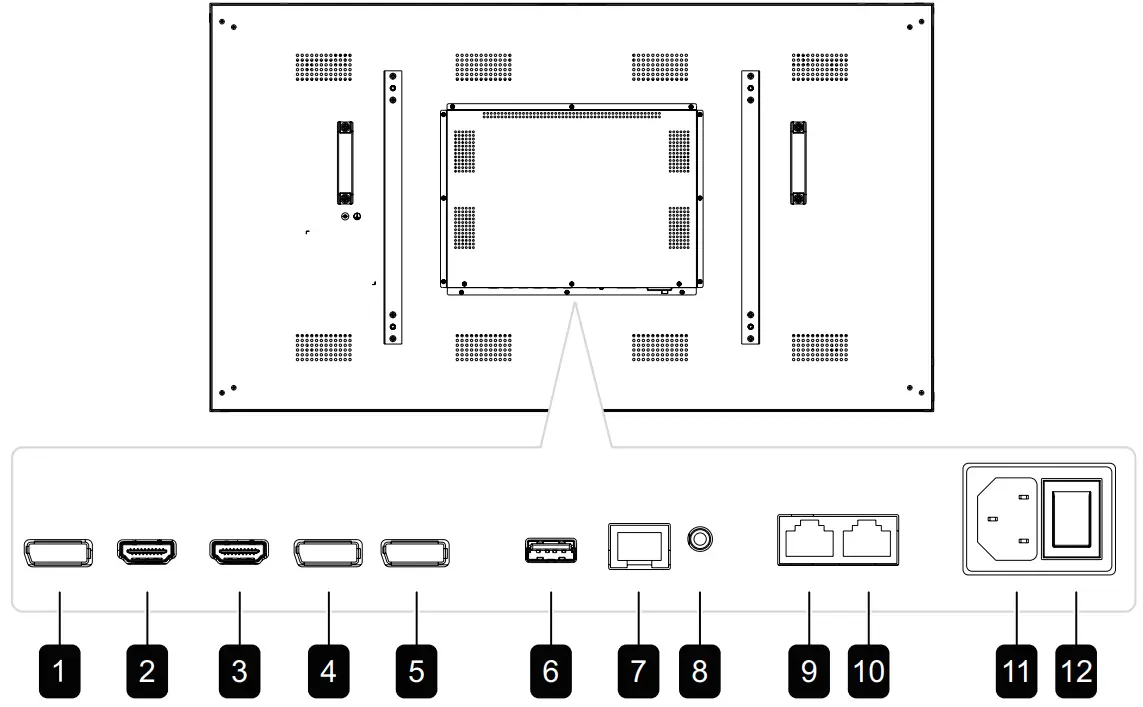
DisplayPort OUT
Connect DisplayPort signals output.
HDMI1 IN / HDMI2 IN
Connect HDMI signals input.
DisplayPort1 IN / DisplayPort2 IN
Connect DisplayPort signals input.
USB
Connects USB 2.0 for service.
LAN
For LAN / internet connection with an Ethernet cable.
IR IN
IR signal input.
RS232 IN:
Connect RS232 input from external equipment.
RS232 OUT:
Connect RS232 output to additional displays.
AC IN
AC power input from the wall outlet.
MAIN POWER SWITCH
Switch the main power on/off.
Note:
- Signals input via RS232-IN can be output via RS232-OUT.
- LAN input interface for transmitting system control commands only.
- HDMI1/HDMI2 input port supports the maximum resolution of 3840*2160 @60Hz.
- DP1/DP2 input port supports the maximum resolution of 3840*2160@60Hz.
- DP-OUT port supports the output of signals input via HDMI/DP ports.
- To obtain sound display effect, it is recommended to use the provided wires or wires of a well-known brand.
Connection
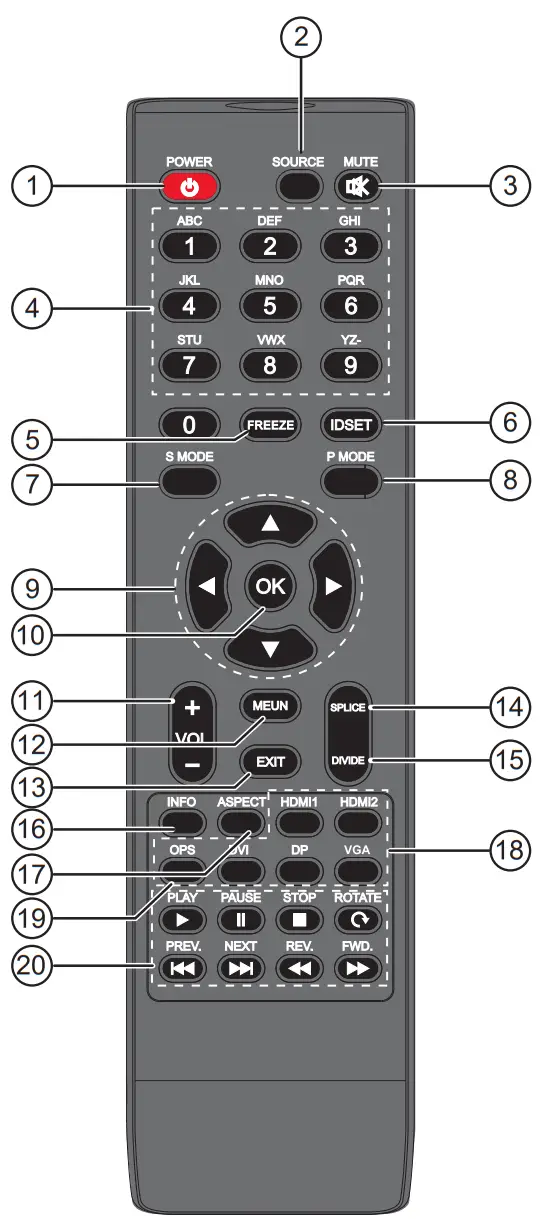
Remote Control
Note:
- Remark: When the product is different from the picture, the product
- prevails. press the DVI key on the remote controller to quickly switch to
- DP1 source, press the DP key on the remote controller to quickly switch
- to DP2 source, and press the VGA key on the remote controller has no effect.
- [
 ] POWER button
Power on / switch to standby mode. - [ SOURCE ] button
Open / close the source list. - [ ] MUTE button
Press to turn the mute function on/off. - [ NUMERIC KEYS ] button
Input the digits. - [ FREEZE ] button
No function. - [ IDSET ] buttons
Set address. - [ SOUND MODE ] button
Voice mode switch key. - [ PICTURE MODE ] button
Quickly switch the image mode. - [ ▲ ] [ ▼ ] [
 ] [
] [ ] CURSOR KEYS
Select up, down, left and right directions. - [ ] button
Comfim the current operations. - [
 ] [
] [ ] VOLUME button
Adjust the volume. - [ MENU ] button
Access the OSD menu. - [ EXIT ] button
Exit the current operations. - [ SPILICE ] button
One-key full screen display. - [ DIVIDE ] button
One-key singal screen display. - [ INFO ] button
View current signal information. - [ ASPECT ] button
Switch the aspect ratio of screen. - [ HDMI1/ HDMI2/ DVI/ DP/ VGA ] buttons
Quickly swith to the designated source. - [ OPS ] button
No function. - [] [
 ] [
] [ ] [
] [ ] [
] [ ] [] button No function.
Operation Instructions
Startup
Connect the power plug to the power socket, press the Standby key on the remote control to turn on the monitor.
Standby
Press the Standby key on the remote control, the monitor goes to Standby.
Tips:
The product is environment-friendly:
- If no signals are detected in 5 minutes after startup, it enters the Standby mode.
- It enters the Standby mode when it reaches the time to switch off;
- Power plug must be removed when the complete power-off is needed.
Selecting Signal Source
Press the “SOURCE” key on the remote control, the Signal Source menu appears;
- Press Left/Right arrow keys on the remote control to select a signal source, such as HDMI1, HDMI2, Display Port1and Display Port2;
- Press the OK key on the remote control to confirm.

Menu Operation
Press the Menu key on the remote control, the main menu appears:
- Press the Up/Down arrow keys on the remote control to select a menu, like Picture, Colour TEMP, OSD Settings, System and UnWall.
- Press the OK key on the remote control to enter category menu. than press the OK key on the remote control to enter sub menu.
- Press the Left/Right arrow keys on remote control to change the value, then press the OK key on the remote control to confirm and return previous menu.
- When the main menu is present on the screen, press the Menu key to exit; when a submenu is present on the screen, press the Menu key to return to the previous menu.
- Press the Signal Source key, the Signal Source menu appears, press
- Press the Up/Down arrow keys on the remote control to select sub menu
- When the main menu is present on the screen, press the Menu key to exit; again to exit.
- During menu operations, the grey options are inaccessible.
Operation Instructions
Picture Setting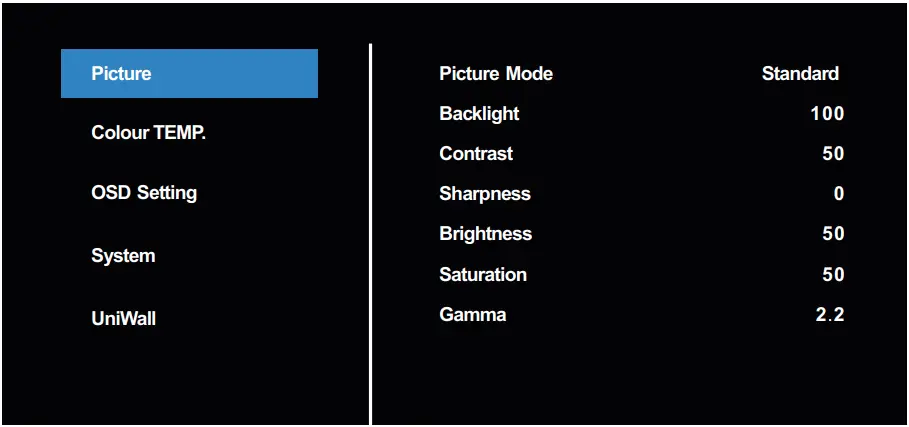
| Item | Subitem | Descripition |
| Picture | Picture mode | Standard, Bright, Soft, User |
| Backlight | Set backlight from 0 to 100 | |
| Contrast | Set contrast from 0 to 100 | |
| Sharpness | Set sharpness from 0 to 15 | |
| Brightness | Set brightness from 0 to 100 | |
| Saturation | Set saturation from 0 to 100 | |
| Gamma | 1.8, 2.0, 2.2, 2.4 |
Colour TEMP.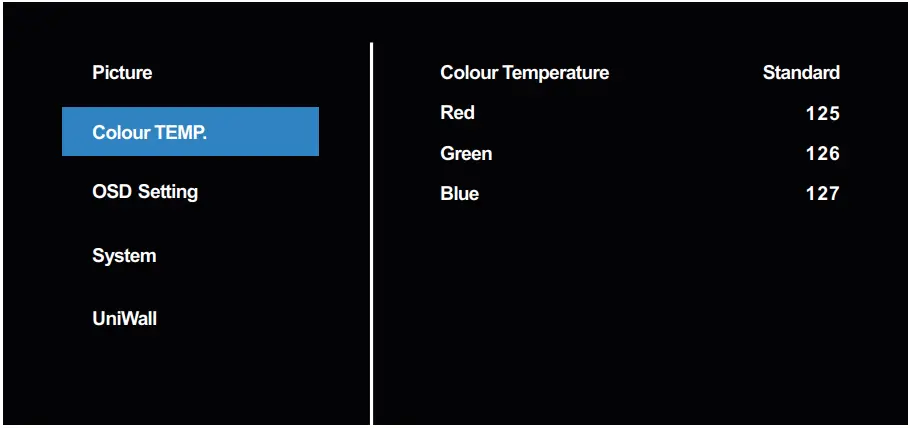
| Item | Subitem | Descripition |
| Colour Temp. | Colour Temperature | Standard, Warm, Cool, User |
| Red | Set the red value of colour temperature from 0 to 255 | |
| Green | Set the green value of colour temperature from 0 to 255 | |
| Blue | Set the green value of colour temperature from 0 to 255 |
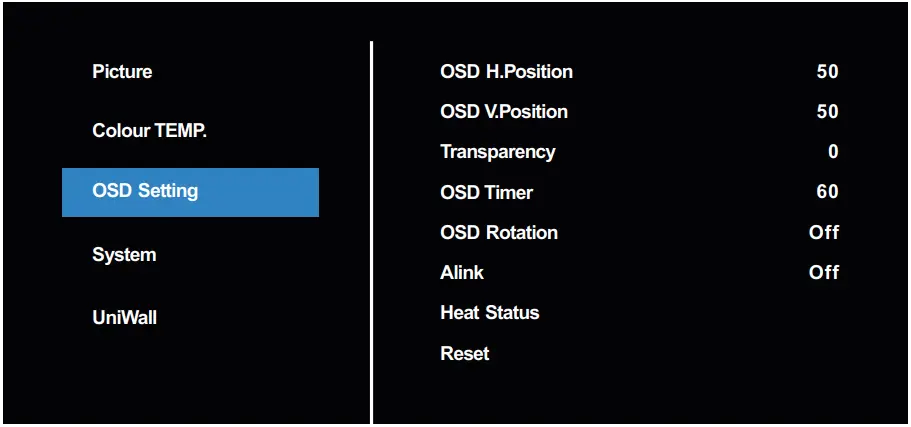
| Item | Subitem | Operation |
| OSD Setting | OSD V.Position | Set the horizontal position of OSD from 0 to 100 |
| OSD H.Position | Set the vertical position of OSD from 0 to 100 | |
| Transparency | Set the transparency of OSD from 0 to 4 | |
| OSD Timer | Set the OSD display time from 5s to 60s | |
| OSD Rotation | Set the OSD display angel: Off, 90°/180°/270° | |
| Alink | On/Off | |
| Reset | Display the working temperature of the main chip | |
| Heat Status | Yes/No |
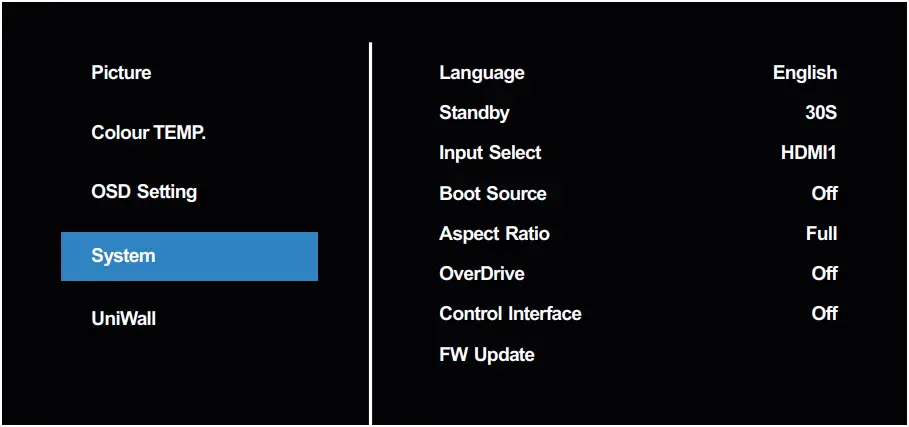
| Item | Subitem | Operation |
| System | Language | Select different language |
| Standby | Off, 30s, 45s, 60s, 3min, 5min | |
| Input Select | Select different inputs | |
| Boot Source | Setting the default source of power off | |
| Aspect Ratio | Set display size to 4:3 or full | |
| OverDriver | On/Off | |
| Control Interface | Off, RS32, LAN | |
| FW Update | USB FW update(disable by default) |
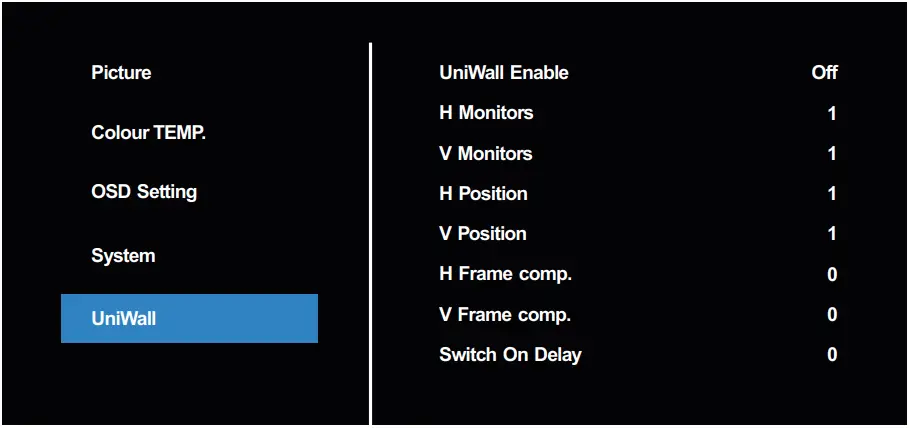
| Item | Subitem | Operation |
| UniWall | UniWall Enable | Enable/disable videowall setting, only enable can adjust below parameters |
| H Monitors | The maximum number of rows of splicing | |
| V Monitors | Set max columns of video wall | |
| H Position | Set current row | |
| V Position | Set current column | |
| H Farme comp. | Set horizontal seam size | |
| V Farme comp. | Set vertical seam size | |
| Switch On Delay | Set startup delay time: 0-10s |
Note:
- Menu options may vary at different models and signal sources, and are subject to the actual situation.
Troubleshooting
Follow the solutions below to solve these common problems, and contact us if the problem persists.
| Symptom | Possible Cause | Remedy |
| The Power indicator does not come on | The monitor is not powered on. | 1 Check if the power cord is connected, and switch ON the monitor. |
| The Power indicator is on, but no image is displayed | The Video wire is detached or connected improperly. No video signal input. | Connect or replace the video wire,and ensure proper and correct connection. Check the signal source, and check if it is properly connected at the output end. |
| Image jerking or ripple | There exists an electric device that interferes with the video signals. | Turn off the electric device, or relocate the monitor. |
| Dim or extremely bright screen | Low or high brightness/contrast. | Check the brightness/contrast settings, or restore to default settings. |
| Colour difference | Improper chromatic chromatic saturation. Improper RGB values or colour temperature. | Check the chromatic saturation. Adjust the RGB values or reset the colour temperature. Restore to default settings. |
| Image distortion | Improper aspect ratio. | Reset the aspect ratio. |
| No sound | The Audio wire is detached or connected improperly. It is mute. | Ensure proper connection at the input end. Reset the volume. |
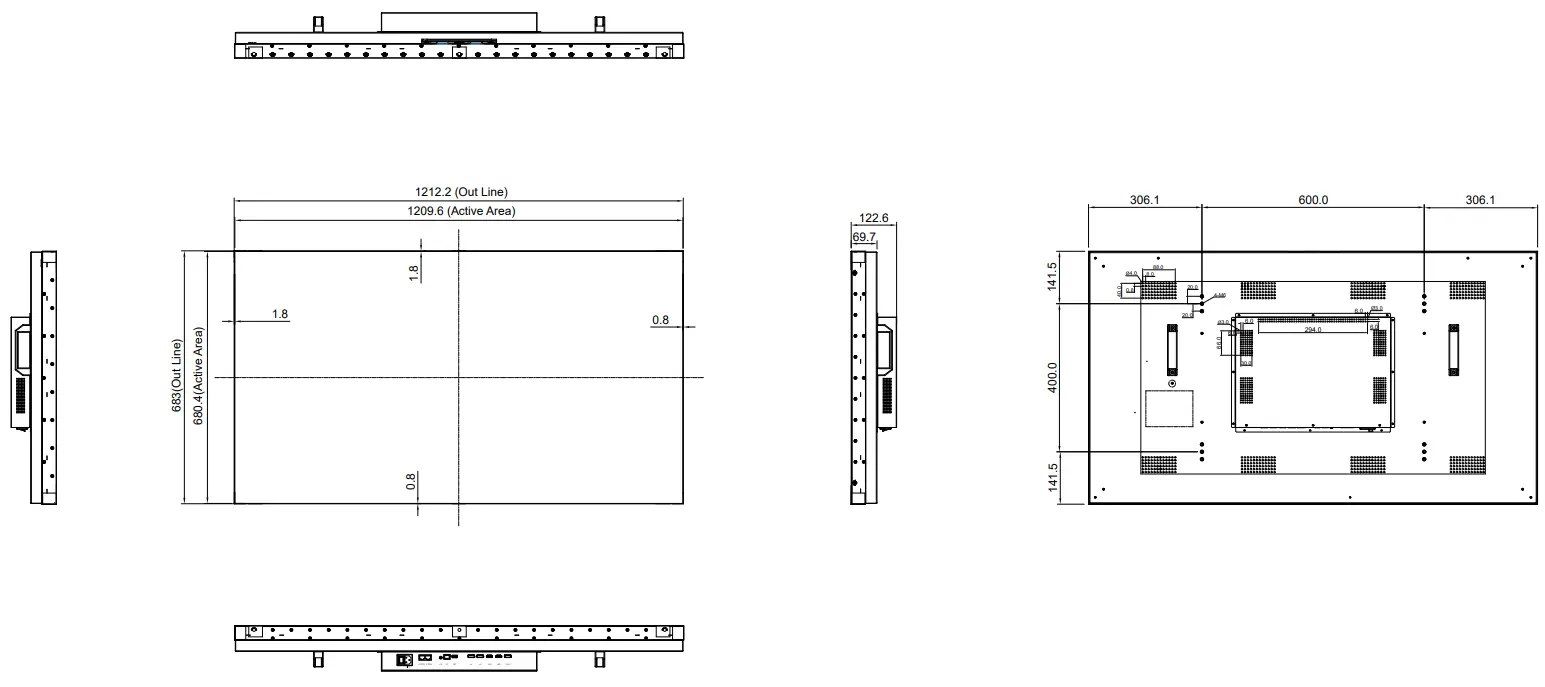
Display Dimesions
VW-55H2
Note 1:"Exceeding 0.1 wt %" and "exceeding 0.01 wt %" indicate that the percentage content of the restricted substance exceeds the reference percentage value of presence condition.
Note 2:"○" indicates that the percentage content of the restricted substance does not exceed the percentage of reference value of presence.
Note 3:The "-" indicates that the restricted substance corresponds to the exemption.
AG Neovo
Company Address: 5F-1, No. 3-1, Park Street, Nangang District, Taipei, 11503, Taiwan.
Copyright © 2019 AG Neovo. All rights reserved.
VW55H2_UM_V010


