![]() LaserLight Series
LaserLight Series
Flange Pole Mount Kit Installation
LaserLight Series Flange Pole Mount Kit
This document contains drawings, replacement parts lists, and instructions for installing optional flange pole mount kits:
- (PN 75856) Flange pole mount kit for LaserLight2 and LaserLight3 with 23 inch enclosures
- (PN 77775) Flange pole mount kit for LaserLight2 with 31 inch enclosure
 Manuals and additional resources are available from Rice Lake Weighing Systems at www.ricelake.com/manuals
Warranty information can be found at www.ricelake.com/warranties CAUTION: The LaserLight devices do not have a power switch. Before working with the unit, ensure the power cord is disconnected from the power outlet.
The LaserLight displays can be easily mounted to a pole using the optional pole mounting weldment and clinching brackets.
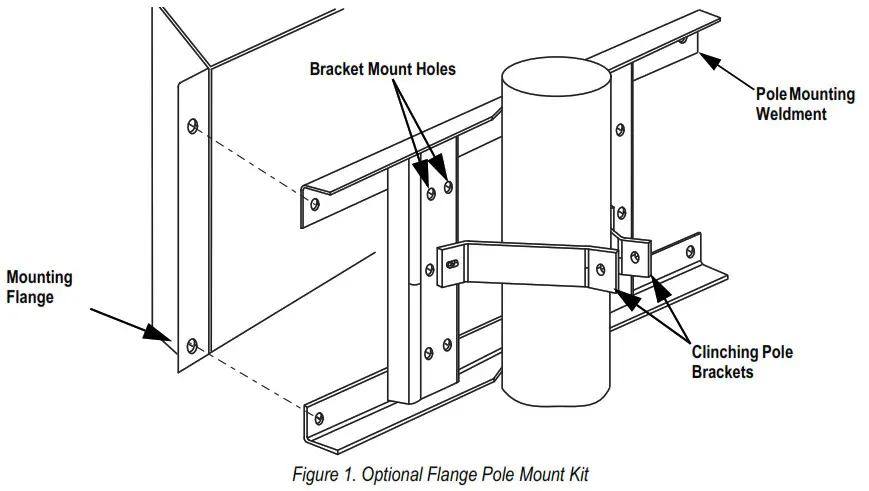
![]() NOTE: The 23 inch enclosure models attach to the pole mounting weldment at the center holes using a pair of clinching pole brackets. The 31 inch enclosure models use two pairs of clinching pole brackets and are connected using the top and bottom hole alignments.
NOTE: The 23 inch enclosure models attach to the pole mounting weldment at the center holes using a pair of clinching pole brackets. The 31 inch enclosure models use two pairs of clinching pole brackets and are connected using the top and bottom hole alignments.![]() NOTE: For LaserLight3, pole mount weldment attaches to outer keyholes on back mounting bracket.
NOTE: For LaserLight3, pole mount weldment attaches to outer keyholes on back mounting bracket.
![]() NOTE: The pole mounting weldment has two sets of mount holes. The two sets of bracket mount holes are for alternate diameter poles. The inner mount holes are used for smaller diameter poles while the outer mount holes are used for larger diameter poles (4 – 8 inch diameter).
NOTE: The pole mounting weldment has two sets of mount holes. The two sets of bracket mount holes are for alternate diameter poles. The inner mount holes are used for smaller diameter poles while the outer mount holes are used for larger diameter poles (4 – 8 inch diameter).
Installation
- Attach the clinching pole brackets to the pole mounting weldment using the supplied 3/8-16NC x 1 in cap screws, washers and lock nuts.
- Attach the clinching pole brackets together using the supplied 3/8-16NC x 2-3/4 bolt, washers and lock nut. Tighten as necessary.
- Repeat Step 1 and Step 2 for second set of clinching pole brackets if installing for a 31 in enclosure model.
- Align the back of the device to the holes in the pole mount weldment. Secure with 5/16-18NC x 1/2 bolts, washers and nuts.
Replacement Parts
Table 1 lists flange pole mount replacement parts for PN 75856 (LaserLight2 and LaserLight3 with 23 enclosures) and PN 77775 (LaserLight2 with 31 in enclosure).
| Part No. | Description | Models | |
| LaserLight2 LaserLight3 23 in enclosure | LaserLight2 31 in enclosure | ||
| 77000 | 4 in Pole Mounting Weldment | 1 | — |
| 76998 | 6 in Pole Mounting Weldment | — | 1 |
| 14646 | Nut, Lock 5/16-18NC | 4 | 4 |
| 14747 | Bolt, 3/8-16NC x 2-3/4 | 1 | 2 |
| 14735 | Bolt, 5/16-18NC x 1/2 | 4 | 4 |
| 15019 | Cap Screws, 3/8-16NC x 1 | 2 | 4 |
| 21939 | Washers 5/16 Type A | 8 | 8 |
| 21938 | Washers 3/8 Type A | 4 | 8 |
| 22072 | Lock Nuts, 3/8-16NC | 3 | 6 |
| 76999 | Clinching Pole Bracket | 2 | 4 |
| 77001 | Machine Screws 3/8-16NC x 6 | 3 | 6 |
Table 1. Flange Pole Mount Replacement Parts
![]() © Rice Lake Weighing Systems
© Rice Lake Weighing Systems
Specifications subject to change without notice.
230 W. Coleman St. · Rice Lake, WI 54868 · USA
U.S. 800-472-6703 · Canada/Mexico 800-321-6703 ·
International 715-234-9171 · Europe +31 (0)26 472 1319
September 27, 2022
www.ricelake.com
PN 78040 Rev D


