![]()
UNI-CHIME
Parking Tone Audio Retention Harness
Installation Guide
![]()
Note: Application data is subject to change at any time
FEATURES
- Retains parking tones & chimes for select vehicles.
- Can be paired with any aftermarket harness when upgrading the aftermarket stereo
- Quick & simple installation
DISCLAIMER
The information provided in this document is subject to change without notice due to manufacturer changes and/or improvements to the product/s. This instruction manual is based on documented data and research. The manufacturer of this product cannot be held responsible for any changes made to the vehicle by the manufacturer or damages that may occur through the installation of this
ABOUT THIS PRODUCT
The UNI-CHIME interface allows you to retain a vehicles original parking tones on when upgrading to an aftermarket stereo. This product is to be used with select PSA, BMW and Land Rover vehicles.
When upgrading the original audio system, certain features, like parking tones, can become lost via the CAN system. But with the application of the UNI-CHIME, this information can be re-interpreted and retained.
Please note, this product should be used when safety tones (reverse sensor audio, seat belt/car door open chimes) would not be retained when upgrading to an aftermarket stereo. This product needs to be used in addition with a separate ISO harness or steering wheel control interface – should you wish to retain those features.
APPLICATION
BMW
| 1-Series (E81, E82, E87) 2004 – 2013 5-Series (E60, E61) 2004 – 2010 7-Series (E6* Variants) 2001 – 2008 X1 (E84) 2009 – 2015 | 3-Series (E90, E91, E92) 2006 – 2013 6-Series (E36, E64) 2004 – 2010 Mini 2006 – 2013 Z4 (E89) 2009 – 2016 |
Citroen
| Berlingo 2008 – 2018 C3-Pluriel (H) 2005 – 2016 C5 (1DC/DE) 2005 – 2008 Jumpy 2007 – 2017 | C2 (J) 2005 – 2009 C4 (L) 2004 – 2010 C8 2005 – 2014 | C3-Picasso 2009 – 2017 C4-Picasso 2006 – 2018 DS3 2009 – 2016 |
Land Rover
Freelander (II) 2006 – 2014
Peugeot
| 207 2006 – 2012 308 2007 – 2013 607 2005 – 2012 Expert (G9/X) 2007 – 2016 | 208 2012 – 2013 3008 2009 – 2013 5008 2009 – 2013 Partner 2008 – 2013 | 307 2005 – 2008 407 2004 – 2010 807 2005 – 2014 RCZ 2010 – 2013 |
PRIOR TO INSTALLATION
Read the manual prior to installation. Technical knowledge is necessary for installation. The place of installation must be free of moisture and away from heat sources. Please ensure that the correct tools are used during the install to avoid any damage to the vehicle or product. Connects2 can not be held responsible for the installation of this product.
INSTALLATION GUIDE
Before installation, make sure that the head unit is disconnected from the power source.
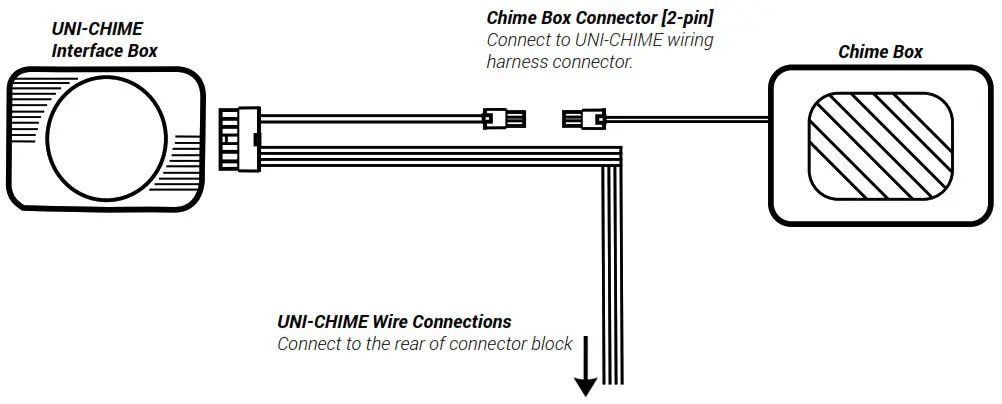
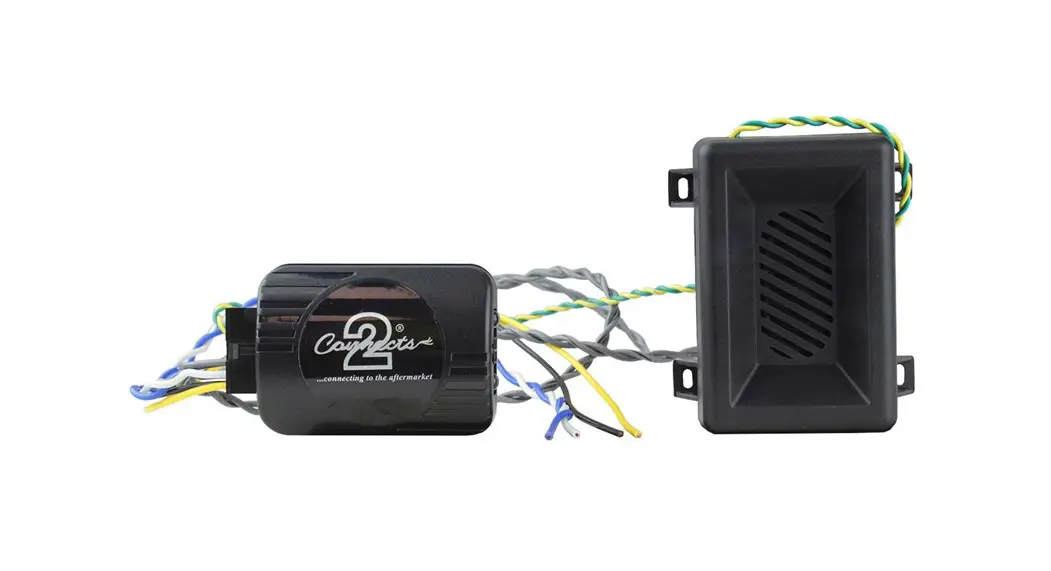
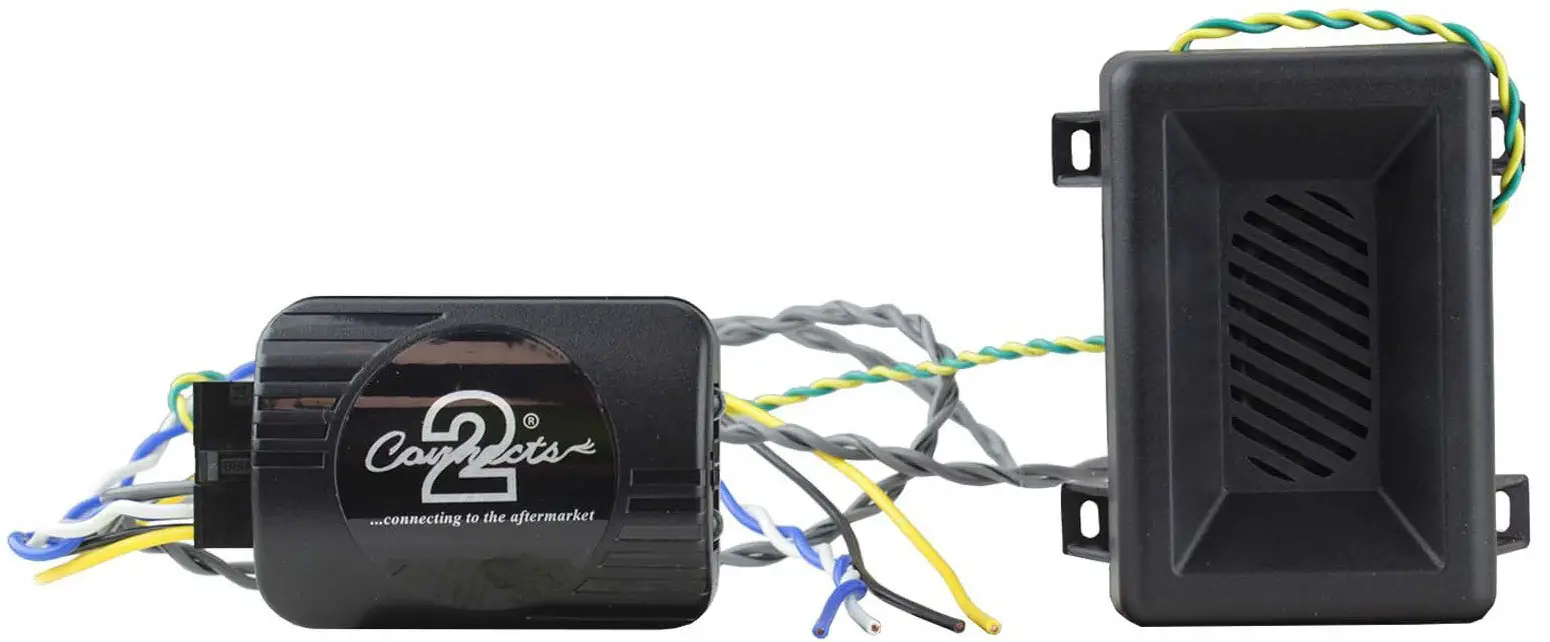
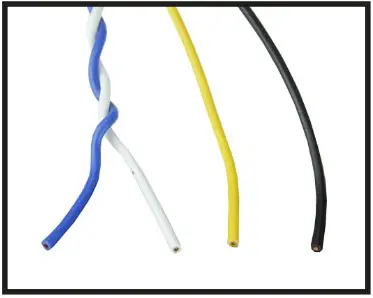
- Connect the 14-pin molex connector to the UNI-CHIME interface. Then attach the following wires to the rear of the block connector (see page 4 for more detail)
Colour
Yellow
Blue
White
BlackFunction
12V Permanent Source
CAN High
CAN Low
Ground
- Connect the 2-pin molex connector from the UNI-CHIME harness and attach this to the provided chime box. Once this is connected, along with the wiring, connect the head unit to the power source.

- When powered on correctly the LED will flash red. This means that the interface has begun coding and is processing the vehicle. Once coding is finished, the LED will light constant green. Test the UNI-CHIME by opening a door or putting the vehicle into reverse. You should now hear the chimes coming through the UNI-CHIME box.
Once tested, proceed to reassemble the dashboard.


If you encounter any problems during the installation of the UNI-CHIME, please contact our technical department with the full details of your issue at: support.connects2.com/tickets/technical
CONNECTOR LOCATIONS
| BMW Vehicles | |
| UNI-CHIME Wire | Pin Location |
| CAN High | 11 |
| CAN Low | 9 |
| Batt 12V | Direct to Battery |
| Ground | 12 |

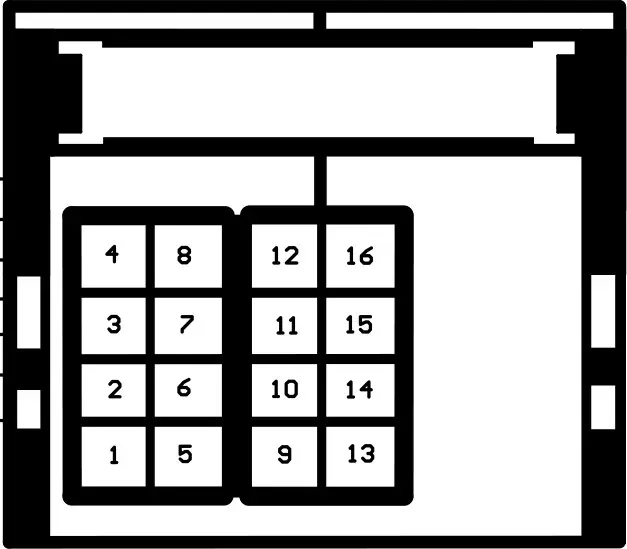
| Citroen/Peugeot Vehicles | |
| UNI-CHIME Wire | Pin Location |
| CAN High | 10 |
| CAN Low | 13 |
| Batt 12V | 12 |
| Ground | 16 |
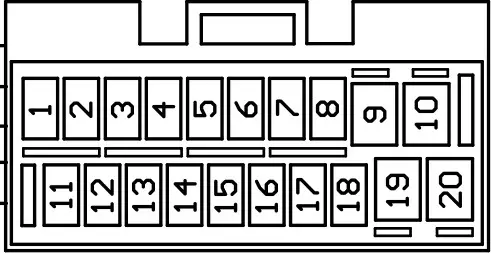
| Land Rover Vehicles | |
| UNI-CHIME Wire | Pin Location |
| CAN High | 2 |
| CAN Low | 1 |
| Batt 12V | 20 |
| Ground | 10 |
WIRING DIAGRAM