Treedix CAI201 1PCS Colorful Digital Clock Installation

Circuit installation
- The components are installed in the order from low to high. The short components such as resistors are installed first, and then the high components are installed. After a part of the component is installed, the component pins must be cut off before the next part of the component is installed.
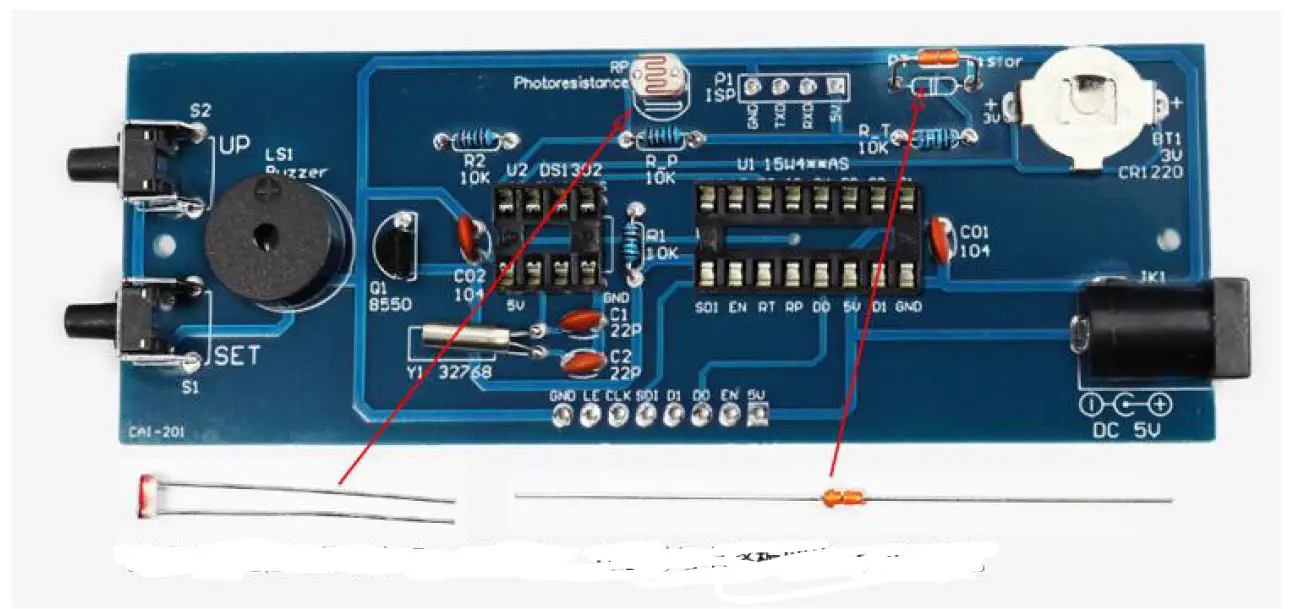
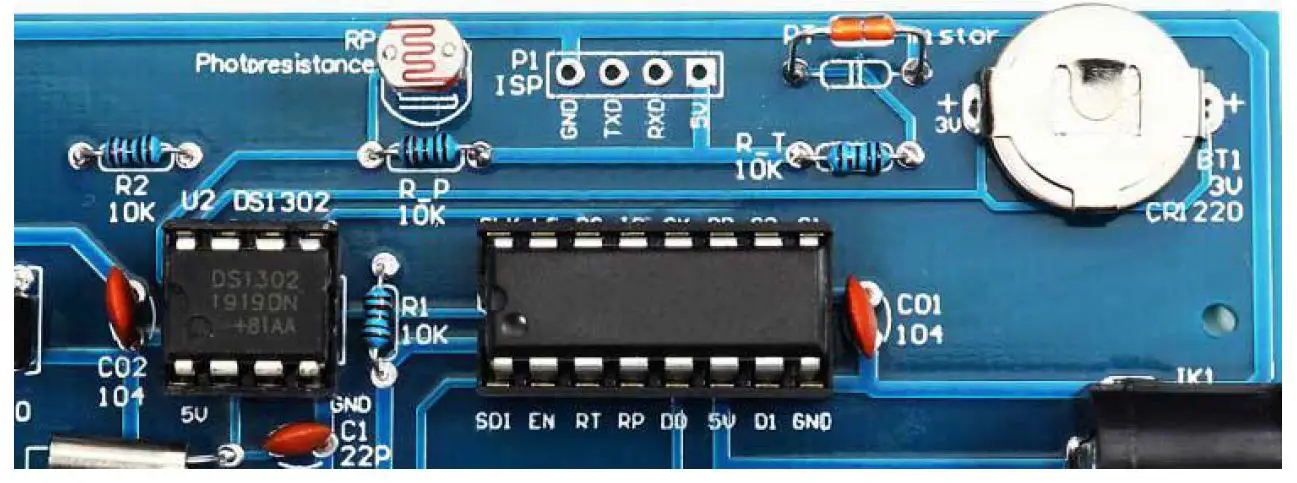
- Photoresistors, thermistors, resistors, crystal oscillators, ceramic capacitors have no positive and negative poles.
- When installing the photoresistor and thermistor, leave a height of 1cm and bend it again(see the installation tutorial in the QR code).
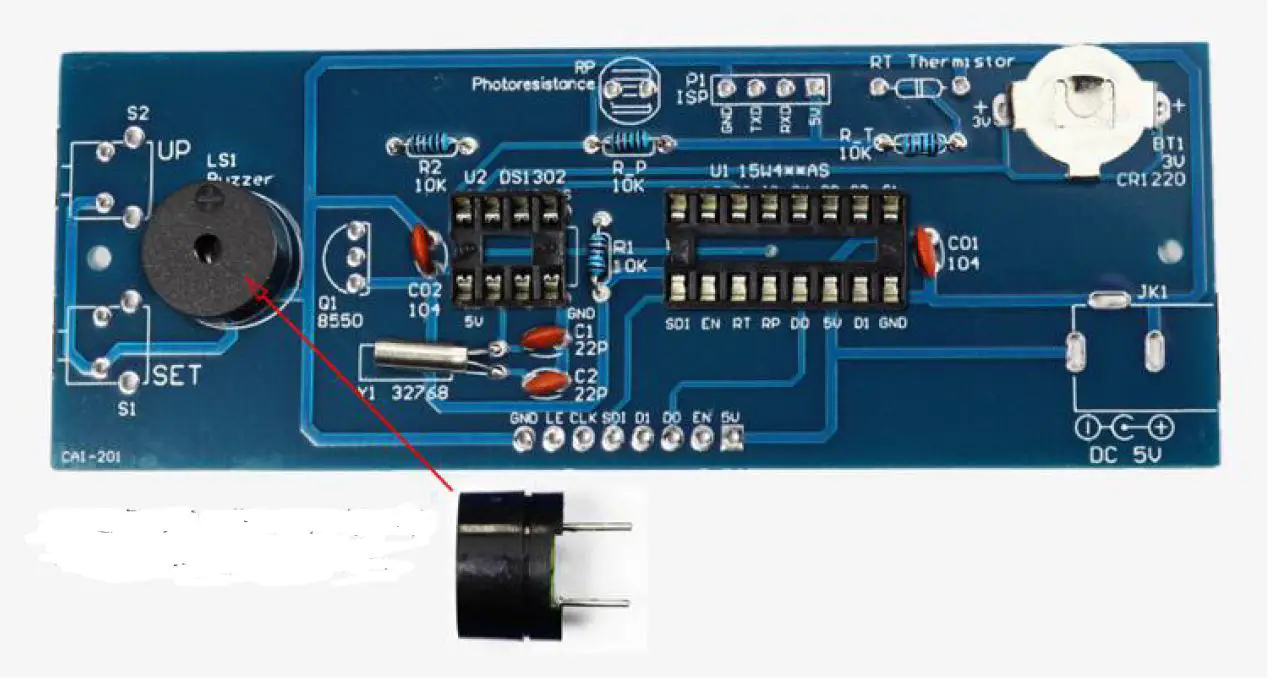
- The buzzer has positive and negative poles, and the position with + on the buzzer is installed opposite to the position with + on the circuit board.
- The integrated circuit should be installed on the socket first, and then the integrated circuit should be installed on the socket after all components are installed. The notch position of the integrated circuit and the socket must be aligned with the notch mark on the circuit board for installation.
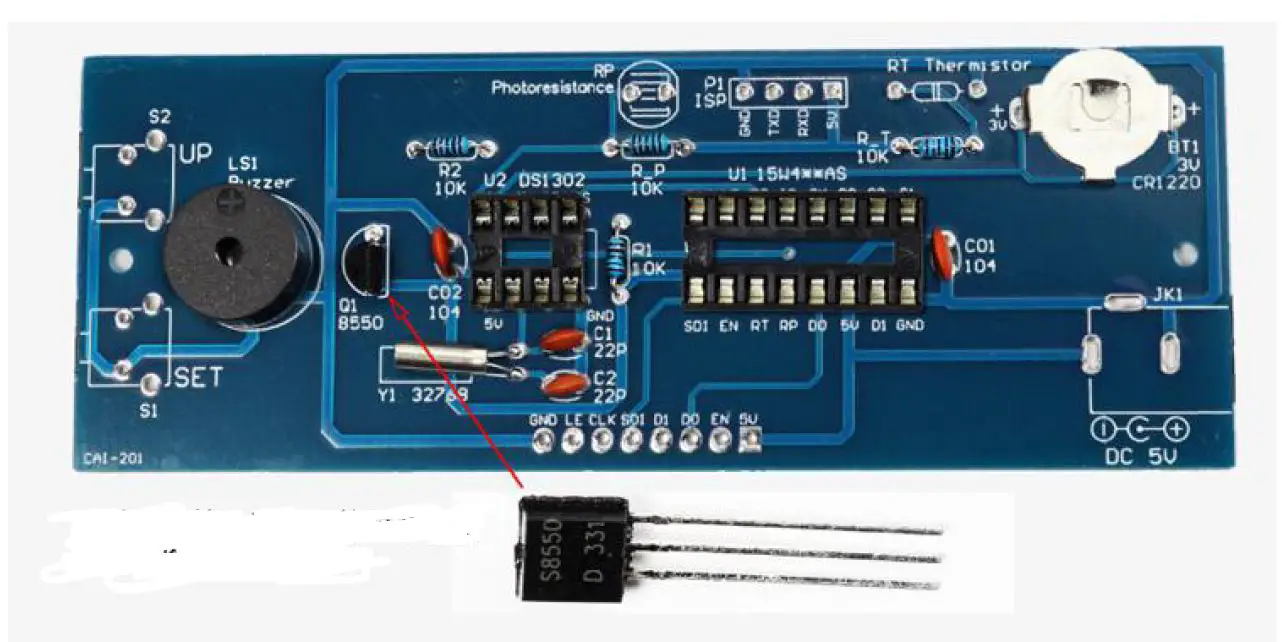
- When installing the triode, just install it according to the shape and position of the triode.
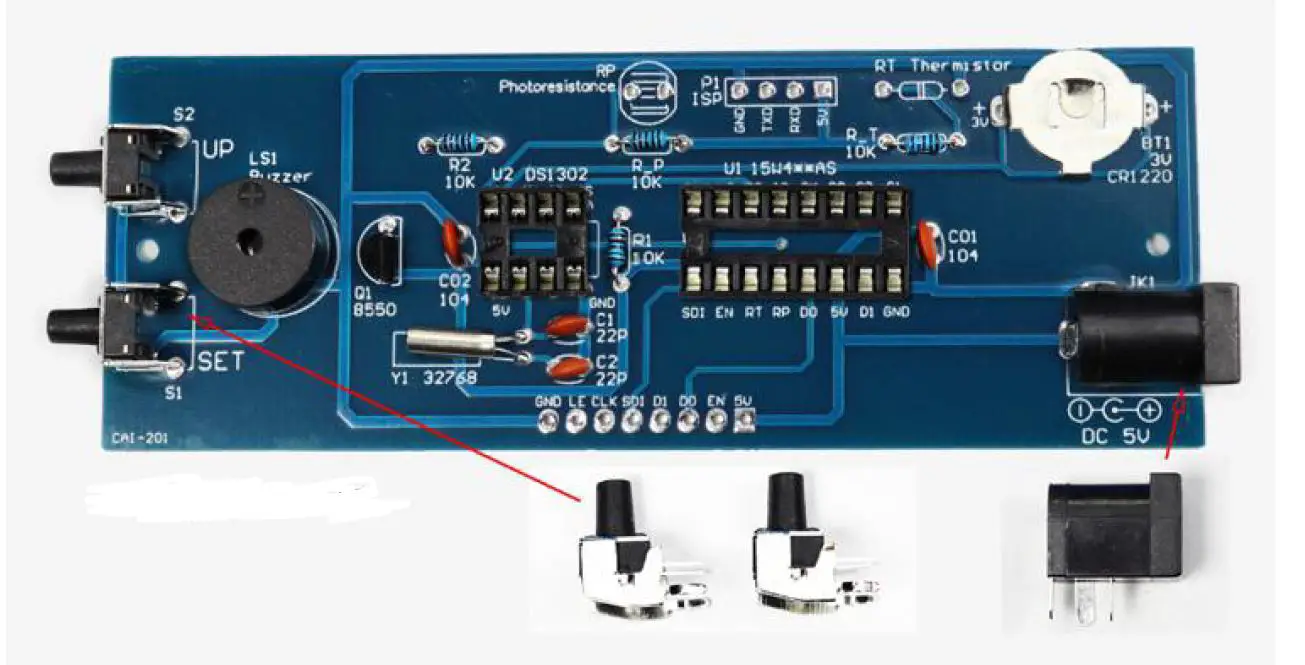
- Tap the switch, power socket, and battery shrapnel to install according to the shape and position.
- After all the components are installed, check again for installation errors, and check whether the solder joints have missing solder, false solder, or short circuit.
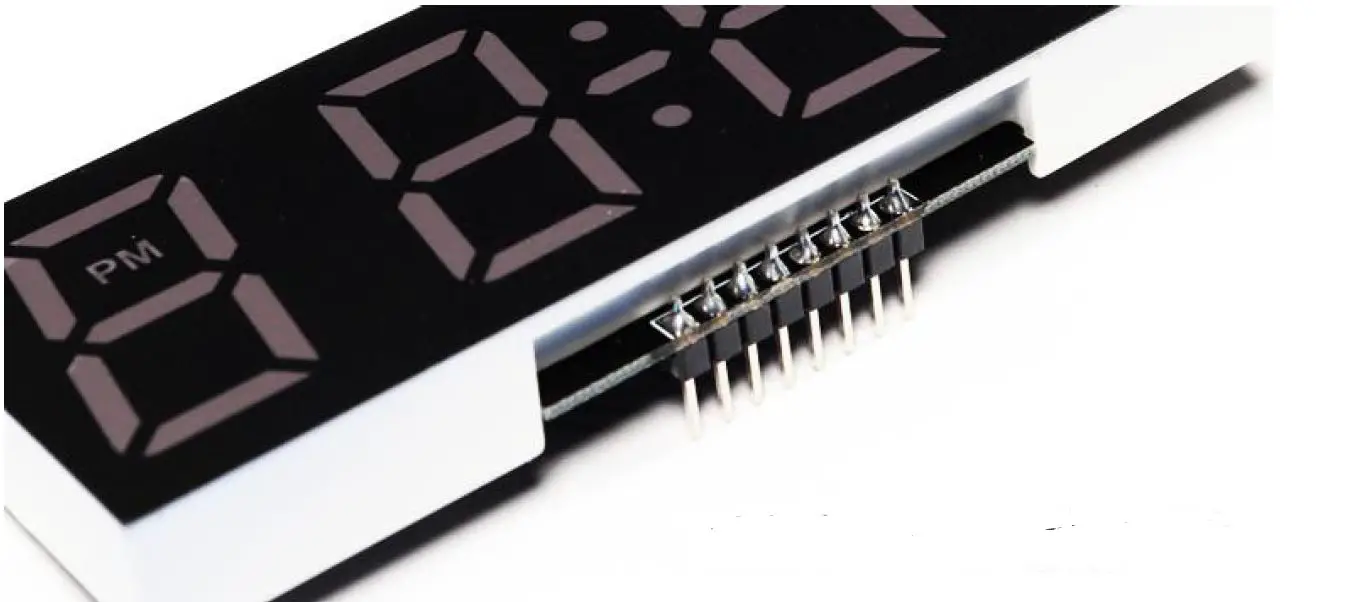
- The digital tube needs to be soldered to the digital tube first, and then the digital tube is welded to the circuit board.
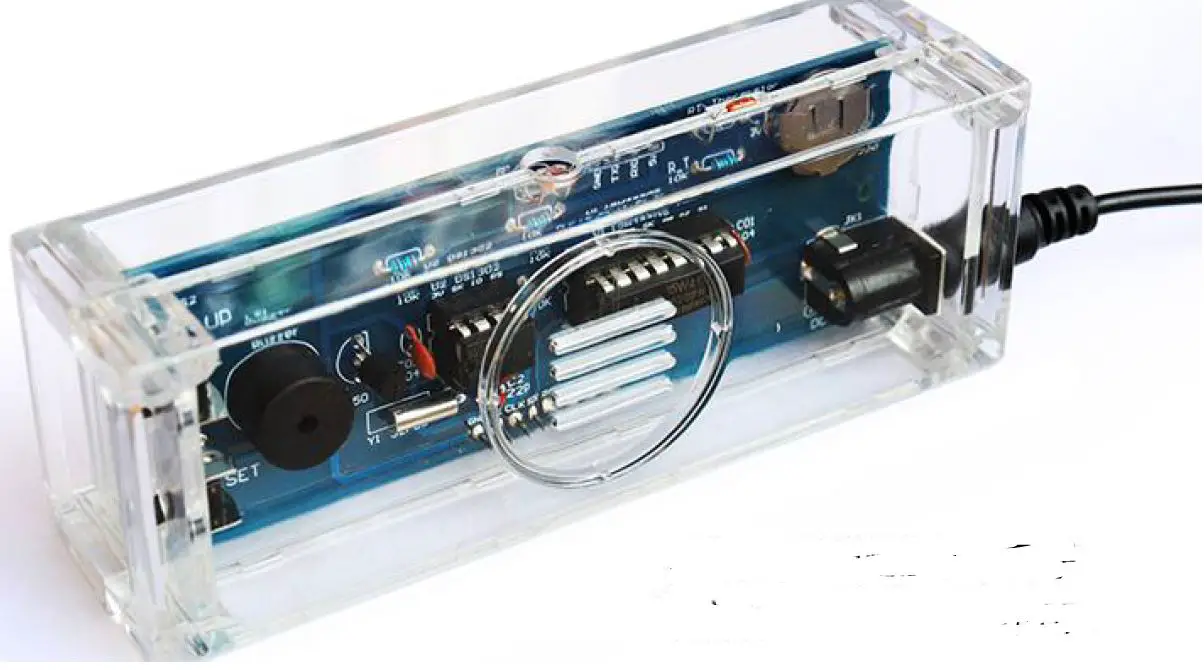
- After confirming that there is no problem with the circuit, install the circuit into the casing and fix the casing with screws.
- Regarding failure: If there is a failure, please first judge whether the component is installed incorrectly, whether the solder joints have missing solder, false solder, or short circuit. The power supply cannot exceed 5V, otherwise the chip will be burnt.
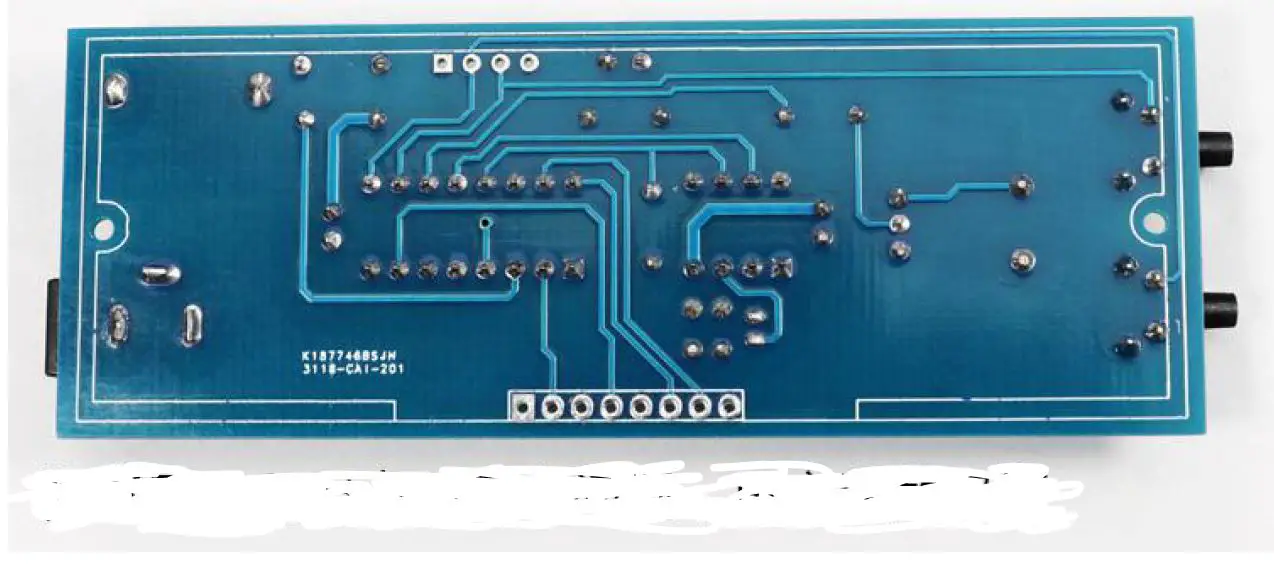
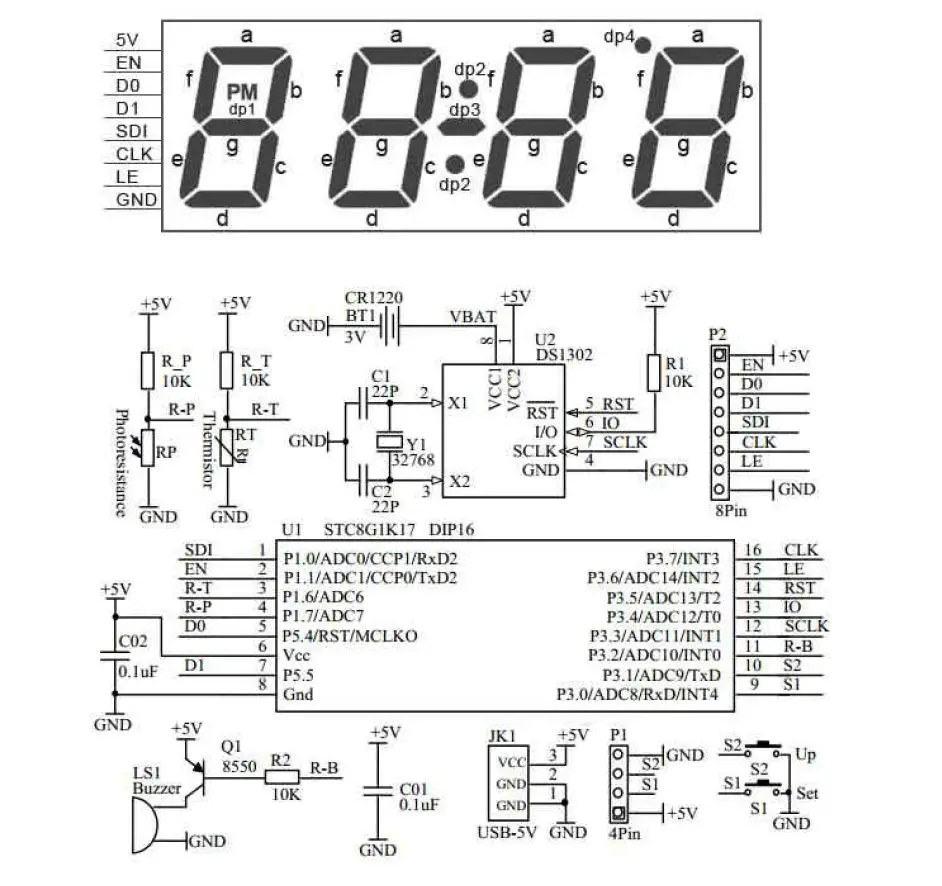
Circuit schematic diagram
Function Settings
| Setting instructions | Press the SET key to enter the next setting. Press the UP key to change the flashing value. If the button is not pressed within 15 seconds, it will automatically exit the setting. The keys will be locked after each setting. If you need to set again, you need to press and hold the SET or UP key again to enter. | |
| Reset | 1. Press the SET and UP buttons at the same time for more than 3 seconds, all the digital tubes will light up and emit a sound, then release it, displaying 7:59, and after 10 seconds it will become 8:00 and sound. The reset was successful. | 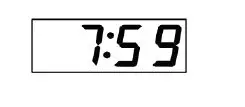 |
| Set time: Press and hold the SET button, and then release it after 2021 flashes. After entering, the UP key is to modify, and the SET key is to enter the next step. | ||
| Set year | 1. The year is displayed and 21 flashes at the same time, press UP to change the year. (If the setting is wrong, you can reset it again) |  Means 2021 Means 2021 |
| Set date | 2. Press the SET button, the month LED flashes, press UP to change the month. Press the SET button again, the day LED flashes, press UP to change the day. | 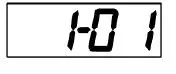 Means January 1 Means January 1 |
| Set time | 3. Press the SET button, the nixie tube flashes, press UP to change. Press the SET button again, the sub-digital tube flashes, and press UP to change the minute. (When you press the SET button to enter and exit, the second starts from 00.) | 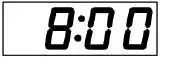 Means eight o’clock in the morning, with PM means afternoon Means eight o’clock in the morning, with PM means afternoon |
| Other function settings: Press and hold the UP button and release it after 24H flashes. After entering, the UP key is to modify, and the SET key is to enter the next step. | ||
| Set time Display mode | 1. After releasing it, press the UP button to switch between the 24-hour system and the 12-hour system (PM will be displayed in the afternoon in the 12-hour system) | 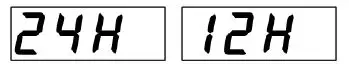 |
| Set the hourly alarm time zone | 2. Press the SET button to display 7-21, which means there will be an hourly reminder from 7 am to 21 pm. The 7 code tube flashes, press UP to change 7. Press the SET button again, the 21 digital tube flashes, press UP to change. Change it to the same two values of 7-7, the hourly alarm will be turned off. | 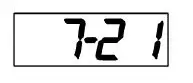 |
| Set the 1st alarm | 3. Press the SET button to display ON: A1, indicating that the first alarm clock is on, press the UP button, and display–: A1 indicates that the first alarm clock is |  |
| clock | off. | |
| 4. Press the SET button to enter the first alarm clock time setting, when it flashes, when you press the UP button to change, press the SET button to flash, and press the UP button to change the minutes. | 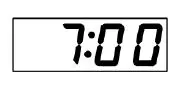 | |
| Set the 2nd alarm clock | 5. Press the SET button to display–: A2, indicating that the second alarm clock is off, press the UP button, and the display is ON: A2 indicates that the second alarm clock is on. | 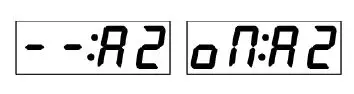 |
| 6. Press the SET button to enter the second alarm clock time setting, when it flashes, when you press the UP button to change, press the SET button to flash, and press the UP button to change the minutes. |  | |
|
Set the 3rd alarm | 7. Press the SET button to display–: A3, indicating that the third alarm clock is off, press the UP button, and display ON: A3 indicates that the third alarm clock is on. | 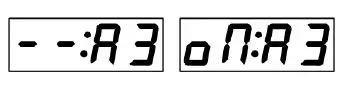 |
| 8. Press the SET button to enter the third alarm time setting, when it flashes, when you press the UP button to change, press the SET button to flash, and press the UP button to change the minute. |  | |
| Weekday alarm setting | 9. Press the SET button to display –: E, indicating that the alarm clock is off on weekdays, and there are alarms available from Monday to Sunday. Press the UP button to change the display to ON: E, indicating that there is an alarm clock from Monday to Friday, and there is no alarm clock on Saturday-Sunday. |  |
| Auto brightness mode | 10. Press the SET button to display oN-L, indicating that the automatic brightness is turned on, and the night brightness is automatically reduced. Press the UP key to change the display —L, which means that the automatic brightness is turned off and one brightness is always maintained. | 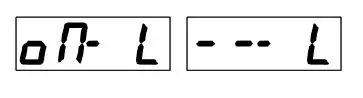 |
| Set brightness | 11. Press the SET button to display L-3, which means high brightness, press UP to change to L-1 low brightness. L-2 medium brightness. (If it is automatic brightness, this item can not be set) |  |
| Set temperatu re | 12. Press the SET key to display the current temperature. Press the UP key to fine-tune the temperature. |  |
| Temperatu re display mode | 13. Press the SET button to display ℃, press the UP button to switch to ℉ |  |
|
Color display mode Single color without this setting | 13-1. Press SET to display dC-1, press UP to switch to the other 3 modes. |  |
| 13-2, dC-1: The color of the digital tube changes randomly | ||
| 13-3, dC-2: The color of 4 digital tubes is optional, press the SET key to display the date, and then press the UP to change the color of the date. Press the SET key to display the time, and then press the UP to change the time color. Press the SET key to display the temperature, and then press the UP to change the temperature color. Press the SET key to display the week, and then press the UP to change the color of the week. |
| |
| 13-4, dC3: Select the color of each digital tube individually, press the SET key to display 4 numbers, press the UP key to adjust the color, then press the SET key to switch to the next number color, and press the UP key to adjust the next number color. |  | |
| Sound settings | 14. Press the SET button to display dU-1, music for Alice, and press the UP button to change to dU-2 Ode to Joy and dU-3 Spanish Bullfighter. | 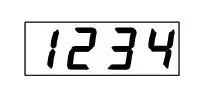 |
| Time correction | 15. Press the SET key to display de-0, 0 means no correction, press the UP key to set the number of seconds to automatically increase or decrease each day. Set the correction by observing a period of time to grasp the time error of each day. |  |
| Display mode setting | 16. Press the SET key to display dP-4, which means time-temperature-date=week cycle display, press the UP key to change. dP-1: Only the time is displayed. dP-2 time temperature cycle display. dP-3 time-date-week cycle display | 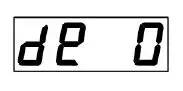 |
| 17. Press the SET button to exit and the setting is complete |  |
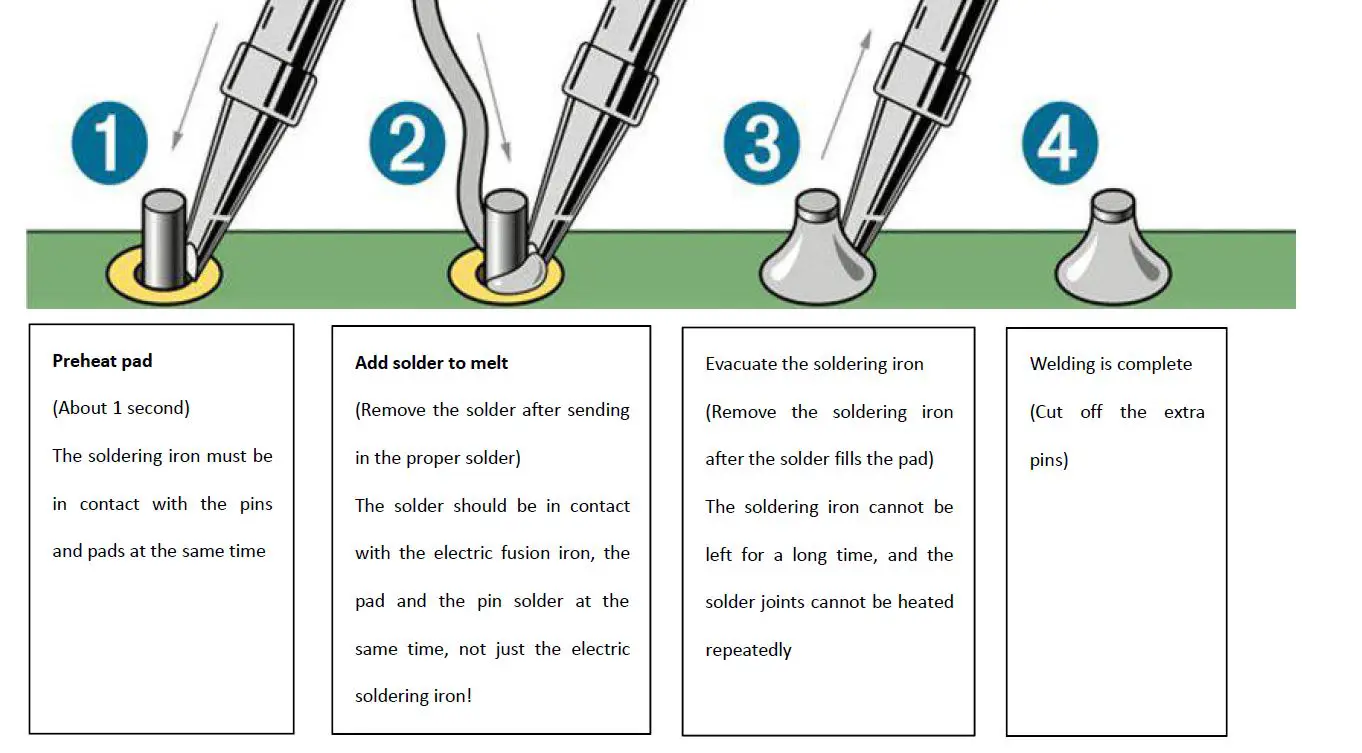
Welding method
- Requirements for solder wire selection: diameter 0.8-lmm, melting point around 183 degrees, please do not use high melting point solder.
- Circuit iron selection requirements: 30-40W
- Keep the soldering iron tip clean: a layer of black impurities oxidized on the surface of thesoldering iron tip forms a thermal insulation layer, which makes the soldering iron tip lose its heating effect.
- The welding steps are as follows: For general solder joints, the welding is completed in about 2-3 seconds
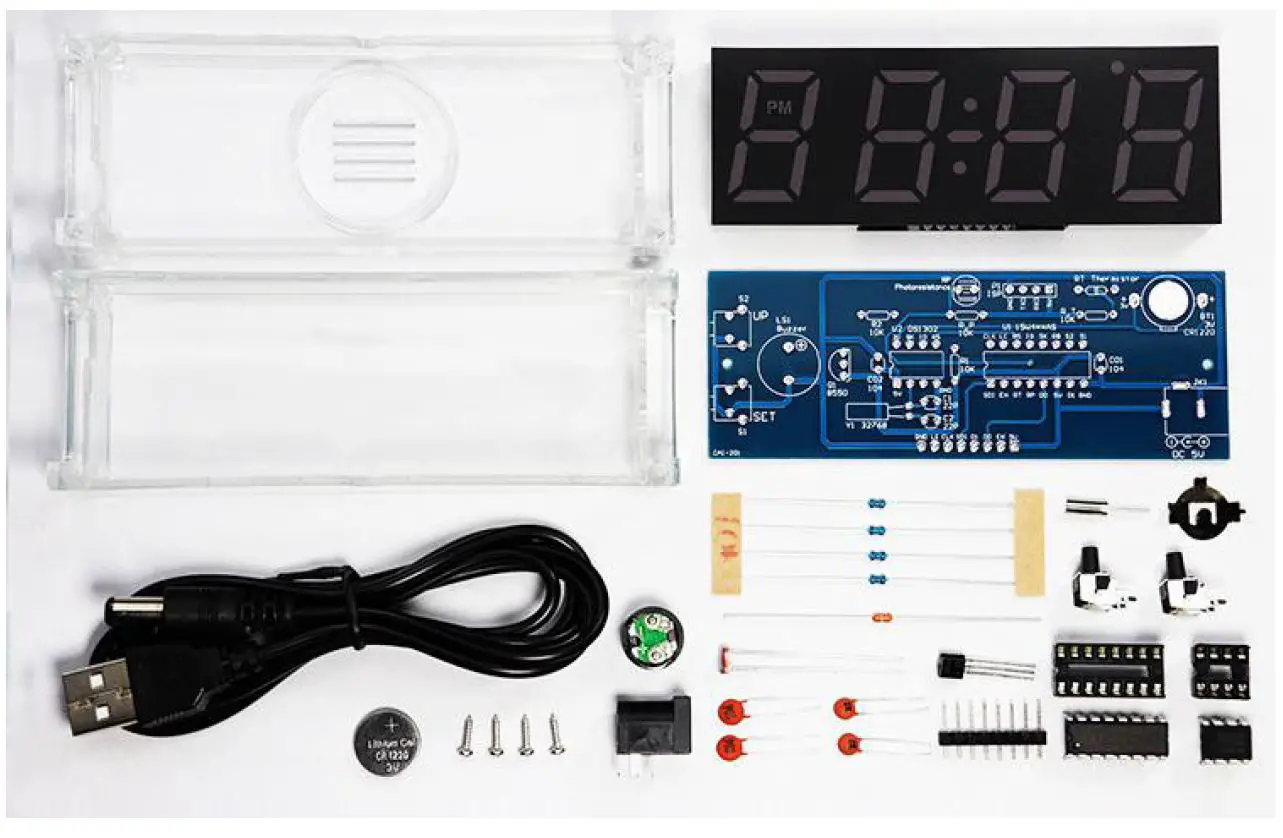
Component List
| Type | Model | QTY. |
| Component package | 10K 1/8W resistor | 4 |
| NTC MF58 negative temperature thermistor 10K 5% 3950 | 1 | |
| 5MM photoresistor 5516CDS | 1 | |
| Crystal 3*8 DT-38 32. 768KHZ 12.5PF 5PPM | 1 |
| S8550 T0-92 in-line triode | 1 | |
| Side foot 6*6*10MM micro switch | 2 | |
| DC005 DC seat 5.5×2. Power interface | 1 | |
| 5V passive buzzer height 8. 55 diameter 12rrm | 1 | |
| 1220 battery shrapnel | 1 | |
| Ceramic chip capacitor 22P 50V | 3 | |
| Ceramic capacitor 104 (0.1UF) 50V | 2 | |
| Screw PA1.7*7 | 6 | |
| CR1220 battery | 1 | |
| 2. 54 single row pin header 8P | 1 | |
| IC | IC socket 8P | 1 |
| IC socket 16P | 1 | |
| DS1302 DIP8 | 1 | |
| STC8G1K17 DIP16 | 1 | |
| Shell | Transparent shell | 1 |
|
Other | Manual | 1 |
| Circuit board | 1 | |
| USB power supply line | 1 | |
| 4-in-one digital tube | 1 |
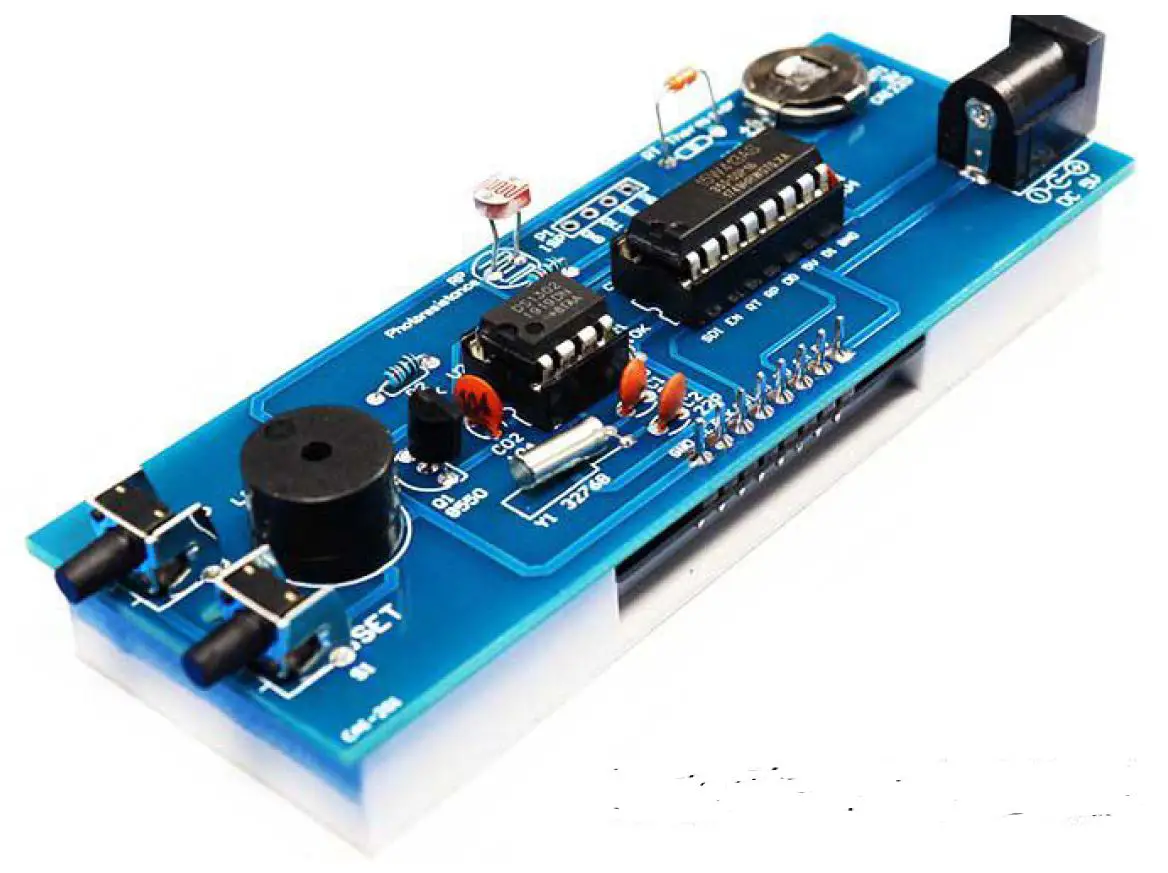
Install according to the steps below
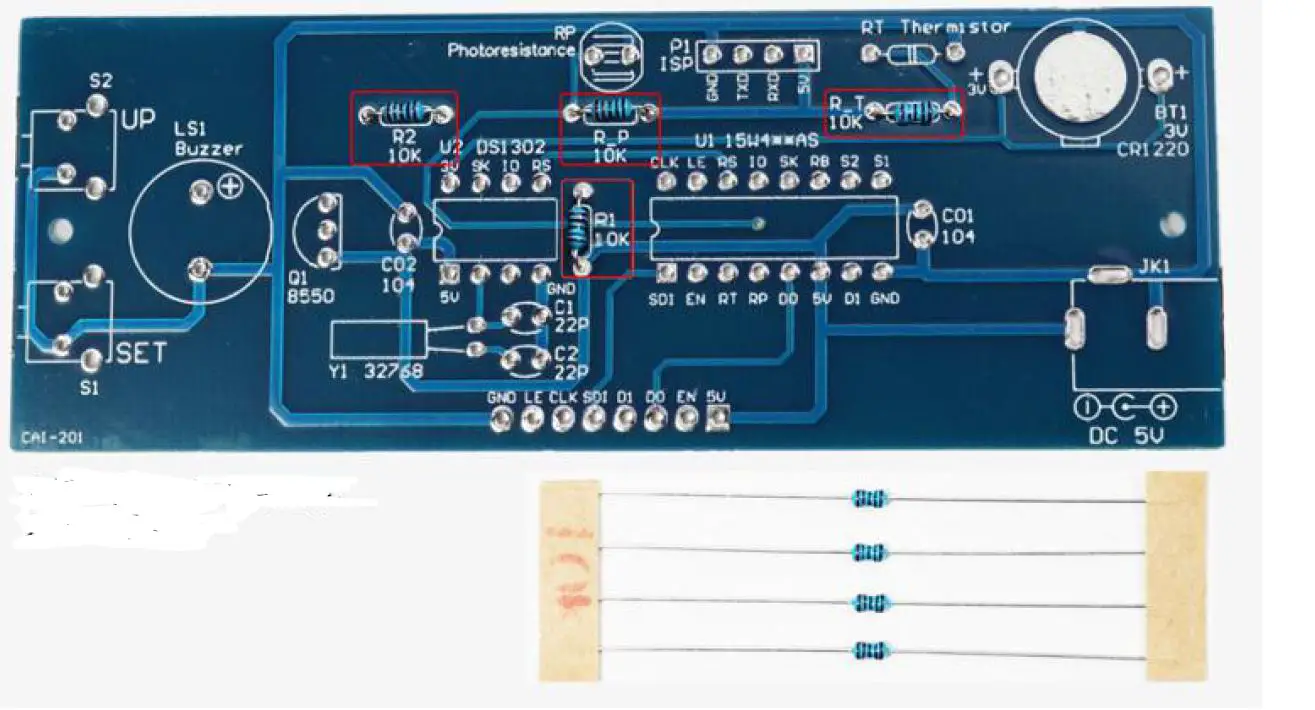
- . Install 4 pieces of 10KΩ resistors, no distinction between positive and negative poles

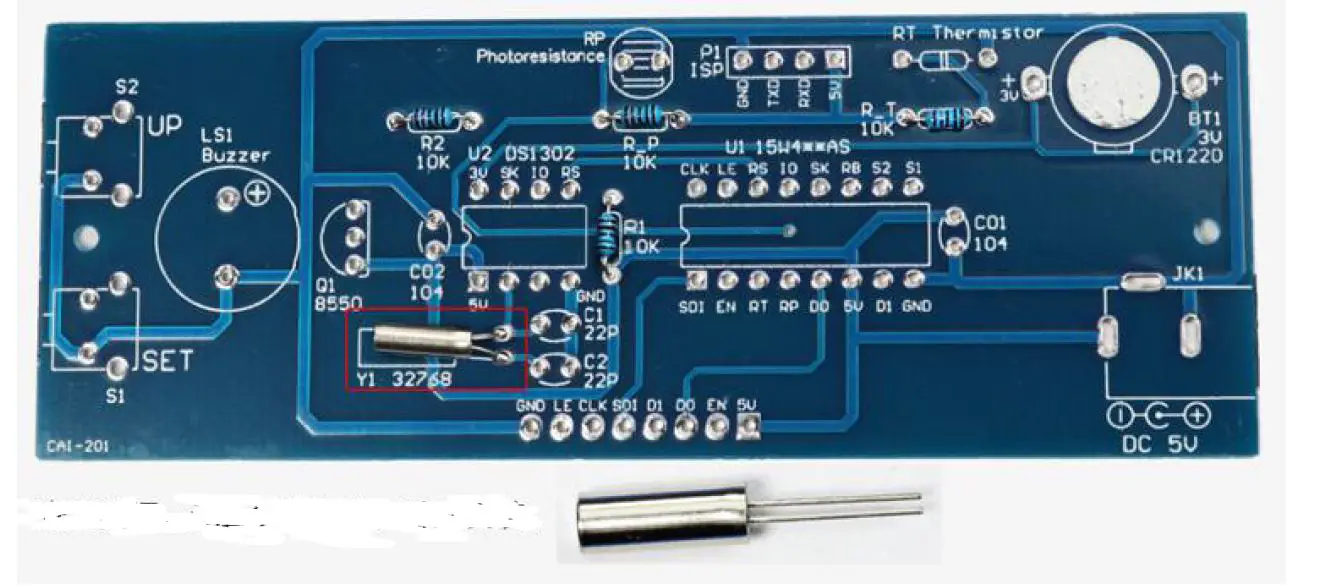
- Install crystal oscillator, no positive and negative poles, horizontal installation

- Install ceramic capacitors, no positive and negative poles

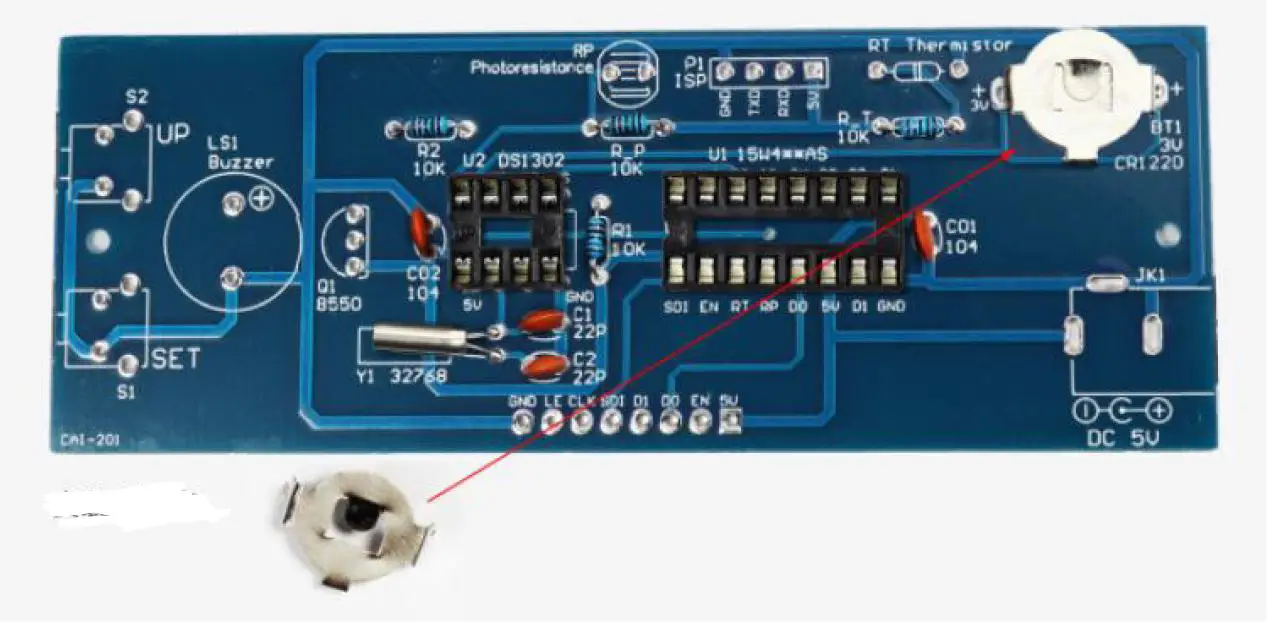
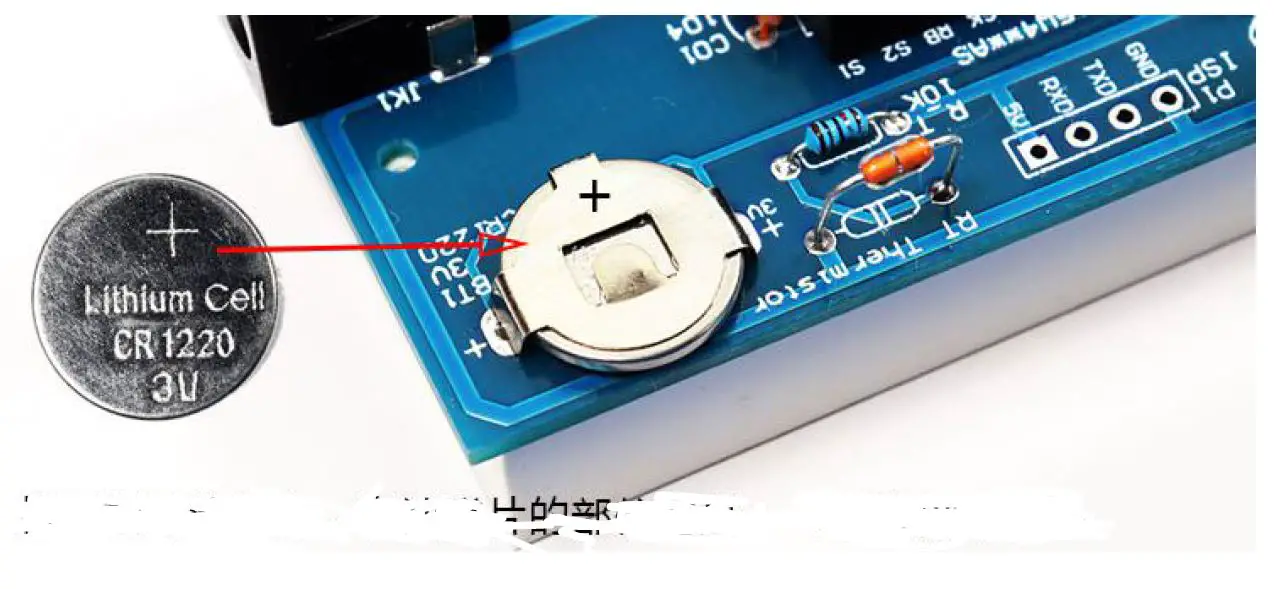
- Install the battery holder

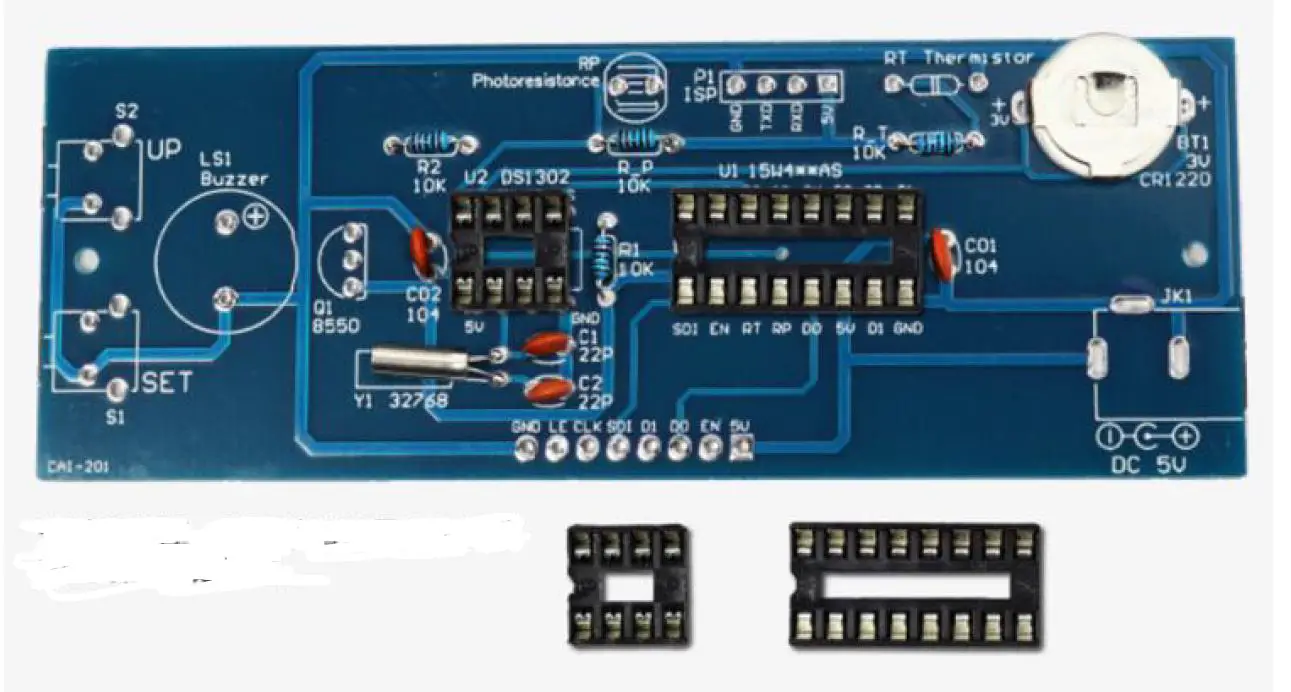
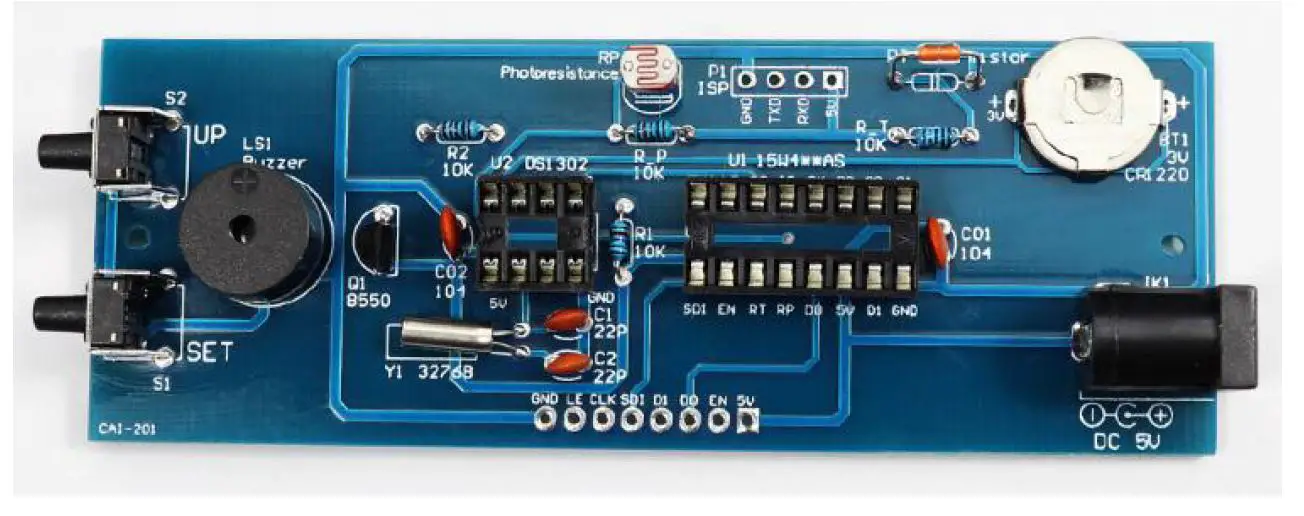
- Install the IC socket, pay attention to the position of the notch aligned with the position of thenotch mark on the circuit board

- Install the buzzer, align the end with + to the position with + on the circuit board and install it

- Install the triode, align the semicircle shape with the semicircle pattern position of the circuit board and install it

- Install the tact switch and DC seat

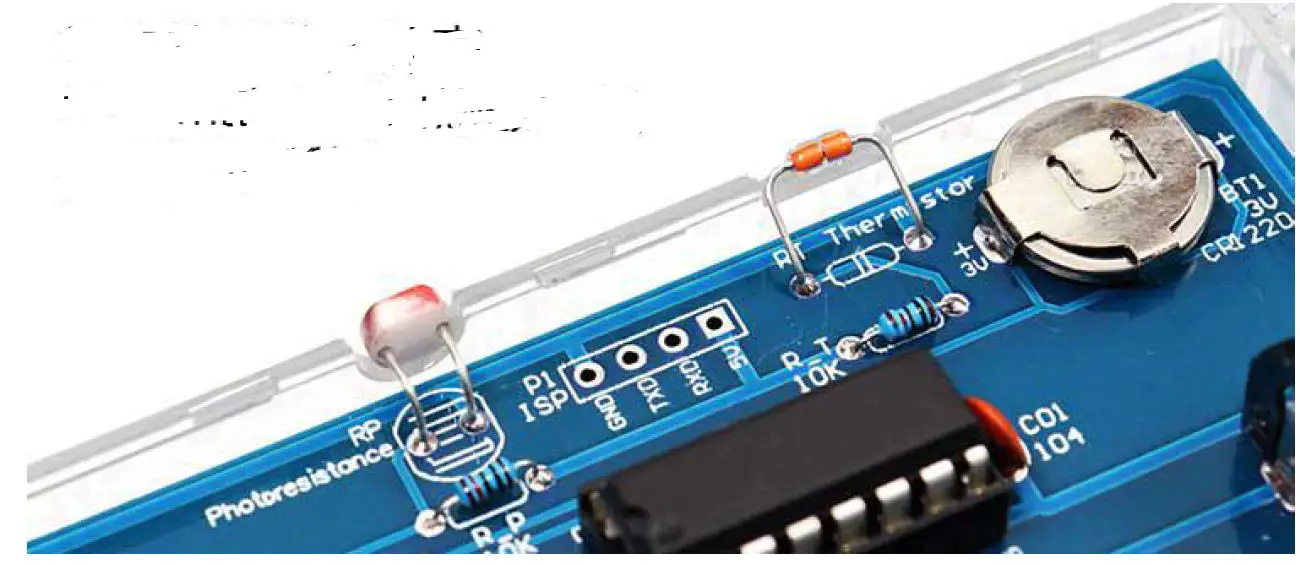
- . Install photoresistor and thermistor, without positive and negative poles. Leave 1cmawayfrom the circuit board during installation

- Weld the header on the digital tube

- Check if there are any problems with the components and solder joints, and then install thedigital tube

- Solder the digital tube on the circuit board

- As shown in the picture, install DS1302 and STC8G1K17, pay attention to the position of thegap

- Insert the battery, the battery shrapnel part is +, the circuit board part is

- Put the circuit board into the shell, and break off the photoresistor and thermistor as shownin the figure

- . Fix the shell with screws. Note: Tighten the screws in place.