 E 200 Elbow
User Manual
E-200 Elbow
To see other language options, visit fillauer.com .
 https://fillauer.com/products/e-200-elbow/
Intended Use
The E-200 Series elbows are used with any transhumeral or higher upper extremity prosthesis. These elbows are appropriately sized for smaller adults and adolescents. These lbow units feature multiple body-powered locking positions and come in a variety of configurations for color and strength. All models feature adjustablefriction axial rotation hrough the proximal turntable, and the standard model can be purchased with or without a forearm section (see prefabricated forearm table).
Performance Characteristics
| E-200 Elbow | E-200HD Elbow | |
| Weight | 12 oz. (340 g) | 12.5 oz. (369 g) |
| Yoke | Aluminum | Aluminum |
| Locking Positions | 11 | 9 |
| Saddle | Single Thickness | Double Thickness Stainless Steel |
| Primary Materials | Stainless Steel, Steel, Aluminum | Stainless Steel, Steel, Aluminum |
These devices are intended for single patient use only.
Storage and Handling
It is recommended that prosthetic elbows be stored in a cool, clean, dry environment away from harsh chemicals (chlorine, acids, acetone, etc.).
Warnings and Precautions
![]() NOTICE: An upper-limb prosthetic device user’s ability to drive should be determined on a case-by-case basis by a specialist. Contact your local governing authorities egarding any driving restrictions or limitations.
NOTICE: An upper-limb prosthetic device user’s ability to drive should be determined on a case-by-case basis by a specialist. Contact your local governing authorities egarding any driving restrictions or limitations. WARNING: Body-powered devices should not rely on cable tension for grasp control if the user has been cleared to drive with the prosthesis. Failure to maintain tension while controlling the steering wheel could cause serious injury or death.
 NOTICE: To prevent malfunction of the elbow, the instructions below on trimming the lock cable and housing must be followed. Failure to do so will likely result in immediate or premature failure that will not be covered under warranty of the device. CAUTION: Abnormal or improper environmental conditions will lead to malfunctioning and damage of the prosthesis and are not covered under the warranty of the device. This prosthetic component must not be subjected to dust/debris, liquids, abrasives, vibration, activities which would damage the biological limb, or prolonged extreme temperatures (< -5 °C or > 50 °C). Do not allow debris or liquids to remain in the prosthesis and its components during use. Rinse the device with fresh water and dry immediately after exposure.
Qualified Provider
Attachment, adjustment, alignment, and delivery of this device must be performed by or under the direct supervision of a qualified prosthetist. Unless stated in this manual, any such activities should not be attempted by the user and will potentially void the device warranty.
Specifications and Preparations Before Use (Risk Management for Installation and Calibration)
Alignment Prosthetic elbows should be aligned to match the natural hanging angle of the contralateral elbow and provide the best possible work envelope for a patient’s specific goals. Standard alignment begins at 5 degrees of flexion and the adduction angle should match the hanging angle of the contralateral limb while also allowing midline tasks and reaching the mouth as necessary. The height of the elbow axis may match that of the other arm, but amputees often prefer a slightly shorter prosthetic side for control and weight.
Installation
- The elbow turntable may be laminated by removing the elbow and cork friction disk from the turntable. They are connected by the ⁹⁄¹⁶ inch slotted nut on the threaded stud visible in the center of the turntable.
- Place the turntable on the distal end of the humeral section mold (beeswax, foam, plaster or similar). A PVA bag should be used to separate the turntable from the humeral mold if foam or plaster are used. Wax the interior surface and the distal face of the turntable.
- Pack any voids between the turntable and mold with silicone fitting gel or similar to prevent it from filling with laminate.
- Mask the turntable distal to the tie-in groove on the knurled ring surface to keep all laminate clear of the distal end.
- Laminate with the appropriate materials for durability and finish as desired by the patient, being sure to tie each structural layer into the tie-in grove in the lamination ring. Carbon fiber tape is a good choice for reinforcing the connection to the lamination ring and is commonly used for distal to proximal strips tied in with circumferential wraps.
- When reattaching the elbow unit, be sure to install the cork disc between the turntable and elbow, and place both washers under the slotted nut before delivery.
- Tighten the nut to set the proper amount of friction with a ⁹⁄¹⁶ wrench.
Shortening the Cable and Housing
The elbow lock cable AND housing should, in most cases, be adjusted in length to allow smooth and consistent cycling of the lock. To shorten the cable housing, the cable must be pulled out distally and the proximal housing ferrule removed. The housing is then cut from the proximal end. NEVER remove the lock cable housing from the lbow to trim it. The housing has been permanently installed on all elbows. If removed, it must be reattached correctly (threadlocker and mechanically altering the thread), or it will hread into the elbow and cause malfunction of the lock.
The lock cable can be replaced. However, it is recommended that only Fillauerfabricated lock cables (PN 50724) be used.
Elbow Assembly
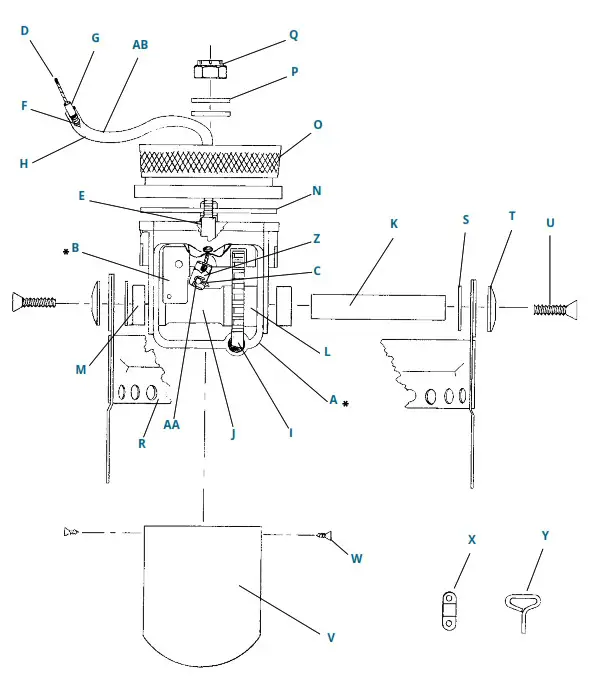
| A. 50646 Yoke Assembly B. 54155 Internal Assembly C. 50576 Cable Lever, E-200A D. 50724 Cable Assembly E. 50744 Guide, E-200A F. 50455 Cable Housing G. 50423 Ferrule H. 50457 Cable Housing Cover I. 50637 Gear Sector, E-200 50638 Gear Sector, E-200HD J. 50642 Long Sleeve K. 50640 Shaft L. 50641 Sleeve Short M. 50722 Bearing N. 50615 Cork | O. 50614 Turntable, E-200 and HD 50617 Turntable, E-200A and HD P. 50668 Belleville Washer Q. 50667 Lock Nut R. 50643 Saddle Assembly, E-200 50912 Saddle Assembly, E-200HD S. 50729 Washer T. 50739 Outside Washer U. 50740 Screw V. Elbow Cap—See Table W. 50742 Screw X. 50427 Anchor Y. 50747 Hanger Z. 50745 Swivel Lever, E-200A AA. 50634 Cotter Pin, E-200A AB. 50725 Cable Housing Assemblywith Ferrule |
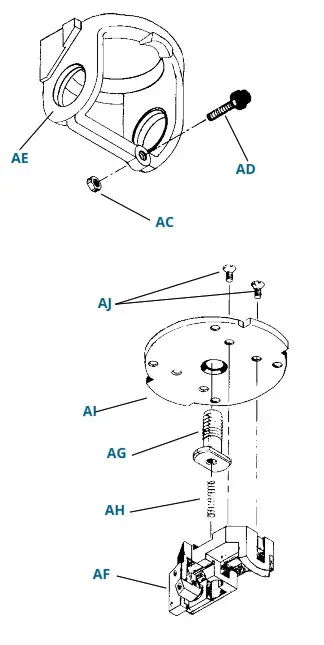
A. 50646 Yoke Assembly
AC. 50675 Nut
AD. 50674 Bumper
AE. 50621 Yoke
B. 54155 Internal Assembly
AF. 50647 Internal Cage Assembly
AG. 50680 Bolt
AH. 50636 Locking Bar Spring
AI.50624 Base
AJ.50679 Screw
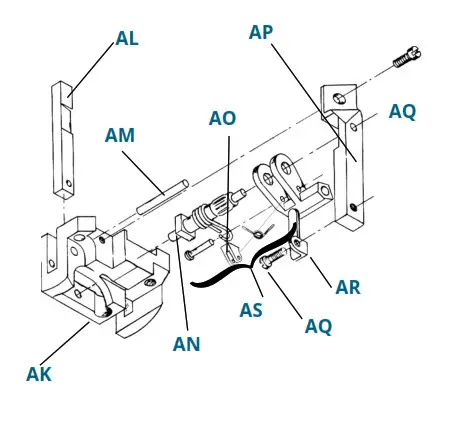
AF. 50647 Internal Cage Assembly
AK. 50625 Cage
AL. 50635 Locking Bar
AM. 50813 Pin
AN. 50628 Cam
AO. 50629 Spring
AP. 50626 Cam Bearing
AQ. 50627 Screw
AR. 50632 Ratchet
AS. 50648 Lever Assembly
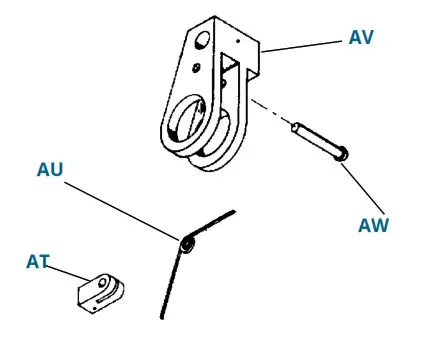
AS. 50648 Lever Assembly
AT. 50630 Pawl
AU. 50705 Spring
AV. 50574 Lever
AW. 50706 Pin
Elbow Cap
| Color | Outside Cable | Inside Cable | Friction Elbow |
| Tan | 50645 | 54437 | 54436 |
| Light Brown | 54435 | 54405 | 54433 |
| Medium Brown | 54432 | 54431 | 54430 |
| Dark Brown | 54429 | 54428 | 54427 |
| Jet Black | 54434 | 54406 | 54407 |
Compatibility
An Elbow Lift Assist (PN 50752 for left and 50609 for right) may be attached medially (standard) or laterally. For lateral placement, be sure to order the opposite side part number. A Nudge Control (PN 52521 for right and 52522 for left) may be used to lock and unlock the elbow when it is not possible through the harness. Lock Cables may be replaced (PN 50724). Prefabricated Forearms (see table below) may be used with all E-200 series elbows. The Northwestern Lift Tab Jig (PN 51040) may be used with E-400 and E-200 Series elbows to properly locate the lift tab assemblies.
Prefabricated Forearms
| Tan | Light Brown | Dark Brown | Jet Black | |
| Medium for 1 ¾ in. (45 mm) Wrist | 57940 | Light | 57548 | 57561 |
| Medium for 1 ¾ in. (45 mm) Wrist with E-200 Elbow | 57541 | Brown | 57507 | 57566 |
Disposal / Waste Handling
The product must be disposed of in accordance with applicable local laws and regulations. If the product has been exposed to bacteria or other infectious agents, it must be isposed of in accordance with applicable laws and regulations for the handling of contaminated material.
All metal components may be removed and recycled at the appropriate recycling facility.
Warranty
This product has a 12-month warranty against manufacturer defects
User Instructions
The providing health care professional must review the following information directly with the user.
Warnings and Precautions for the User
![]() NOTICE: The user should monitor their prosthesis daily and contact their health care professional if they experience changes in device performance or if it begins to make noise.CAUTION: All maintenance should be performed by the qualified health care professional.
NOTICE: The user should monitor their prosthesis daily and contact their health care professional if they experience changes in device performance or if it begins to make noise.CAUTION: All maintenance should be performed by the qualified health care professional.![]() NOTICE: An upper-limb prosthetic device user’s ability to drive should be determined on a case-by-case basis by a specialist. Contact your local governing authorities regarding any driving restrictions or limitations.WARNING: Body-powered devices should not rely on cable tension for grasp control if the user has been cleared to drive with the prosthesis. Failure to maintain tension while controlling the steering wheel could cause serious injury or death.CAUTION: Abnormal or improper environmental conditions will lead to malfunctioning and damage of the prosthesis and are not covered under the warranty of the device. This prosthetic component must not be subjected to dust/debris, liquids, abrasives, vibration, activities which would damage the biological limb, or prolonged extreme temperatures (< -5 °C or > 50 °C). Do not allow debris or liquids to remain in the prosthesis and its components during use. Rinse the device with fresh water and dry immediately after exposure.
NOTICE: An upper-limb prosthetic device user’s ability to drive should be determined on a case-by-case basis by a specialist. Contact your local governing authorities regarding any driving restrictions or limitations.WARNING: Body-powered devices should not rely on cable tension for grasp control if the user has been cleared to drive with the prosthesis. Failure to maintain tension while controlling the steering wheel could cause serious injury or death.CAUTION: Abnormal or improper environmental conditions will lead to malfunctioning and damage of the prosthesis and are not covered under the warranty of the device. This prosthetic component must not be subjected to dust/debris, liquids, abrasives, vibration, activities which would damage the biological limb, or prolonged extreme temperatures (< -5 °C or > 50 °C). Do not allow debris or liquids to remain in the prosthesis and its components during use. Rinse the device with fresh water and dry immediately after exposure.
Serious Incidents
In the unlikely event of a serious incident, seek immediate medical help and contact your prosthetist at your earliest possible convenience. Clinicians should contact their local illauer representative immediately in the event of any device failure.
2710 Amnicola Highway Chattanooga, TN 37406 423.624.0946 | Kung Hans väg 2 192 68 Sollentuna, Sweden +46 (0)8 505 332 00 |
www.fillauer.com![]() © 2021 Fillauer LLC
© 2021 Fillauer LLC
M092/11-03-21/Rev.1


