![]()
SOLAR LIGHTS ![]()
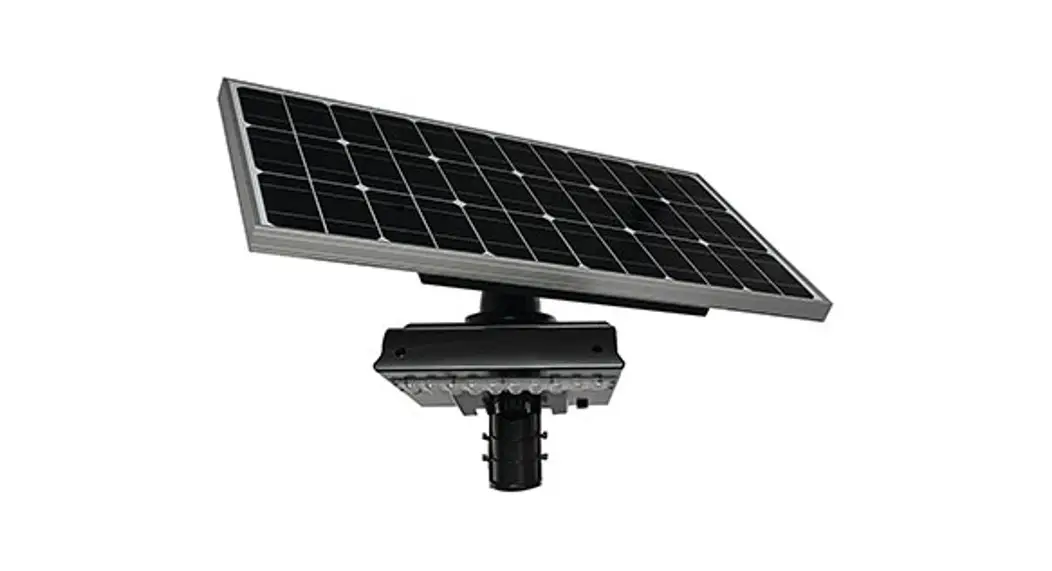
OG/HYBRID 365 AREA LIGHT SL-SAL-OG/HYB-50W-XXK-SF-G2
INSTRUCTIONS
HYBRID 365 AREA LIGHT
READ CAREFULLY BEFORE INSTALLING THE FIXTURE. RETAIN THESE INSTRUCTIONS FOR FUTURE REFERENCE
Fixtures must be wired in accordance with the National Electrical Code and all applicable local codes. Proper grounding is required for safety. This product must be installed in accordance with the applicable installation code by a person familiar with the construction and operation of the product and hazards involved.
PLEASE NOTE THAT THE PERFORMANCE OF A SOLAR LIGHT DEPENDS ON MANY FACTORS INCLUDING SOLAR RADIATION, TEMPERATURE, AND OTHER ENVIRONMENTAL FACTORS. DIRTY SOLAR PANELS CAN SIGNIFICANTLY REDUCE THE CHARGE EFFICIENCY OF SOLAR PANELS. IMPROPER ALIGNMENT OF THE PANEL, SHADOWS, OR OBSTACLES THAT BLOCK DIRECT SUNLIGHT TO THE SOLAR PANEL CAN CAUSE POOR PERFORMANCE.
NOTE: THE BATTERY IS DISCONNECTED UNTIL THE 4 PIN CONNECTOR FOR THE SOLAR PANEL IS CONNECTED. THE LIGHT WILL NOT OPERATE UNLESS THE SOLAR PANEL OR A CHARGER ARE CONNECTED.
DO NOT OPEN THE FIXTURE HOUSING, AS THERE ARE NO USER SERVICEABLE PARTS INSIDE. IF BATTERY REPLACEMENT IS REQUIRED, PLEASE CONTACT THE MANUFACTURER.
STEP 1: REMOVE THE CONTENTS FROM ALL THE CARTON
Please be sure to check that everything is in the box.
1 x Remote (CU-ALL6)
2 x AA Batteries
1 x Manual
1 x 5mm allen wrench
1 x 6mm allen wrench
1 x Fixture
1 x Slipfitter
*(4 set screws pre attached)
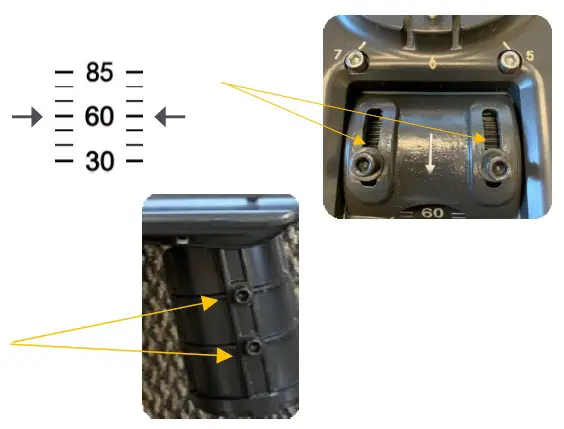
STEP 2: SLIPFITTER MOUNTING
a. Adjust the angle of the fixture. Align the white lines w/ numbers and the arrows on the fixture. Loosen the screws and swivel the fixture to the desired angle, then re-tighten the screws.
b. The slipfitter mounting fits a 2 3/8″ O.D. tenon. Place the slipfitter over the tenon and secure the fixture with the two set screws on the side of the slipfitter.
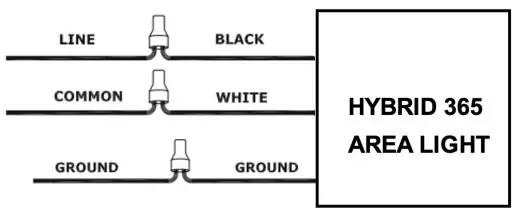
STEP 3: WIRING THE FIXTURE (HYBRID ONLY)
The fixture permits operation at 120V thru 277V, 50 or 60 Hz
a. Connect the black wire to the line
b. Connect the the white wire to the common
c. Connect the the green wire to ground
STEP 4: INSTALL SOLAR PANEL KIT
Install solar panel kit model # SL-SAL-50W-2PANELKIT. This comes in a separate carton. Installation instructions for the solar panel kit are included in the carton or are available on the solera solar website.
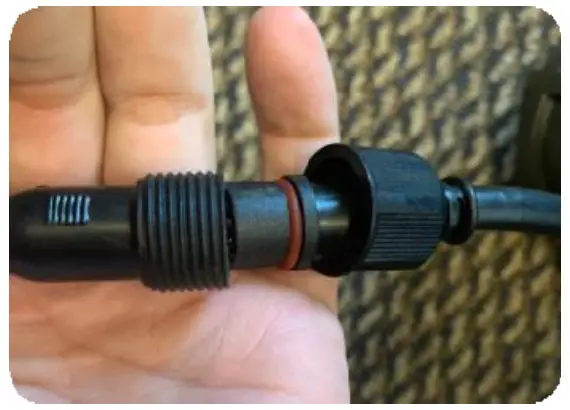
STEP 5: CONNECT SOLAR PANEL TO FIXTURE
Once the fixture is completely installed, plug the cable from the solar panel to the cable on the back of the fixture to activate the fixture. The light will turn on approximately 15- 20 minutes after sunset.
THE HYBRID 365 FIXTURE WILL PULL FROM LINE POWER WHEN THE BATTERY GETS TO <20%. THIS IS TO CONSERVE THE LONGEVITY OF THE BATTERY
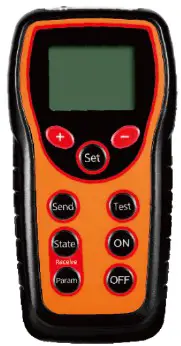
INTRODUCTION: REMOTE-CONTROL
The default setting is Dusk `til Dawn @80% First 2 hours, 50% constant & 80% w/ motion for the remainder of the night, *remote does not need to be connected or adjusted if your lighting goals are met.
QUICK START GUIDE
START UP THE REMOTE BY CLICKING ANY BUTTON
a. The remote has a range of about 24ft
b. The fixture will operate in the default mode without using the remote.
c. You may want to adjust the settings based off your geographical area to attain more solar powered operation, rather than pulling from the grid. We can change the settings by following the below:
DEFAULT OPERATING MODE
a. For the first 2 hours the product runs at 80% fixed output.
b. The next 12 hours, it will run it at 50% idle & 80% when motion is sensed.
c. After motion detector will allow the fixture to return to idle state after no motion is detected for 30 seconds.
d. When the solar panel detects daylight, it will shut off for the day.
| 1st Time: 2-15hrs 1st Power: 0-100% | Controls the time after dusk: The fixture must be set at 2 hours minimum; the motion sensor is disabled during this time. Controls the power output setting of the LEDs brightness for the first-time selection. |
| If you would like to add | motion sensing options, this can be done in the selections listed below, these time slots start to take effect after the r Time duration ends. Time Duration begins after 1st Time Duration is complete, set hours and output you would like the light to behave when motion is sensed. Controls the power output setting of the LEDs brightness for the first-time selection. |
| 2nd Time: 0-15hrs 2nd Power:0-100% | |
| 3rd Time: X 3rd Power: 0100% | Default, matches the 2i id time setting Set the power output when motion is idle during the 2nd Time duration, no motion detected output |
| Add Dawn Constant M Time: X M Power: X | The motion sensor is disabled during this period Set Pre-Dawn Time 0 – 15 hours Set Pre-Dawn Power 0 – 100% *The motion sensor will stay active for 30 seconds unless motion is still active |
| FIXTURE | |
| Product Model | SL-SAL-HYB-50W-XXK-SF-BK-G2 SL-SAL-OG-50W-XXK-SF-BK-G2 |
| Actual Power/ Lumen | 50W / 9300LM |
| Dimension LxWxH | Main body: 16.33 x 10.5 X 6 in |
| LED rated life | >50,000 HRS |
| Mounting | Slip Fitter 02 3/8 in |
| Working Mode | Default- 80% on for first 2 hours, after 2 hours runs 50% output, 80% when motion sensed until dawn |
| Color Temperature | 3000K / 4000K / 5000K |
| Material | Aluminum Alloy + Polycarbonate |
| Charge Time | About 9-10 hours of good sunlight |
| Beam Angle/ Lens Type | 140° Type 3 Optics, other options available |
| IP Rating | IP65 |
| Recommended Install Height | 20-30 ft. |
| Weight | 30 lbs. (not including solar panels) |
| Warranty | 5 YEARS |
| Packing | QTY/CTN: 1 pc |
| Battery Charing Temp | Charging Temperature -4°F — 140°F |
| Discharging Temp | -40°F — 140°F |
| Fixture Operating Temp | -40°F — 140°F |
| Surge Protection | 3kV |
| EPA Rating | 4.45 ft2 |
WARNING AND ATTENTION:
- Before installation, please ensure that the foundation, pole and bracket are strong enough to support the light fixture.
- Position the solar panel to optimize its exposure to sunlight. Always face the equator if possible (solar panel to face south
if located in the northern hemisphere, for example). - In order to allow self-cleaning of the solar panels, please have a minimum angle of 15 degrees.
- Adjust the angle of the panel to optimize exposure to sunlight. Avoid north facing panels in the USA
- The fixture will be active once the solar panel is connected to the fixture’s solar panel connector wire.
- Please make sure that the panel is installed under direct sunlight. The red light should be flashing, indicating that it is charging.
- The lighting fixture will automatically turn on at night and turn off during daylight. The solar panel acts as a photocell.
- Please select an operating mode according to the local legislation needs and the local sunshine conditions.
- The battery of the HYBRID 365 fixture will stop charging when the ambient temperature is below -4°F or above 140°F.
The working temperature of the solar fixture is -40°F (-40°C) to +140°F (+60°C). When operating in an environment with a temperature lower than -40°F (-20°C), line voltage will kick in to operate the light.
LIGHT EFFICIENT DESIGN HEADQUARTERS
188 S. Northwest Highway
· Cary, IL 60013 INNOVATION & MANUFACTURING CENTER
30 Log Bridge Road, Building 200
· Middleton, MA 01949 847.380.3540
· led-llc.com 04.08.22
Information is subject to change without notice.
![]()


