![]()
RE-2 Space Echo
Owner’s Manual RE-2
RE-2
Owner’s Manual
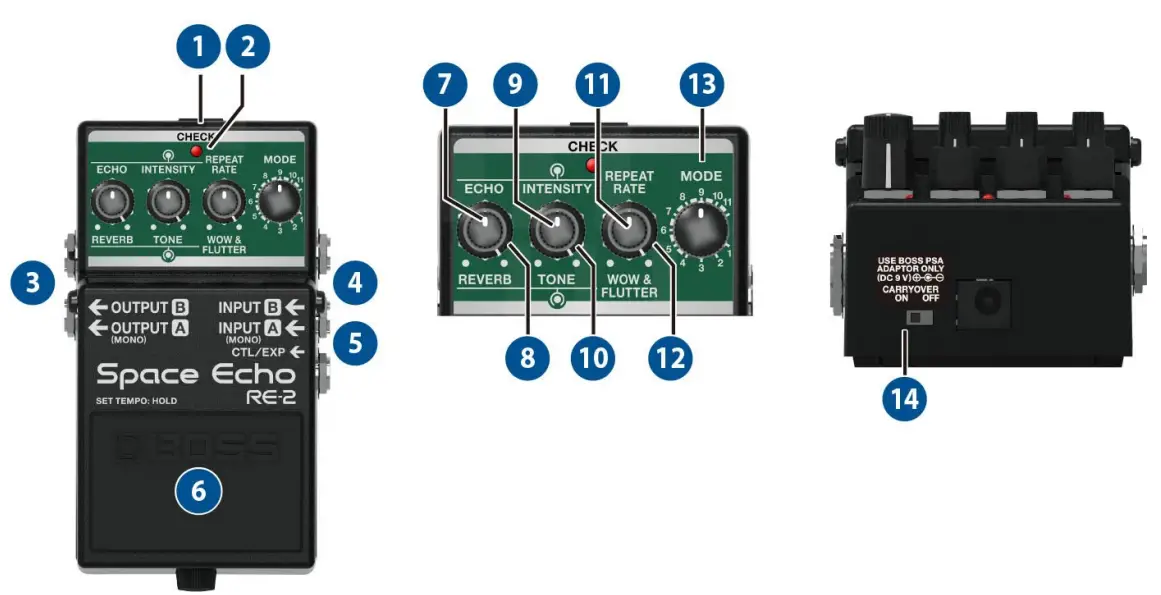
Panel Descriptions
| Name | Function | |
| 1 | DC IN jack | Use this jack to connect an AC adaptor (PSA-100S series, sold separately). * Use only the specified AC adaptor (sold separately: PSA-S series) and plug it into an AC outlet of the correct voltage. * If the AC adaptor is connected while power is on, the power supply is drawn from the AC adaptor. |
|
2 | CHECK indicator | This indicator shows whether an effect is ON/OFF, and doubles as the Battery Check indicator. The indicator lights when an effect is ON. * The brightness of the CHECK indicator (LED) will dim as the battery lowers. Replace the battery when the LED is dim or does not light. For details on how to replace, refer to “3. Changing the Batteries(P.11).” |
| 3 | OUTPUT (A/MONO, B) jacks | Connect these jacks to your amp or monitor speakers. Use only the OUTPUT A/MONO jack if using this unit in mono. If you’re using a stereo setup, use the A/MONO and B jacks. When connected to both the A/MONO and B jacks, the reverb effect is heard in stereo. |
| 4 | INPUT (A/MONO, B) jacks | Connect your guitar, bass, or effect unit here. Use the A/MONO jack and B jack when connecting a stereo-output effects unit. Use only the A/MONO jack if you’re using a mono source. * The INPUT A jack also operates as the power switch. The power turns on when you insert a plug into the INPUT A jack. Turning the power on/off |
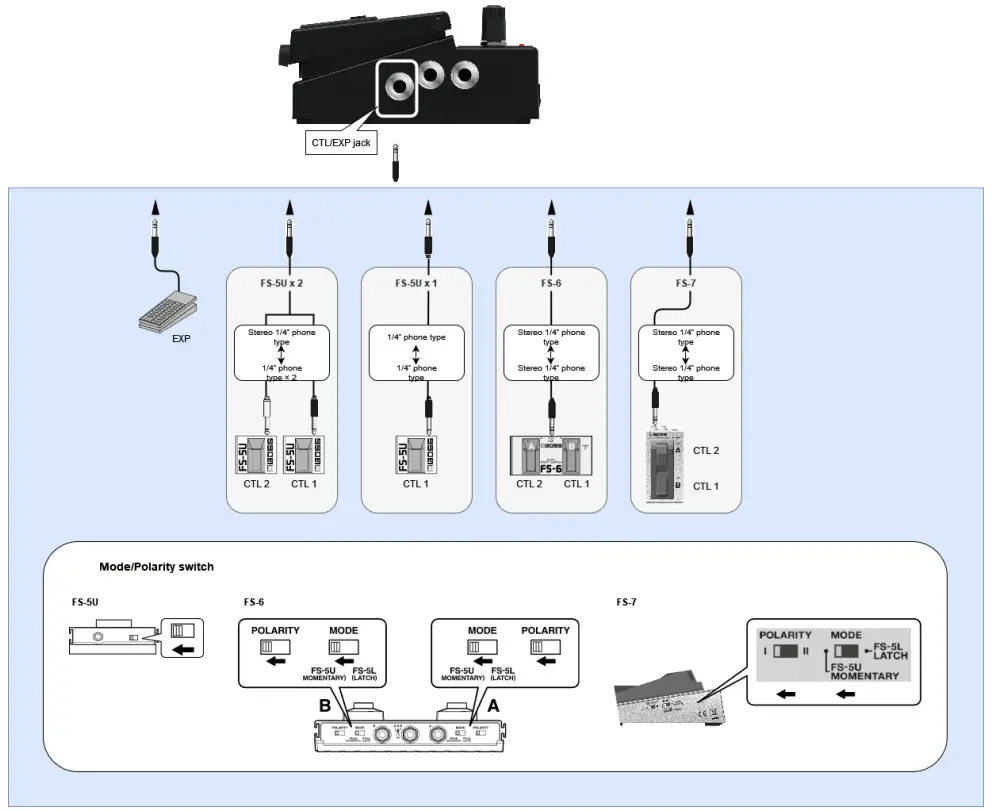
| 5 | CTL/EXP jack | ● Using as the CTL jack You can connect a footswitch (FS-5U, FS-6, FS-7; sold separately) to switch between TAP and TWIST effects. CTL1: Press to set the REPEAT RATE in time with the tempo of the song being played (TAP). CTL2: Long-press to produce an aggressive sense of rotation (TWIST) that oscillates the echoed sound while you press. ●Using as the EXP jack Connect an expression pedal (EV-30, Roland EV-5, etc.; sold separately) to continuously change the effect settings for the expression pedal’s pushed-up (horizontal) and pushed-down (slanted) positions. For more about function settings, refer to “2.4. Setting the Expression Pedal Function(P.9).” * Refer to “1.2. Connecting External Pedals(P.5)” for more on footswitch and expression pedal settings. |
| Name | Function | |
| 6 | Pedal switch | Turn on/off effects. By long-pressing the switch, you can set the REPEAT RATE (tap input) in time with the tempo, or produce an aggressive sense of rotation (TWIST) that oscillates the echoed sound.2.5. Specifying the Function of the Pedal Switches(P.10) |
| 7 | [ECHO] knob | Adjusts the echo volume. |
| 8 | [REVERB] knob | Adjusts the volume of the reverb. Turn the [ECHO] knob all the way counterclockwise to use only reverb. |
| 9 | [INTENSITY] knob | Adjusts the echo volume (amount of feedback). Turn this all the way clockwise to make the effect oscillate. |
| 10 | [TONE] knob | Turn clockwise: emphasizes the high frequencies and cuts the low frequencies. Turn counterclockwise: emphasizes the low frequencies and cuts the high frequencies. |
| 11 | [REPEAT RATE] knob | Adjusts the tape speed. The farther the knob is turned clockwise, the shorter the intervals become between echoes. The tone also changes along with the speed. |
| 12 | [WOW & FLUTTER] knob | Adjusts the wavering in tape speed, which occurs due to the friction resistance of the tape mechanism, tape slippage and so on. Turning this clockwise produces more wavering. |
| 13 | [MODE] knob | Switches between modes 1–11. The combination of three different playback heads and reverb gives you 11 types of echo. 1.1. Combining the Playback Heads and Reverb(P.4) |
| 14 | CARRYOVER switch | Specifies whether the effect sound is carried over (ON) or not carried over (OFF) when you turn off the effect. |
* To prevent malfunction and equipment failure, always turn down the volume, and turn off all the units before making any connections.
* Do not use connection cables that contain a built-in resistor.
Turning the power on/off
Once everything is properly connected, be sure to follow the procedure below to turn on their power. If you turn on equipment in the wrong order, you risk causing malfunction or equipment failure.
Turning the Power On
Turn on the power to your amp last.
Turning the Power Off
Turn off the power to your amp first.
* Before turning the unit on/off, always be sure to turn the volume down. Even with the volume turned down, you might hear some sound when switching the unit on/off. However, this is normal and does not indicate a malfunction.
Combining the Playback Heads and Reverb
The combinations for the playback heads (1–3) and the reverb in modes 1–11 are shown below.
| Mode | 1 | 2 | 3 | 4 | 5 | 6 | 7 | 8 | 9 | 10 | 11 |
| Playback head 1 | |||||||||||
| Playback head 2 | |||||||||||
| Playback head 3 | |||||||||||
| Reverb |
* The delay times for playback heads 2 and 3 are 2x and 3x the delay time of playback head 1 respectively. When you use tap input, this is set as the delay time (tap delay time) for playback head 1, which is the base delay time for each mode.
Connecting External Pedals
Various Settings
Turning the Direct Sound Output On/Off
You can turn the output of the direct sound off when you want to output only the effect’s sound, such as when you’re connecting this unit to the send/return of a mixer.
- With the power turned off (nothing should be plugged into the INPUT A jack), set the [MODE] knob to “7”.
- While holding down the pedal switch, turn on the power (by connecting a plug to the INPUT A jack).
- Turn the [ECHO] knob to select either on or off.
Knob position Setting All the way counterclockwise Outputs the direct sound. All the way clockwise Does not output the direct sound. - Press the pedal switch to exit the settings.
Switching the Direct Sound
- With the power turned off (nothing should be plugged into the INPUT A jack), set the [MODE] knob to “8”.
- While holding down the pedal switch, turn on the power (by connecting a plug to the INPUT A jack).
- Turn the [ECHO] knob to select a sound.
Knob position Function Explanation All the way counterclockwise Analog Bypass The audio input is outputted without change. All the way clockwise RE-201 Simulation Uses digital signal processing to recreate the sound of the direct sound going through a RE-201 preamp. - Press the pedal switch to exit the settings.
* When this is set to “RE-201 Simulation,” the simulation effect is still heard even when the effect is off.
Setting the Operation Mode for the [REPEAT RATE] Knob
You can switch the operating mode of the [REPEAT RATE] knob to change the tape speed’s adjustable range. The setting range for the tap delay time (delay time for playback head 1) also changes at the same time.
- With the power turned off (nothing should be plugged into the INPUT A jack), set the [MODE] knob to “9”.
- While holding down the pedal switch, turn on the power (by connecting a plug to the INPUT A jack).
- Turn the [ECHO] knob to select a mode.
Knob position Mode Function Minimum value Normal The [REPEAT RATE] knob operates in the same range as the Roland RE-201. The value for the tap delay time can be set to a maximum of one second. Maximum value Long The setting range for the [REPEAT RATE] knob is twice that of Normal mode. The value for the tap delay time can be set to a maximum of two seconds. - Press the pedal switch to exit the settings.
Setting the Expression Pedal Function
By connecting an expression pedal (such as the Roland EV-5, sold separately) to the CTL/EXP jack, you can operate the top panel knobs aside from the [MODE] knob.
You can set the respective sounds for when the expression pedal is at MAX position (pushed all the way up with your toes) and at MIN position (pushed all the way down with your heel), and make continuous changes to them.
* Use only the specified expression pedal. Connecting expression pedals made by third-party manufacturers may cause this unit to malfunction.
- With the power turned off (nothing should be plugged into the INPUT A jack), set the [MODE] knob to “10”.
- While holding down the pedal switch, turn on the power (by connecting a plug to the INPUT A jack).
- Use the respective knobs to set the sound that’s used when the pedal is at the MIN value (pushed all the way down with your heel).
- Press the pedal switch.
- Use the respective knobs to set the sound that’s used when the pedal is at the MAX value (pushed all the way up with your toes).
- Press the pedal switch again to exit the settings.
Specifying the Function of the Pedal Switches
Here’s how to configure the functions that are called up when you long-press the pedal switch.
- With the power turned off (nothing should be plugged into the INPUT A jack), set the [MODE] knob to “11”.
- While holding down the pedal switch, turn on the power (by connecting a plug to the INPUT A jack).
- Turn the [ECHO] knob to select a function.
Knob position Setting Minimum value When you long-press the pedal switch until the CHECK indicator lights up green, the unit enters tap input mode.
Press the pedal switch at the tempo of the song you’re playing to specify a matching repeat rate.Maximum value TWIST is on while the pedal switch is pressed. - Press the pedal switch to exit the settings.
Changing the Batteries
When operating on battery power only, the CHECK indicator gets dimmer when battery power gets too low. Replace the battery as soon as possible.
* Batteries should always be installed or replaced before connecting any other devices. This way, you can prevent malfunction and damage. 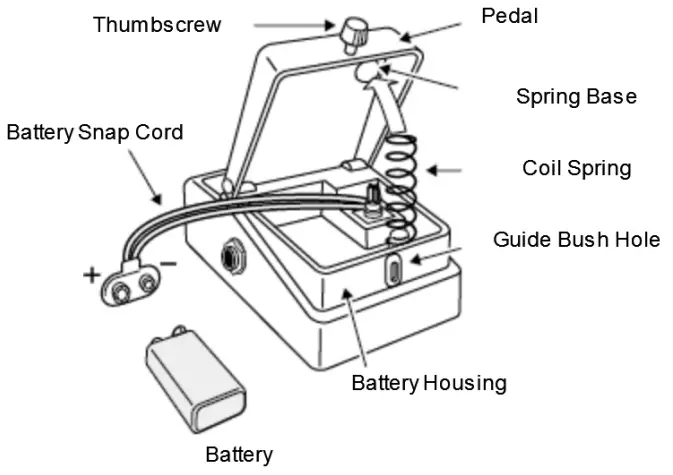
- Hold down the pedal and loosen the thumbscrew, then open the pedal upward. You don’t need to take the thumbscrew out completely to open the pedal.
- Remove the old battery from the battery housing, and remove the snap cord connected to it.
- Connect the battery snap to the new battery, and place the battery inside the battery housing. Be sure to carefully observe the battery’s polarity (+ versus -).
- Slip the coil spring onto the spring base on the back of the pedal, and then close the pedal. Carefully avoid getting the snap cord caught in the pedal, coil spring, and battery housing.
- Finally, hold down the pedal while tightening the thumbscrew into the guide bush hole.
Use of Battery
- Use alkaline batteries if you are running the unit on battery power.
- This device contains batteries when shipped from the factory. These are test batteries, which may not last as long as new batteries.
- If you handle batteries improperly, you risk explosion and fluid leakage. Make sure that you carefully observe all of the items related to batteries that are listed in the “USING THE UNIT SAFELY” and “IMPORTANT NOTES” leaflets for proper use.
- The sound may distort if the batteries are nearly depleted. This is not a malfunction. If this happens, replace the batteries or use the AC adaptor (sold separately).
Main Specifications
| Modes | 11 modes |
| Nominal Input Level | INPUT A(MONO), INPUT B: -20 dB |
| Maximum Input Level | INPUT A(MONO), INPUT B: +7 dB |
| Input Impedance | INPUT A(MONO), INPUT B: 1 M ohm |
| Nominal Output Level | OUTPUT A(MONO), OUTPUT B: -20 dB |
| Maximum Output Level | OUTPUT A(MONO), OUTPUT B: +7 dB |
| Output Impedance | OUTPUT A(MONO), OUTPUT B: 1 k ohm |
| Recommended Load Impedance | OUTPUT A(MONO), OUTPUT B: 10 k ohms or greater |
| Bypass | Buffered bypass |
| Controls | MODE knob, REPEAT RATE knob, WOW & FLUTTER knob, INTENSITY knob, TONE knob, ECHO knob, REVERB knob, CARRYOVER switch, Pedal switch |
| Indicator | CHECK indicator (Used for indication of check battery) |
| Connectors | INPUT A(MONO) jack, INTPUT B jack, OUTPUT A(MONO) jack, OUTPUT B jack: 1/4-inch phone type CTL/EXP jack: 1/4-inch TRS phone type DC IN jack |
| Power Supply | Alkaline battery (9 V, 6LR61) AC adaptor (PSA series: sold separately) |
| Current Draw | 75 mA |
| Expected battery life under continuous use (These figures will vary depending on the actual conditions of use.) | Alkaline: Approx. 4.5 hours |
| Dimensions | 73 (W) x 129 (D) x 59 (H) mm 2-7/8 (W) x 5-1/8 (D) x 2-3/8 (H) inches |
| Weight (including battery) | 450 g 1 lb |
| Accessories | Leaflet (“USING THE UNIT SAFELY,” “IMPORTANT NOTES,” and “Information”) Dry battery (9 V, 6LR61) |
| Options (sold separately) | AC adaptor: PSA series Footswitch: FS-5U Dual footswitch: FS-6, FS-7 Expression pedal: FV-500H, FV-500L, EV-30, Roland EV-5 |
* 0 dB = 0.775 Vims
* This document explains the specifications of the product at the time that the document was issued. For the latest information, refer to the Roland website.
![]() © 2022 Roland Corporation
© 2022 Roland Corporation


 User Manual")


 User Manual")